# How to

# Enable wake on lan on Proxmox

Edit /etc/network/interfaces and add post-uup /sbin/ethtool -s enp6s0 wol g (important to check if ethtool is installed on system $which ethtool)

```
auto vmbr0
iface vmbr0 inet static
        address 192.168.3.10/23
        gateway 192.168.2.1
        bridge-ports enp6s0
        bridge-stp off
        bridge-fd 0
        bridge-vlan-aware yes
        bridge-vids 2-4094
        post-up /sbin/ethtool -s enp6s0 wol g

```

# Export OVA to Proxmox

Upload .ova file to proxmox server

root@pve:/Mirror1/csr/backups/OVAs# tar -xvf SMGR-10.2.0.0.439670-e70-46E.ova  
SMGR-10.2.0.0.439670-e70-46E.ovf  
SMGR-10.2.0.0.439670-e70-46E.mf  
SMGR-10.2.0.0.439670-e70-46E.cert  
SMGR-10.2.0.0.439670-e70-46E-disk1.vmdk

Run the import tool

qm importovf 1001 SMGR-10.2.0.0.439670-e70-46E.ovf backups --format raw

Importovf tool where 1001 is the VM number backups is the destination of the drive in raw format.

Sometimes you need to modify the BIOS to UEFI in order to boot, if VM is stuck at booting from disk change to UEFI

# Monitoring with Prometheus and Grafana (Testing still in progress)

First create auser on proxmox

![image.png](https://wiki.tinod.net/uploads/images/gallery/2024-05/scaled-1680-/WItKcYJogk42nPAY-image.png)

Next setup group permissions

![image.png](https://wiki.tinod.net/uploads/images/gallery/2024-05/scaled-1680-/nrr8bTjk2tOSKRYf-image.png)

next setup an api token

![image.png](https://wiki.tinod.net/uploads/images/gallery/2024-05/scaled-1680-/2HtQ7a5XzIlI0r2m-image.png)

copy your api token

<details id="bkmrk-e34d851e-c847-47c1-a"><summary></summary>

e34d851e-c847-47c1-a6e1-9082347bc5cd

</details>create a pve.yml file and place in /etc/prometheus/pve.yml

```shell
default:
        user: prometheus@pve
        token_name: "exporter"
        token_value: e34d851e-c847-47c1-a6e1-9082347bc5cd
        verify_ssl: false
```

Add Service Unit to prometheus server (make sure to create a prometheus user on host in order to run the unit)

```bash
tee /etc/systemd/system/prometheus-pve-exporter.service<<EOF
> [Unit]
> Description=Prometheus Exporter for Proxmox VE
> Documentation=https://github.com/znerol/prometheus-pve-exporter
> 
> [Service]
> Restart=always
> User=prometheus
> ExecStart=/usr/local/bin/pve_exporter /etc/prometheus/pve.yml
> 
> [Install]
> WantedBy=multi-user.target
> EOF
[Unit]
Description=Prometheus Exporter for Proxmox VE
Documentation=https://github.com/znerol/prometheus-pve-exporter

[Service]
Restart=always
User=prometheus
ExecStart=/usr/local/bin/pve_exporter /etc/prometheus/pve.yml

[Install]
WantedBy=multi-user.target
```

# Add CPU Temp sensors on Proxmox gui

<span class="yt-core-attributed-string yt-core-attributed-string--white-space-pre-wrap"><span class="yt-core-attributed-string--link-inherit-color" style="font-weight: bold; color: rgb(255, 255, 255);">Please back up files before editing!!</span><span class="yt-core-attributed-string--link-inherit-color" style="color: rgb(255, 255, 255);"> </span></span>

<span class="yt-core-attributed-string yt-core-attributed-string--white-space-pre-wrap"><span class="yt-core-attributed-string--link-inherit-color" style="color: rgb(255, 255, 255);">apt-get install lm-sensors </span></span>

<span class="yt-core-attributed-string yt-core-attributed-string--white-space-pre-wrap"><span class="yt-core-attributed-string--link-inherit-color" style="color: rgb(255, 255, 255);">vim /usr/share/perl5/PVE/API2/Nodes.pm </span></span>

<span class="yt-core-attributed-string yt-core-attributed-string--white-space-pre-wrap"><span class="yt-core-attributed-string--link-inherit-color" style="color: rgb(255, 255, 255);">search for: version\_text </span></span>

<span class="yt-core-attributed-string yt-core-attributed-string--white-space-pre-wrap"><span class="yt-core-attributed-string--link-inherit-color" style="color: rgb(255, 255, 255);">vim /usr/share/pve-manager/js/pvemanagerlib.js </span></span>

<span class="yt-core-attributed-string yt-core-attributed-string--white-space-pre-wrap"><span class="yt-core-attributed-string--link-inherit-color" style="color: rgb(255, 255, 255);">search for: PVE Manager Version Add code systemctl restart pveproxy (versions 8 search for pveversion  
</span></span>

<span class="yt-core-attributed-string yt-core-attributed-string--white-space-pre-wrap"><span class="yt-core-attributed-string--link-inherit-color" style="color: rgb(255, 255, 255);">modify file and add</span></span>

```shell
    {
            itemId: 'thermal',
            colspan: 2,
            printBar: false,
            title: gettext('CPU Thermal State'),
            textField: 'thermalstate',
            renderer:function(value){
                let objValue = JSON.parse(value);
                let cores = objValue["coretemp-isa-0000"]
                let items = Object.keys(cores).filter(item => /Core/.test(item));
                let str = '';
                items.forEach((x, idx) => {
                        str += cores[x][`temp${idx+2}_input`] + ' ';
                });
                str += '°C';
                return str;
            }
    }
```

![image.png](https://wiki.tinod.net/uploads/images/gallery/2024-05/scaled-1680-/HUv4TljdmUOZSJt8-image.png)

Restart pveproxy (sometimes you need to clear cache to make it work)

systemctl restart pveproxy

![image.png](https://wiki.tinod.net/uploads/images/gallery/2024-05/scaled-1680-/bZJSmDxkLC4g3sOP-image.png)

# Proxmox Monitoring Influxhdb2 and Grafana

Add new metric server on proxmox, generate token from InfluxDB, make sure you get read/write access token API.

Make sure bucket and name patch, we are using organization htf and http port 8086

![image.png](https://wiki.tinod.net/uploads/images/gallery/2024-05/scaled-1680-/p35Fp9S8UeBiZt3R-image.png)

![image.png](https://wiki.tinod.net/uploads/images/gallery/2024-05/scaled-1680-/SrUphLXvyj8yuJfu-image.png)

Create new API this time for grafana and give all read access to all buckets

![image.png](https://wiki.tinod.net/uploads/images/gallery/2024-05/scaled-1680-/gf6yV8k6qj0SGqUn-image.png)

On grafana we will add a new source where URL IP is our Influxdb

![image.png](https://wiki.tinod.net/uploads/images/gallery/2024-05/scaled-1680-/T5APbGSJjD0DNMYv-image.png)

![image.png](https://wiki.tinod.net/uploads/images/gallery/2024-05/scaled-1680-/uURFiLtaymbQq1DY-image.png)

Save and test should work next we will add a new dashboard, we are using [https://grafana.com/grafana/dashboards/17051-proxmox/?tab=revisions](https://grafana.com/grafana/dashboards/17051-proxmox/?tab=revisions) for our dashboard, copy code and import to grafana

![image.png](https://wiki.tinod.net/uploads/images/gallery/2024-05/scaled-1680-/kjeGrlWuzu7SQt9o-image.png)

Select DB (Influxdb) give it a name and import

![image.png](https://wiki.tinod.net/uploads/images/gallery/2024-05/scaled-1680-/cljkMRiu3azeh7XJ-image.png)

![image.png](https://wiki.tinod.net/uploads/images/gallery/2024-05/scaled-1680-/VZ7pqgNr22ak4jfB-image.png)

you can use the following command on Proxmox to view influxdb errors

<p class="callout info">journalctl -a | grep influxdb </p>

Also if no data is being sent make sure pvestatd is running on proxmox

![image.png](https://wiki.tinod.net/uploads/images/gallery/2024-05/scaled-1680-/8zeMe0rus14d2Ffg-image.png)

# Import qcow2 image to proxmox and attach to vm

First we need to create a VM on Proxmox and assign an ID

then we need to upload the image, in this case we will upload from local PC to remote server

```bash
sudo scp fedora-coreos-40.20240504.3.0-qemu.x86_64.qcow2.xz root@192.168.1.100:/mnt/sdcard/images
```

Next we wll import disk to our PVE VM ID 201 in this case and select the disk we want our image to be stored - sdcard in this example

```shell
root@px:/mnt/sdcard/images# qm importdisk 201 fedora-coreos-40.20240504.3.0-qemu.x86_64.qcow2.xz sdcard
```

![image.png](https://wiki.tinod.net/uploads/images/gallery/2024-05/scaled-1680-/sVHQRfbjVZWG0vhU-image.png)

Now we select Unused disk 2 in this example and then edit then Add, make sure Bus/DEvice is set to VirtIO Block

[![image.png](https://wiki.tinod.net/uploads/images/gallery/2024-05/scaled-1680-/efbuLr3EqAHOf7AH-image.png)
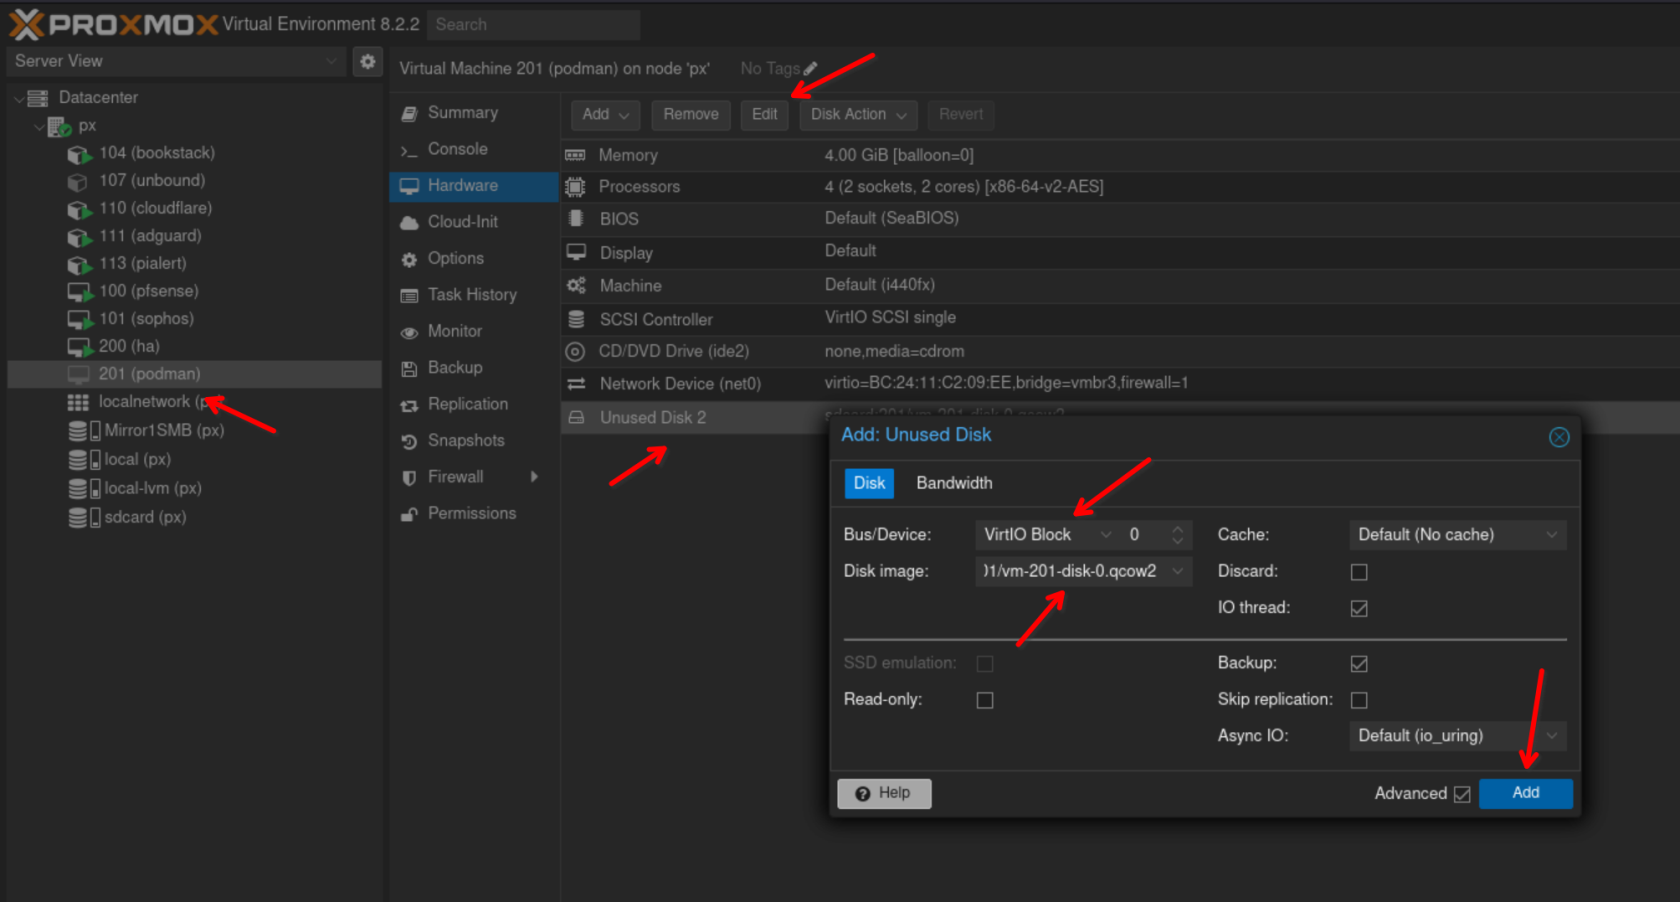
](https://wiki.tinod.net/uploads/images/gallery/2024-05/efbuLr3EqAHOf7AH-image.png)

# Rebuild proxmox and attach old drives and ZFS pool

  
first create mount point and mount disk  
mkdir /mnt/pve/nvme  
mount /dev/nvme01n101 /mnt/pve/nvme

Add Dir to proxmox

pvesm add dir nvme --path /mnt/pve/nvme --content images,rootdir,vztmpl,iso,snippets  
pvesm remove nvme to remove (in case it needs to be removed)

  
lsblk -fs  
sdd1 zfs\_member 5000 zfs 2868149595680930352   
└─sdd   
sdd9   
└─sdd   
sde1 exfat 1.0 Ventoy 4E21-0000   
└─sde   
sde2 vfat FAT16 VTOYEFI 3F32-27F5   
└─sde   
pve-swap swap 1 4b7443dd-4357-40d6-98d7-4818f30dc971 \[SWAP\]  
└─sda3 LVM2\_member LVM2 001 kPYhIF-2doR-T21m-weoW-bCDV-dzQs-enc6rS   
 └─sda   
pve-root ext4 1.0 b2859389-2b3c-49cb-a5c3-4ff199c9d370 32.4G 7% /  
└─sda3 LVM2\_member LVM2 001 kPYhIF-2doR-T21m-weoW-bCDV-dzQs-enc6rS   
 └─sda   
pve-data   
└─pve-data-tpool   
 ├─pve-data\_tmeta   
 │ └─sda3 LVM2\_member LVM2 001 kPYhIF-2doR-T21m-weoW-bCDV-dzQs-enc6rS   
 │ └─sda   
 └─pve-data\_tdata   
 └─sda3 LVM2\_member LVM2 001 kPYhIF-2doR-T21m-weoW-bCDV-dzQs-enc6rS   
 └─sda   
pve-vm--100--disk--0 ext4 1.0 b0990dfc-450e-463c-b83d-9b3ac5fab81e   
└─pve-data-tpool   
 ├─pve-data\_tmeta   
 │ └─sda3 LVM2\_member LVM2 001 kPYhIF-2doR-T21m-weoW-bCDV-dzQs-enc6rS   
 │ └─sda   
 └─pve-data\_tdata   
 └─sda3 LVM2\_member LVM2 001 kPYhIF-2doR-T21m-weoW-bCDV-dzQs-enc6rS   
 └─sda   
nvme0n1p1 ext4 1.0 34336a3a-a495-42a4-a0b9-e970b7165c9e 702.9G 18% /mnt/pve/nvme  
└─nvme0n1

  
 echo '34336a3a-a495-42a4-a0b9-e970b7165c9e /mnt/pve/nvme ext4 defaults 0 2' &gt;&gt; /etc/fstab  
   
   
 root@pve:/mnt/pve# echo '34336a3a-a495-42a4-a0b9-e970b7165c9e /mnt/pve/nvme ext4 defaults 0 2' &gt;&gt; /etc/fstab  
root@pve:/mnt/pve# cat /etc/fstab  
\# &lt;file system&gt; &lt;mount point&gt; &lt;type&gt; &lt;options&gt; &lt;dump&gt; &lt;pass&gt;  
/dev/pve/root / ext4 errors=remount-ro 0 1  
UUID=B107-3B17 /boot/efi vfat defaults 0 1  
/dev/pve/swap none swap sw 0 0  
proc /proc proc defaults 0 0  
34336a3a-a495-42a4-a0b9-e970b7165c9e /mnt/pve/nvme ext4 defaults 0 2

  
systemctl daemon-reload

for ZFS pool

zpool import -f zfs (name of the pool)

# Nvidia Driver Install on Proxmox LXC

1\. Blacklist nouveau:  
vi /etc/modprobe.d/blacklist-nouveau.conf

2\. Paste, save and quit:  
blacklist nouveau  
options nouveau modeset=0

3\. Update initramfs:  
update-initramfs -u

4\. Check if nouveau is enabled:  
lsmod | grep nouveau

5\. Disable nouveau and verify:  
rmmod nouveau  
lsmod | grep nouveau

6\. Ensure GPU is visible:  
lspci | grep NVIDIA

7\. Download driver (check for most recent version compatible with nvidia-utils-xxx-server):  
wget https://us.download.nvidia.com/XFree86/Linux-x86\_64/550.90.07/NVIDIA-Linux-x86\_64-550.90.07.run  
chmod +x NVIDIA-Linux-x86\_64-550.90.07.run

8.Install build packages:  
apt install build-essential pve-headers-$(uname -r)

9\. Run instalation:  
./NVIDIA-Linux-x86\_64-550.90.07.run

10\. Check if instalation was successfull:  
nvidia-smi

11\. \[optional\] Turn on persistane mode if necessary (lowers IDLE power consumption):  
https://docs.nvidia.com/deploy/driver-persistence/index.html  
nvidia-smi --persistence-mode=1 #only for current session  
nvidia-persistenced

12\. After creating CT shut it down and edit lxc configuration file (location might be diffrent):  
vi /etc/pve/nodes/pve/lxc/10001.conf

13\. run ls -al /dev/nvidia\* to find out your VMID, in our case is 195,255

```bash
$ sudo ls -al /dev/nvidia*
```

root@pve:/home# ls -al /dev/nvidia\*  
crw-rw-rw- 1 root root 195, 0 Jan 31 02:03 /dev/nvidia0  
crw-rw-rw- 1 root root 195, 255 Jan 31 02:03 /dev/nvidiactl  
crw-rw-rw- 1 root root 508, 0 Jan 31 02:03 /dev/nvidia-uvm  
crw-rw-rw- 1 root root 508, 1 Jan 31 02:03 /dev/nvidia-uvm-tools

14\. Edit your lxc config, /etc/pve/lxc/XXX.conf append the following

```
lxc.cgroup2.devices.allow: c 195:* rwm
lxc.cgroup2.devices.allow: c 508:* rwm
lxc.mount.entry: /dev/nvidia0 dev/nvidia0 none bind,optional,create=file
lxc.mount.entry: /dev/nvidiactl dev/nvidiactl none bind,optional,create=file
lxc.mount.entry: /dev/nvidia-uvm dev/nvidia-uvm none bind,optional,create=file
lxc.mount.entry: /dev/nvidia-uvm-tools dev/nvidia-uvm-tools none bind,optional,create=file
```

Conf example

```
arch: amd64
cores: 4
features: nesting=1
hostname: immich
memory: 8096
mp0: nvme:105/vm-105-disk-1.raw,mp=/nvme/upload,size=500G
mp1: /zfs/media,mp=/mnt/media
nameserver: 192.168.3.1
net0: name=eth0,bridge=vmbr0,hwaddr=BC:24:11:E2:D3:5D,ip=dhcp,type=veth
onboot: 1
ostype: ubuntu
rootfs: nvme:105/vm-105-disk-0.raw,size=50G
swap: 2048
lxc.cgroup2.devices.allow: c 195:* rwm
lxc.cgroup2.devices.allow: c 508:* rwm
lxc.mount.entry: /dev/nvidia0 dev/nvidia0 none bind,optional,create=file
lxc.mount.entry: /dev/nvidiactl dev/nvidiactl none bind,optional,create=file
lxc.mount.entry: /dev/nvidia-uvm dev/nvidia-uvm none bind,optional,create=file
lxc.mount.entry: /dev/nvidia-uvm-tools dev/nvidia-uvm-tools none bind,optional,create=file
```

14\. Push the nvidia driver to your LXC by selecting the LXC VMID

```bash
sudo pct push <VMID> ./NVIDIA-Linux-x86_64-550.90.07.run /root/NVIDIA-Linux-x86_64-550.90.07.run
```

15\. Install Nvidia driver on LXC

```bash
sudo ./NVIDIA-Linux-x86_64-550.90.07.run --no-kernel-module
```

Test with nvidia-smi

![image.png](https://wiki.tinod.net/uploads/images/gallery/2025-01/scaled-1680-/gKFlUuMayZUN5Hor-image.png)