if you are installing this via the wan interface access, make sure you go back and disable packet filter as doing the installation will re enable, go to the shell and type pfctl -d to disable and gain access via WAN interface
Navigate to Services/Acme go to Account keys and click add, fill out the information below, for ACME Server you can use production or test, its the same click on create new account key then register acme account key, after you are done click save [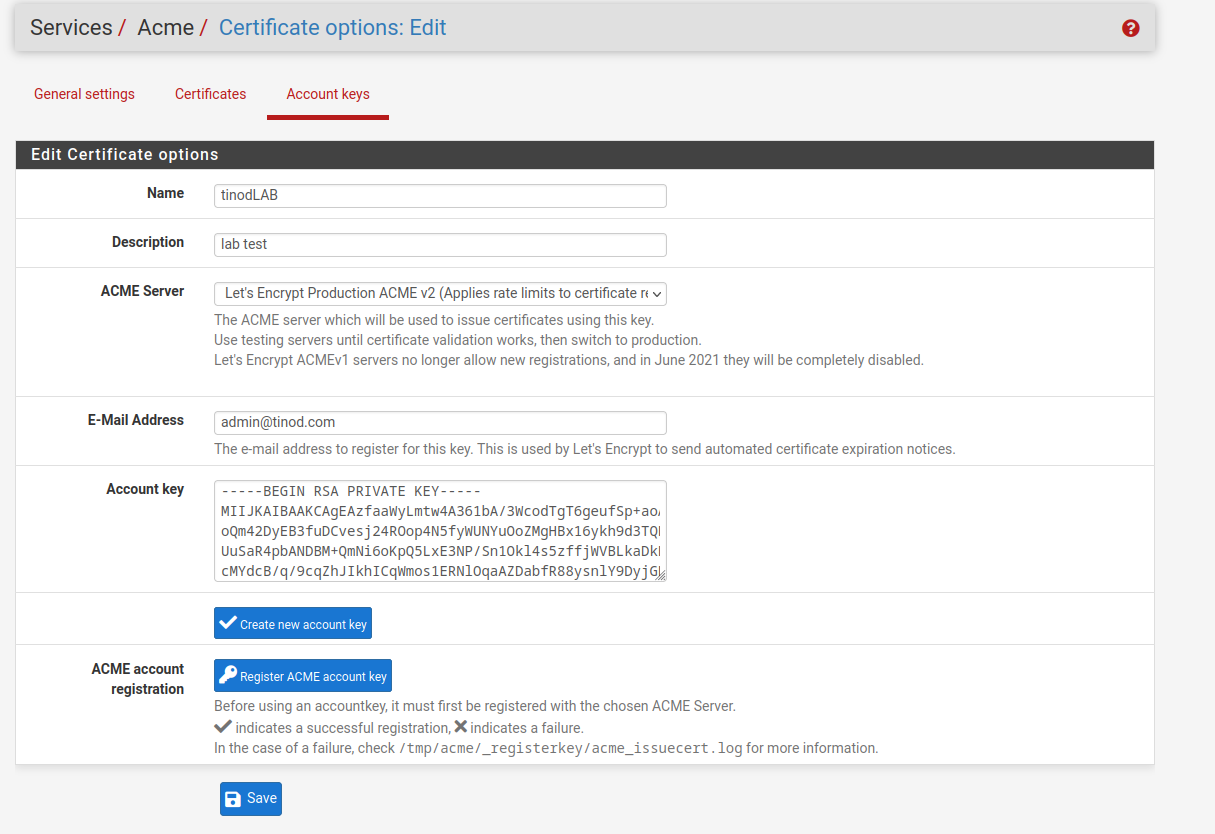](https://wiki.tinod.net/uploads/images/gallery/2023-03/o71mgnUXts2osSZK-qAWimage.png) you have now your account key. [](https://wiki.tinod.net/uploads/images/gallery/2023-03/vKcaHy0T00Gc6wG9-hRyimage.png) Navigate to General Settings and select Enable Acmee client renewal jojb to auto renew your certificates. [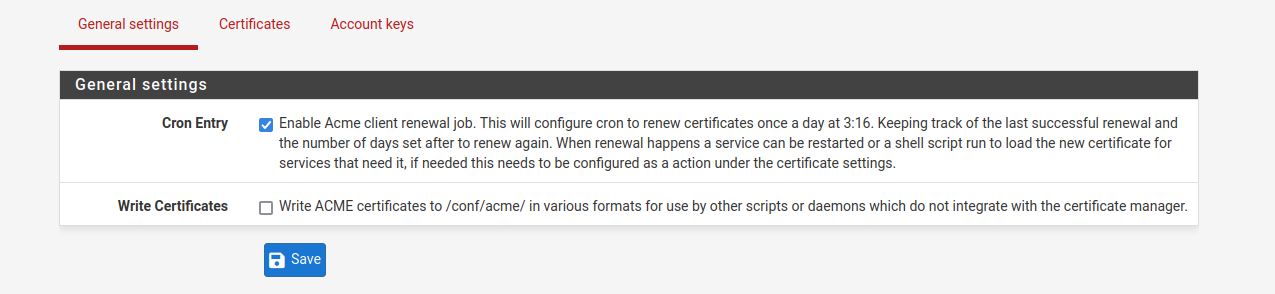](https://wiki.tinod.net/uploads/images/gallery/2023-03/kdfrXuuHoCM9xp3A-KgQimage.png) now you can create your first certificate, navigate to certificates and click add, we're using cloudflare [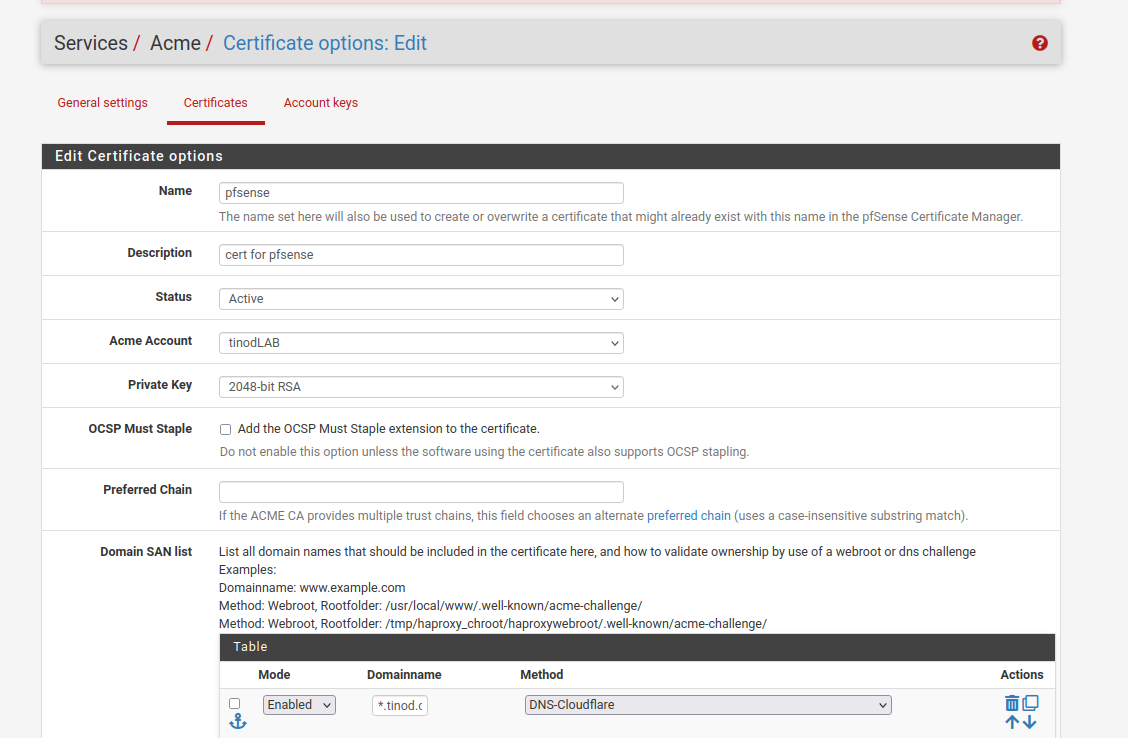](https://wiki.tinod.net/uploads/images/gallery/2023-03/2SW8a3cVkNeblSMw-gzaimage.png) For this lab we're using a wildcard certificate, for our domain we will do \*.tinod.com you need to get your key, token, accound ID and Zone ID from cloudflare [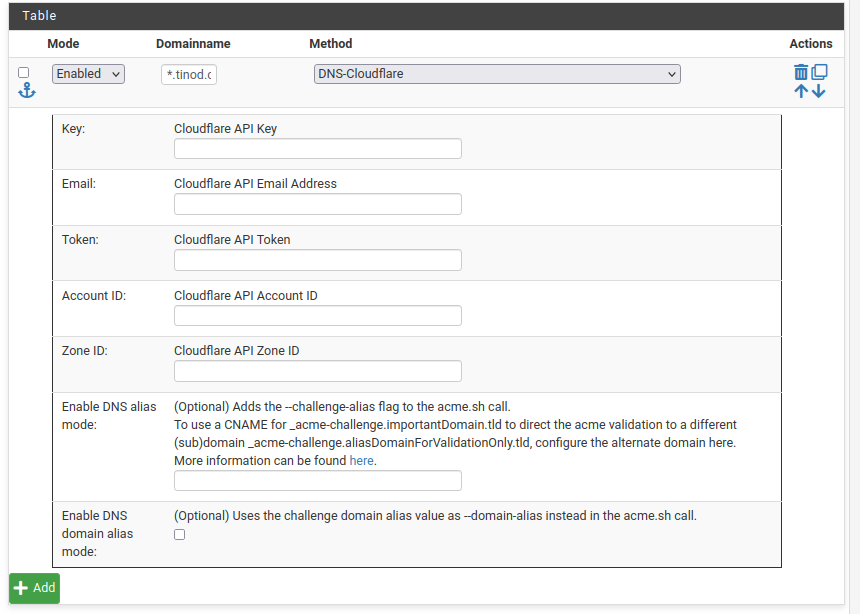](https://wiki.tinod.net/uploads/images/gallery/2023-03/YX79ir7V9NjTTgeY-N9vimage.png) click add and your cert will be ready and it will renew automatically # Administration # Enable WAN access To enable wan access go into ssh and run the following command pfctl - d to enable protection pfctl -e # Update PFSense CLI Run a backup cp /usr/local/share/pfSense/pkg/repos/pfSense-repo.abi /usr/local/share/pfSense/pkg/repos/pfSense-repo.abi.backup 23.05-RELEASE\]\[admin@pfsense.htf.com.mx\]/root: pkg-static -d update # Troubleshooting # Disk Full Discover PFSense disk is full, discovered snort log files not clearing up, manually run script to clear logs Enter an option: 8 \[23.05-RELEASE\]\[admin@pfsense.htf.com.mx\]/root: du -Pshx /\* 4.5K /COPYRIGHT 892K /bin 365M /boot 2.4M /cf 512B /conf 9.5K /conf.default 4.0K /dev 4.5K /entropy 4.1M /etc 512B /home 10M /lib 113K /libexec 512B /media 512B /mnt 512B /net 1.0K /pfSense 512B /proc 17M /rescue 131M /root 3.0M /sbin 178K /tmp 995M /usr 15M /var \[23.05-RELEASE\]\[admin@pfsense.htf.com.mx\]/root: cd /var \[23.05-RELEASE\]\[admin@pfsense.htf.com.mx\]/var: ls account audit backups crash db empty games lib mail preserve rwho tmp yp at authpf cache cron dhcpd etc heimdal log msgs run spool unbound \[23.05-RELEASE\]\[admin@pfsense.htf.com.mx\]/var: du -Pshx /var/log\* 47G /var/log \[23.05-RELEASE\]\[admin@pfsense.htf.com.mx\]/var: du -Pshx /var/\* 512B /var/account 1.5K /var/at 1.5K /var/audit 512B /var/authpf 8.2M /var/backups 66K /var/cache 1.0K /var/crash 1.0K /var/cron 15M /var/db 3.0M /var/dhcpd 512B /var/empty 102K /var/etc 512B /var/games 512B /var/heimdal 1.0K /var/lib 47G /var/log 12K /var/mail 512B /var/msgs 512B /var/preserve 135K /var/run 512B /var/rwho 12K /var/spool 13K /var/tmp 3.4M /var/unbound 512B /var/yp \[23.05-RELEASE\]\[admin@pfsense.htf.com.mx\]/var: du -Pshx /var/log\* 47G /var/log \[23.05-RELEASE\]\[admin@pfsense.htf.com.mx\]/var: cd /var/log \[23.05-RELEASE\]\[admin@pfsense.htf.com.mx\]/var/log: ls auth.log filter.log lighttpd openvpn.log ppp.log system.log wireless.log bsdinstall\_log gateways.log mount.today pf.today resolver.log userlog dhcpd.log haproxy.log nginx pf.yesterday routing.log utx.lastlogin dmesg.boot ipsec.log nginx.log pfblockerng routing.log.0 utx.log dmesg.today l2tps.log ntp poes.log setuid.today vpn.log dmesg.yesterday lastlog ntpd.log portalauth.log snort watchdogd.log \[23.05-RELEASE\]\[admin@pfsense.htf.com.mx\]/var/log: ls -la total 300 drwxr-xr-x 7 root wheel 39 Oct 10 20:18 . drwxr-xr-x 27 root wheel 27 May 22 09:57 .. -rw------- 1 root wheel 484415 Oct 10 20:15 auth.log -rw-r--r-- 1 root wheel 56964 Jan 9 2023 bsdinstall\_log -rw------- 1 root wheel 0 Oct 10 20:18 dhcpd.log -rw-r--r-- 1 root wheel 12145 Oct 10 17:28 dmesg.boot -rw------- 1 root wheel 22577 Jun 14 02:01 dmesg.today -rw------- 1 root wheel 18863 Jun 13 02:01 dmesg.yesterday -rw------- 1 root wheel 0 Oct 10 20:18 filter.log -rw------- 1 root wheel 0 Oct 10 20:18 gateways.log -rw------- 1 root wheel 0 Mar 28 2023 haproxy.log -rw------- 1 root wheel 0 Oct 10 20:18 ipsec.log -rw------- 1 root wheel 0 Oct 10 20:18 l2tps.log -rw-r--r-- 1 root wheel 0 Mar 19 2023 lastlog drwx------ 2 www www 2 Feb 17 2023 lighttpd -rw------- 1 root wheel 971 Mar 20 2023 mount.today drwxr-xr-x 2 root wheel 3 Jan 9 2023 nginx -rw------- 1 root wheel 0 Oct 10 20:18 nginx.log drwxr-xr-x 2 root wheel 2 Jan 9 2023 ntp -rw------- 1 root wheel 0 Oct 10 20:18 ntpd.log -rw------- 1 root wheel 0 Oct 10 20:18 openvpn.log -rw------- 1 root wheel 628 Jun 14 02:01 pf.today -rw------- 1 root wheel 461 Jun 13 02:01 pf.yesterday drwxr-xr-x 2 unbound unbound 13 Oct 10 19:09 pfblockerng -rw------- 1 root wheel 0 Oct 10 20:18 poes.log -rw------- 1 root wheel 0 Oct 10 20:18 portalauth.log -rw------- 1 root wheel 0 Oct 10 20:18 ppp.log -rw------- 1 root wheel 0 Oct 10 20:18 resolver.log -rw------- 1 root wheel 70759 Oct 10 20:11 routing.log -rw------- 1 root wheel 511905 Sep 27 18:26 routing.log.0 -rw------- 1 root wheel 2340 Mar 20 2023 setuid.today drwxr-xr-x 4 root wheel 6 Jul 17 00:45 snort -rw------- 1 root wheel 0 Oct 10 20:18 system.log -rw------- 1 root wheel 25523 Oct 10 17:28 userlog -rw-r--r-- 1 root wheel 394 Oct 10 20:15 utx.lastlogin -rw------- 1 root wheel 4022 Oct 10 20:15 utx.log -rw------- 1 root wheel 0 Oct 10 20:18 vpn.log -rw------- 1 root wheel 0 Oct 10 17:28 watchdogd.log -rw------- 1 root wheel 0 Oct 10 20:18 wireless.log \[23.05-RELEASE\]\[admin@pfsense.htf.com.mx\]/var/log: du -hi du: invalid option -- i usage: du \[-Aclnx\] \[-H | -L | -P\] \[-g | -h | -k | -m\] \[-a | -s | -d depth\] \[-B blocksize\] \[-I mask\] \[-t threshold\] \[file ...\] \[23.05-RELEASE\]\[admin@pfsense.htf.com.mx\]/var/log: du -h \* 113K auth.log 13K bsdinstall\_log 512B dhcpd.log 8.5K dmesg.boot 8.5K dmesg.today 8.5K dmesg.yesterday 512B filter.log 512B gateways.log 512B haproxy.log 512B ipsec.log 512B l2tps.log 512B lastlog 512B lighttpd 4.5K mount.today 1.0K nginx 512B nginx.log 512B ntp 512B ntpd.log 512B openvpn.log 4.5K pf.today 4.5K pf.yesterday 2.0M pfblockerng 512B poes.log 512B portalauth.log 512B ppp.log 512B resolver.log 8.5K routing.log 69K routing.log.0 4.5K setuid.today 47G snort/snort\_igc317124 43M snort/snort\_igc138051 47G snort 512B system.log 4.5K userlog 512B utx.lastlogin 4.5K utx.log 512B vpn.log 512B watchdogd.log 512B wireless.log \[23.05-RELEASE\]\[admin@pfsense.htf.com.mx\]/var/log: ls auth.log filter.log lighttpd openvpn.log ppp.log system.log wireless.log bsdinstall\_log gateways.log mount.today pf.today resolver.log userlog dhcpd.log haproxy.log nginx pf.yesterday routing.log utx.lastlogin dmesg.boot ipsec.log nginx.log pfblockerng routing.log.0 utx.log dmesg.today l2tps.log ntp poes.log setuid.today vpn.log dmesg.yesterday lastlog ntpd.log portalauth.log snort watchdogd.log \[23.05-RELEASE\]\[admin@pfsense.htf.com.mx\]/var/log: cd snort/ \[23.05-RELEASE\]\[admin@pfsense.htf.com.mx\]/var/log/snort: ls HOMENETWORK\_disabled\_preproc\_rules.log snort\_igc317124 snort\_igc138051 snort\_rules\_update.log \[23.05-RELEASE\]\[admin@pfsense.htf.com.mx\]/var/log/snort: du -h \* 512B HOMENETWORK\_disabled\_preproc\_rules.log 43M snort\_igc138051 47G snort\_igc317124 4.5K snort\_rules\_update.log \[23.05-RELEASE\]\[admin@pfsense.htf.com.mx\]/var/log/snort: du -h 47G ./snort\_igc317124 43M ./snort\_igc138051 47G . \[23.05-RELEASE\]\[admin@pfsense.htf.com.mx\]/var/log/snort: df -h Filesystem Size Used Avail Capacity Mounted on pfSense/ROOT/default 1.5G 1.5G 6.1M 100% / devfs 1.0K 1.0K 0B 100% /dev pfSense/tmp 6.5M 384K 6.1M 6% /tmp pfSense/var 21M 15M 6.1M 71% /var pfSense 6.2M 96K 6.1M 2% /pfSense pfSense/home 6.2M 96K 6.1M 2% /home pfSense/var/log 47G 47G 6.1M 100% /var/log pfSense/var/db 21M 15M 6.1M 72% /var/db pfSense/var/tmp 6.2M 104K 6.1M 2% /var/tmp pfSense/var/cache 6.2M 104K 6.1M 2% /var/cache pfSense/reservation 5.6G 96K 5.6G 0% /pfSense/reservation pfSense/ROOT/default/cf 8.6M 2.5M 6.1M 29% /cf pfSense/ROOT/default/var\_cache\_pkg 18M 12M 6.1M 65% /var/cache/pkg pfSense/ROOT/default/var\_db\_pkg 13M 6.9M 6.1M 53% /var/db/pkg tmpfs 4.0M 148K 3.9M 4% /var/run /lib 1.5G 1.5G 6.1M 100% /var/unbound/lib devfs 1.0K 1.0K 0B 100% /var/unbound/dev /var/log/pfblockerng 47G 47G 6.1M 100% /var/unbound/var/log/pfblockerng /usr/local/share/GeoIP 1.5G 1.5G 6.1M 100% /var/unbound/usr/local/share/GeoIP /usr/local/bin 1.5G 1.5G 6.1M 100% /var/unbound/usr/local/bin /usr/local/lib 1.5G 1.5G 6.1M 100% /var/unbound/usr/local/lib devfs 1.0K 1.0K 0B 100% /var/dhcpd/dev \[23.05-RELEASE\]\[admin@pfsense.htf.com.mx\]/var/log/snort: cat /etc/cron cron.d/ crontab \[23.05-RELEASE\]\[admin@pfsense.htf.com.mx\]/var/log/snort: cat /etc/crontab \# \# pfSense specific crontab entries \# Created: October 10, 2023, 8:11 pm \# SHELL=/bin/sh PATH=/sbin:/bin:/usr/sbin:/usr/bin:/usr/local/sbin:/usr/local/bin \*/1 \* \* \* \* root /usr/sbin/newsyslog 1 3 \* \* \* root /etc/rc.periodic daily 15 4 \* \* 6 root /etc/rc.periodic weekly 30 5 1 \* \* root /etc/rc.periodic monthly 1,31 0-5 \* \* \* root /usr/bin/nice -n20 adjkerntz -a 1 3 1 \* \* root /usr/bin/nice -n20 /etc/rc.update\_bogons.sh 1 1 \* \* \* root /usr/bin/nice -n20 /etc/rc.dyndns.update \*/60 \* \* \* \* root /usr/bin/nice -n20 /usr/local/sbin/expiretable -v -t 3600 virusprot 30 12 \* \* \* root /usr/bin/nice -n20 /etc/rc.update\_urltables 1 0 \* \* \* root /usr/bin/nice -n20 /etc/rc.update\_pkg\_metadata 16 3 \* \* \* root /usr/local/pkg/acme/acme\_command.sh "renewall" | /usr/bin/logger -t ACME 2>&1 \*/5 \* \* \* \* root /usr/bin/nice -n20 /usr/local/bin/php -f /usr/local/pkg/snort/snort\_check\_cron\_misc.inc 52 3 \*/1 \* \* root /usr/bin/nice -n20 /usr/local/bin/php -f /usr/local/pkg/snort/snort\_check\_for\_rule\_updates.php 0 8 \* \* 5 root /usr/local/bin/php /usr/local/www/pfblockerng/pfblockerng.php dcc >> /var/log/pfblockerng/extras.log 2>&1 0 \* \* \* \* root /usr/local/bin/php /usr/local/www/pfblockerng/pfblockerng.php cron >> /var/log/pfblockerng/pfblockerng.log 2>&1 \# \# DO NOT EDIT THIS FILE MANUALLY! \# Use the cron package or create files in /etc/cron.d/. \# \[23.05-RELEASE\]\[admin@pfsense.htf.com.mx\]/var/log/snort: cat /etc/crontab \# \# pfSense specific crontab entries \# Created: October 10, 2023, 8:11 pm \# SHELL=/bin/sh PATH=/sbin:/bin:/usr/sbin:/usr/bin:/usr/local/sbin:/usr/local/bin \*/1 \* \* \* \* root /usr/sbin/newsyslog 1 3 \* \* \* root /etc/rc.periodic daily 15 4 \* \* 6 root /etc/rc.periodic weekly 30 5 1 \* \* root /etc/rc.periodic monthly 1,31 0-5 \* \* \* root /usr/bin/nice -n20 adjkerntz -a 1 3 1 \* \* root /usr/bin/nice -n20 /etc/rc.update\_bogons.sh 1 1 \* \* \* root /usr/bin/nice -n20 /etc/rc.dyndns.update \*/60 \* \* \* \* root /usr/bin/nice -n20 /usr/local/sbin/expiretable -v -t 3600 virusprot 30 12 \* \* \* root /usr/bin/nice -n20 /etc/rc.update\_urltables 1 0 \* \* \* root /usr/bin/nice -n20 /etc/rc.update\_pkg\_metadata 16 3 \* \* \* root /usr/local/pkg/acme/acme\_command.sh "renewall" | /usr/bin/logger -t ACME 2>&1 \*/5 \* \* \* \* root /usr/bin/nice -n20 /usr/local/bin/php -f /usr/local/pkg/snort/snort\_check\_cron\_misc.inc 52 3 \*/1 \* \* root /usr/bin/nice -n20 /usr/local/bin/php -f /usr/local/pkg/snort/snort\_check\_for\_rule\_updates.php 0 8 \* \* 5 root /usr/local/bin/php /usr/local/www/pfblockerng/pfblockerng.php dcc >> /var/log/pfblockerng/extras.log 2>&1 0 \* \* \* \* root /usr/local/bin/php /usr/local/www/pfblockerng/pfblockerng.php cron >> /var/log/pfblockerng/pfblockerng.log 2>&1 \# \# DO NOT EDIT THIS FILE MANUALLY! \# Use the cron package or create files in /etc/cron.d/. \# \[23.05-RELEASE\]\[admin@pfsense.htf.com.mx\]/var/log/snort: php -f /usr/local/pkg/snort/snort\_check\_cron\_misc.inc \[23.05-RELEASE\]\[admin@pfsense.htf.com.mx\]/var/log/snort: df -h Filesystem Size Used Avail Capacity Mounted on pfSense/ROOT/default 42G 1.5G 41G 4% / devfs 1.0K 1.0K 0B 100% /dev pfSense/tmp 41G 384K 41G 0% /tmp pfSense/var 41G 15M 41G 0% /var pfSense 41G 96K 41G 0% /pfSense pfSense/home 41G 96K 41G 0% /home pfSense/var/log 47G 6.5G 41G 14% /var/log pfSense/var/db 41G 15M 41G 0% /var/db pfSense/var/tmp 41G 104K 41G 0% /var/tmp pfSense/var/cache 41G 104K 41G 0% /var/cache pfSense/reservation 46G 96K 46G 0% /pfSense/reservation pfSense/ROOT/default/cf 41G 2.5M 41G 0% /cf pfSense/ROOT/default/var\_cache\_pkg 41G 12M 41G 0% /var/cache/pkg pfSense/ROOT/default/var\_db\_pkg 41G 6.9M 41G 0% /var/db/pkg tmpfs 4.0M 148K 3.9M 4% /var/run /lib 42G 1.5G 41G 4% /var/unbound/lib devfs 1.0K 1.0K 0B 100% /var/unbound/dev /var/log/pfblockerng 47G 6.5G 41G 14% /var/unbound/var/log/pfblockerng /usr/local/share/GeoIP 42G 1.5G 41G 4% /var/unbound/usr/local/share/GeoIP /usr/local/bin 42G 1.5G 41G 4% /var/unbound/usr/local/bin /usr/local/lib 42G 1.5G 41G 4% /var/unbound/usr/local/lib devfs 1.0K 1.0K 0B 100% /var/dhcpd/dev \[23.05-RELEASE\]\[admin@pfsense.htf.com.mx\]/var/log/snort: # Wireshark Wireshark is an open-source packet analyzer which is widely used for network troubleshooting and traffic analysis. You can download it from the official website [https://www.wireshark.org/#download](https://www.wireshark.org/#download)