Genesys Cloud - How to - CCaaS Administrator
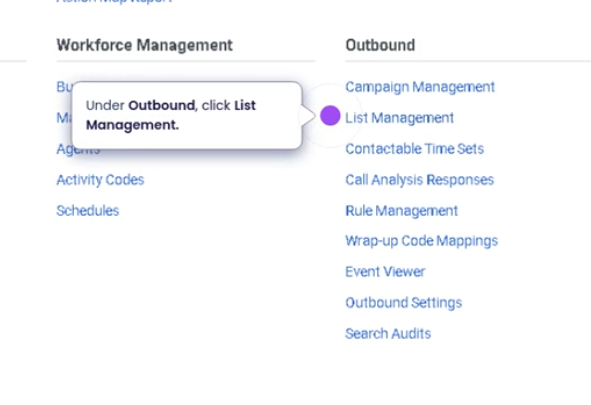
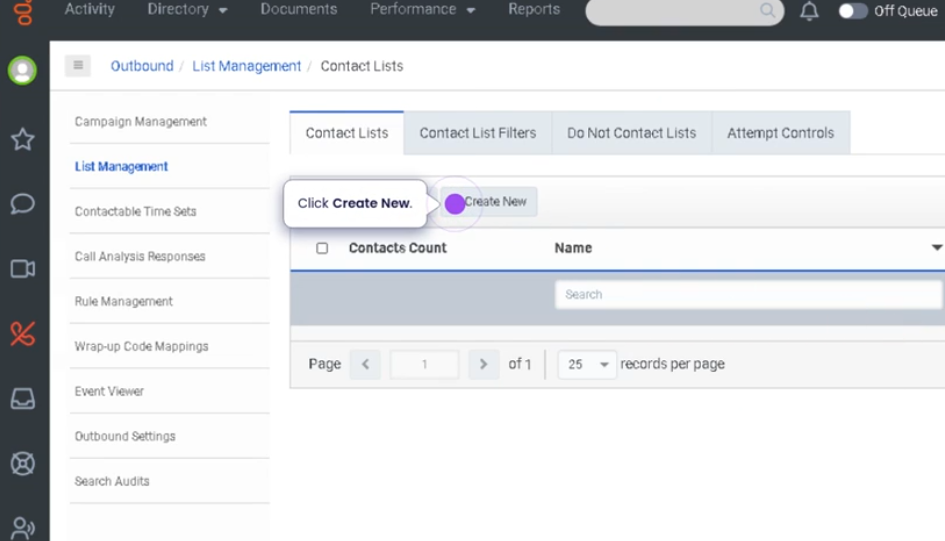
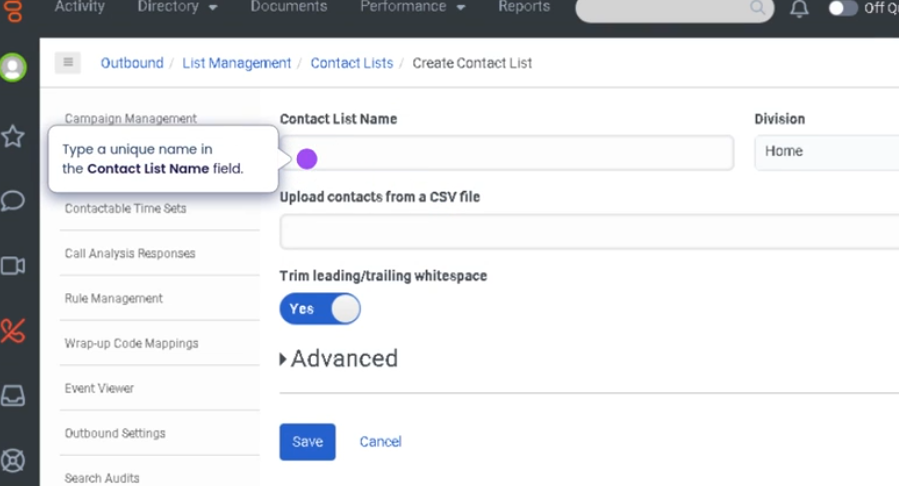
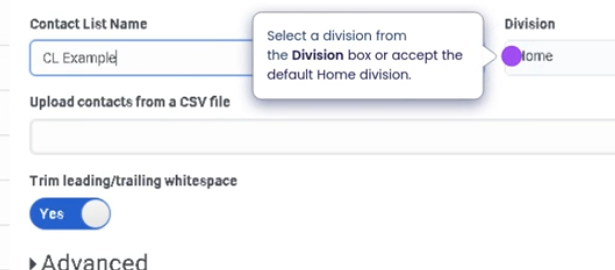
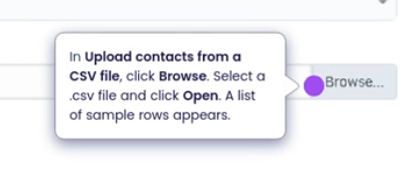
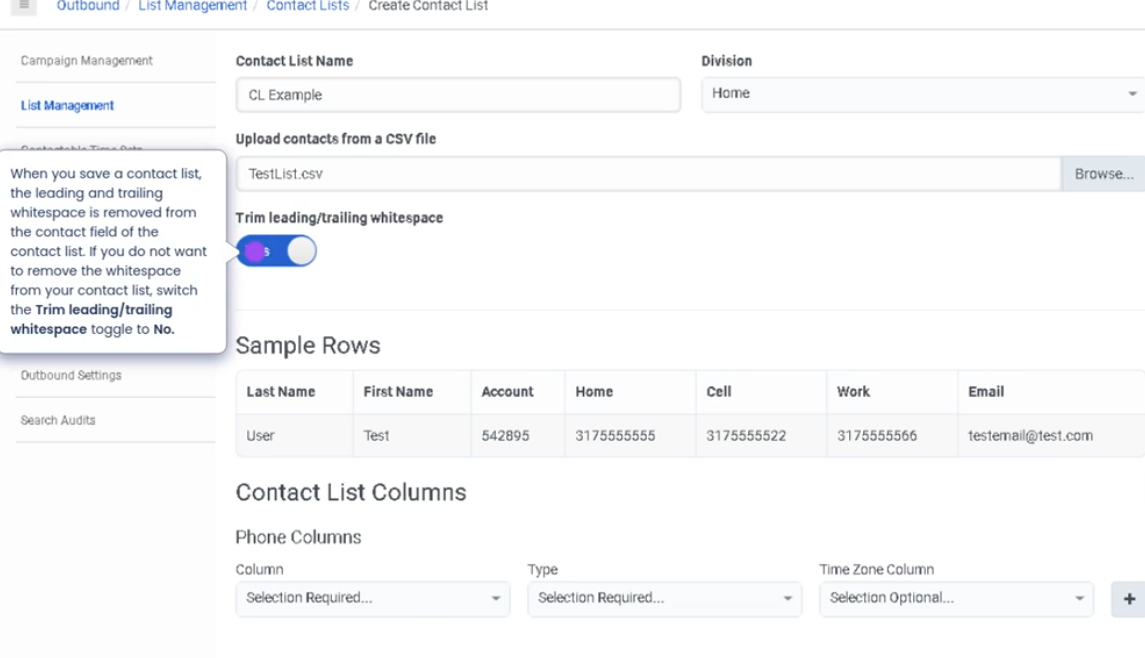
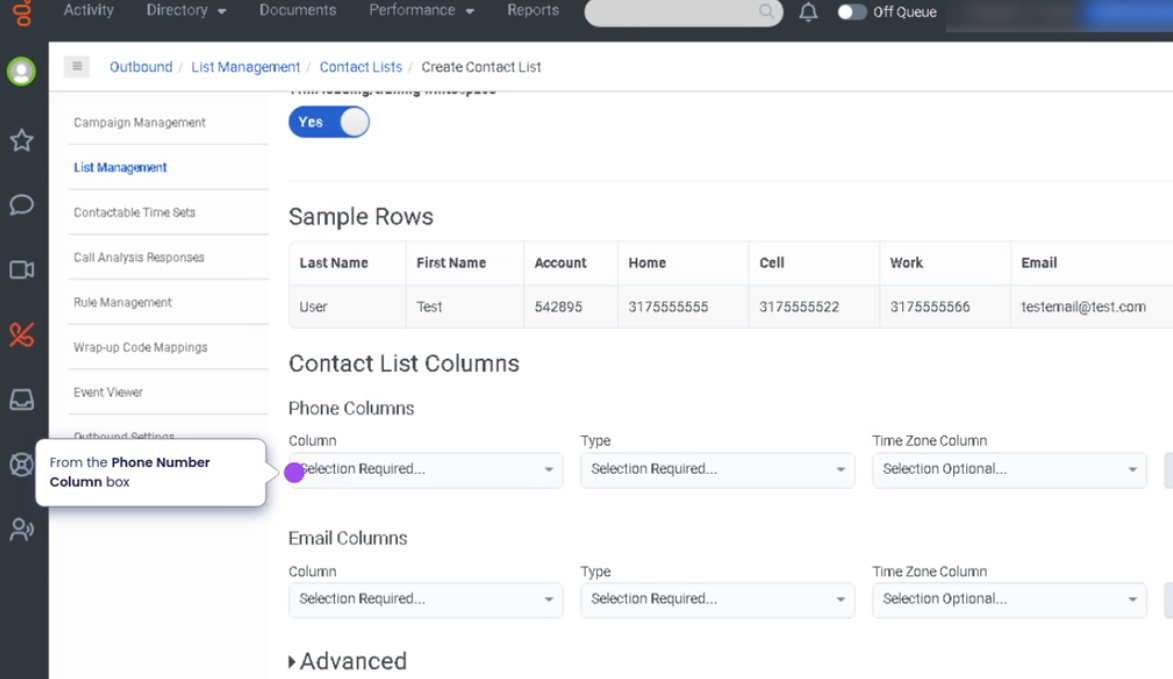
- Genesys Cloud - How to - Outbound - Contact Lists
- Genesys Cloud - how to - Outbound - Create a set of rules
- Genesys Cloud - How to - Contact Center - Create widget for web chat
- Genesys Cloud - How to - Contact Center - Canned responses
- Genesys Cloud - How to - Outbound - Contact Lists Filters
- Genesys Cloud - How to - Directory - Profile Fields
- Genesys Cloud - How to - Account Settings - Reset Agent Routing Score after presence change
- Genesys Cloud - How to - Schedules - Generate a schedule without forecast
- Genesys Cloud - How to - Contact Center - ACD Skills
- Genesys Cloud - How to - Outbound - SMS Campaign
- Genesys Cloud - How to - Outbound - Agentless Campaign
- Create a skill expression group
Genesys Cloud - How to - Outbound - Contact Lists
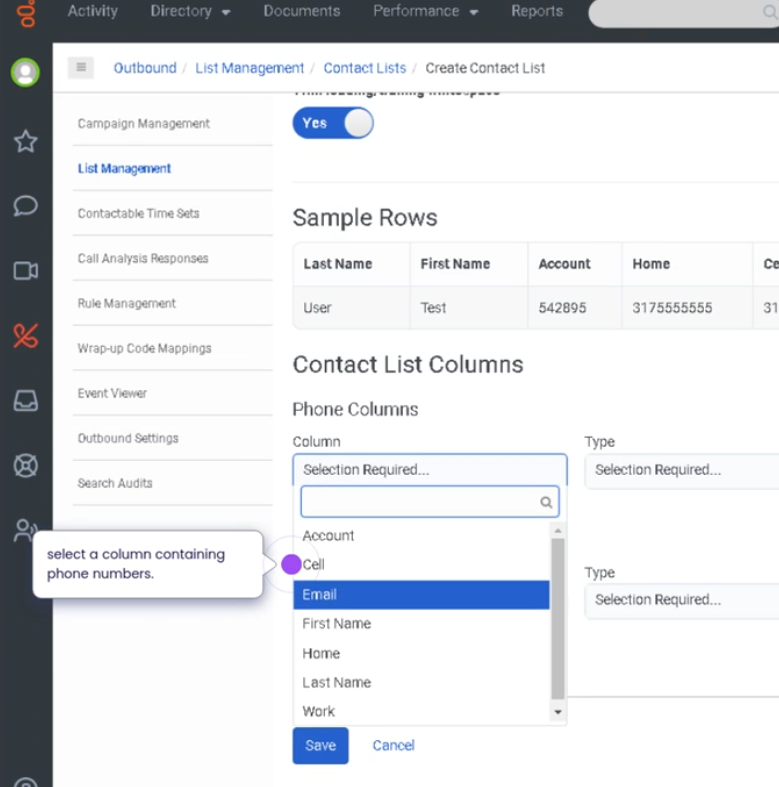
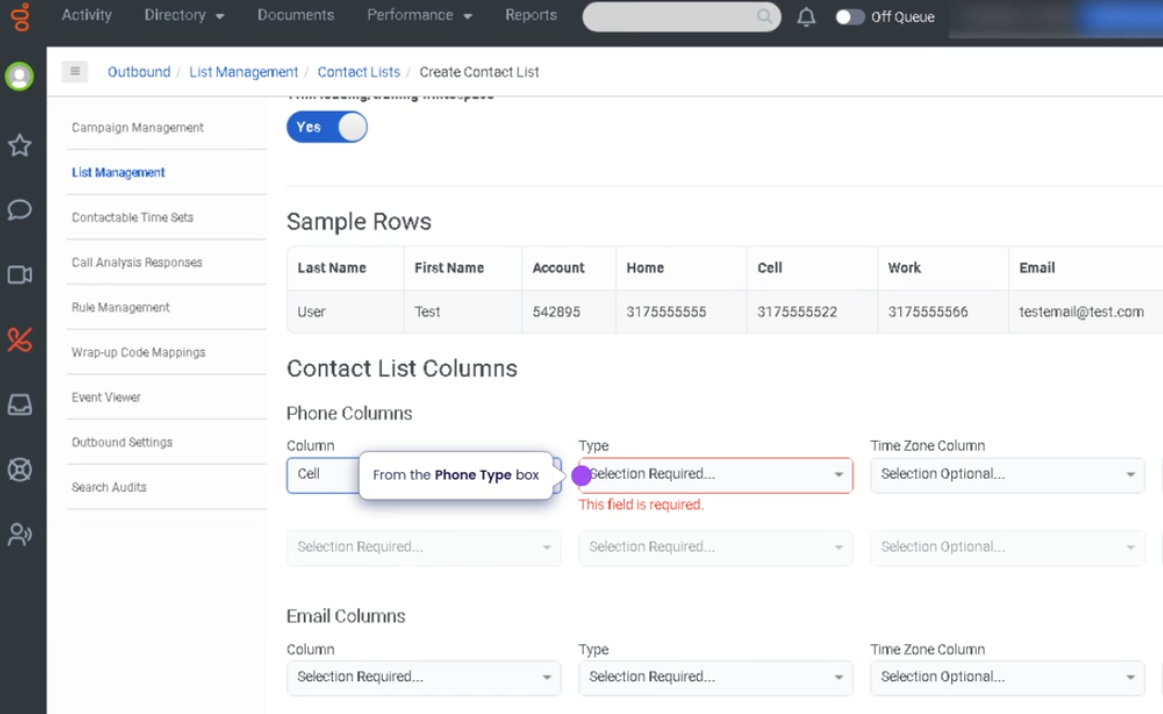
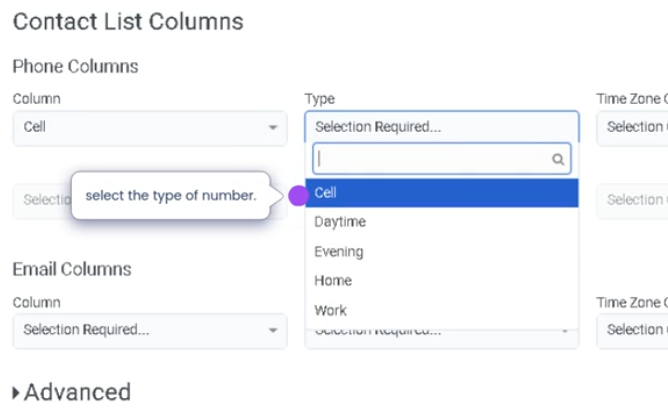
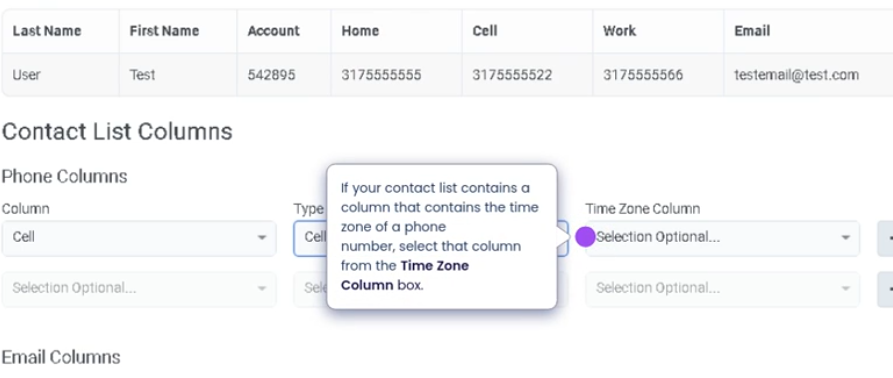
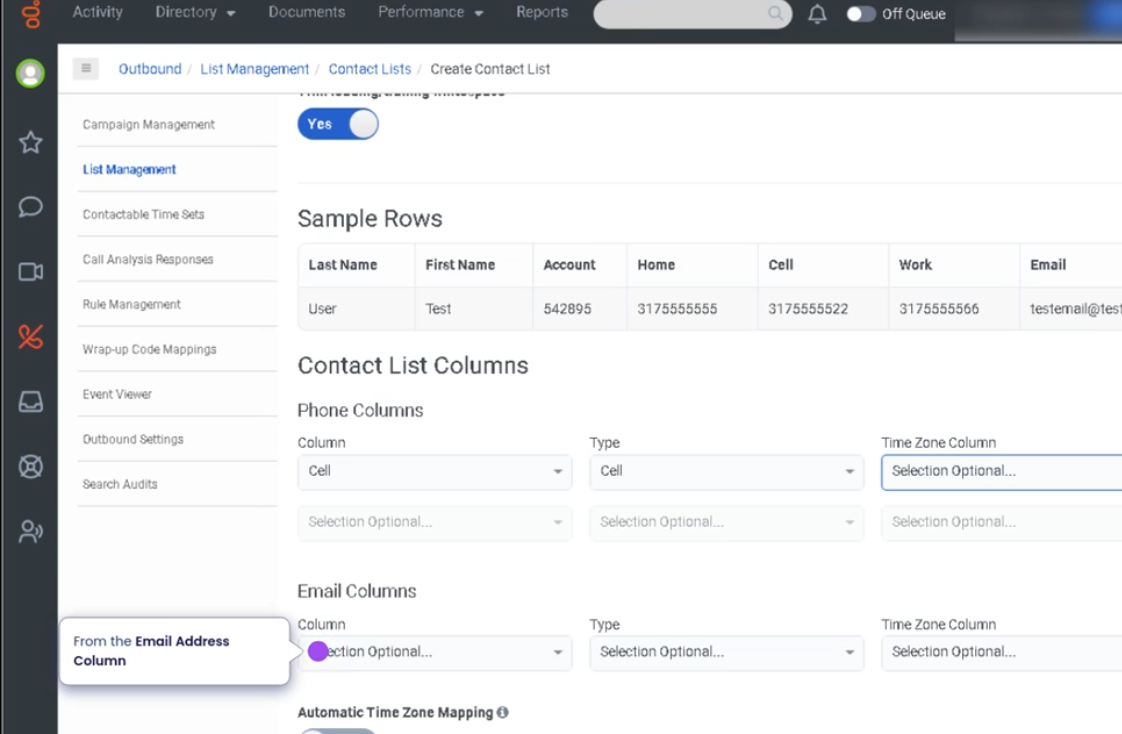
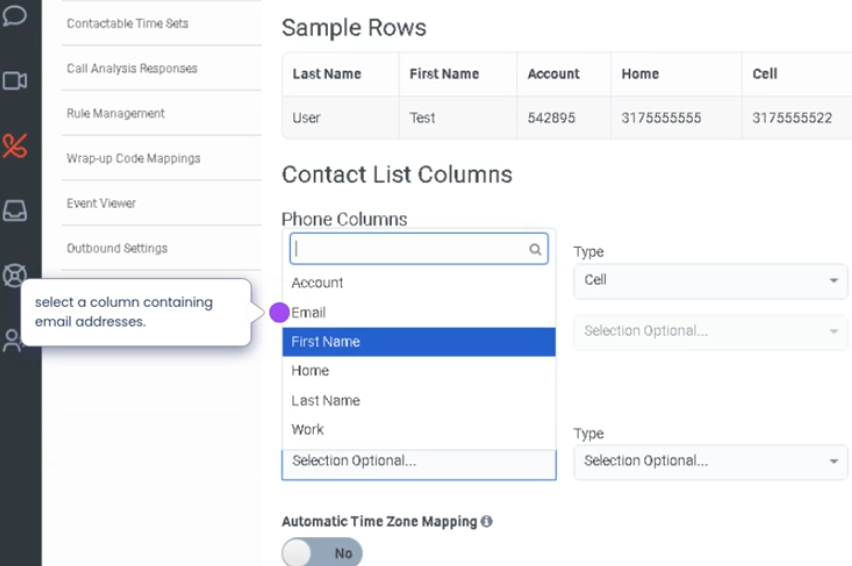
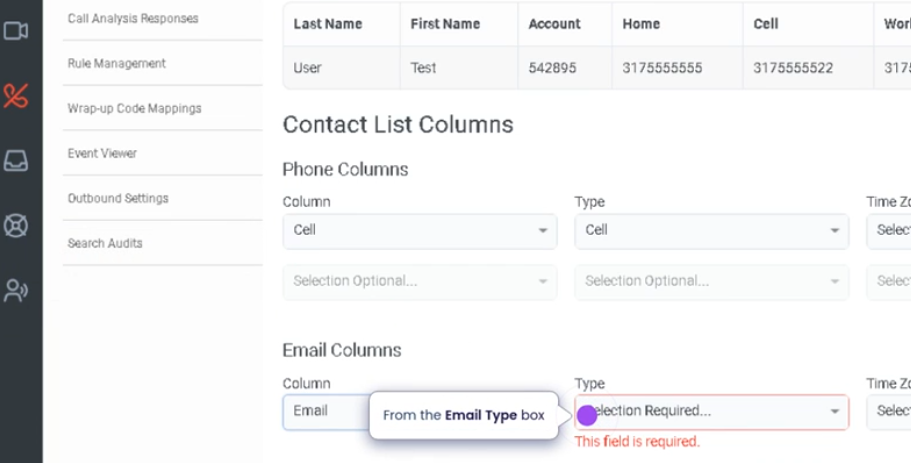
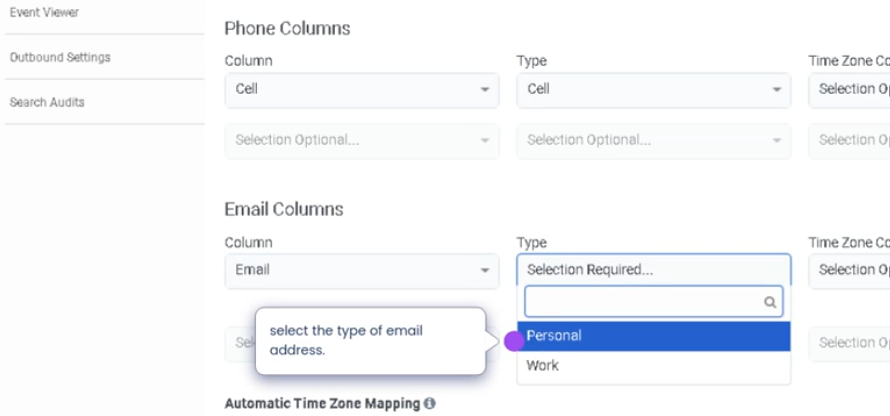
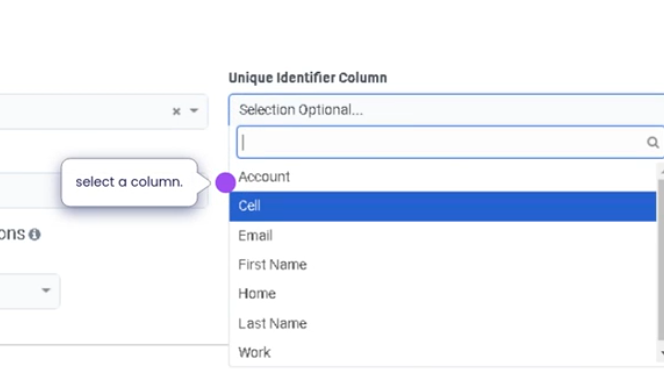
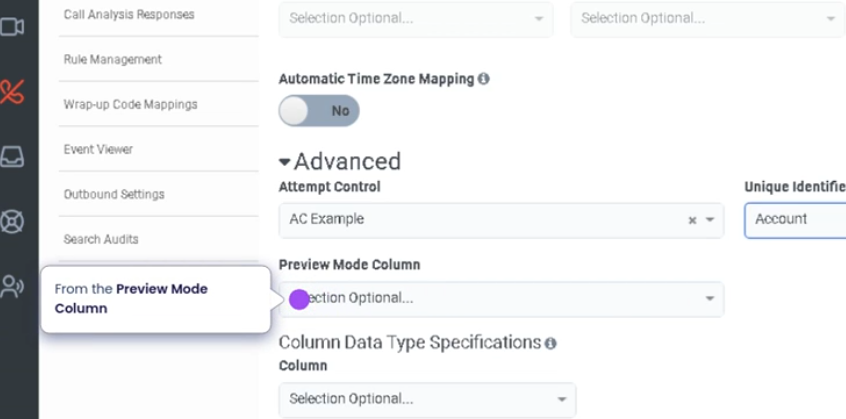
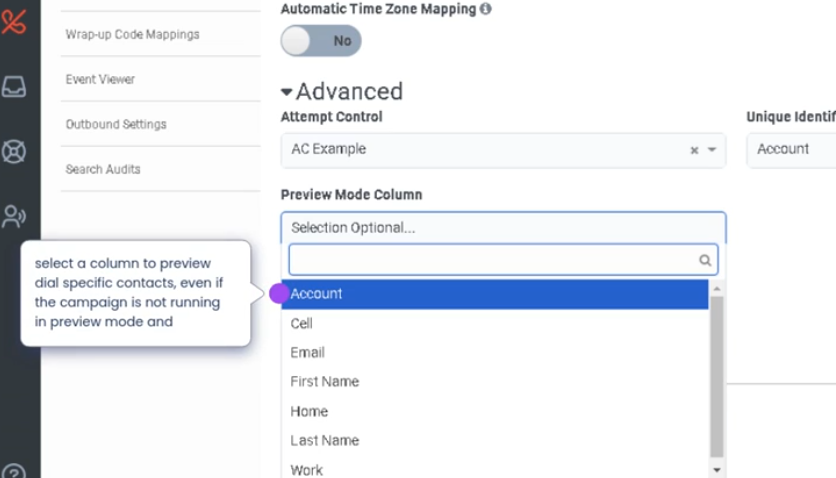
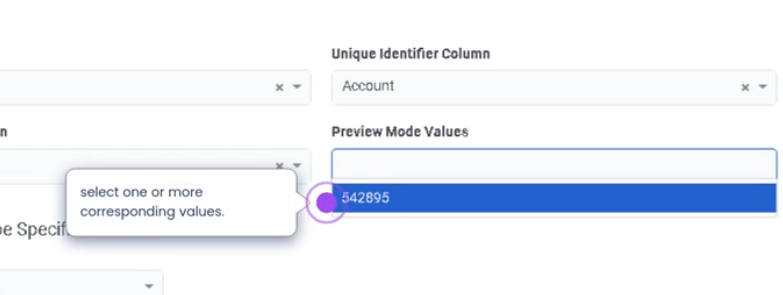

Contact Lists (Genesys Cloud)
Summary
Contact Lists in Genesys Cloud are collections of customer records used primarily in outbound dialing campaigns and customer outreach activities. These lists store information such as phone numbers, email addresses, names, and custom attributes, which can be used by the dialing system to contact customers automatically or by agents to access customer information during interactions.
Contact lists are managed by administrators and integrated with campaign management, dialing systems, and customer engagement workflows, enabling contact centers to efficiently manage outbound communications.
Utilization
| Use Case | Description |
|---|---|
| Outbound dialing campaigns | Contact lists provide customer numbers for dialer campaigns |
| Sales outreach | Sales teams use contact lists to contact potential leads |
| Customer notifications | Organizations notify customers about updates or promotions |
| Customer follow-ups | Agents contact customers regarding service requests |
| Data-driven engagement | Contact lists store attributes used for campaign targeting |
Contact lists help organizations manage large sets of customer contact data used for automated or agent-driven outreach.
Best Practices
| Practice | Reason |
|---|---|
| Keep contact lists updated | Ensures accurate customer information |
| Remove invalid or outdated numbers | Improves dialing efficiency |
| Use custom fields for segmentation | Helps target specific customer groups |
| Follow compliance and privacy regulations | Ensures legal outbound communication |
| Validate contact data before importing | Prevents errors during campaigns |
| Maintain clear naming conventions | Helps administrators identify lists easily |
Example Scenarios
Scenario 1 – Outbound Sales Campaign
Marketing team prepares customer contact list
↓
Administrator uploads contact list to Genesys Cloud
↓
Contact list assigned to outbound campaign
↓
Dialer begins contacting customers
↓
Agents handle live connections
Scenario 2 – Customer Follow-Up Calls
Support team creates follow-up contact list
↓
List includes customers needing additional assistance
↓
Outbound campaign created
↓
Agents contact customers to verify issue resolution
Scenario 3 – Promotional Outreach
Company launches promotional campaign
↓
Contact list includes targeted customers
↓
Outbound dialing campaign initiated
↓
Customers receive promotional calls
Key Benefits
| Benefit | Explanation |
|---|---|
| Centralized customer data | Stores contact information for campaigns |
| Efficient outbound communication | Enables automated dialing and outreach |
| Campaign targeting | Custom fields allow segmentation of contacts |
| Improved agent productivity | Agents have customer information readily available |
| Scalable customer engagement | Supports large outbound contact lists |
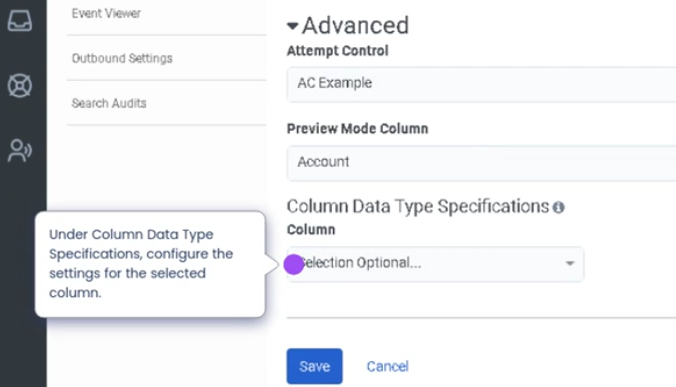
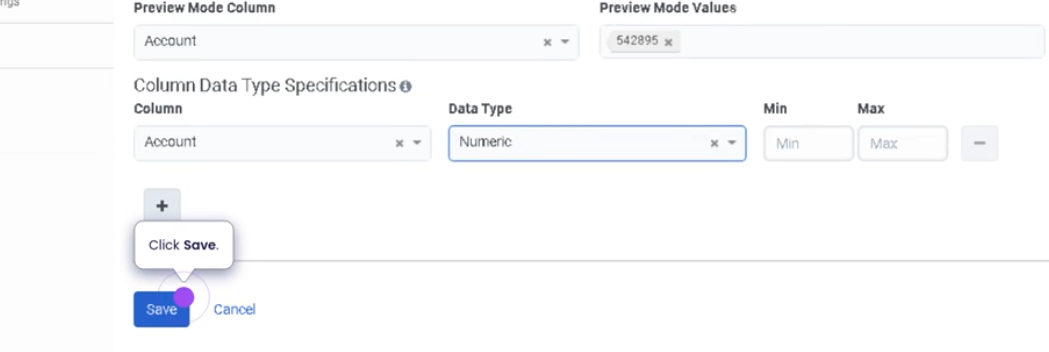
Genesys Cloud - how to - Outbound - Create a set of rules
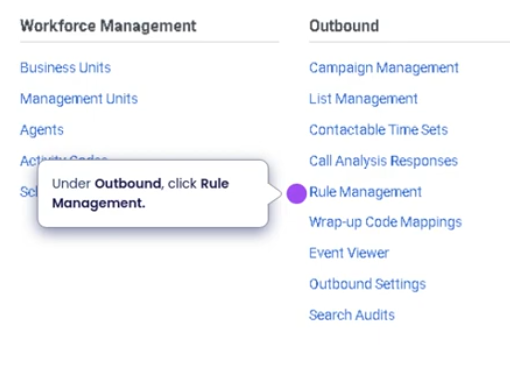
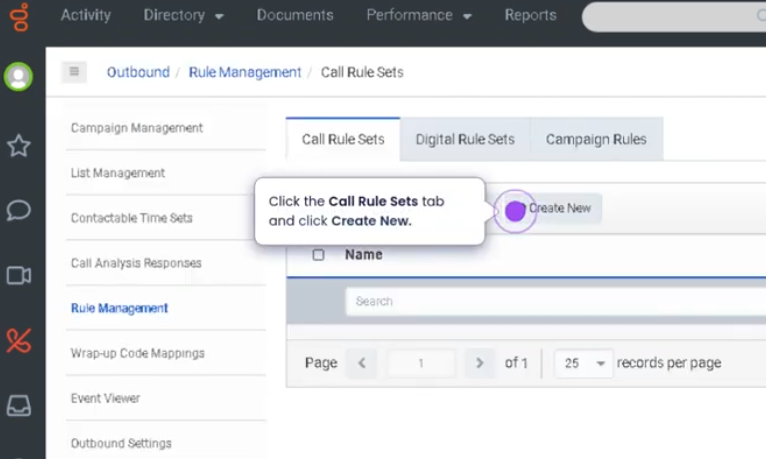
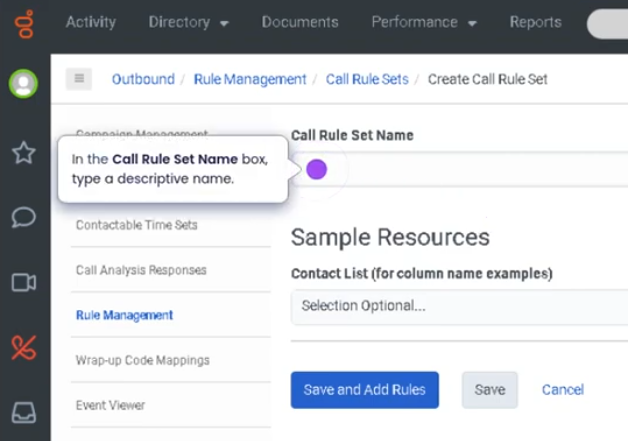
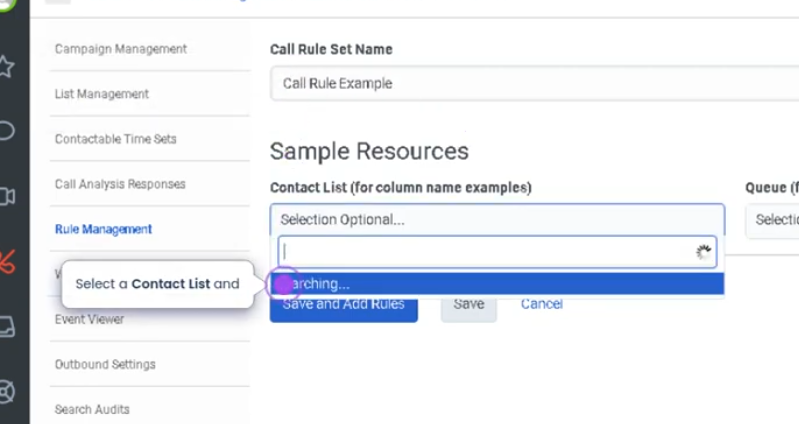
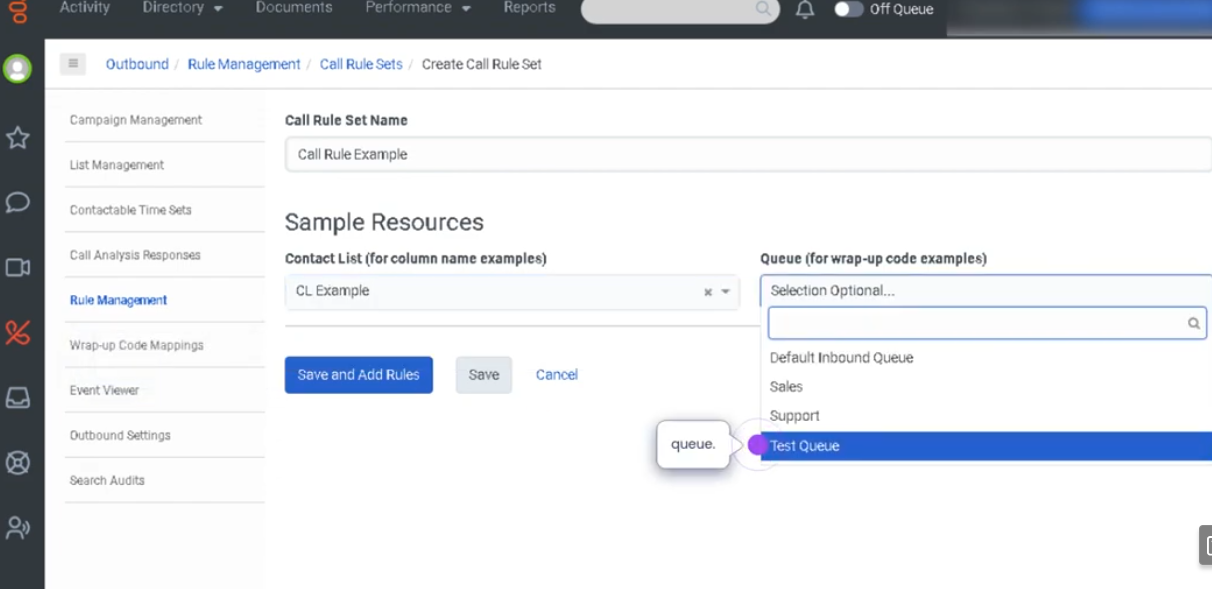
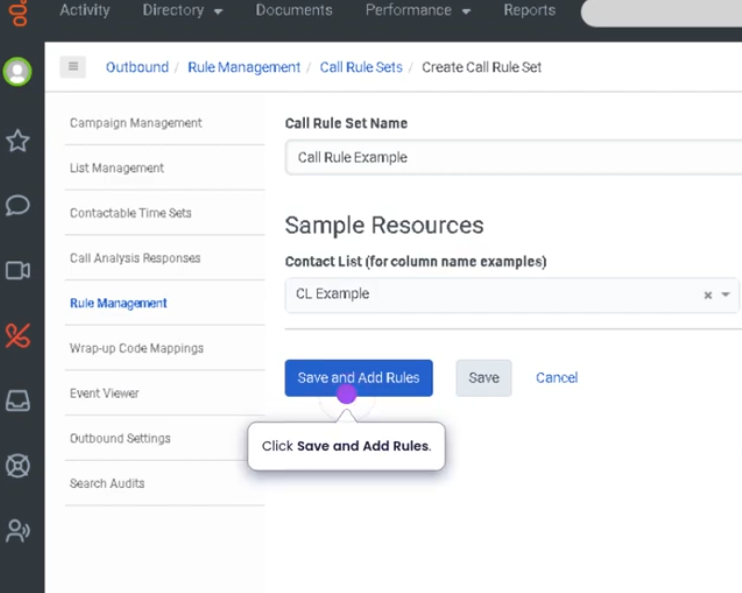
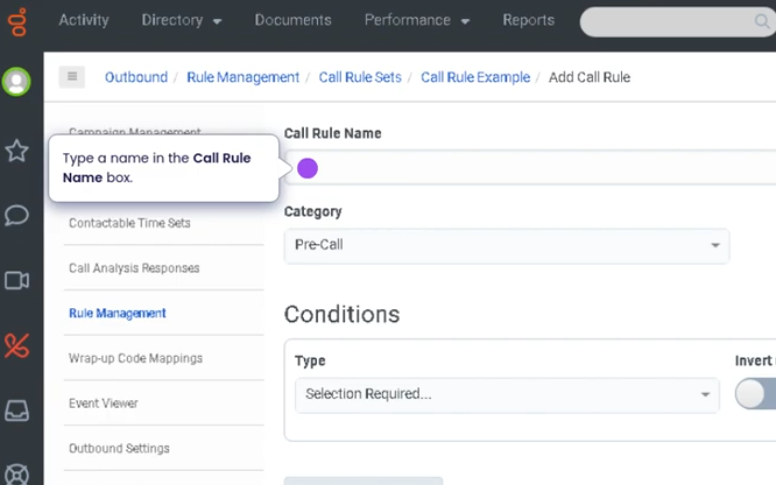
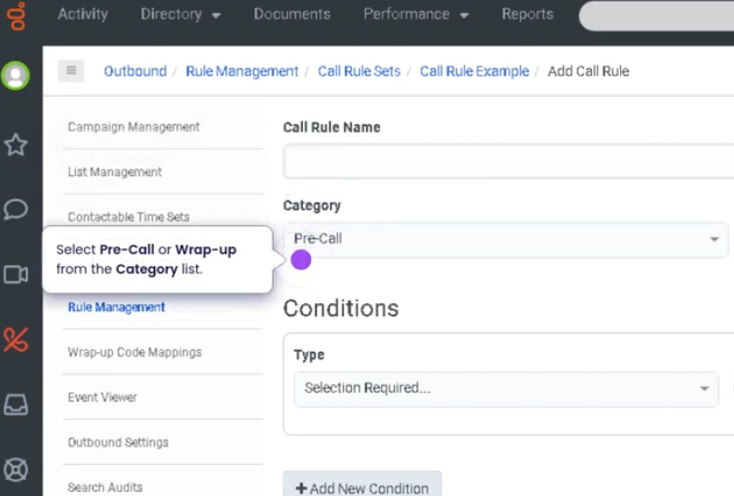


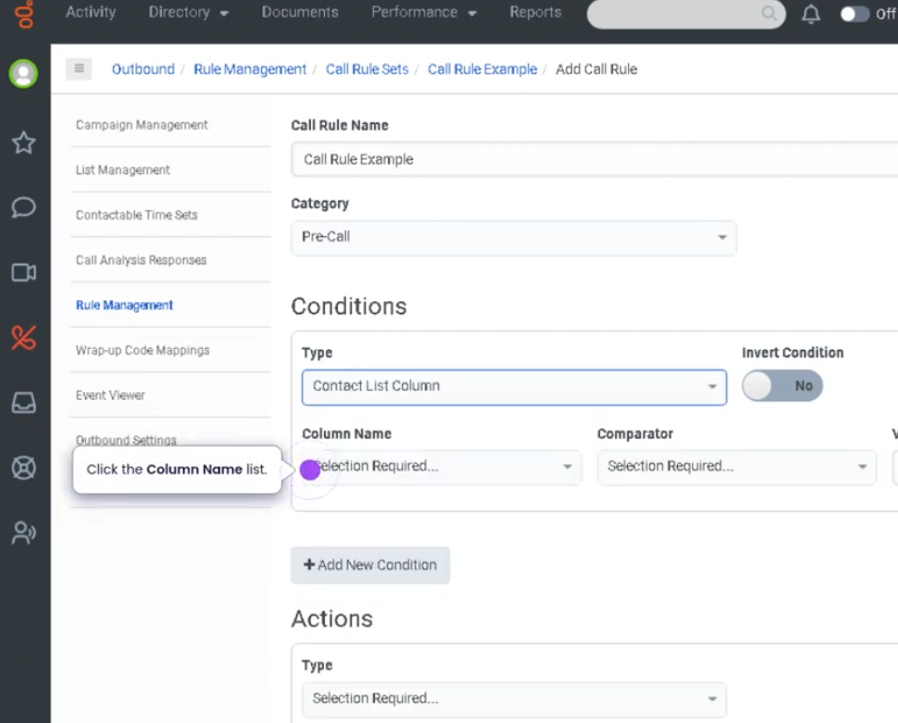
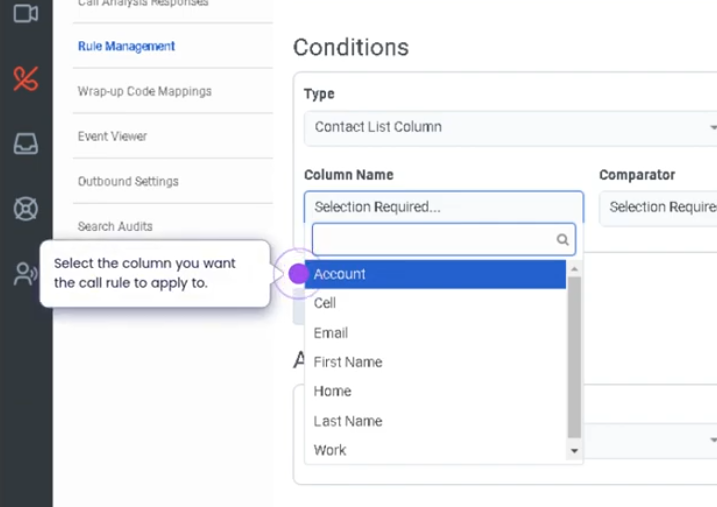
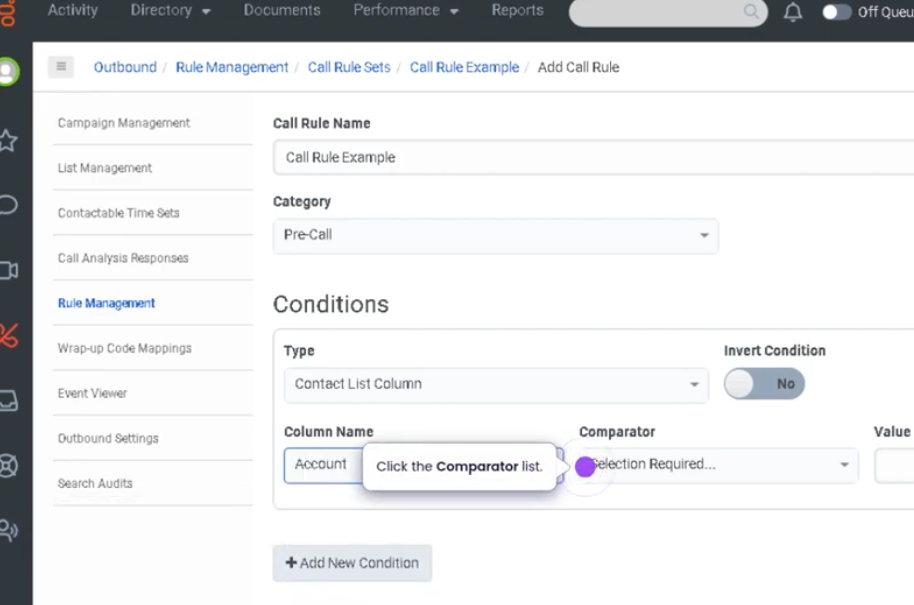
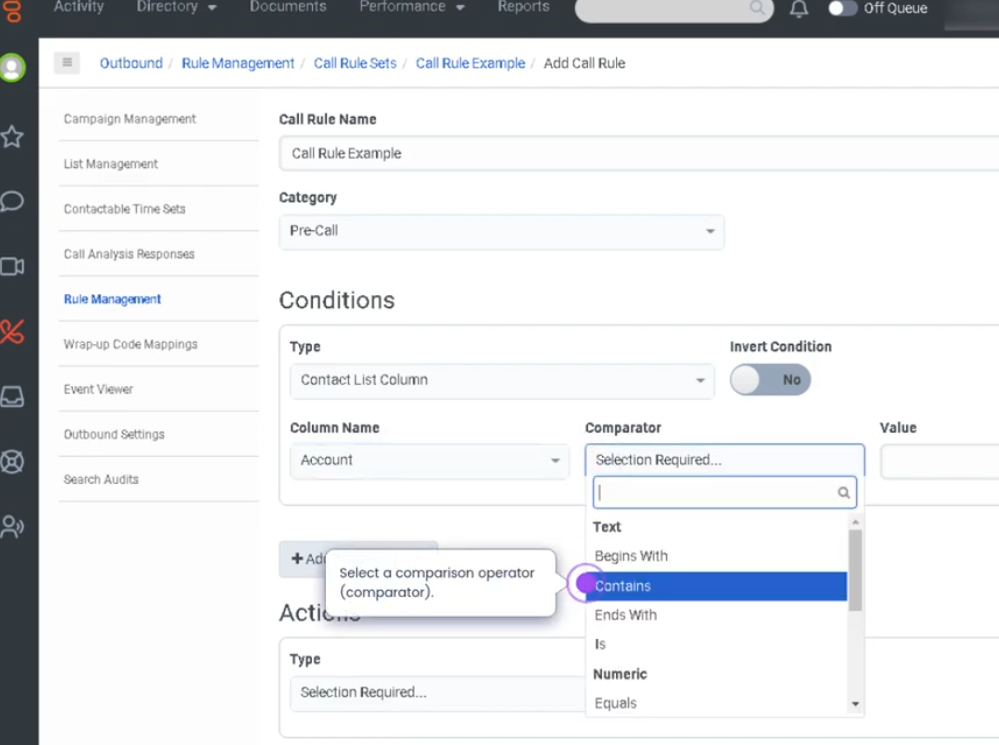
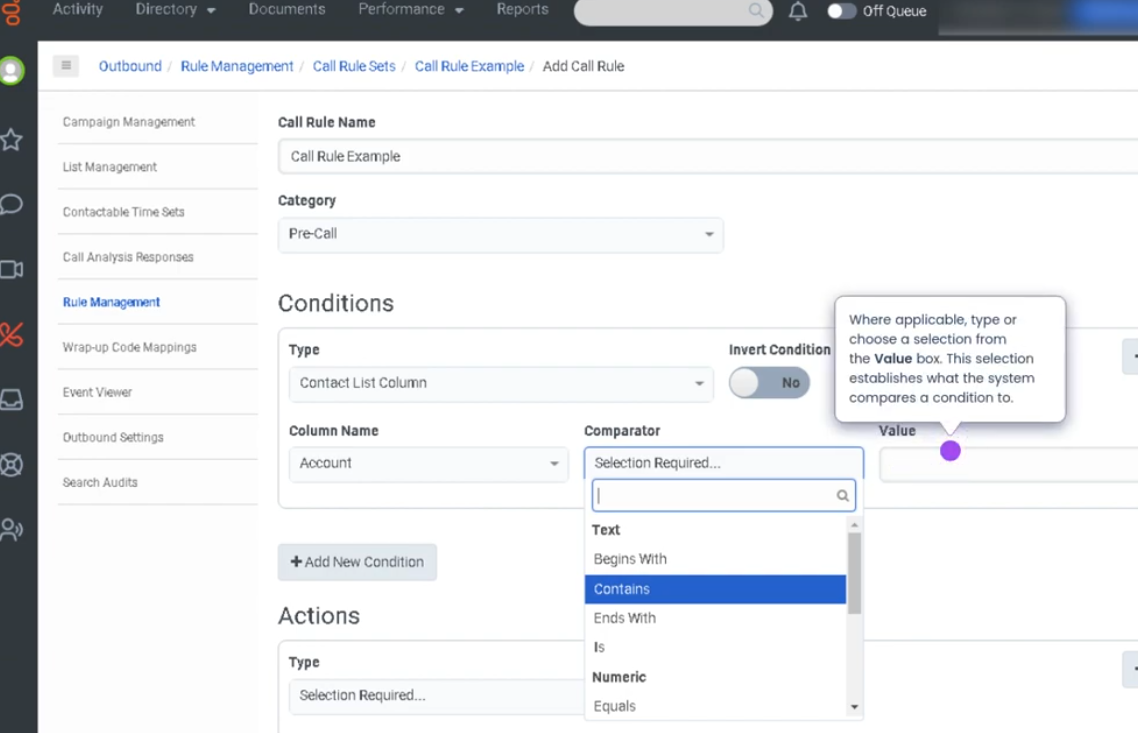
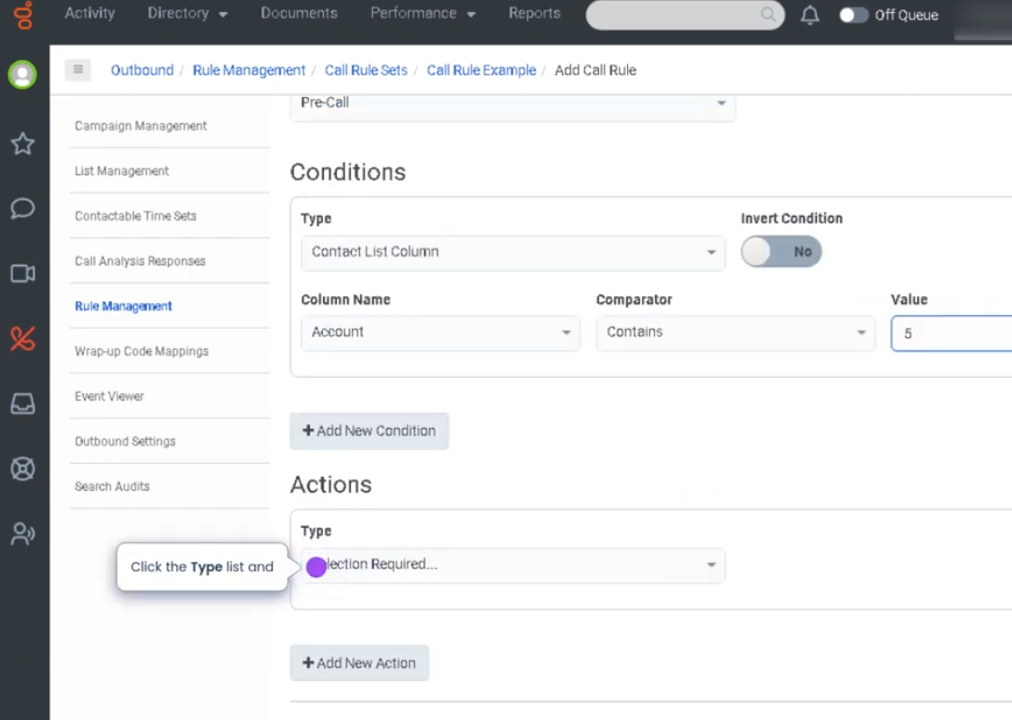
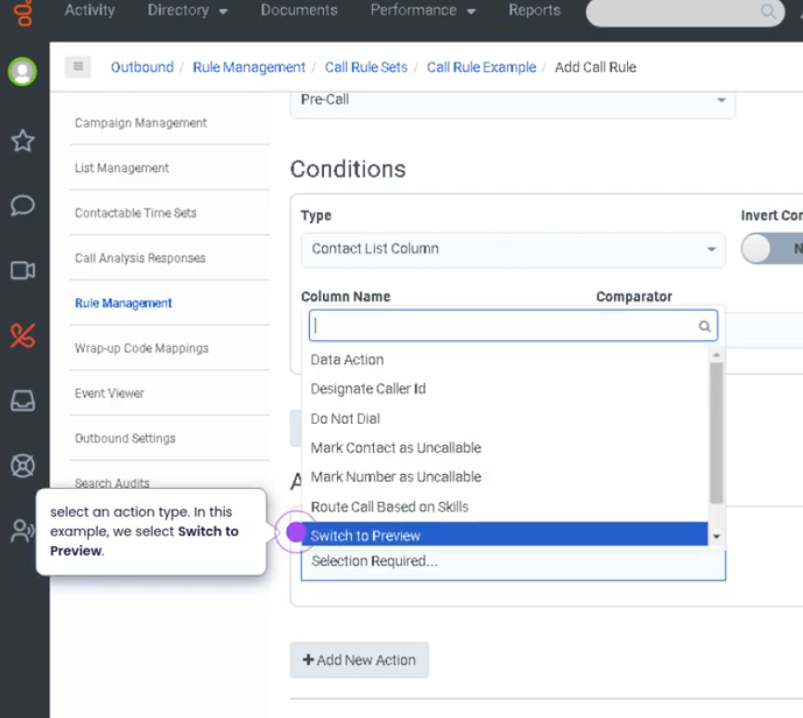
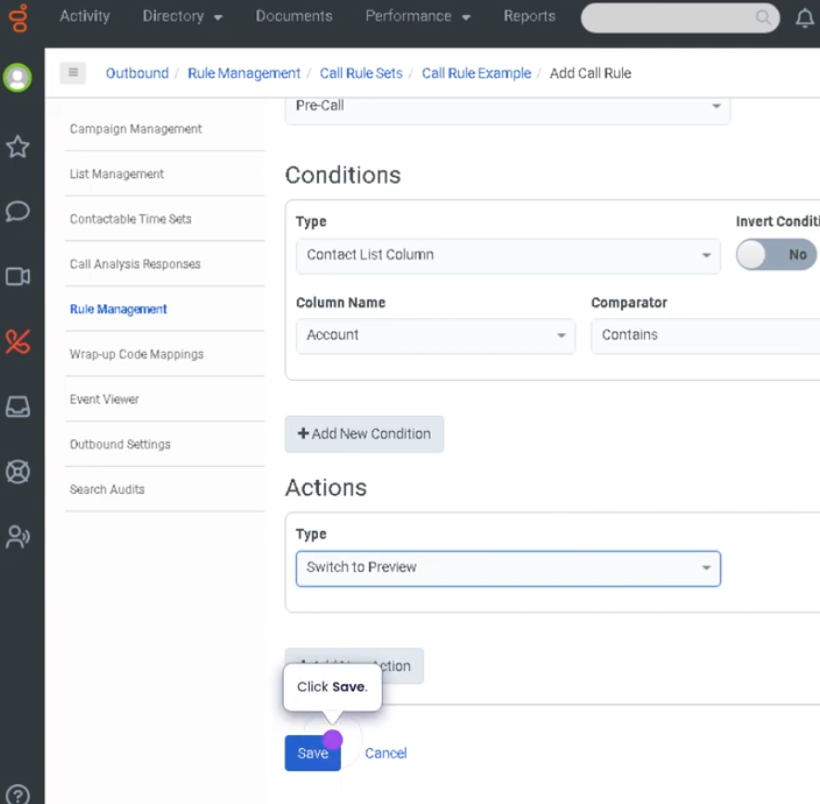
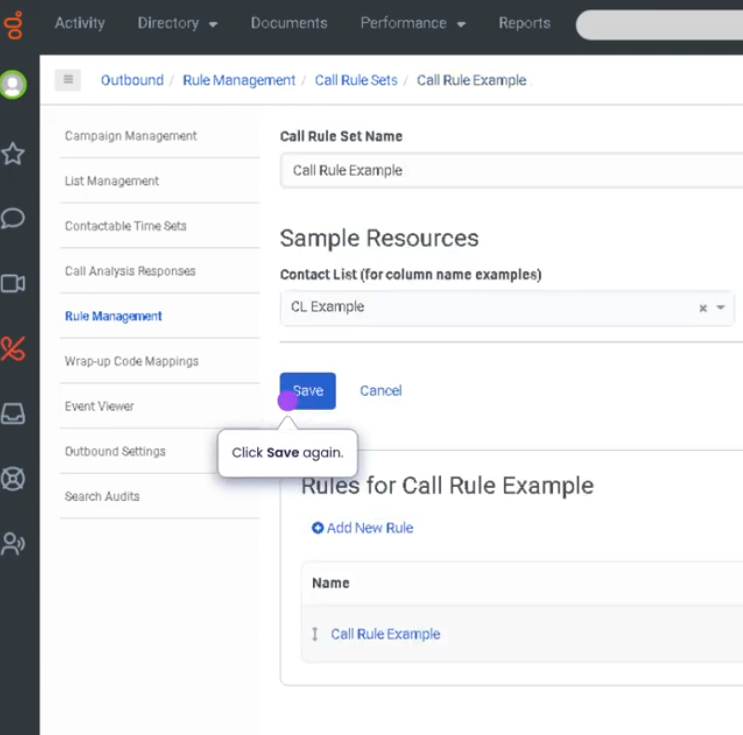
Create a Set of Rules (Genesys Cloud)
Summary
A Set of Rules in Genesys Cloud allows administrators or supervisors to define automated conditions and actions that control how certain platform behaviors occur. These rules can be used in various modules such as routing, dialing campaigns, workforce management, or analytics filters, depending on the feature being configured.
Rule sets help organizations standardize decision logic and automate operational processes, ensuring consistent handling of interactions, contacts, or scheduling conditions without requiring manual intervention.
Utilization
| Use Case | Description |
|---|---|
| Routing logic | Define conditions that determine how interactions are distributed |
| Campaign dialing rules | Control how outbound contacts are handled |
| Workforce management policies | Automate scheduling or shift rules |
| Data filtering | Apply rules for analytics or segmentation |
| Operational automation | Trigger actions based on predefined criteria |
Rule sets help maintain consistent operational behavior across the platform.
Best Practices
| Practice | Reason |
|---|---|
| Clearly define rule conditions | Prevents unintended routing or automation |
| Test rules before deploying to production | Ensures expected outcomes |
| Keep rule logic simple and well documented | Improves troubleshooting and maintenance |
| Avoid overlapping or conflicting rules | Prevents unpredictable behavior |
| Regularly review rule sets | Ensures they remain aligned with operational needs |
| Use descriptive names for rule sets | Makes administration easier |
Example Scenarios
Scenario 1 – Routing Condition for Interactions
Customer interaction enters system
↓
System evaluates configured rule set
↓
Conditions match routing criteria
↓
Interaction routed to appropriate queue
Scenario 2 – Outbound Campaign Rule
Outbound campaign starts
↓
Dialer reviews rule set
↓
Conditions determine which contacts can be dialed
↓
Dialer proceeds with eligible contacts
Scenario 3 – Automated Operational Behavior
System detects defined condition
↓
Rule set triggers predefined action
↓
Platform applies routing or configuration behavior
Key Benefits
| Benefit | Explanation |
|---|---|
| Automation of processes | Reduces manual intervention |
| Consistent system behavior | Rules enforce standardized logic |
| Operational efficiency | Improves routing and campaign management |
| Scalability | Supports large-scale contact center operations |
| Improved control | Administrators can manage platform behavior through rules |
Genesys Cloud - How to - Contact Center - Create widget for web chat

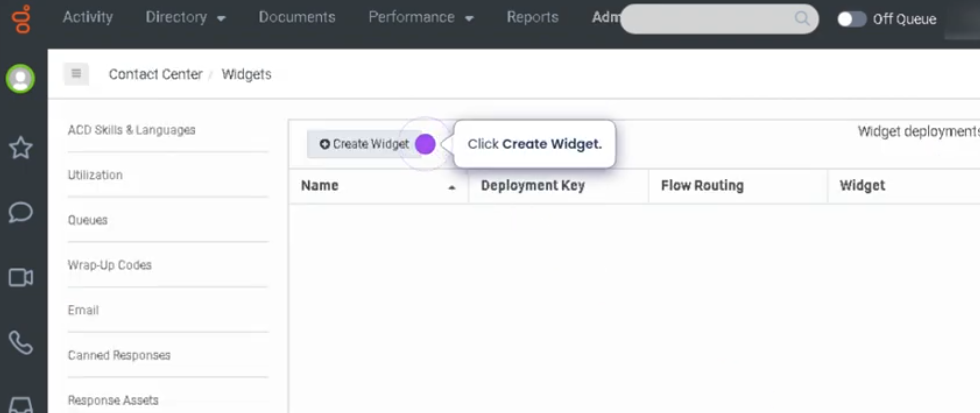
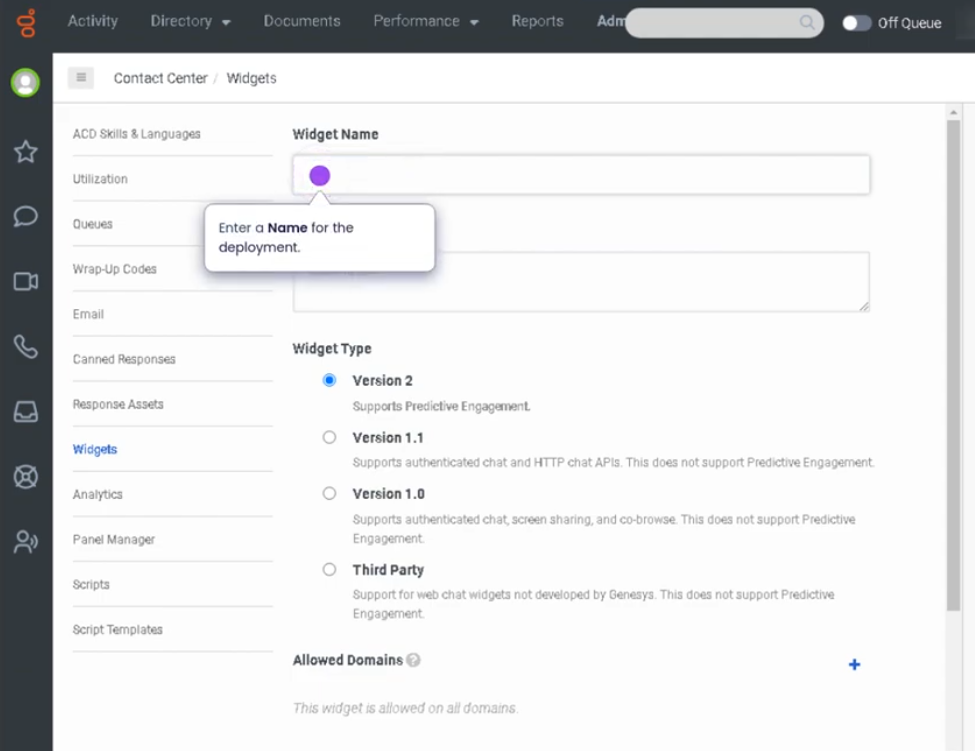
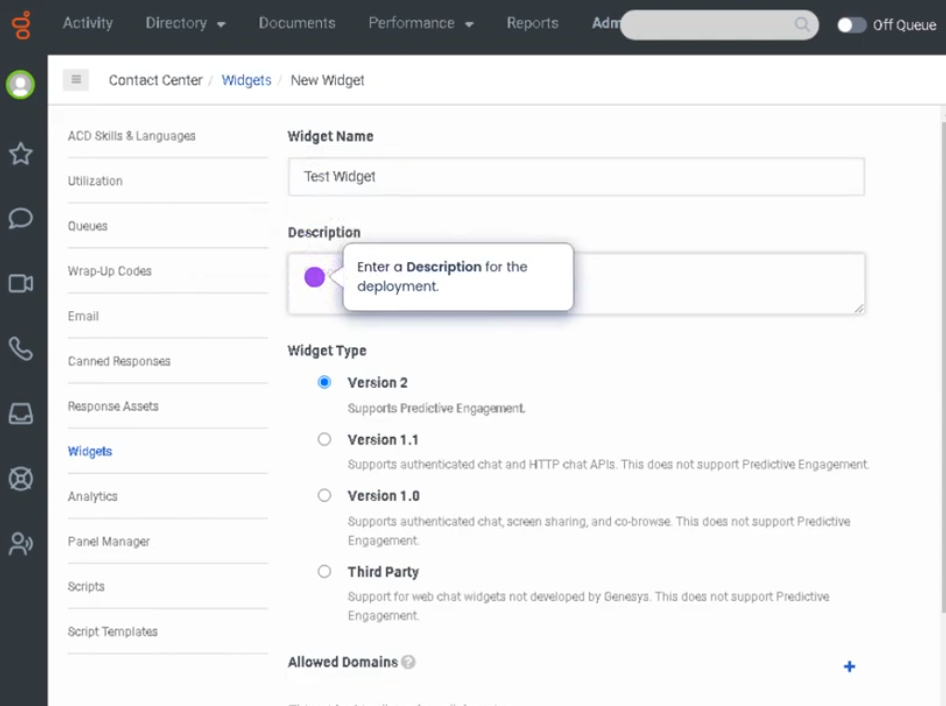
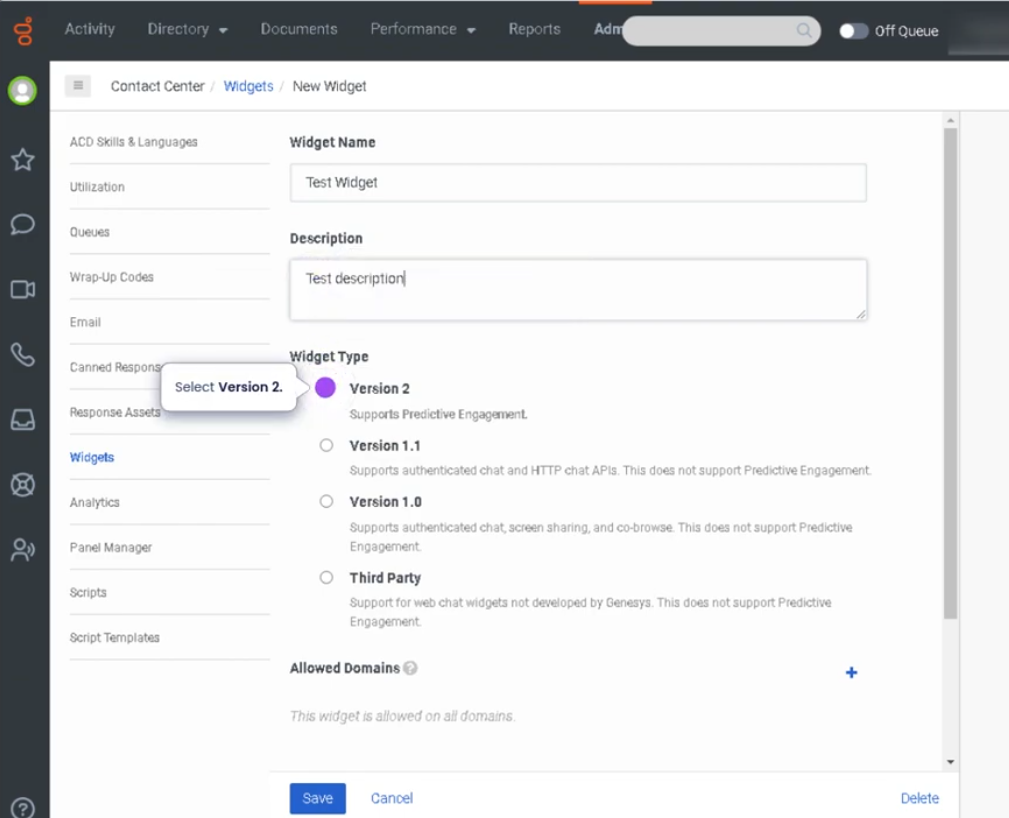
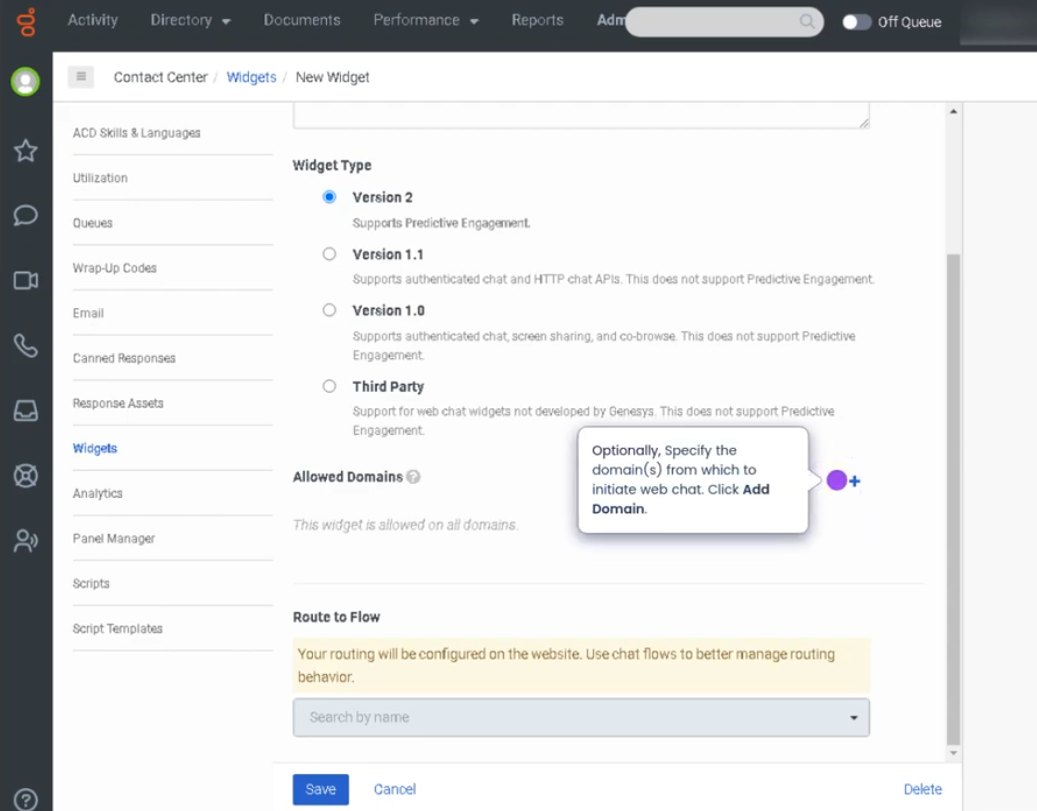
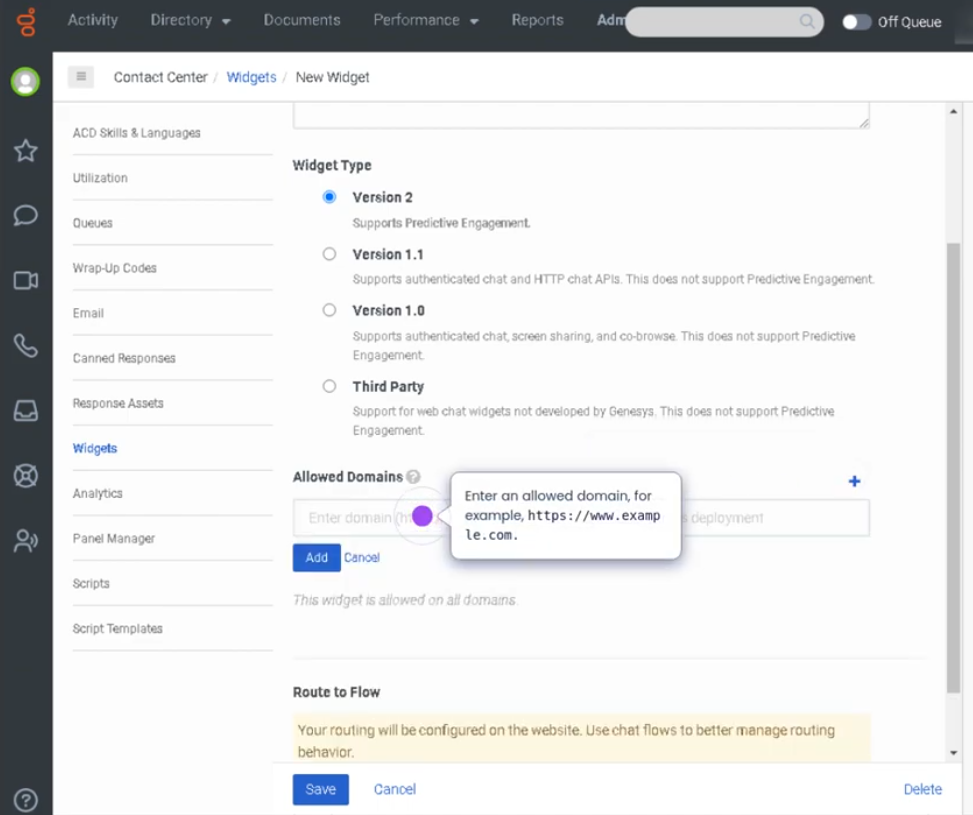
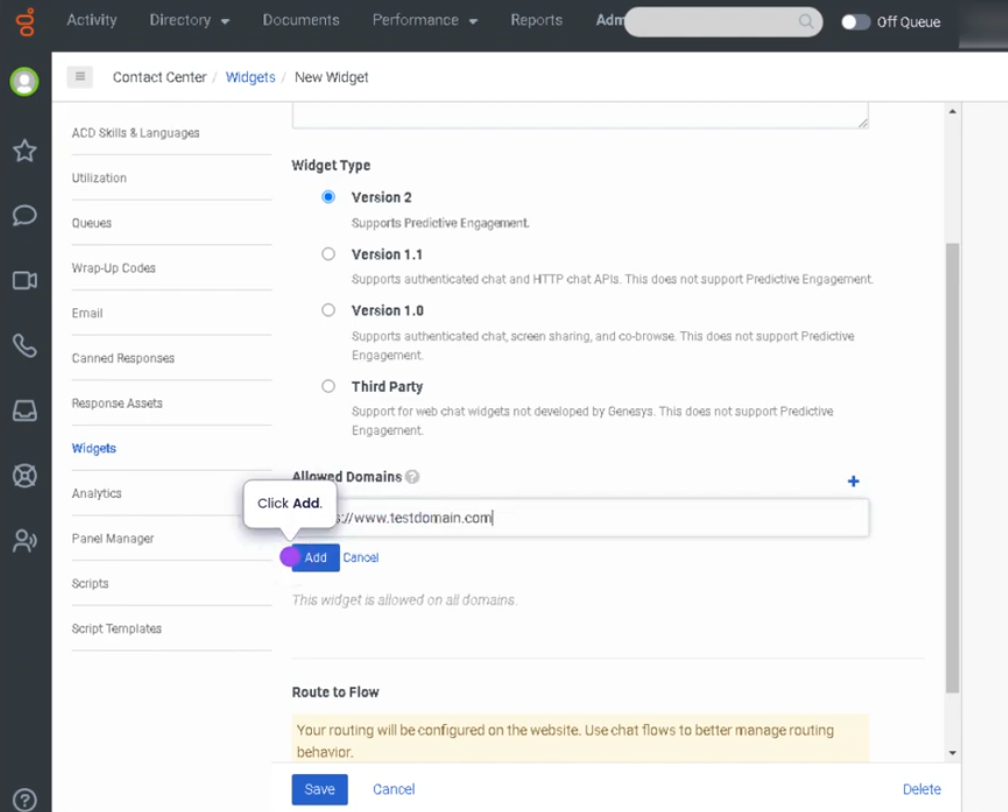
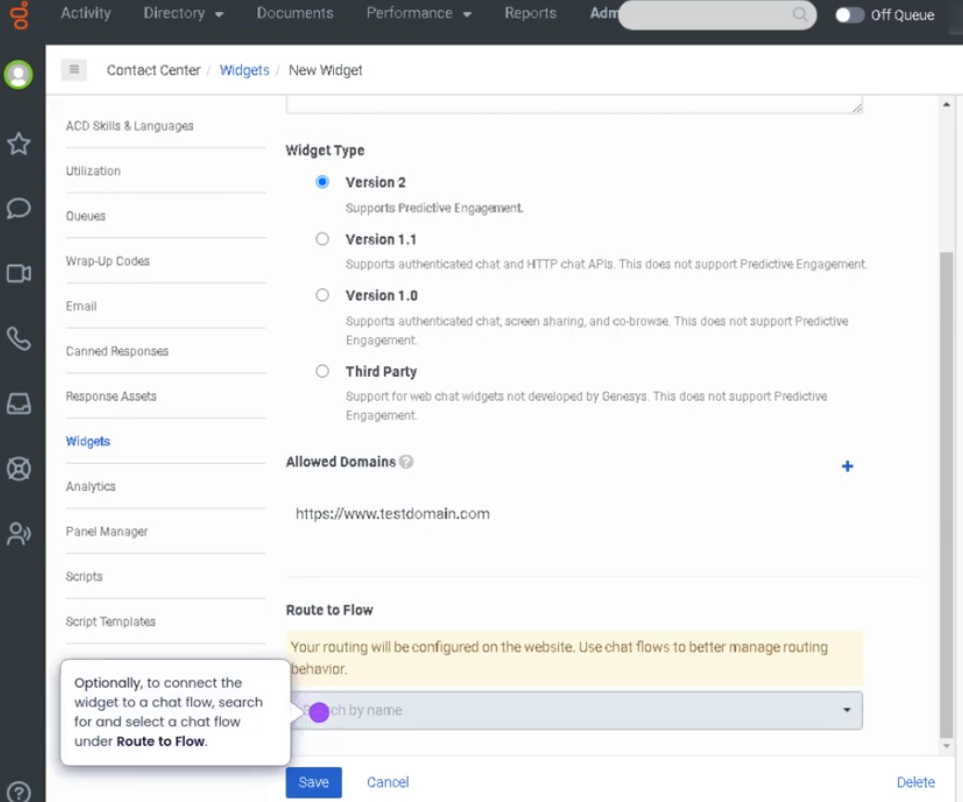
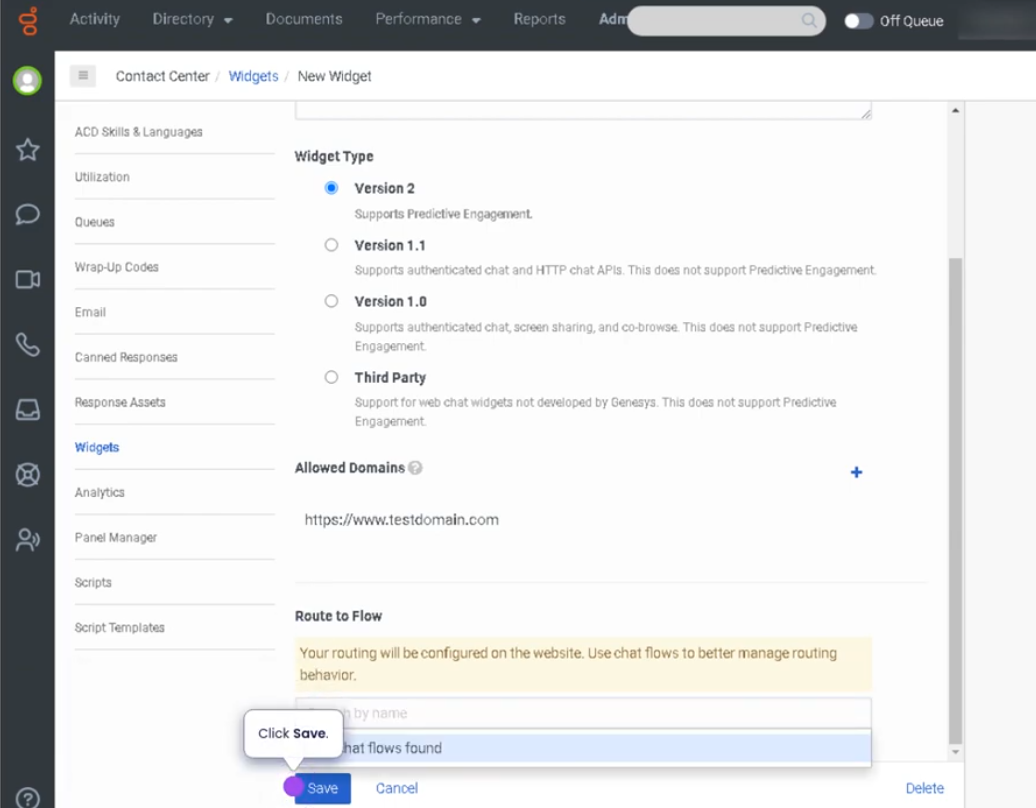
Create a Widget for Web Chat (Genesys Cloud)
Summary
Creating a Web Chat Widget in Genesys Cloud allows organizations to embed a chat interface on their website so customers can communicate directly with support agents. The widget provides a simple way for visitors to start a conversation with the contact center without making a phone call.
Once configured, the widget connects to Genesys Cloud chat flows and queues, allowing interactions to be routed through the ACD (Automatic Contact Distribution) system. Customers initiate chat from the website, and agents handle the interaction within the Agent Workspace.
Utilization
| Use Case | Description |
|---|---|
| Website customer support | Customers can chat with agents directly from a website |
| Pre-sales assistance | Sales teams assist customers browsing products or services |
| Technical support | Users receive help with troubleshooting or product questions |
| Customer engagement | Organizations offer real-time help during online sessions |
| Omnichannel support | Chat integrates with other interaction channels such as voice, email, and messaging |
Web chat widgets provide a convenient and accessible way for customers to communicate with support teams in real time.
Best Practices
| Practice | Reason |
|---|---|
| Customize the widget to match brand design | Provides a consistent user experience |
| Configure proper chat routing to queues | Ensures chats reach the correct team |
| Use pre-chat forms when necessary | Collects useful information before starting the conversation |
| Set clear business hours for chat availability | Prevents customer frustration when agents are unavailable |
| Test the widget before publishing on the website | Ensures proper functionality and routing |
| Monitor chat performance metrics | Helps improve response times and service quality |
Example Scenarios
Scenario 1 – Customer Initiates Web Chat
Customer visits company website
↓
Customer clicks chat widget
↓
Chat session starts
↓
Chat interaction routed to support queue
↓
Agent accepts and responds
Scenario 2 – Pre-Chat Information Collection
Customer opens chat widget
↓
Pre-chat form asks for name and issue
↓
Customer submits form
↓
Interaction routed to appropriate queue
↓
Agent begins conversation with context
Scenario 3 – Website Sales Assistance
Customer browsing product page
↓
Customer opens chat widget
↓
Customer asks product questions
↓
Agent provides information and guidance
Key Benefits
| Benefit | Explanation |
|---|---|
| Real-time customer support | Customers receive immediate assistance |
| Improved customer engagement | Website visitors can easily contact support |
| Omnichannel integration | Chat interactions integrate with Genesys Cloud routing |
| Efficient interaction handling | Agents manage chats alongside other channels |
| Enhanced customer experience | Reduces friction compared to phone support |
Genesys Cloud - How to - Contact Center - Canned responses
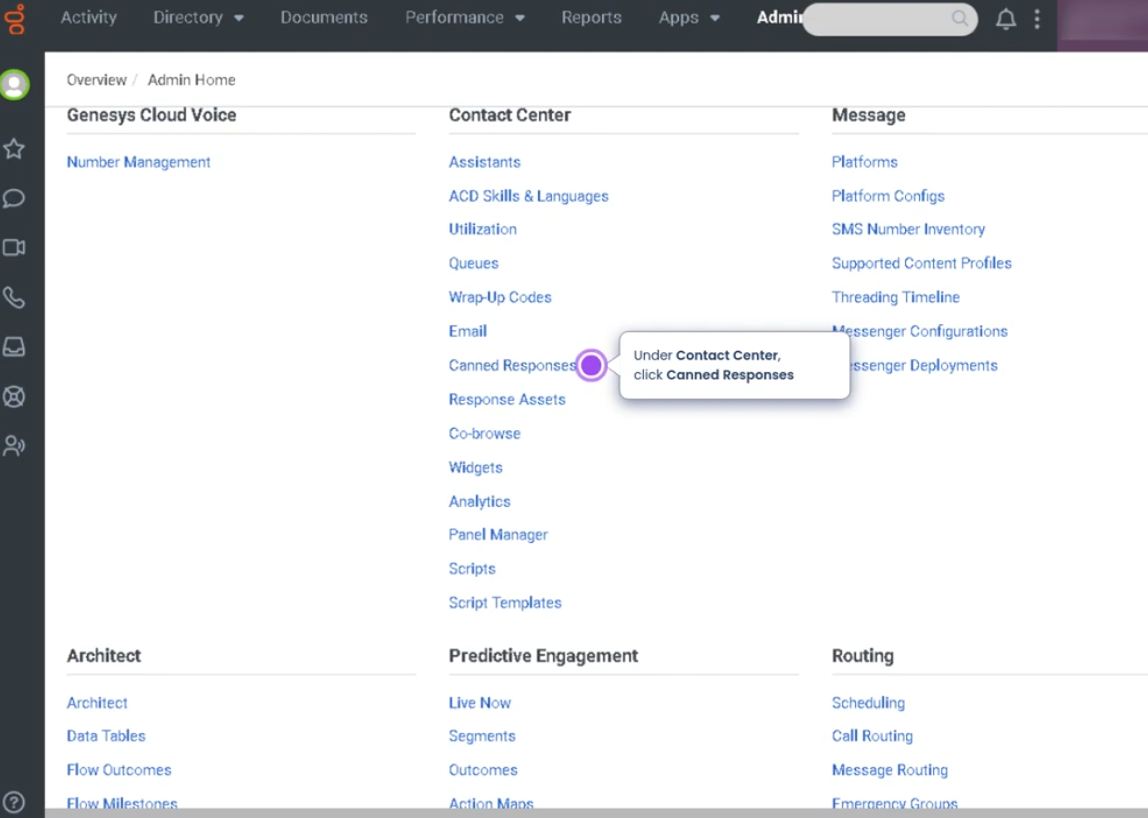
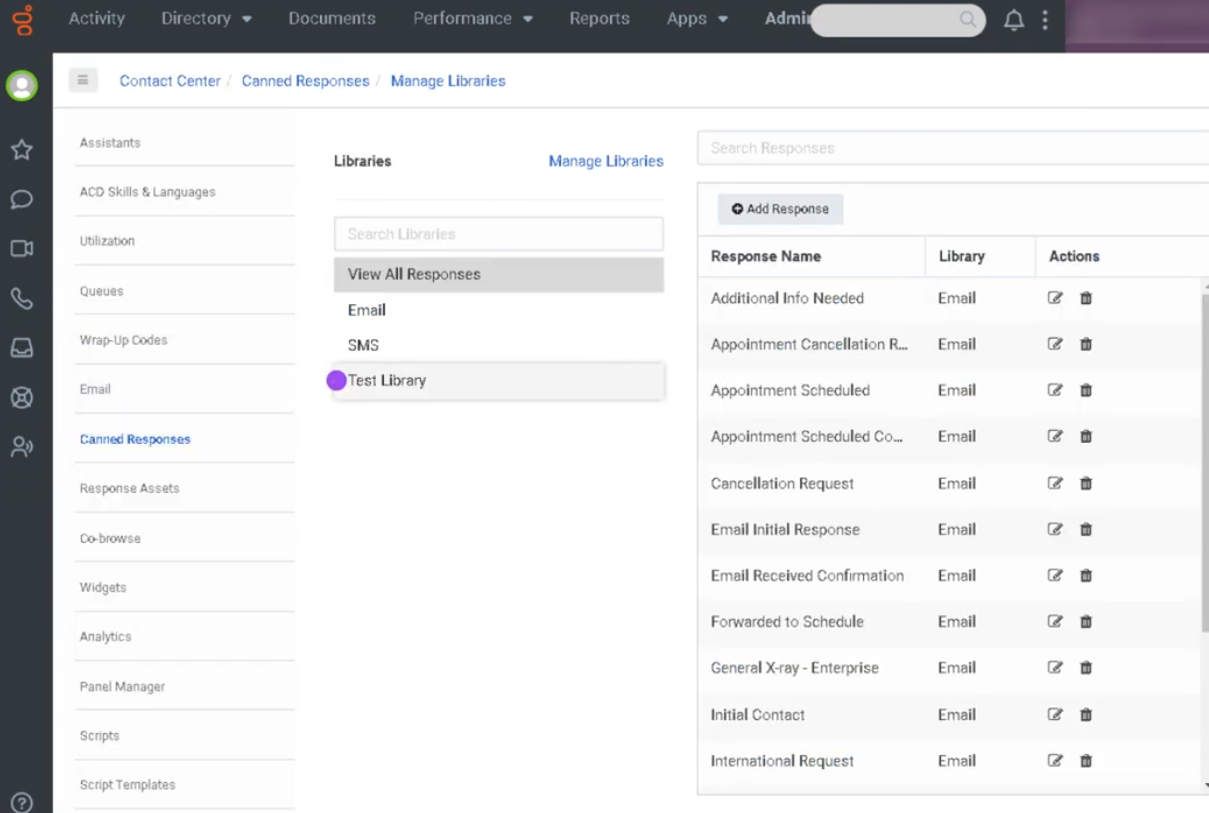
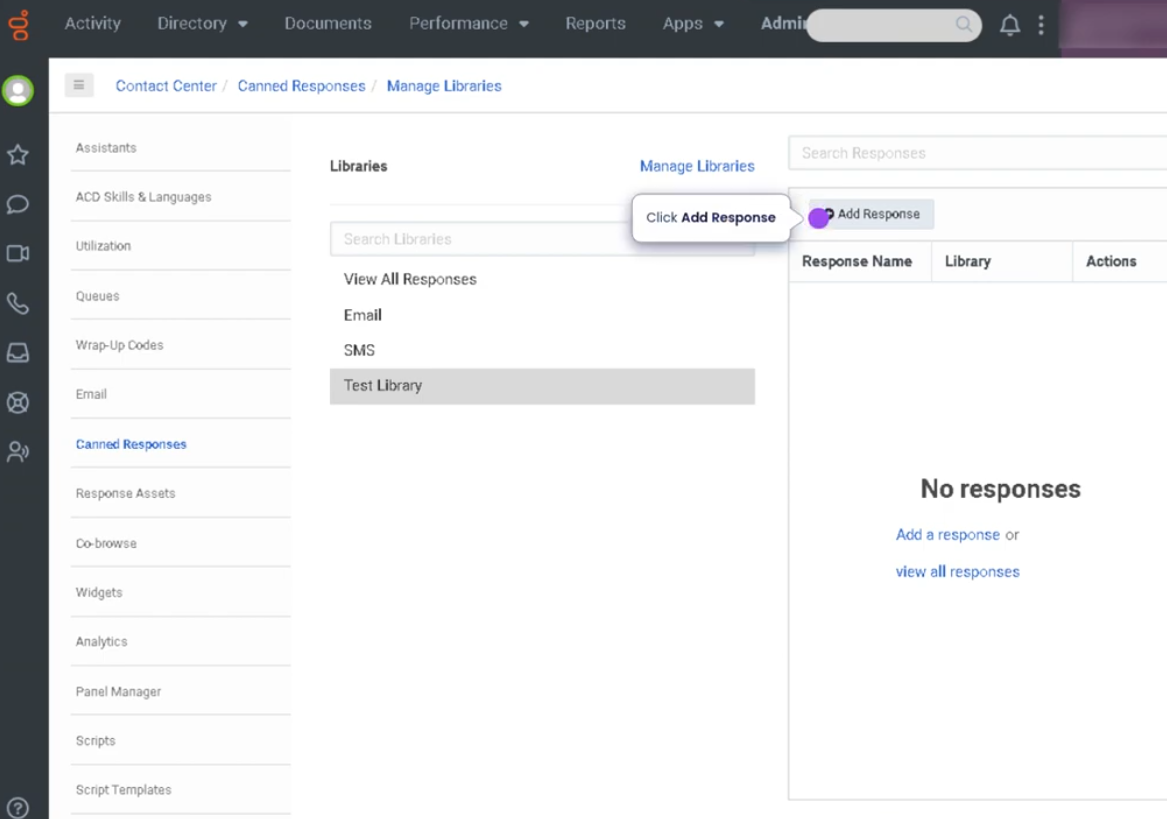
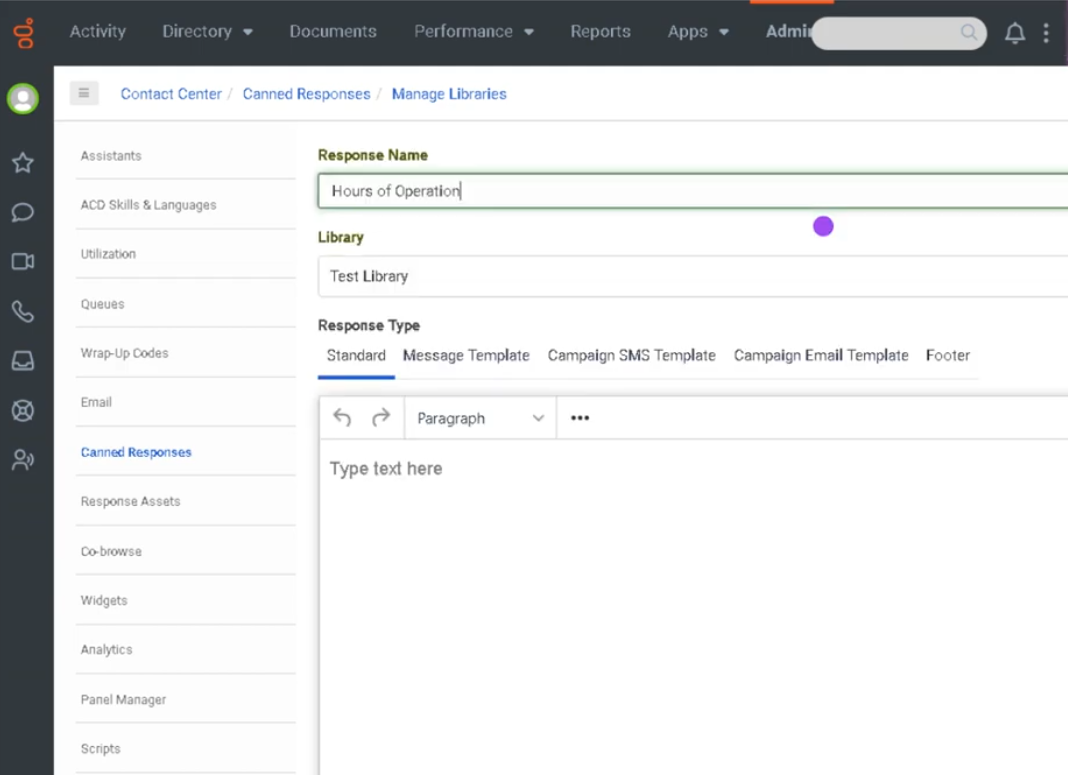
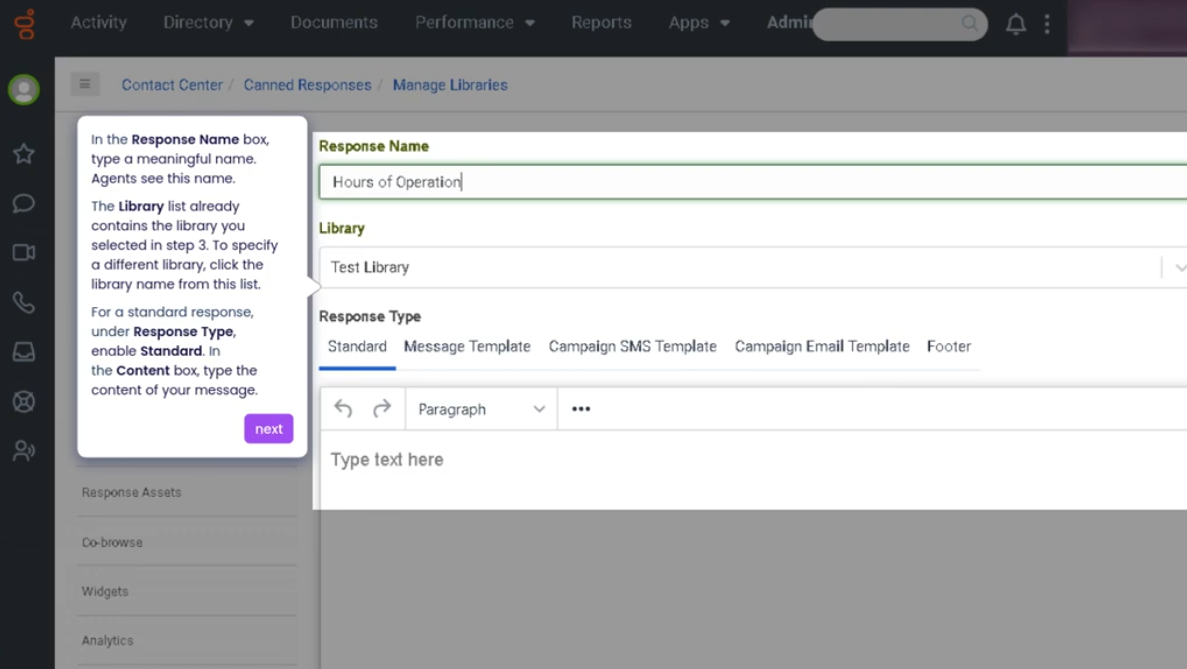
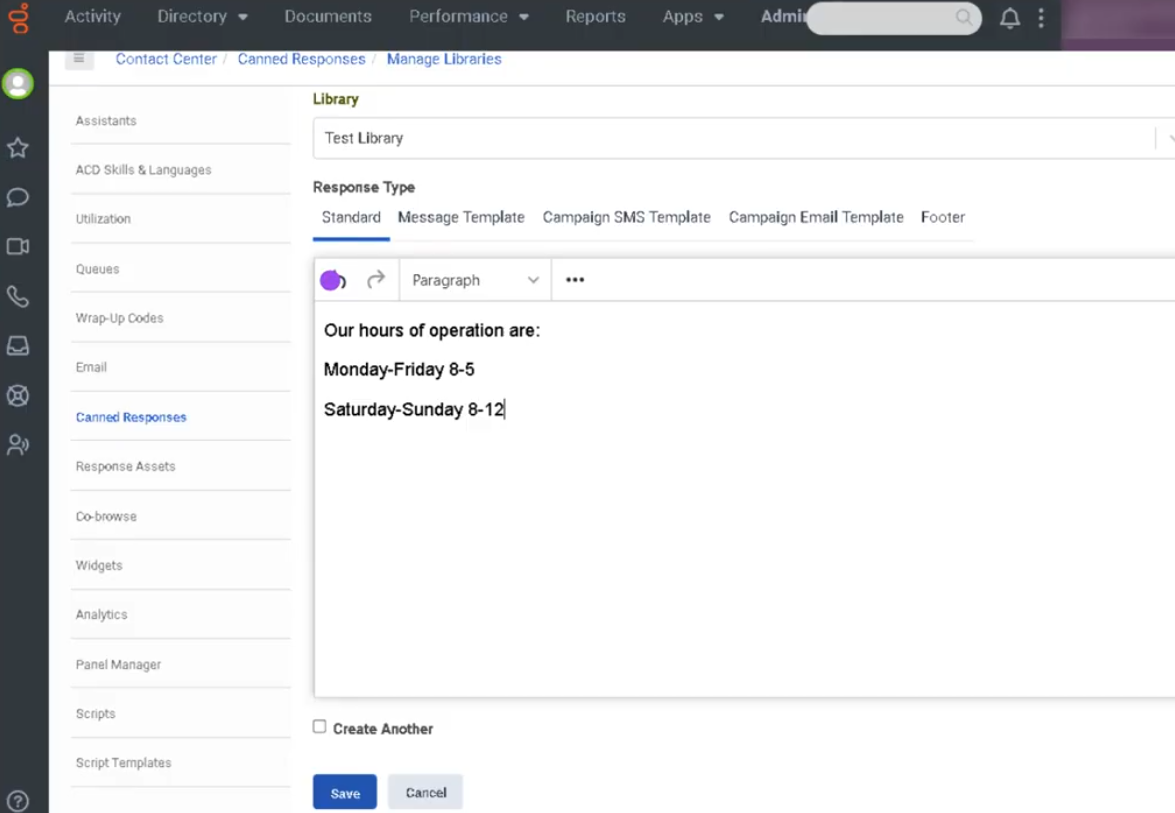
Canned Responses (Genesys Cloud)
Summary
Canned Responses in Genesys Cloud are prewritten message templates that agents can quickly insert into conversations across digital channels such as chat, email, SMS, and social messaging. They are designed to help agents respond faster while maintaining consistent messaging aligned with company policies and support guidelines.
Canned responses are typically organized into categories and can include placeholders for personalization (for example, customer name or case details). Agents can search, select, and edit these responses before sending them to customers.
Utilization
| Use Case | Description |
|---|---|
| Frequently asked questions | Provide quick answers to common inquiries |
| Standard greetings | Use consistent opening messages when starting interactions |
| Troubleshooting guidance | Deliver step-by-step instructions to customers |
| Policy explanations | Share approved company policies or procedures |
| Closing messages | Send consistent closing statements when interactions end |
Canned responses help agents reduce response time and maintain consistent communication across customer interactions.
Best Practices
| Practice | Reason |
|---|---|
| Keep responses concise and easy to read | Customers should quickly understand the message |
| Organize responses into categories | Helps agents locate the correct response quickly |
| Personalize responses when needed | Prevents interactions from feeling automated |
| Regularly review and update templates | Ensures information remains accurate |
| Avoid sending canned responses without context | Improves customer satisfaction |
| Train agents on when to use them | Ensures they enhance rather than replace proper communication |
Example Scenarios
Scenario 1 – Responding to a Common Question
Customer asks a frequently asked question
↓
Agent searches canned response library
↓
Agent selects appropriate response
↓
Agent reviews and personalizes message
↓
Agent sends response to customer
Scenario 2 – Troubleshooting Assistance
Customer reports technical issue
↓
Agent selects troubleshooting canned response
↓
Response provides step-by-step instructions
↓
Customer follows instructions to resolve issue
Scenario 3 – Closing an Interaction
Agent resolves customer's issue
↓
Agent selects closing canned response
↓
Agent sends professional closing message
↓
Interaction ends with consistent communication
Key Benefits
| Benefit | Explanation |
|---|---|
| Faster response times | Agents can reply quickly without typing repetitive information |
| Consistent messaging | Ensures customers receive standardized responses |
| Improved agent efficiency | Reduces time spent composing messages |
| Knowledge sharing | Centralized repository of approved responses |
| Better customer experience | Clear and consistent communication |
Genesys Cloud - How to - Outbound - Contact Lists Filters
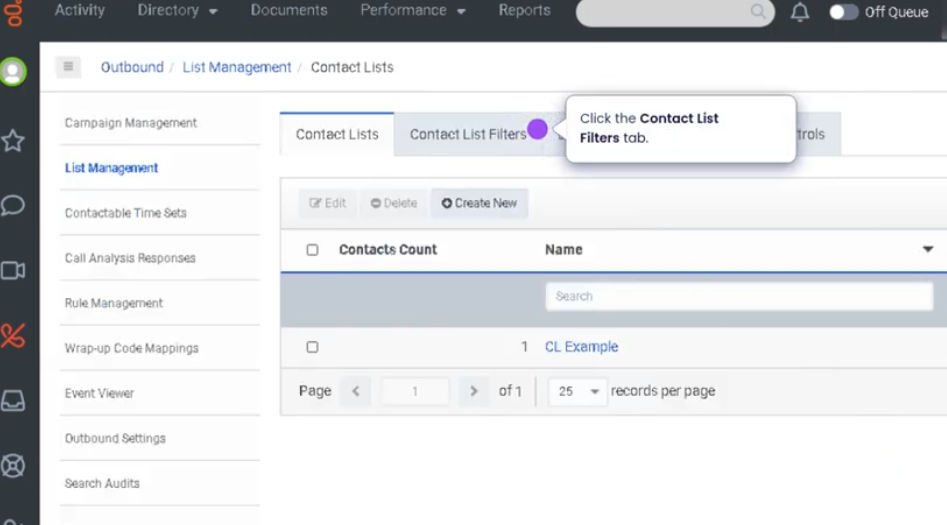
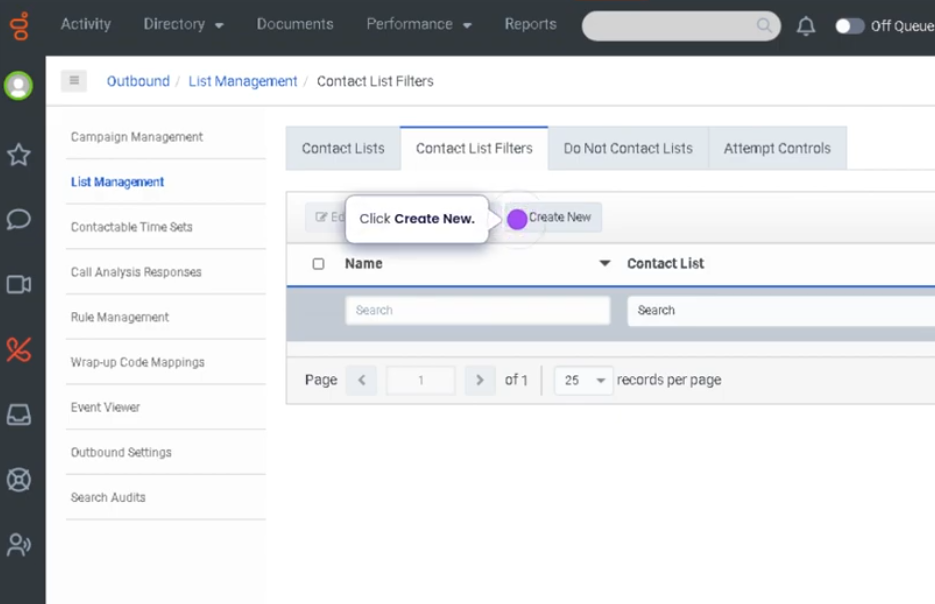
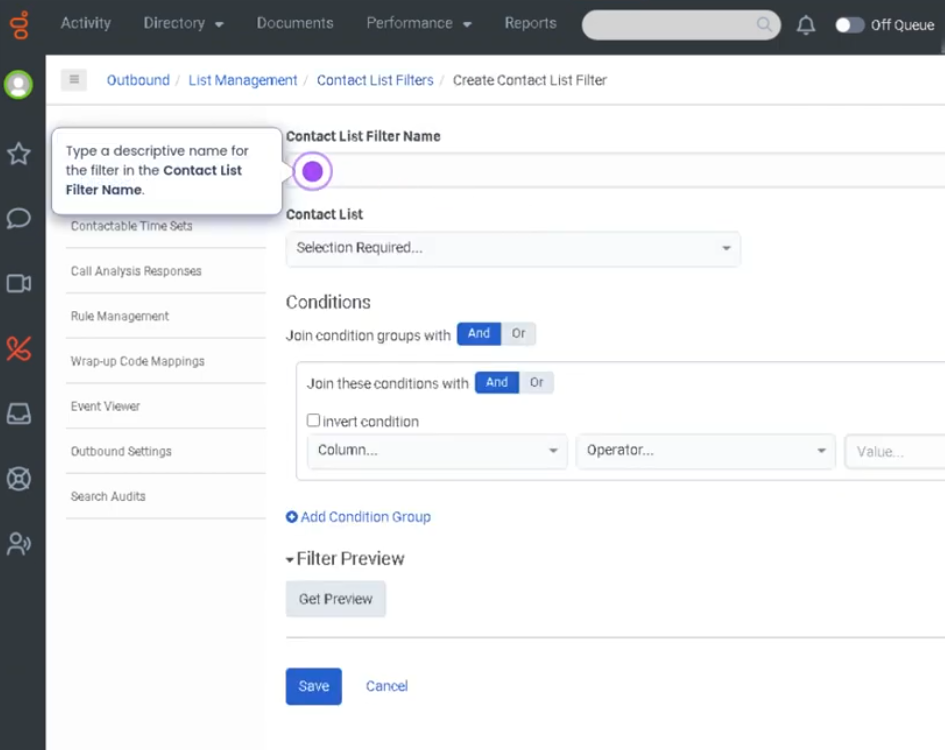
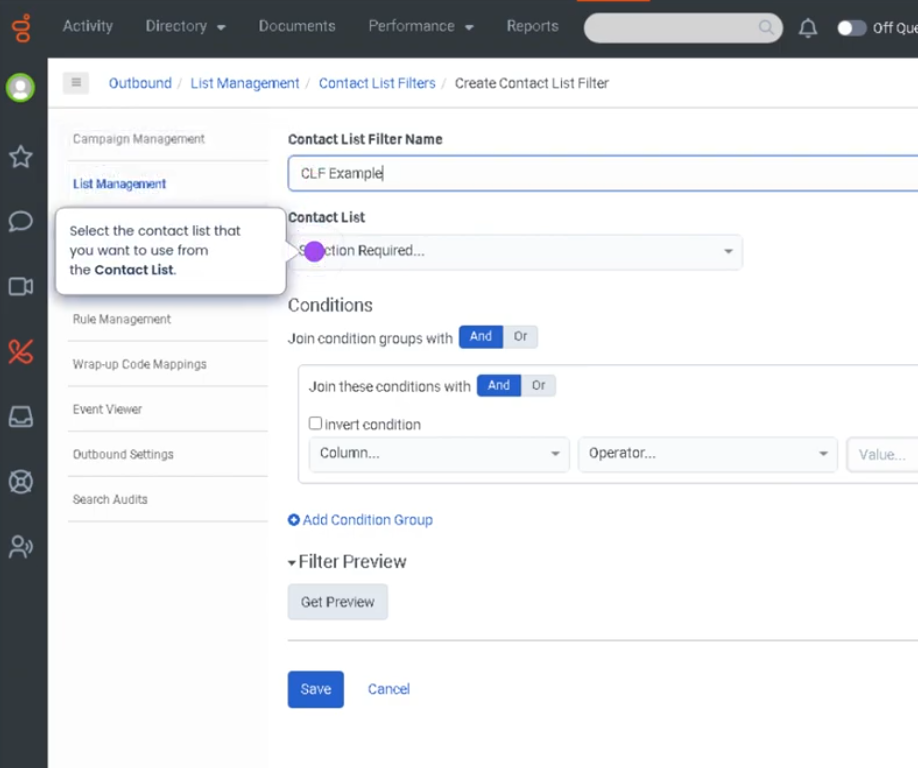
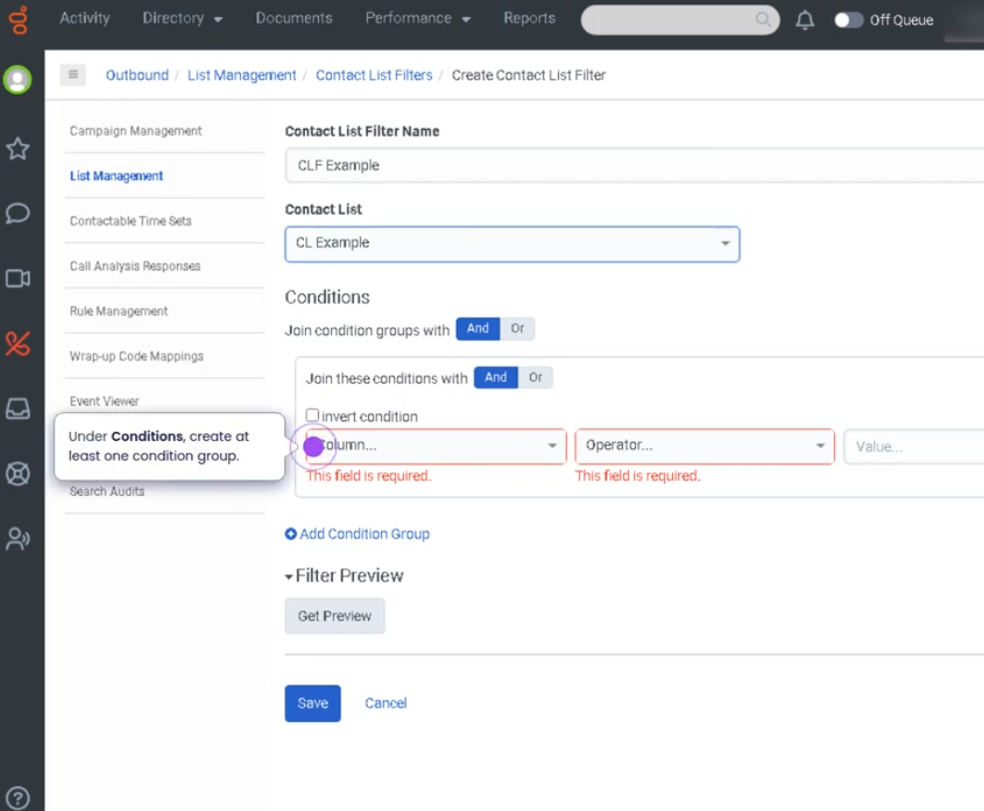
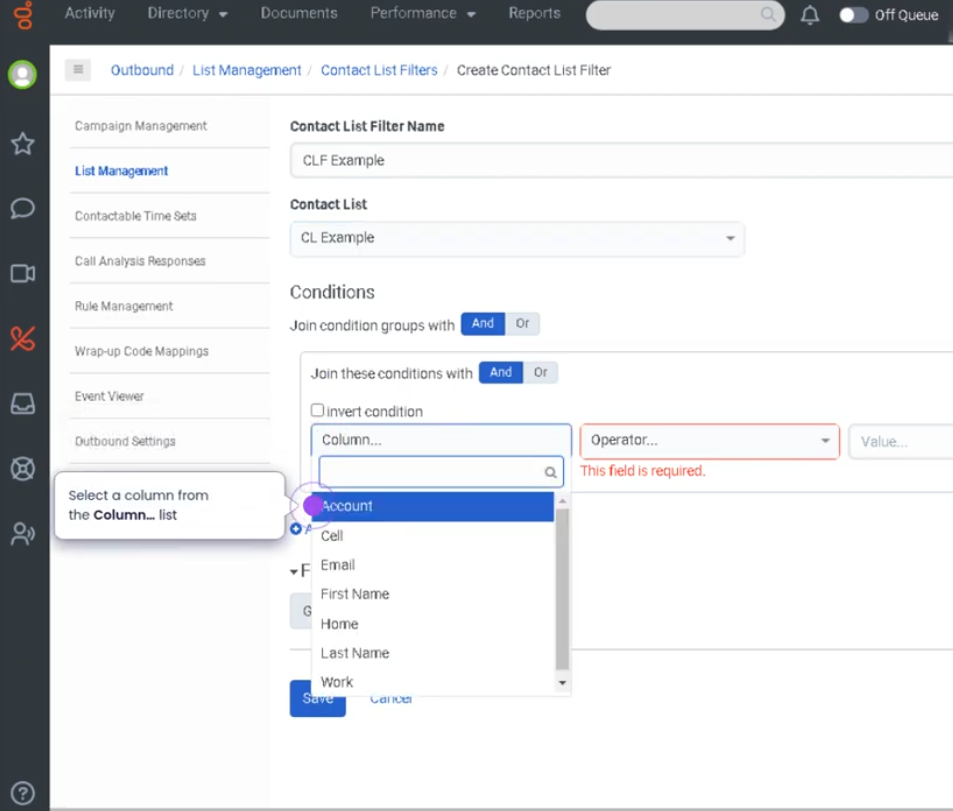
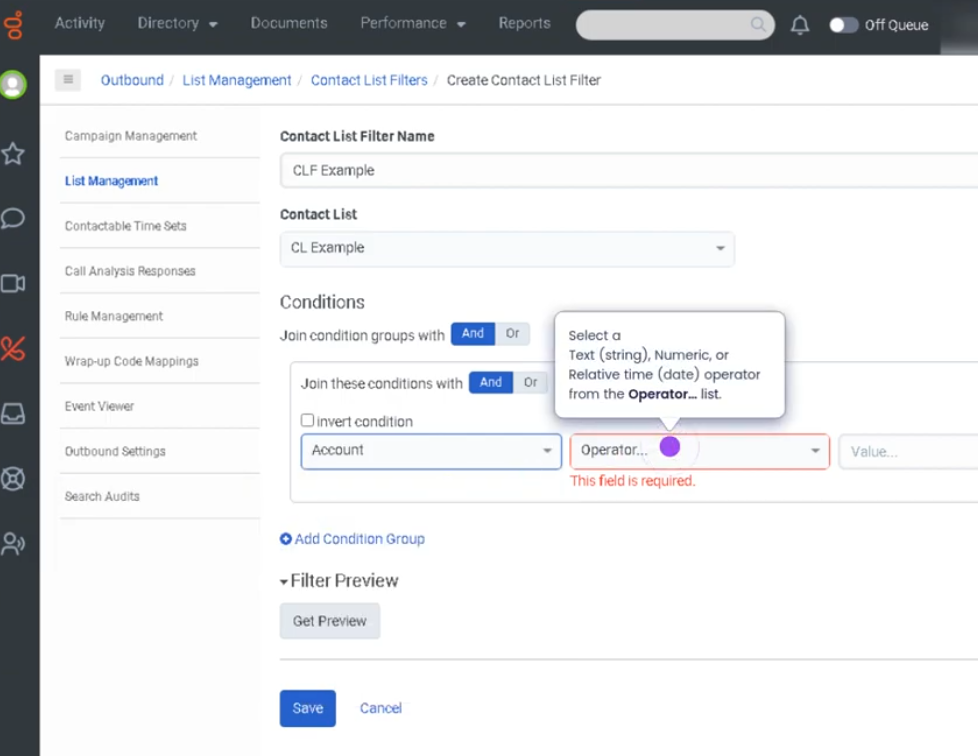
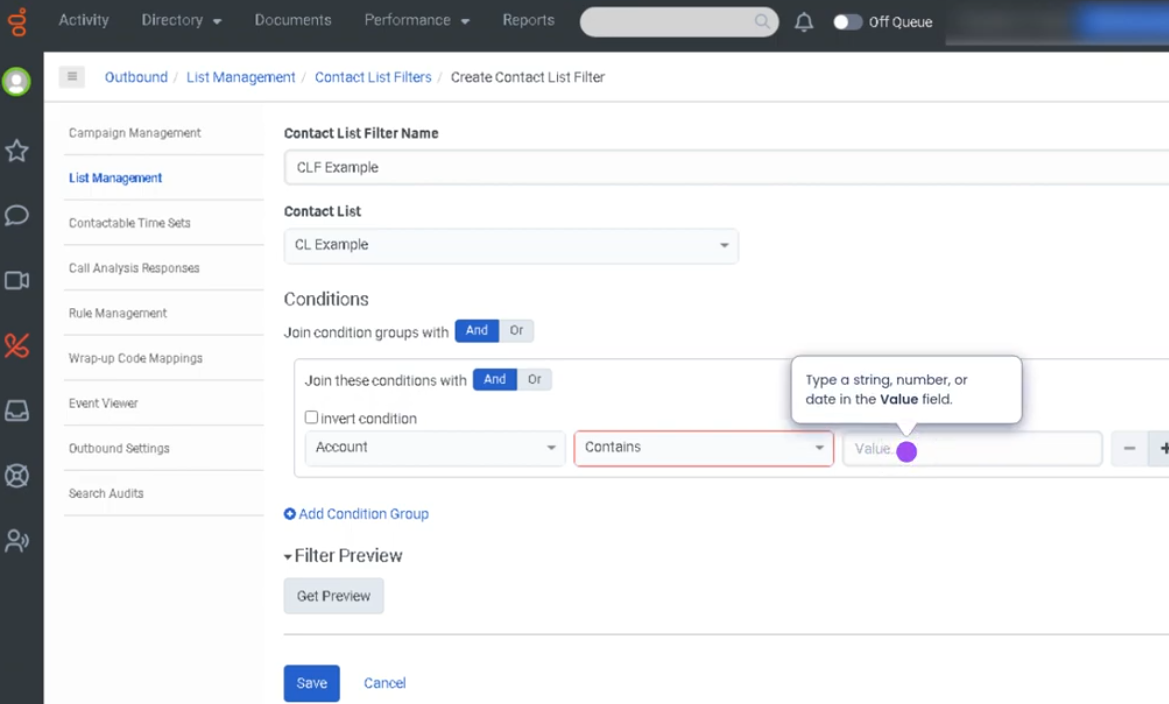
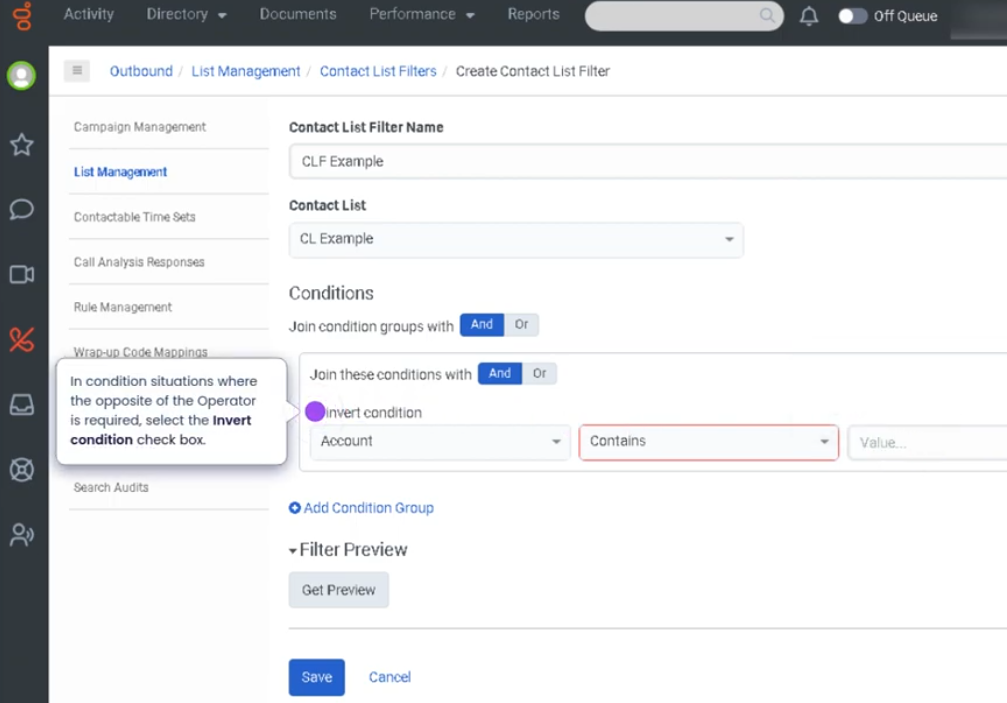
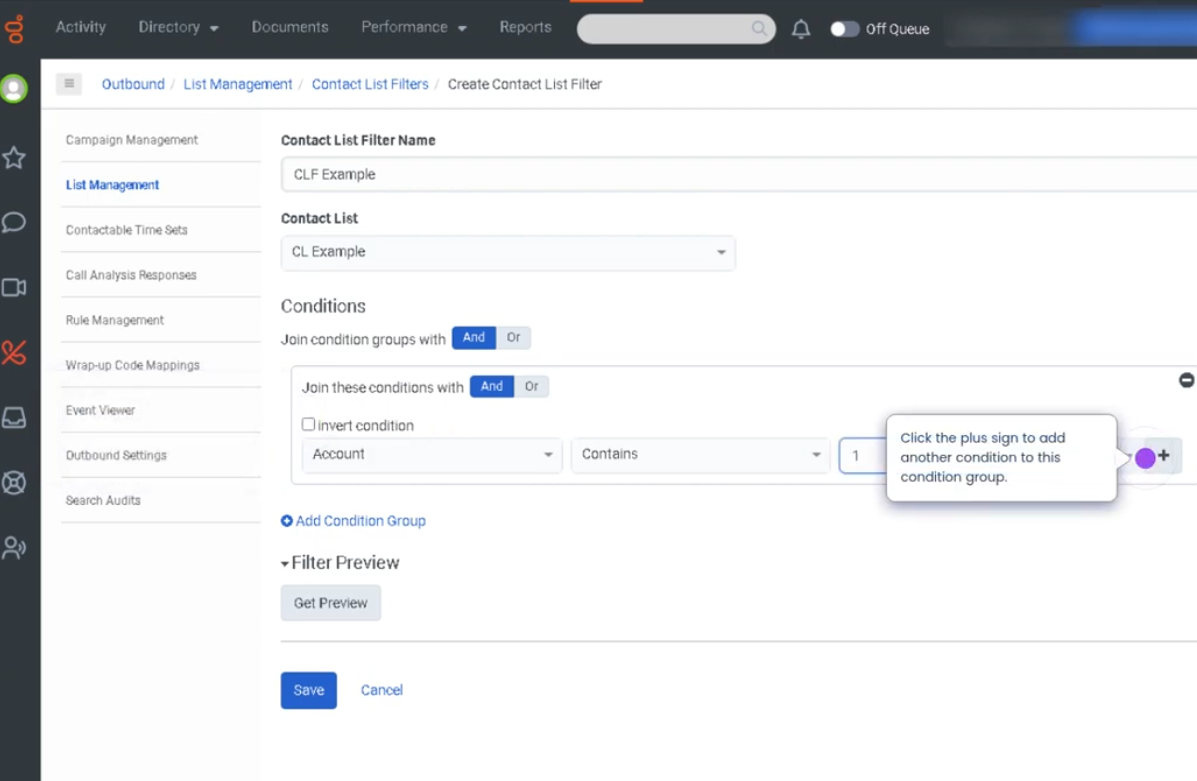
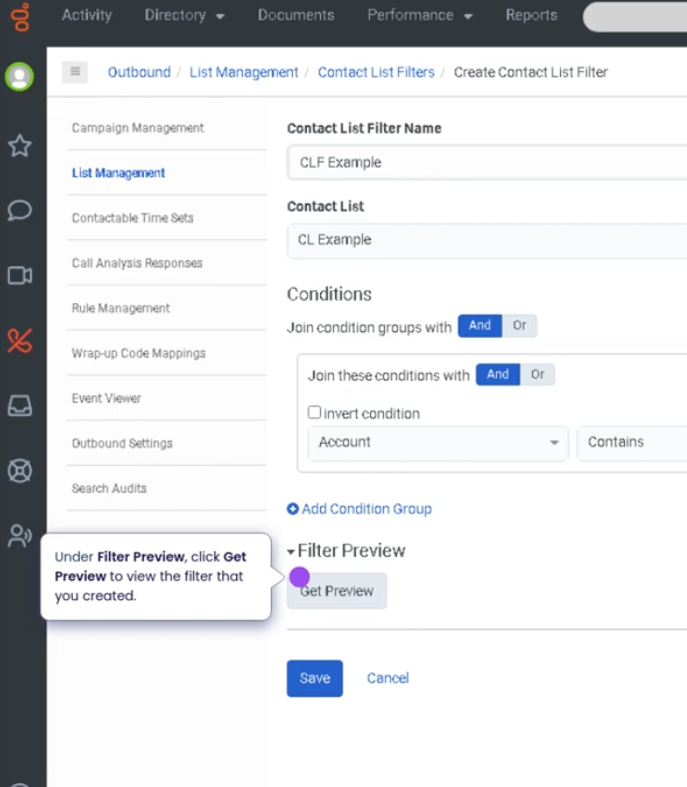
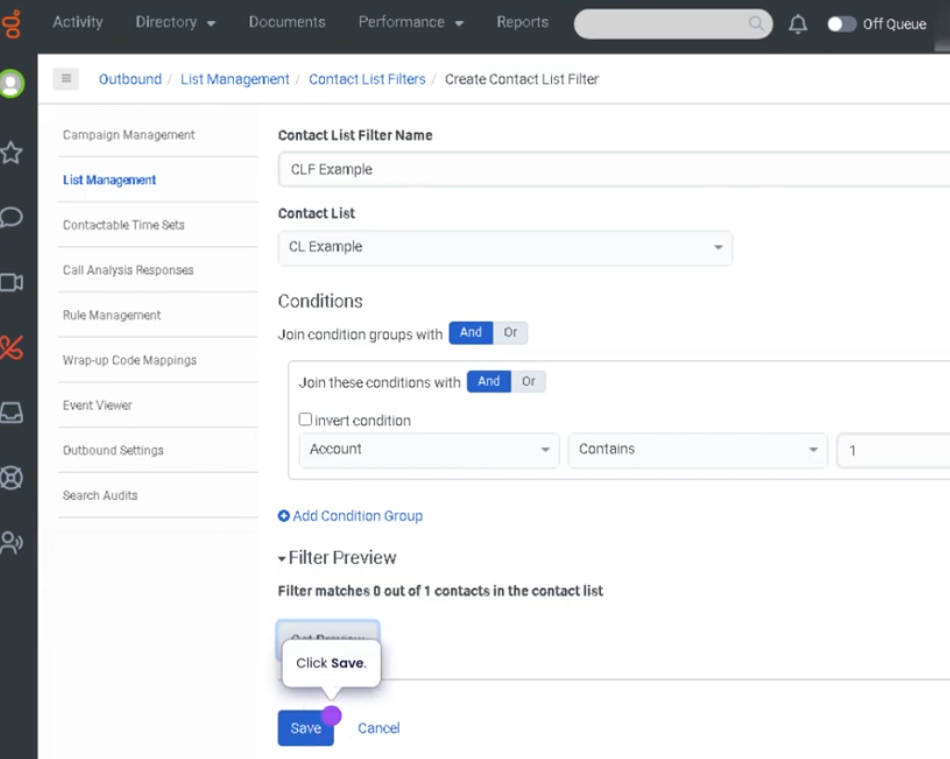
## Outbound Contact List Filters (Genesys Cloud)
### Summary
**Outbound Contact List Filters** in Genesys Cloud allow administrators to **define rules that determine which contacts from a contact list are eligible to be dialed during an outbound campaign**. These filters evaluate **contact list fields and conditions** to include or exclude specific records from dialing attempts.
By applying filters, organizations can **target specific customer segments, enforce compliance rules, and improve campaign efficiency**. Filters are commonly used in outbound dialing campaigns to control when and how contacts are called.
---
## Utilization
| Use Case | Description |
|---|---|
| Targeted campaign dialing | Only dial customers matching specific criteria |
| Compliance filtering | Exclude contacts who opted out or should not be called |
| Time-based campaigns | Filter contacts based on region or time zone |
| Priority outreach | Focus dialing on high-value or high-priority customers |
| Campaign segmentation | Separate contacts by demographics or account status |
Outbound contact list filters help ensure that **only the appropriate contacts are dialed during campaigns**.
---
## Best Practices
| Practice | Reason |
|---|---|
| Use clear and logical filter conditions | Ensures accurate contact selection |
| Test filters before launching campaigns | Prevents dialing errors or incorrect targeting |
| Include compliance rules in filters | Helps meet regulatory requirements |
| Keep filters simple and well documented | Makes troubleshooting easier |
| Regularly review filter logic | Ensures campaigns remain aligned with business goals |
| Use descriptive filter names | Helps administrators quickly identify filter purpose |
---
## Example Scenarios
### Scenario 1 – Targeting Active Customers
```text
Administrator creates outbound campaign
↓
Contact list contains multiple customer types
↓
Filter created to include only active customers
↓
Campaign dials only filtered contacts
Scenario 2 – Excluding Do-Not-Call Contacts
Campaign uses contact list
↓
Filter checks Do-Not-Call field
↓
Contacts flagged as DNC excluded
↓
Campaign dials only compliant records
Scenario 3 – Region-Based Campaign
Marketing campaign targets specific region
↓
Filter applied based on location field
↓
Contacts in selected region included
↓
Campaign runs with targeted audience
Key Benefits
| Benefit | Explanation |
|---|---|
| Improved campaign targeting | Ensures only relevant contacts are dialed |
| Compliance support | Helps enforce regulatory dialing restrictions |
| Better dialing efficiency | Reduces wasted dialing attempts |
| Campaign segmentation | Enables targeted outreach strategies |
| Operational control | Administrators manage who gets contacted and when |
Genesys Cloud - How to - Directory - Profile Fields
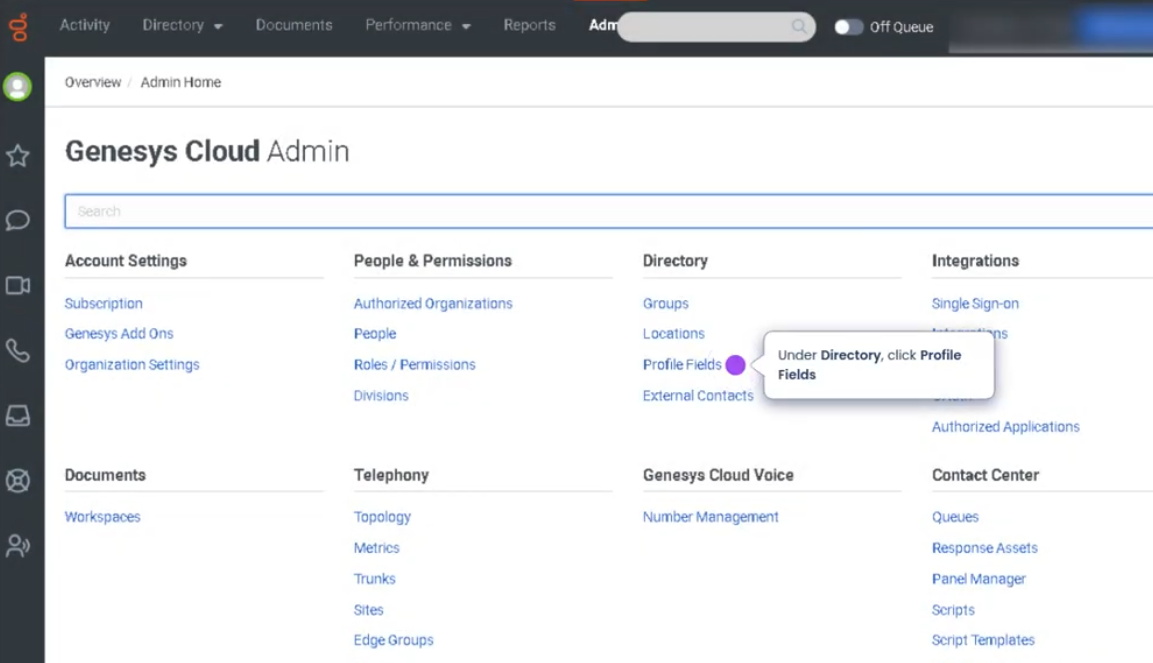
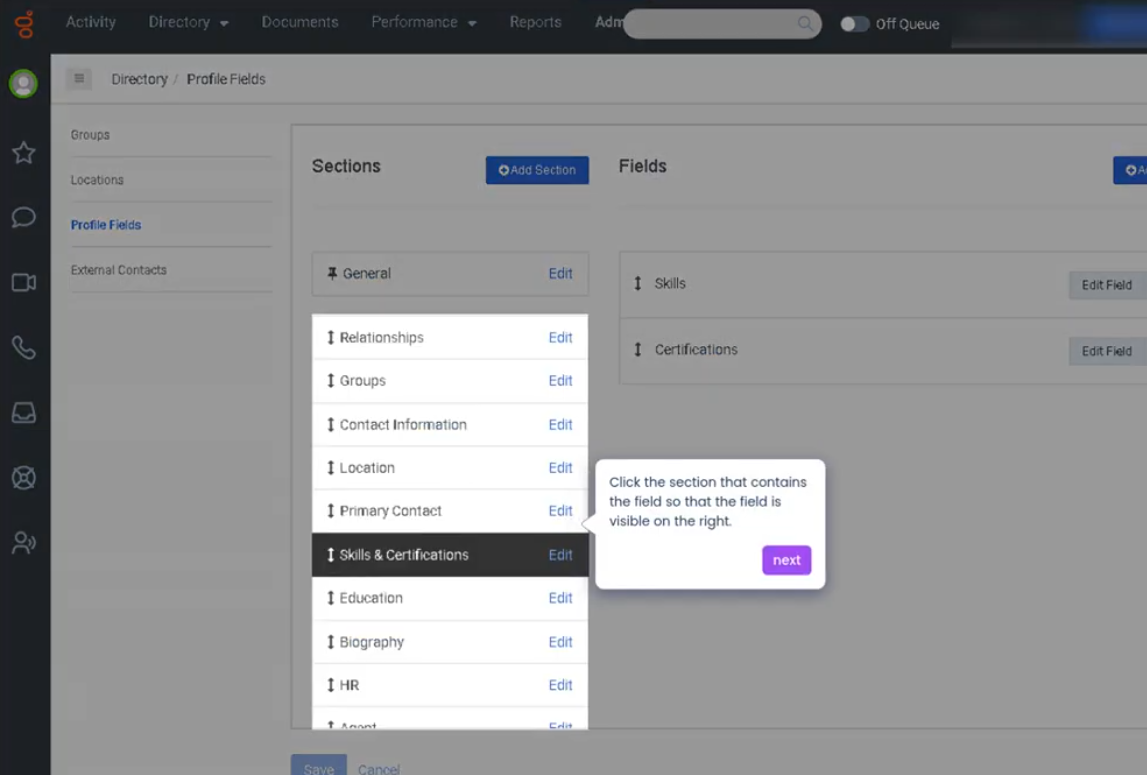
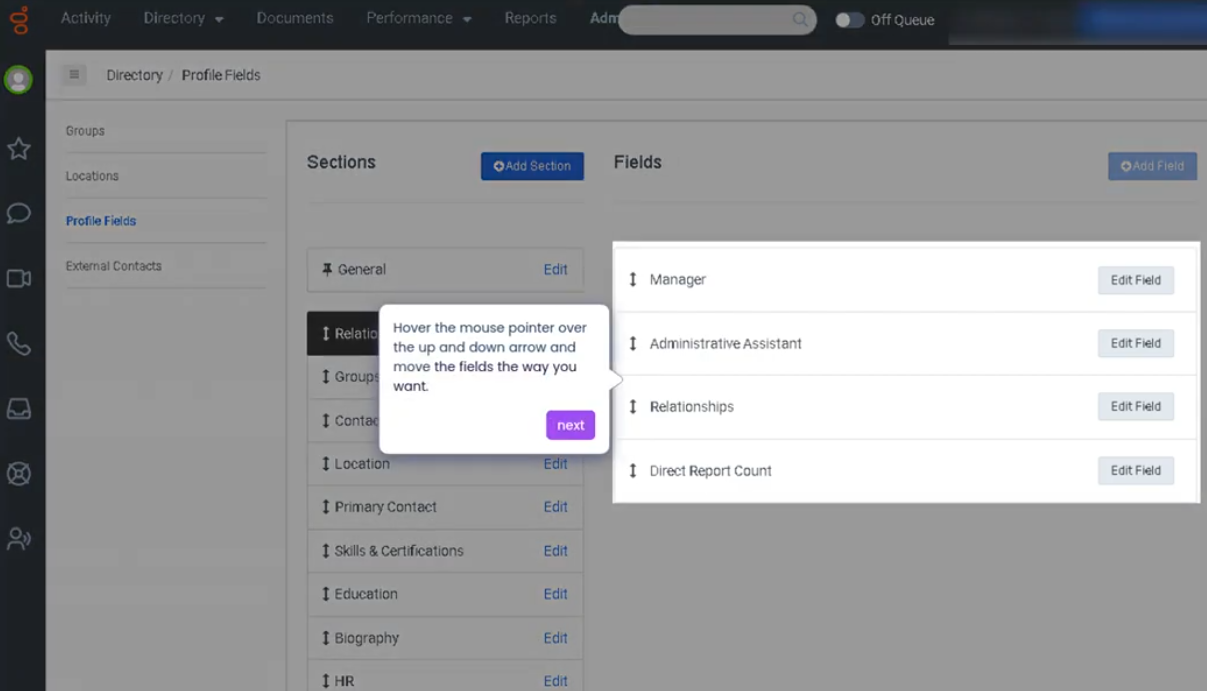
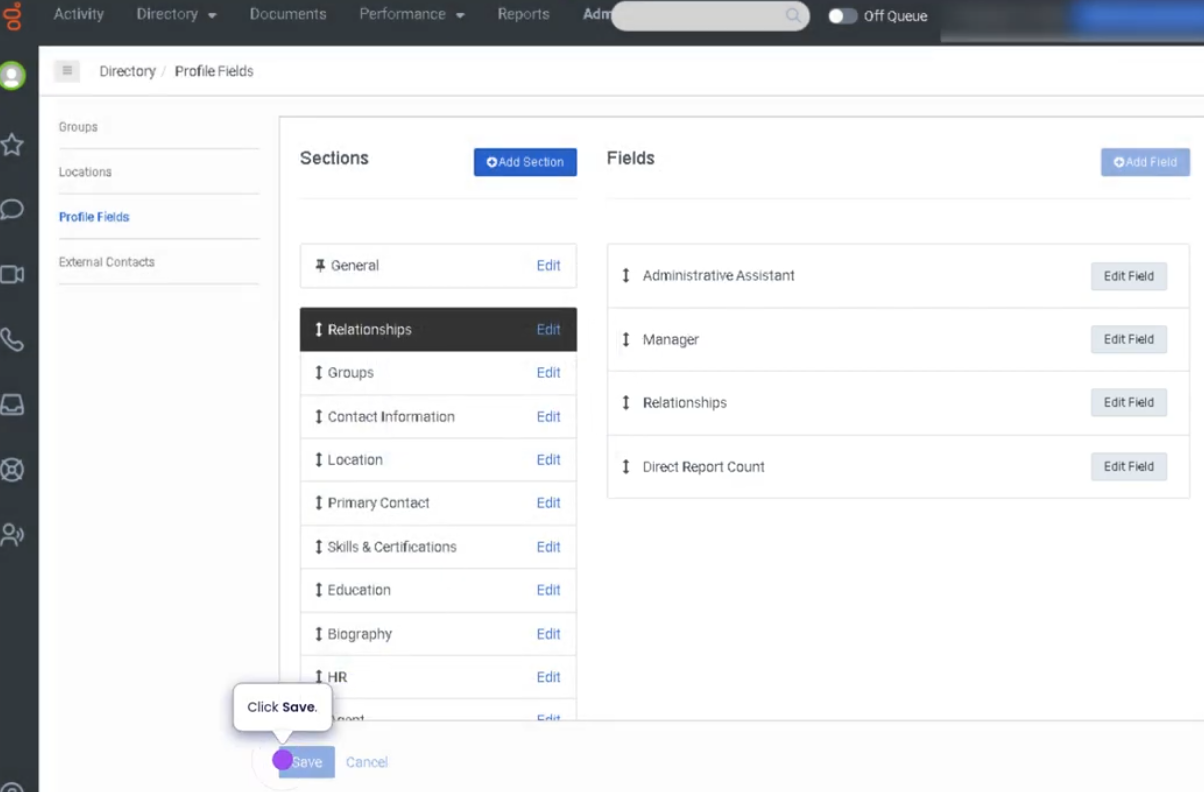
Reorder Fields in the Profile Configuration (Genesys Cloud)
Summary
The Reorder Fields in the Profile Configuration feature in Genesys Cloud allows administrators to control the order in which profile fields appear in the user interface. Profile fields typically include information such as name, contact details, department, location, or custom attributes that are displayed in user profiles or interaction views.
Reordering fields helps organizations prioritize important information, making it easier for agents and administrators to quickly access relevant data when viewing customer or user profiles.
Utilization
| Use Case | Description |
|---|---|
| Prioritizing important information | Key profile fields appear first in the interface |
| Improved agent workflow | Agents can quickly locate frequently used information |
| Custom profile layouts | Organizations align the field order with operational needs |
| Data organization | Makes profile views cleaner and easier to navigate |
| Interaction context | Agents see the most relevant customer information during interactions |
Reordering profile fields improves usability and efficiency by presenting critical information first.
Best Practices
| Practice | Reason |
|---|---|
| Place frequently used fields at the top | Helps agents find important information quickly |
| Group related fields together | Improves readability and organization |
| Avoid excessive field customization | Keeps the interface simple and intuitive |
| Review profile configuration regularly | Ensures the layout matches operational needs |
| Align field order with agent workflows | Reduces time spent searching for data |
Example Scenarios
Scenario 1 – Prioritizing Customer Contact Information
Administrator reviews profile configuration
↓
Administrator moves phone and email fields to the top
↓
Agents can immediately view customer contact details
Scenario 2 – Organizing Custom Fields
Administrator adds custom profile fields
↓
Administrator reorders fields to group related data
↓
Agents see organized customer information during interactions
Scenario 3 – Improving Agent Efficiency
Agent opens customer profile during interaction
↓
Important fields appear at the top of the profile
↓
Agent quickly finds relevant information
Key Benefits
| Benefit | Explanation |
|---|---|
| Improved usability | Agents quickly locate critical information |
| Better data organization | Profile layouts become clearer and easier to navigate |
| Faster interaction handling | Agents spend less time searching for data |
| Customizable interface | Organizations tailor profiles to operational needs |
| Enhanced workflow efficiency | Supports smoother interaction management |
Genesys Cloud - How to - Account Settings - Reset Agent Routing Score after presence change
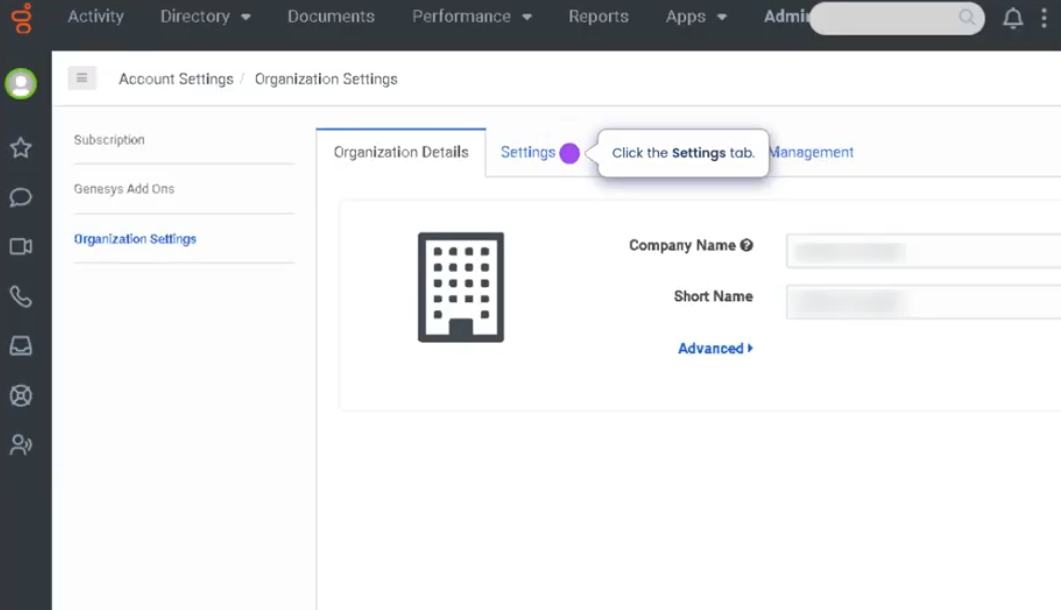
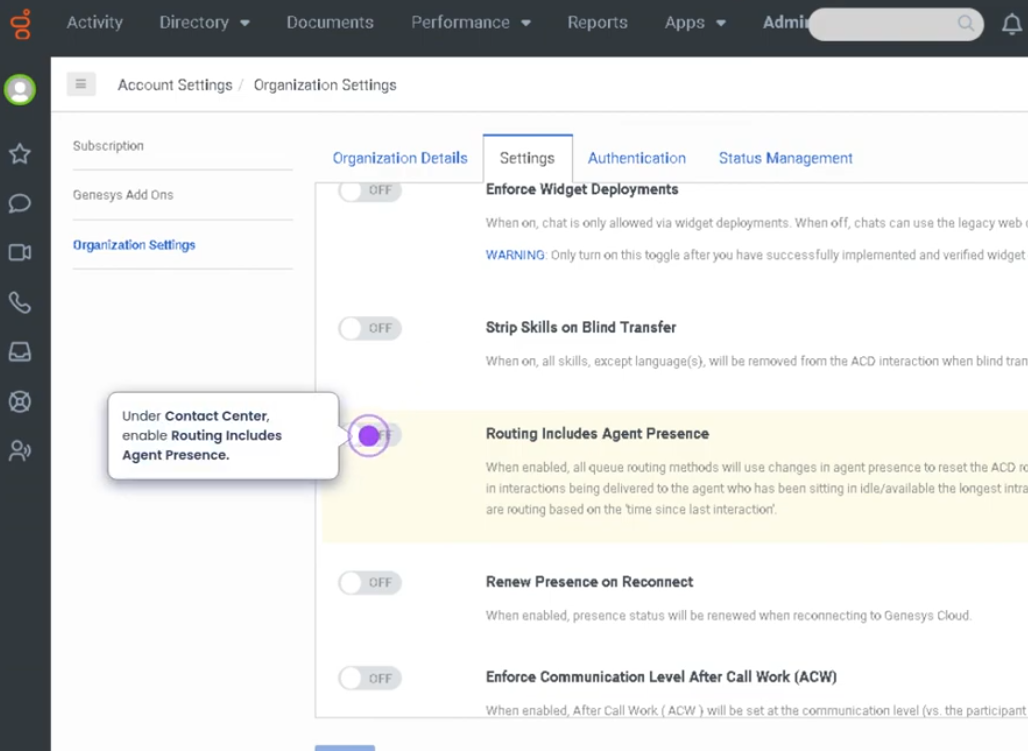
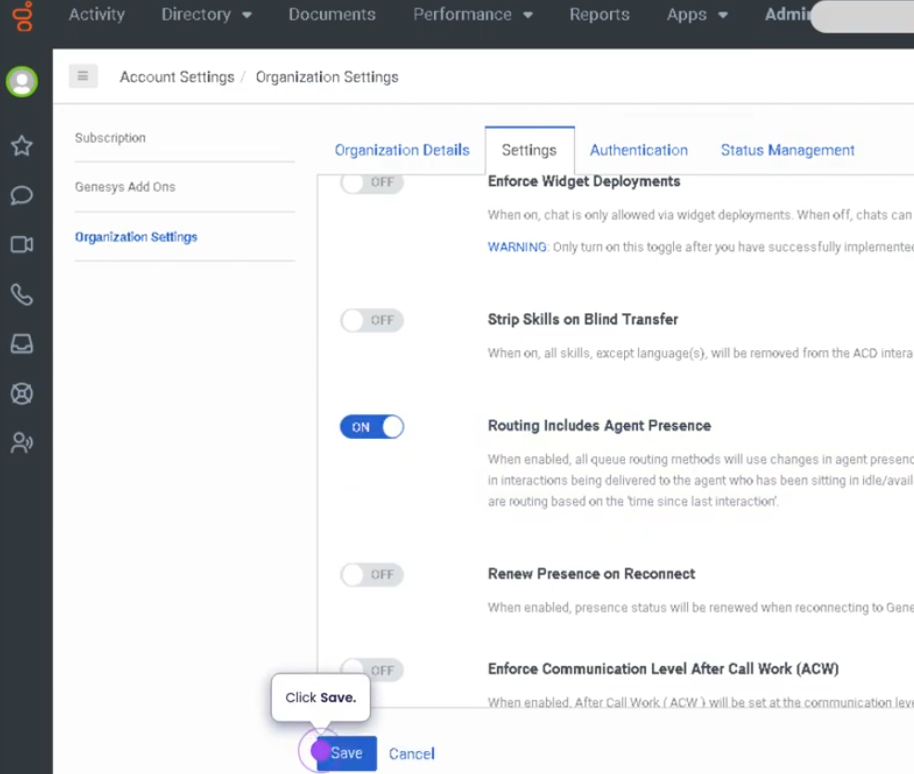
Reset an Agent's Routing Score After Presence Change (Genesys Cloud)
Summary
In Genesys Cloud, an Agent Routing Score is used by certain routing methods (such as Preferred Agent Routing or predictive routing models) to determine how interactions are distributed among agents. The routing score helps balance workload and maintain fairness when assigning interactions.
When an agent's presence changes (for example from Available to Away, Offline, or another status), the system may reset the agent’s routing score. This ensures that routing decisions remain fair and accurate once the agent becomes available again, preventing situations where returning agents are unfairly prioritized or delayed in receiving interactions.
Resetting routing scores maintains balanced interaction distribution and efficient queue performance.
Utilization
| Use Case | Description |
|---|---|
| Agent returns from break | Routing score resets to allow fair distribution of interactions |
| Presence change during shift | Score recalculated when agent switches status |
| Queue fairness | Prevents agents from being unfairly prioritized after absence |
| Dynamic staffing environments | Maintains balanced workload across active agents |
| Routing algorithm accuracy | Ensures routing decisions reflect current agent availability |
Resetting routing scores helps maintain equitable interaction distribution within queues.
Best Practices
| Practice | Reason |
|---|---|
| Ensure agents change presence accurately | Allows routing algorithms to adjust properly |
| Avoid frequent unnecessary status changes | Prevents disruptions in routing calculations |
| Monitor queue routing performance | Helps ensure interactions are distributed fairly |
| Educate agents on presence management | Ensures routing behavior remains predictable |
| Align routing methods with operational goals | Maintains consistent workload distribution |
Example Scenarios
Scenario 1 – Agent Returns from Break
Agent changes status to Break
↓
Agent finishes break
↓
Agent sets presence to Available
↓
System resets routing score
↓
Agent re-enters queue routing fairly
Scenario 2 – Agent Logs Back into System
Agent logs out at end of shift
↓
Agent logs in for next shift
↓
Presence changes to Available
↓
Routing score reset
↓
Agent receives interactions based on current queue conditions
Scenario 3 – Preventing Queue Imbalance
Agent temporarily unavailable
↓
Agent changes presence status
↓
Agent returns to Available
↓
Routing score recalculated
↓
Queue maintains fair interaction distribution
Key Benefits
| Benefit | Explanation |
|---|---|
| Fair interaction distribution | Prevents routing bias when agents return |
| Improved queue balance | Helps maintain equitable workload |
| Accurate routing decisions | Reflects current agent availability |
| Consistent queue performance | Supports stable contact center operations |
| Better workforce management | Ensures agents rejoin queues fairly |
Genesys Cloud - How to - Schedules - Generate a schedule without forecast
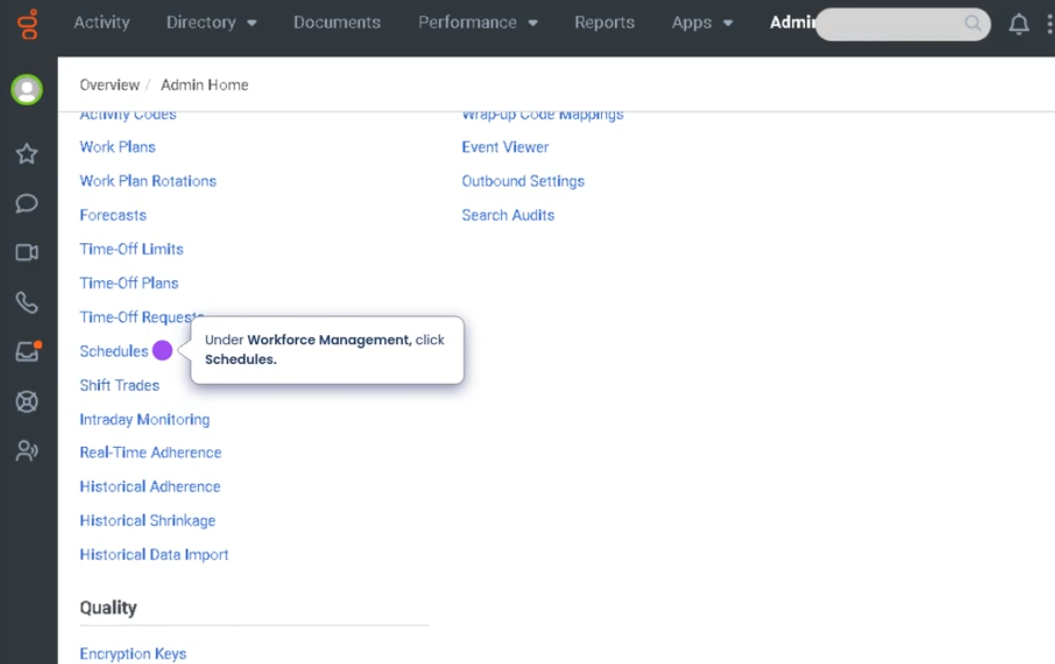
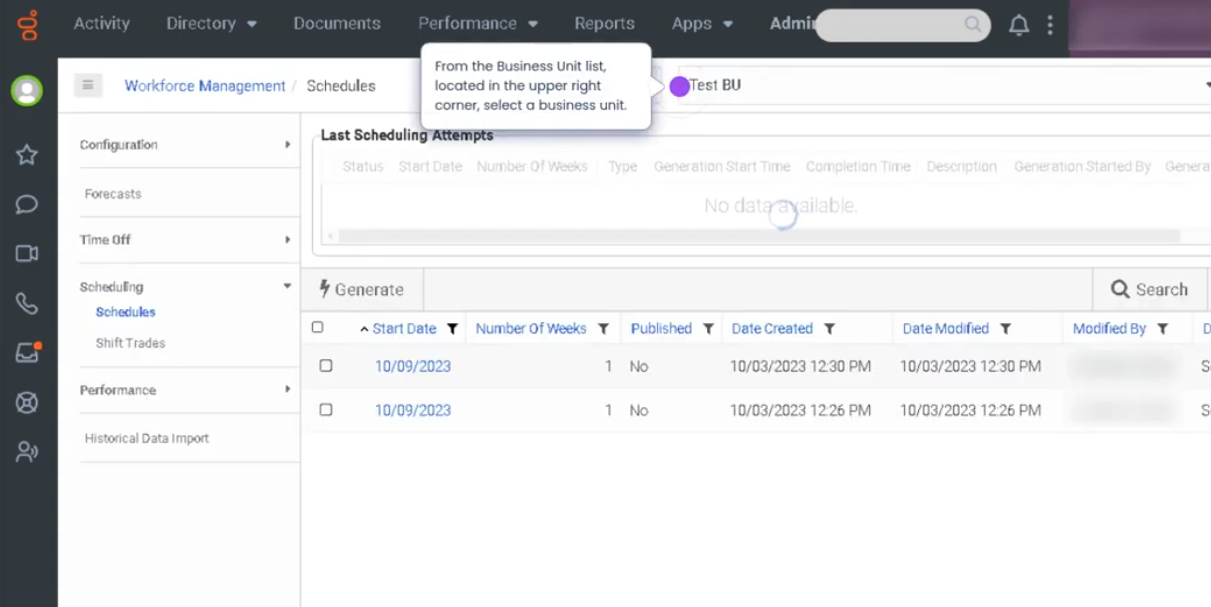
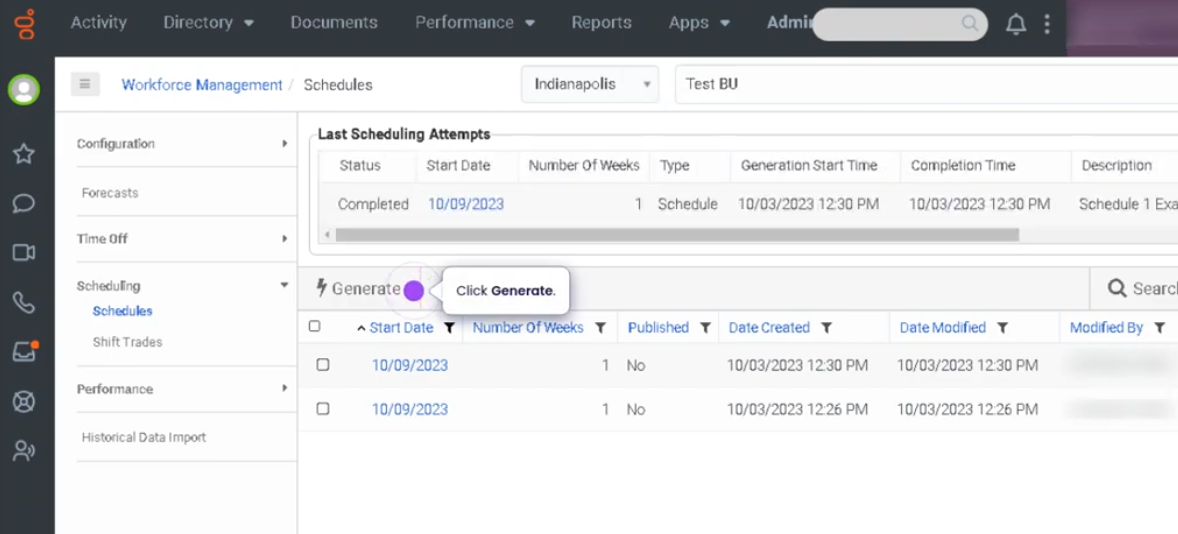

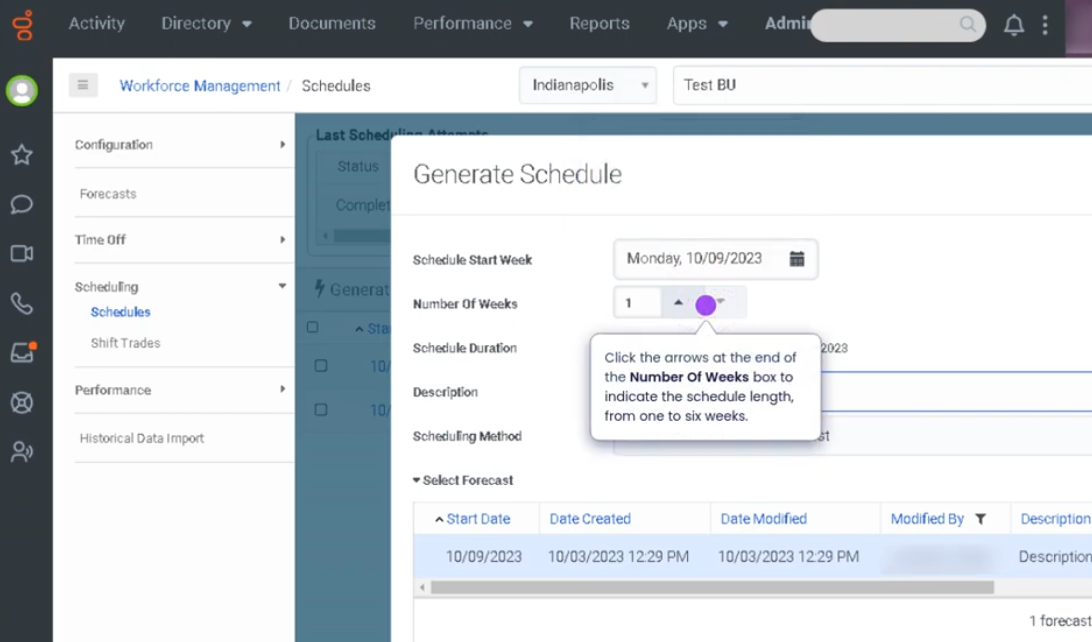
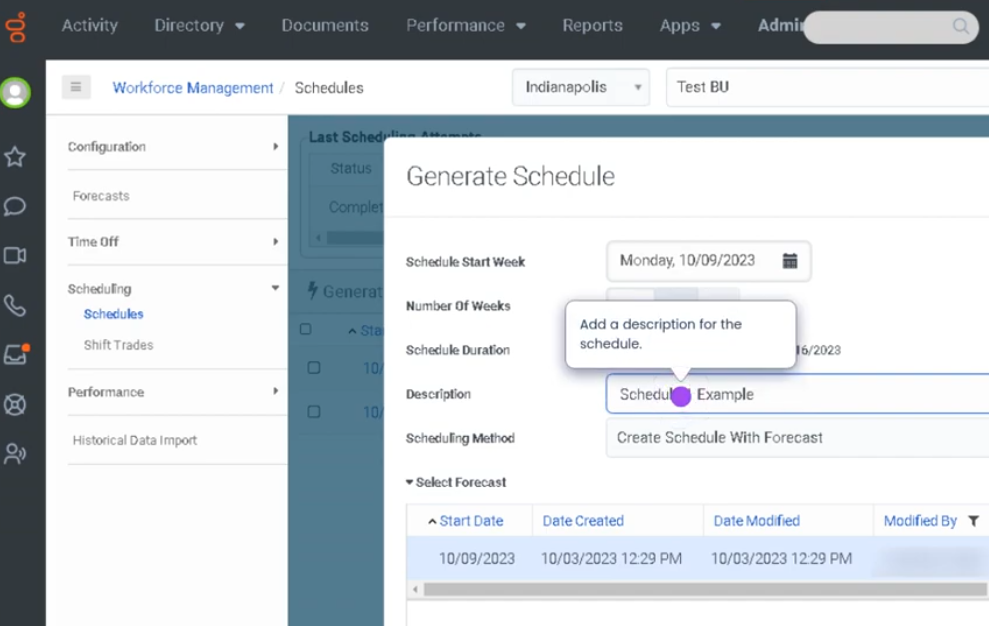
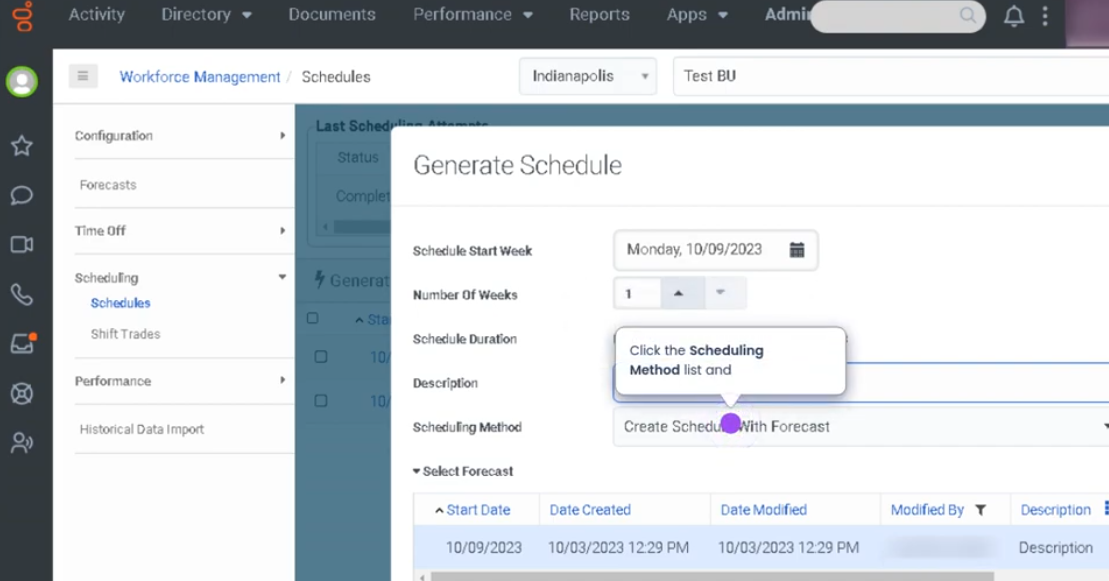
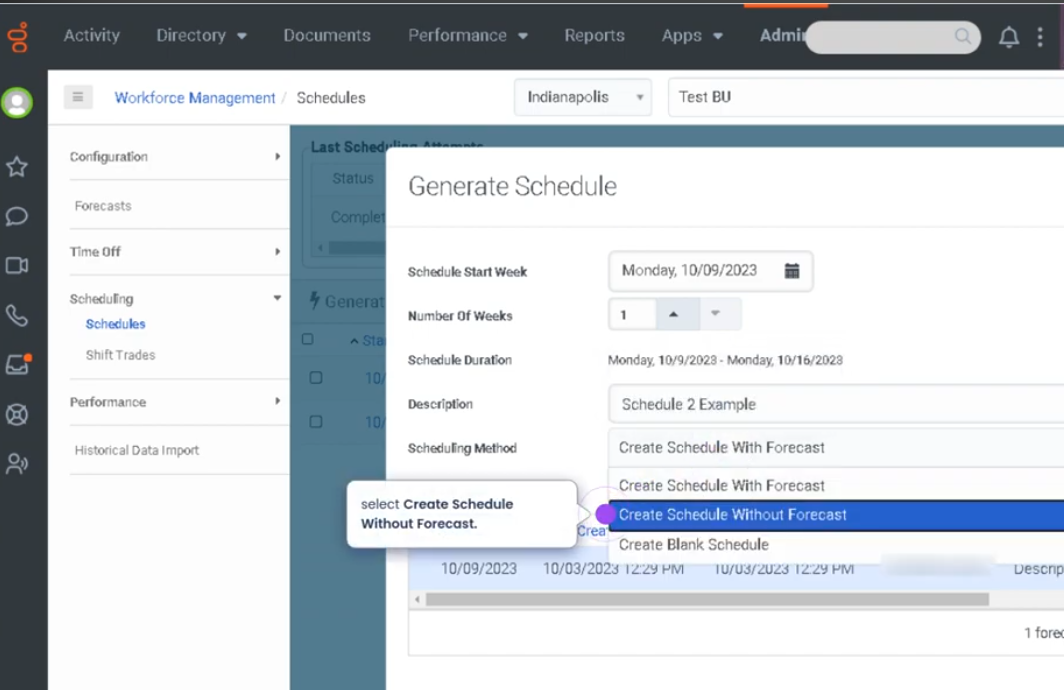
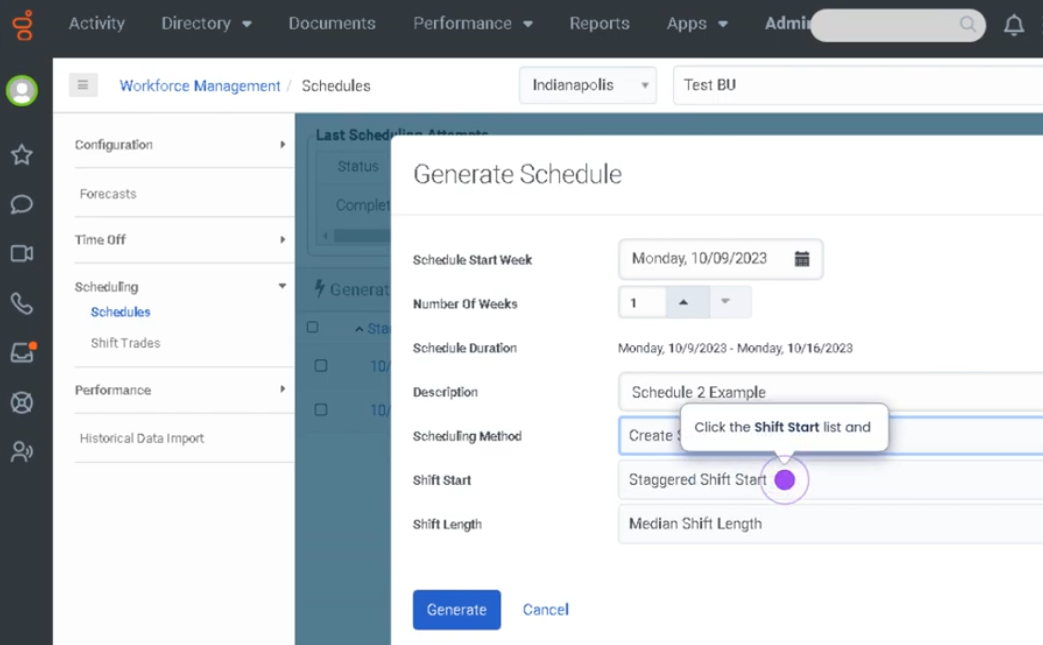
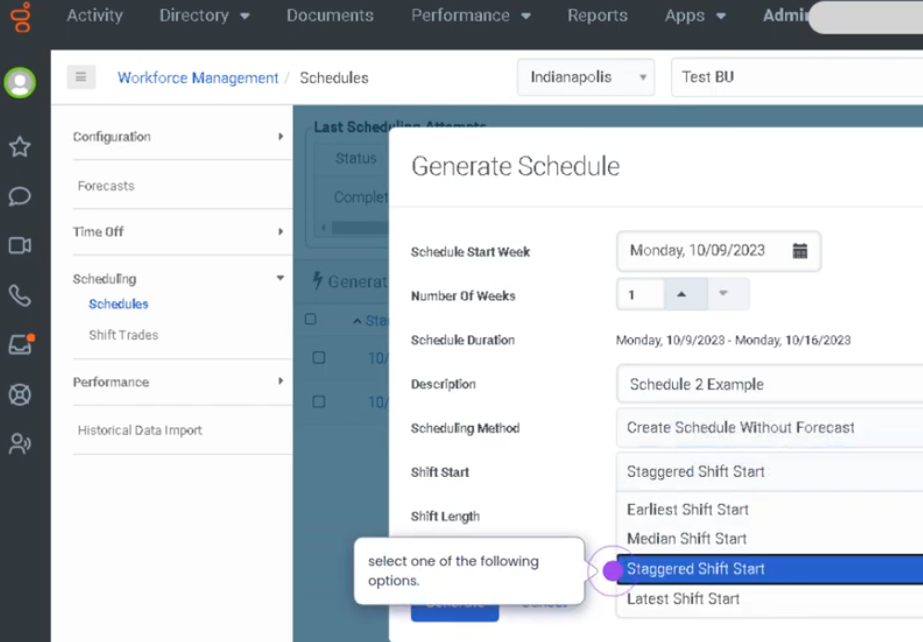
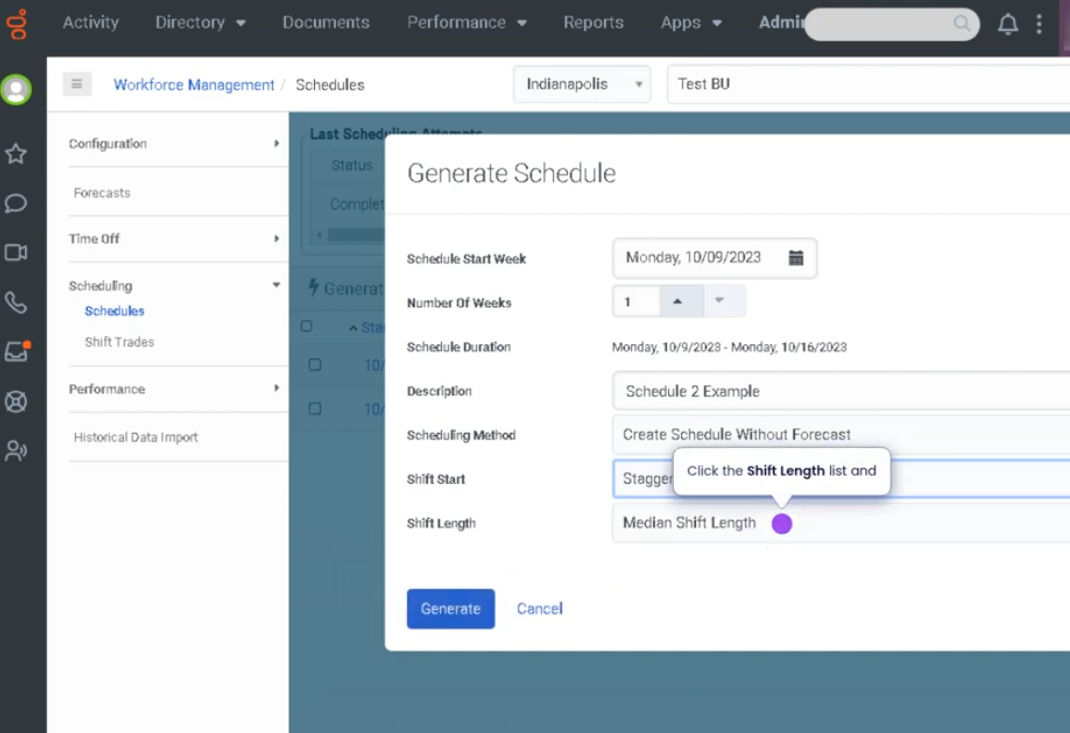
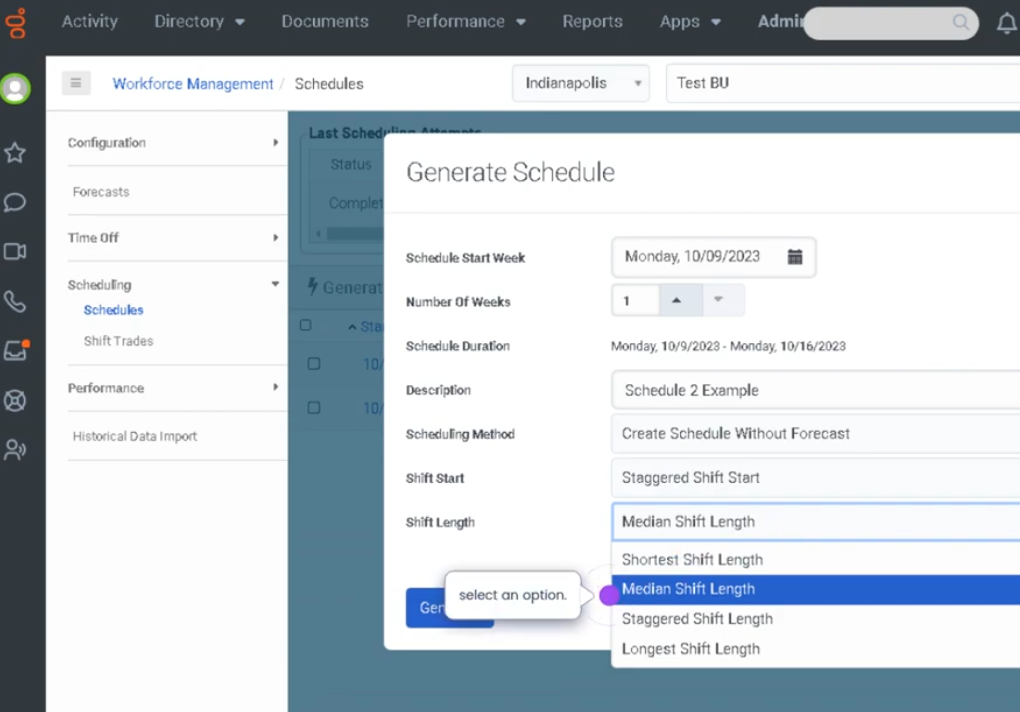
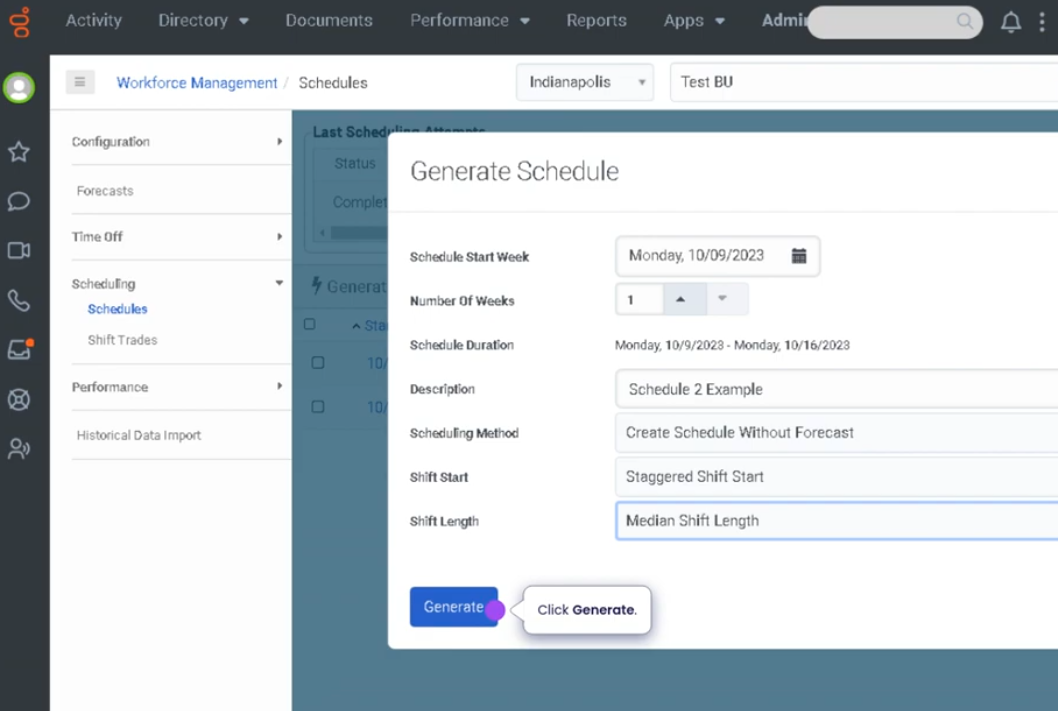
Generate a Schedule Without Forecast (Genesys Cloud Workforce Management)
Summary
In Genesys Cloud Workforce Management (WFM), administrators and supervisors can generate a work schedule without using a forecast. This method creates agent schedules based on existing staffing requirements, manual planning, or predefined staffing rules, rather than relying on predicted interaction volume.
Generating a schedule without a forecast is useful when organizations need to quickly create schedules, manage small teams, handle temporary operations, or build schedules based on fixed staffing levels rather than forecasted demand.
Utilization
| Use Case | Description |
|---|---|
| Small contact centers | Teams with stable staffing needs generate schedules manually |
| Temporary operations | Used when forecasts are unavailable or unnecessary |
| Rapid schedule creation | Supervisors create schedules quickly without forecast calculations |
| Fixed staffing models | Organizations maintain constant agent coverage regardless of demand |
| Training or onboarding periods | Scheduling agents during non-standard operational periods |
Generating schedules without a forecast allows managers to maintain workforce coverage even when demand forecasting is not required.
Best Practices
| Practice | Reason |
|---|---|
| Verify staffing requirements before generating the schedule | Ensures enough agents are assigned |
| Review agent availability and constraints | Prevents scheduling conflicts |
| Apply consistent shift templates | Helps maintain balanced work hours |
| Monitor operational metrics after scheduling | Ensures coverage aligns with workload |
| Adjust schedules manually when necessary | Maintains operational flexibility |
| Communicate schedule updates to agents | Ensures staff are aware of their assigned shifts |
Example Scenarios
Scenario 1 – Small Team Schedule Creation
Supervisor opens Workforce Management
↓
Supervisor selects scheduling period
↓
Supervisor generates schedule without forecast
↓
System assigns shifts based on staffing rules
Scenario 2 – Emergency Schedule Generation
Forecast data unavailable
↓
Supervisor generates schedule manually
↓
Agents assigned shifts based on availability
↓
Operations continue with temporary staffing plan
Scenario 3 – Fixed Coverage Model
Organization requires fixed staffing levels
↓
Supervisor generates schedule without forecast
↓
Agents assigned standard shifts
↓
Contact center maintains constant coverage
Key Benefits
| Benefit | Explanation |
|---|---|
| Faster schedule creation | Schedules can be generated without forecast calculations |
| Operational flexibility | Managers can manually control staffing levels |
| Useful for small teams | Forecasting may not be necessary in stable environments |
| Simplified scheduling | Reduces complexity when forecasting data is unavailable |
| Maintains workforce coverage | Ensures agents are scheduled even without demand predictions |
Genesys Cloud - How to - Contact Center - ACD Skills
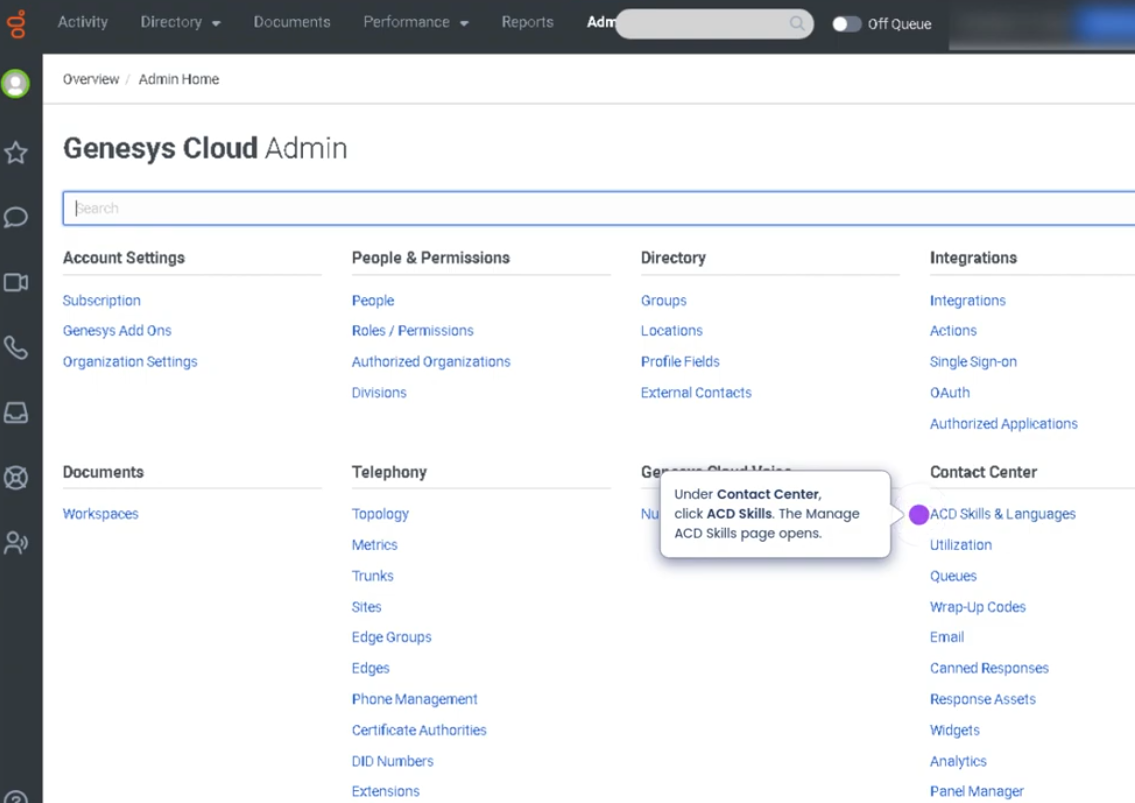
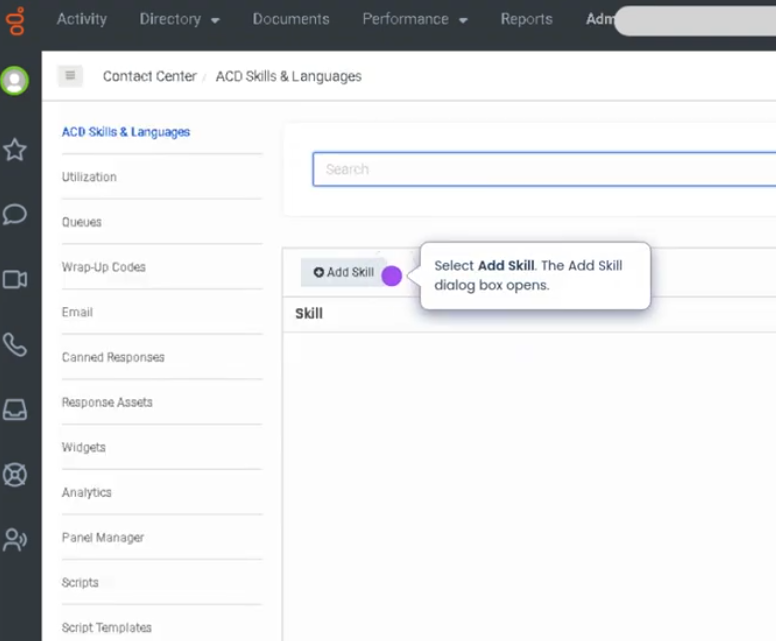
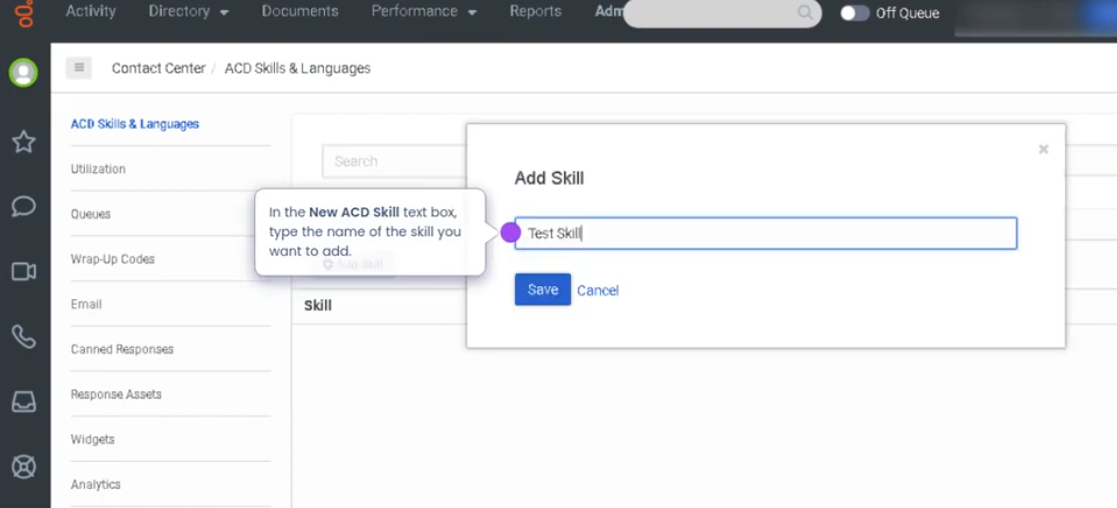
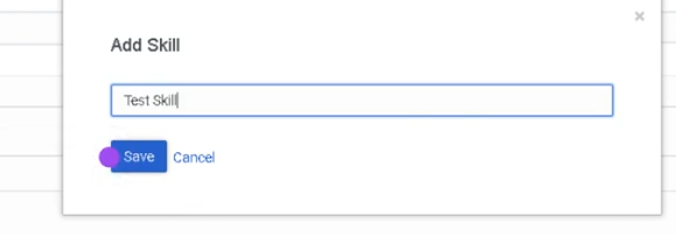
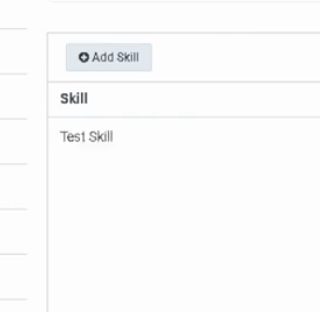
Add an ACD Skill (Genesys Cloud)
Summary
ACD Skills in Genesys Cloud are attributes assigned to agents that allow the Automatic Call Distribution (ACD) routing engine to match interactions with the most qualified agents. Administrators create ACD skills to represent languages, product expertise, technical knowledge, or service specialties, and then assign proficiency levels to agents.
Adding an ACD skill enables skill-based routing, ensuring that customer interactions are delivered to agents who have the appropriate knowledge or capabilities to resolve the issue efficiently.
Utilization
| Use Case | Description |
|---|---|
| Skill-based routing | Interactions routed to agents with the required expertise |
| Language support | Calls routed to agents fluent in a specific language |
| Product specialization | Customers connected with agents trained in certain products |
| Tiered support models | Level 1, Level 2, or specialist support routing |
| Service segmentation | Different teams handle specific customer categories |
ACD skills allow organizations to improve routing accuracy and customer experience by matching interactions with qualified agents.
Best Practices
| Practice | Reason |
|---|---|
| Use clear and descriptive skill names | Helps administrators easily identify skills |
| Limit unnecessary skills | Prevents routing complexity |
| Assign accurate proficiency levels | Improves routing precision |
| Regularly review skill assignments | Ensures agents maintain appropriate qualifications |
| Align skills with queue requirements | Ensures interactions reach the right agents |
| Train agents before assigning new skills | Maintains service quality |
Example Scenarios
Scenario 1 – Language-Based Routing
Customer calls support line
↓
IVR detects preferred language
↓
ACD routing evaluates agent skills
↓
Call routed to agent with matching language skill
Scenario 2 – Product Expertise Routing
Customer needs help with specific product
↓
Interaction routed to product support queue
↓
ACD engine matches required skill
↓
Agent with product expertise receives interaction
Scenario 3 – Tiered Support Escalation
Customer issue requires advanced troubleshooting
↓
Initial agent escalates interaction
↓
Routing evaluates advanced support skill
↓
Interaction routed to specialist agent
Key Benefits
| Benefit | Explanation |
|---|---|
| Improved routing accuracy | Interactions reach agents with the correct expertise |
| Faster issue resolution | Skilled agents handle relevant requests |
| Better customer experience | Customers receive knowledgeable support |
| Efficient workforce utilization | Skills help distribute interactions effectively |
| Scalable routing model | Supports complex contact center operations |
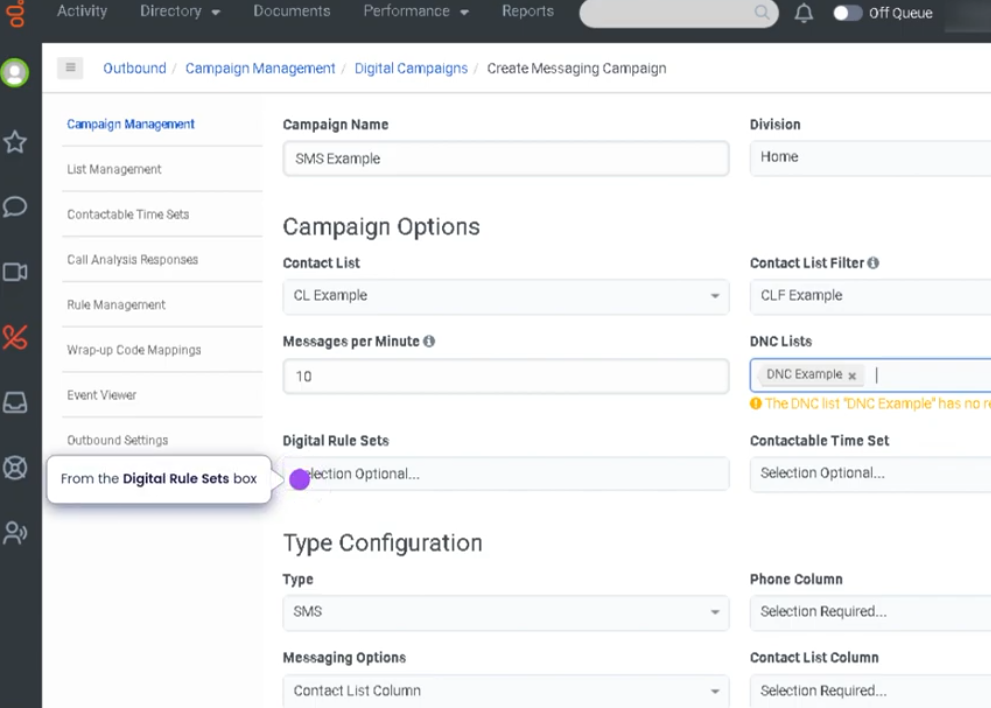
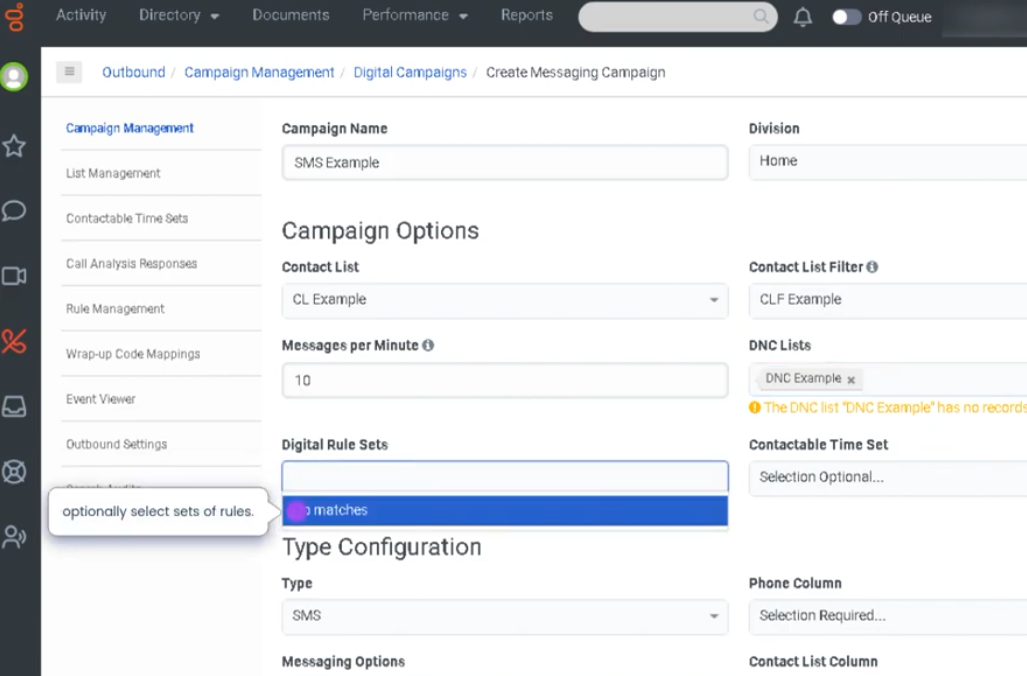
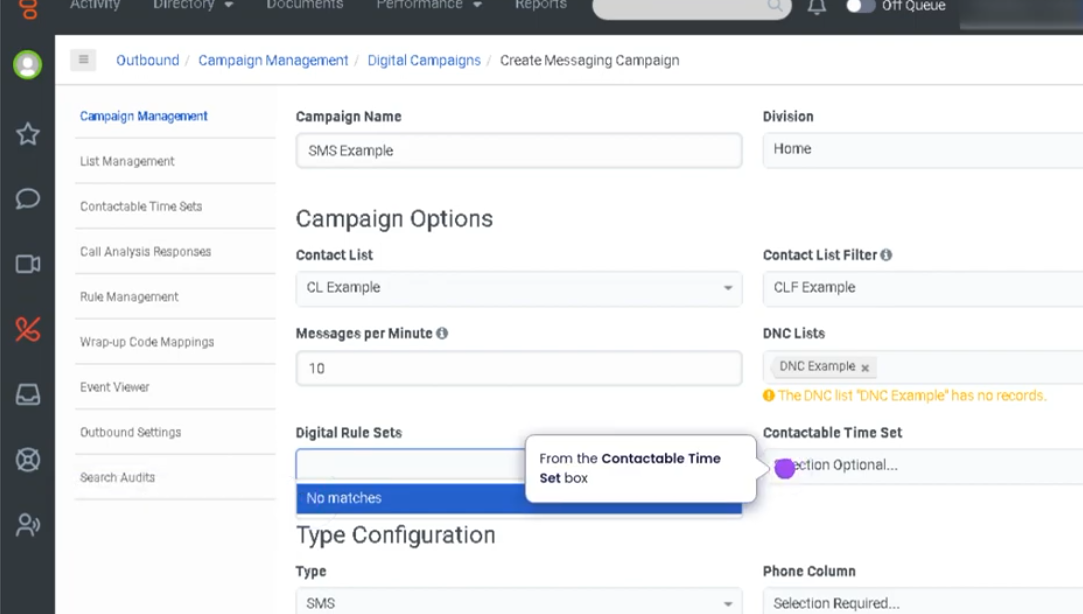
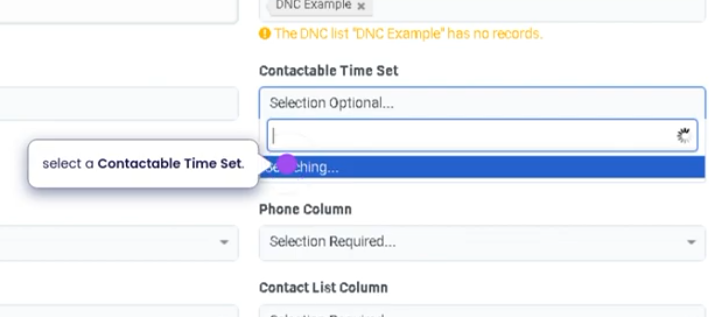
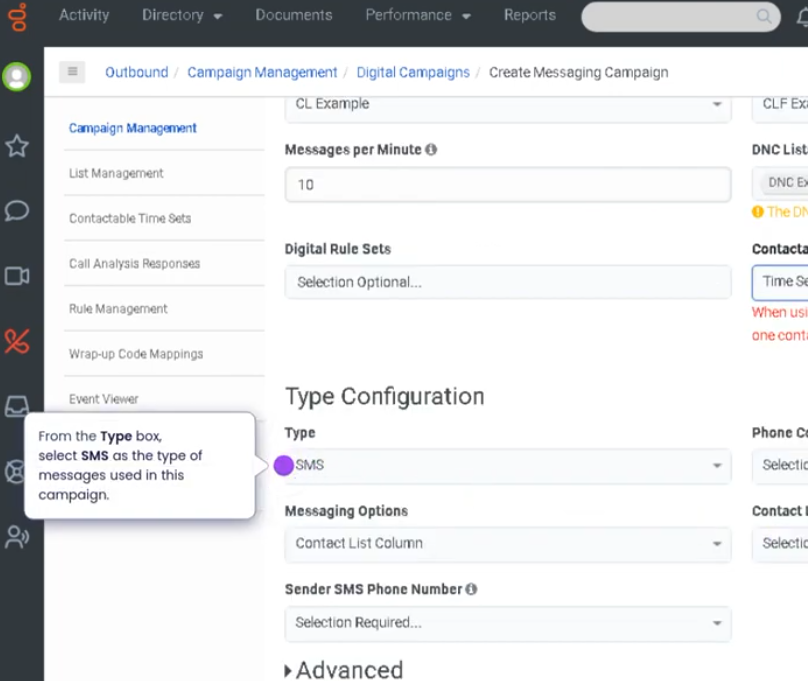
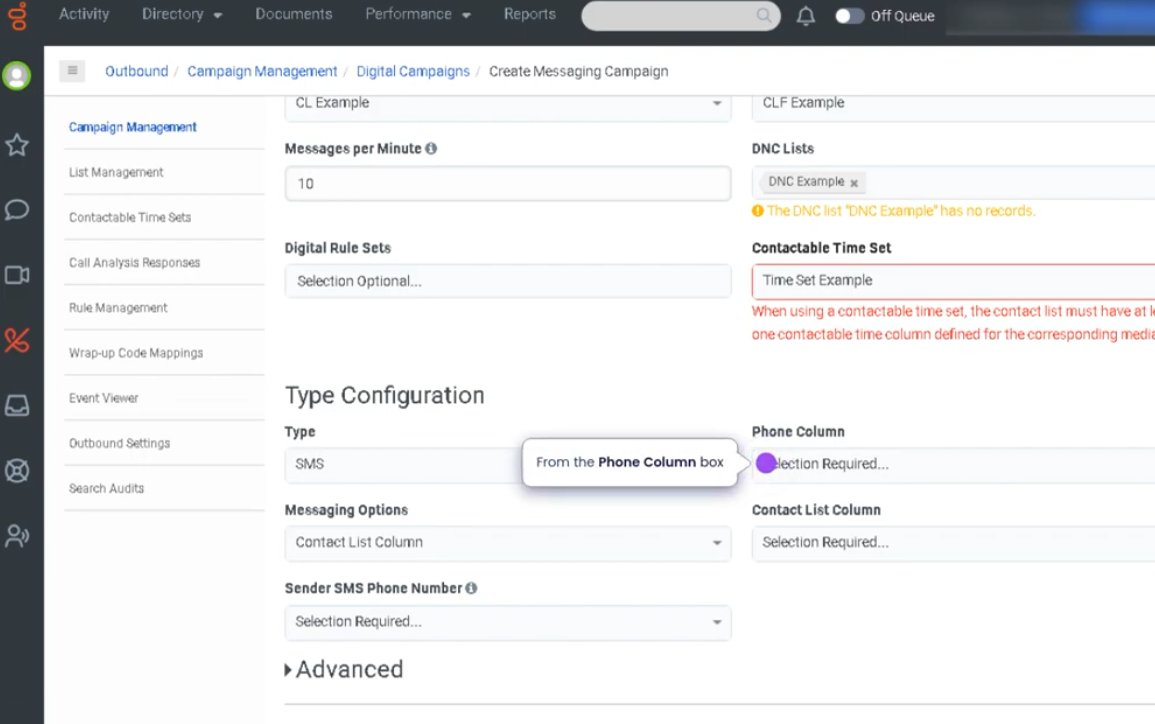
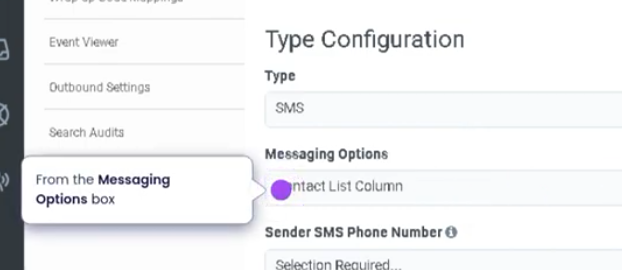
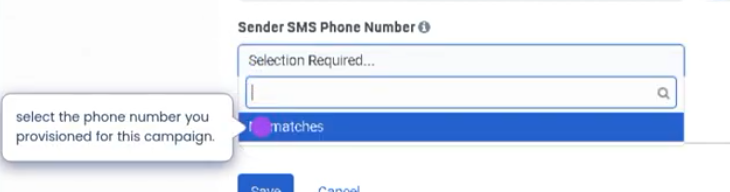
Genesys Cloud - How to - Outbound - SMS Campaign
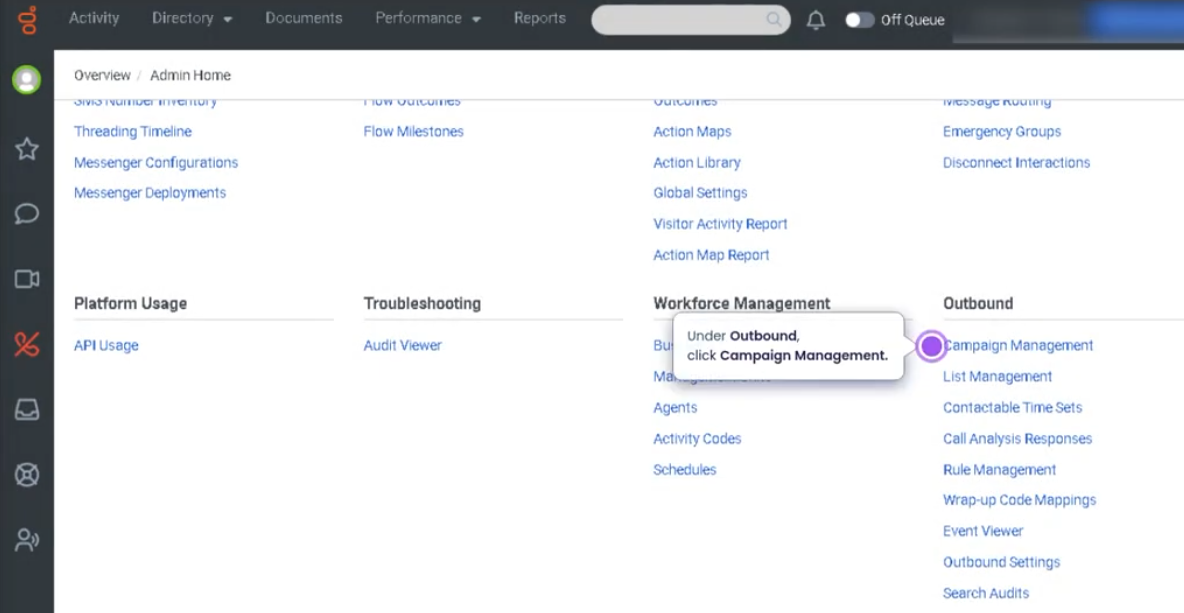
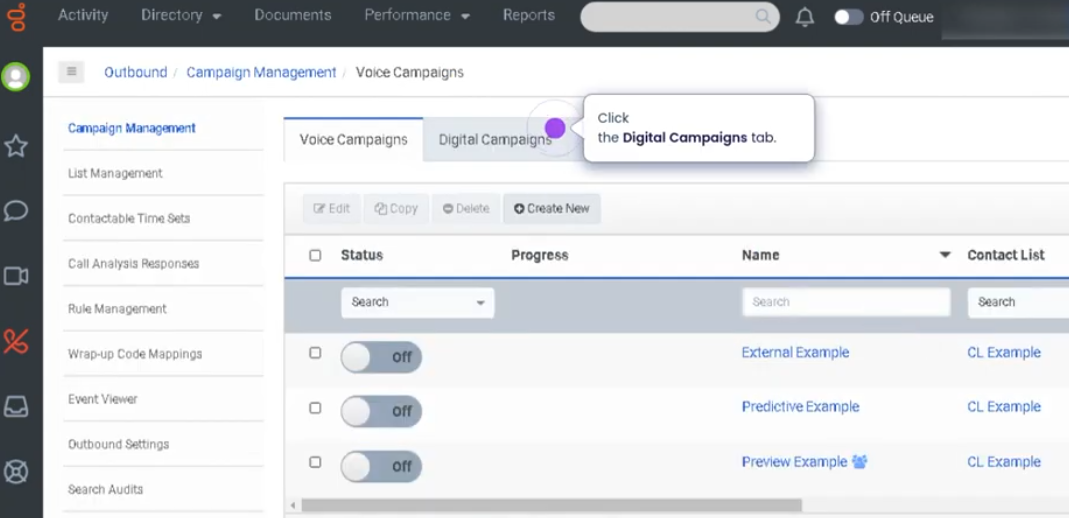
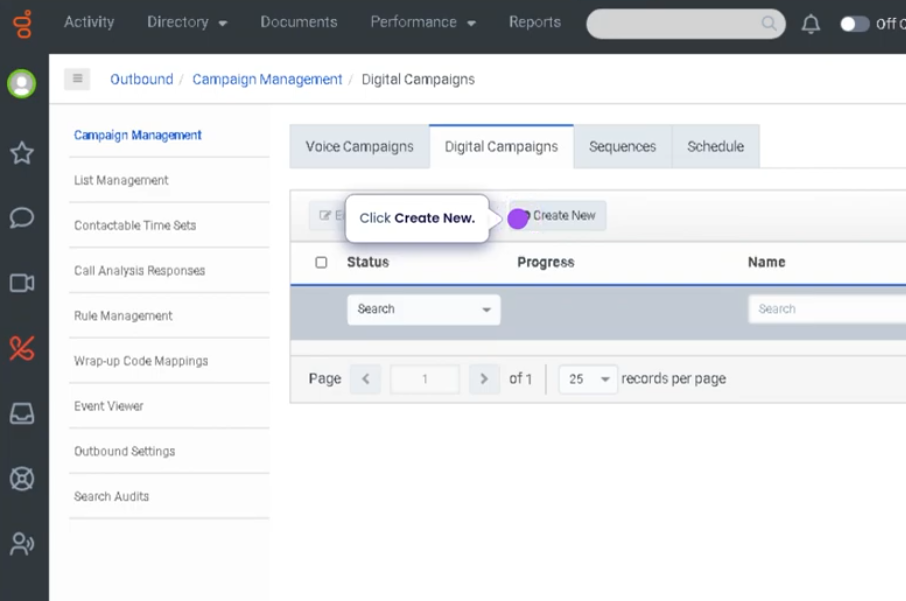
![]()
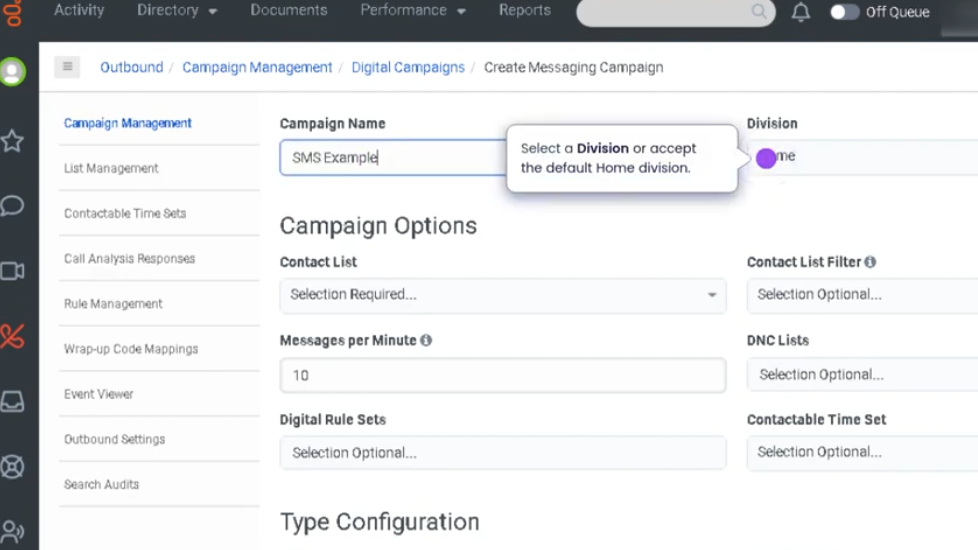

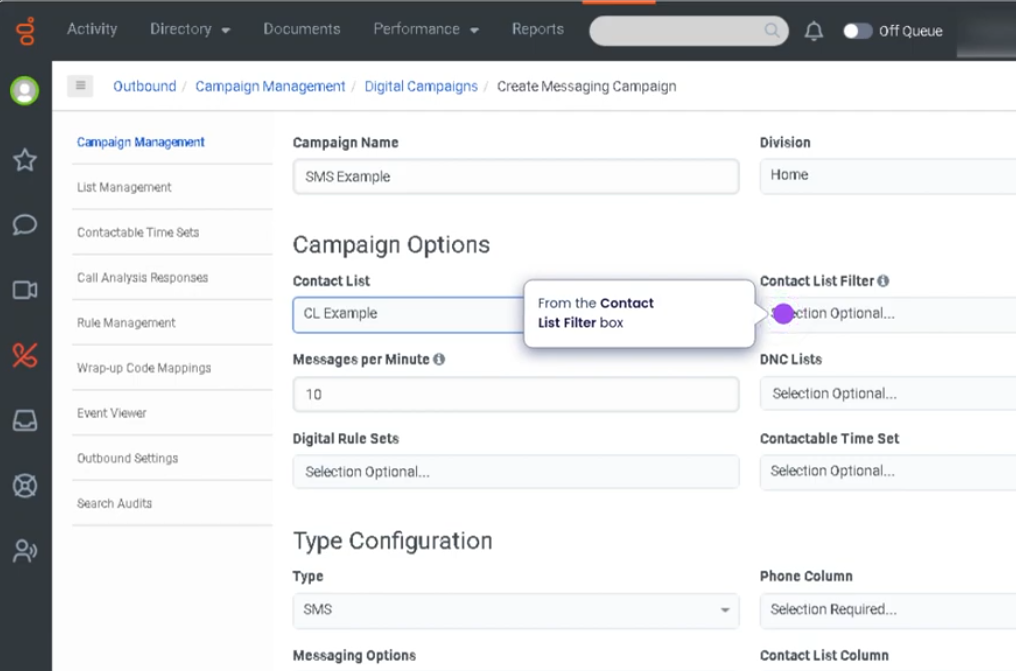
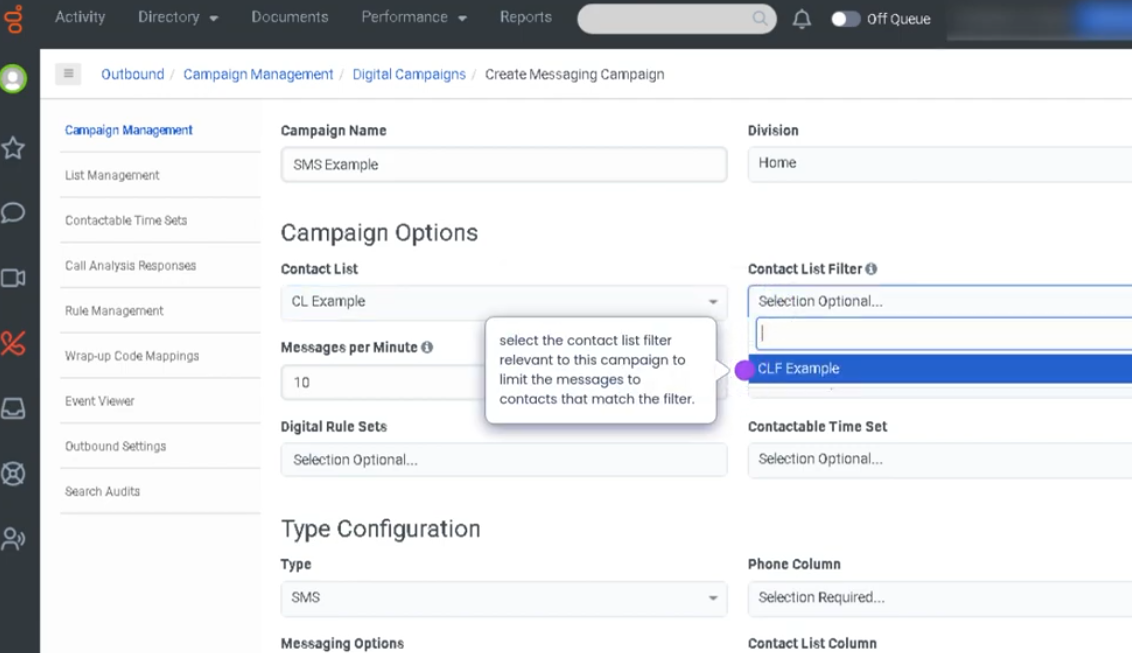
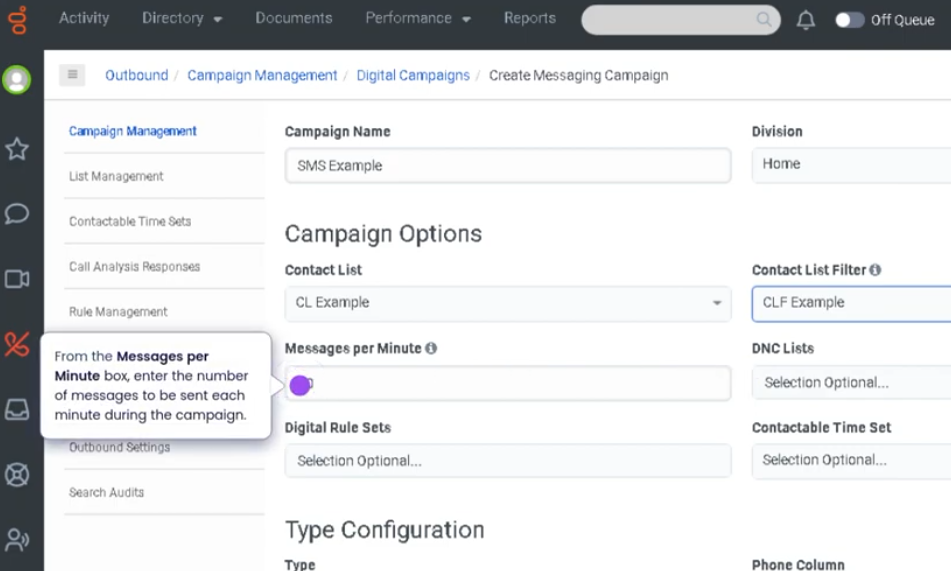
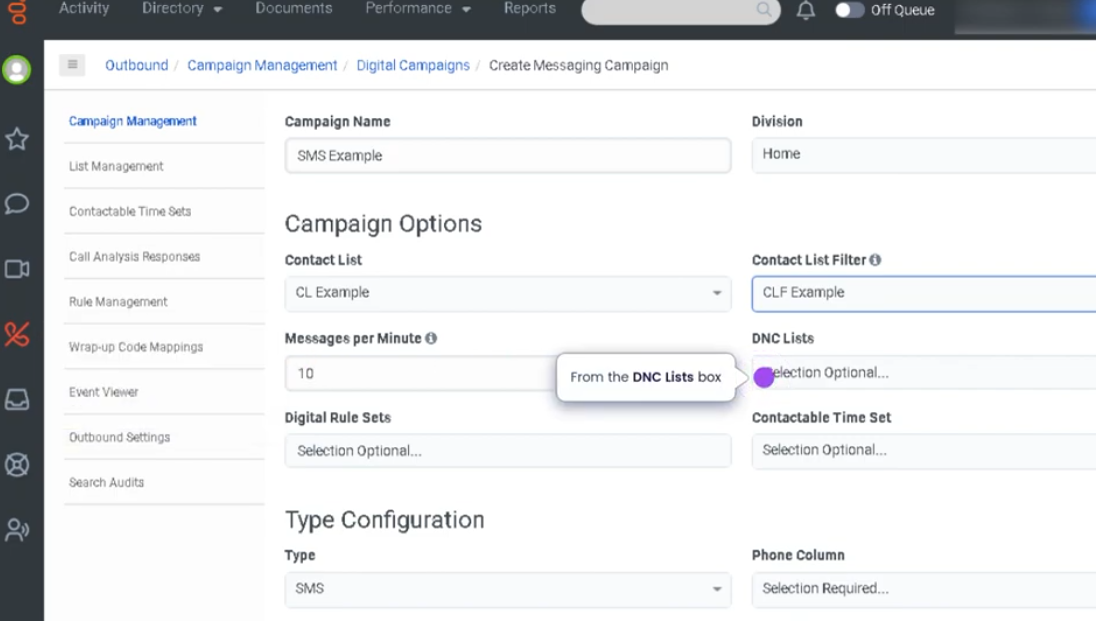
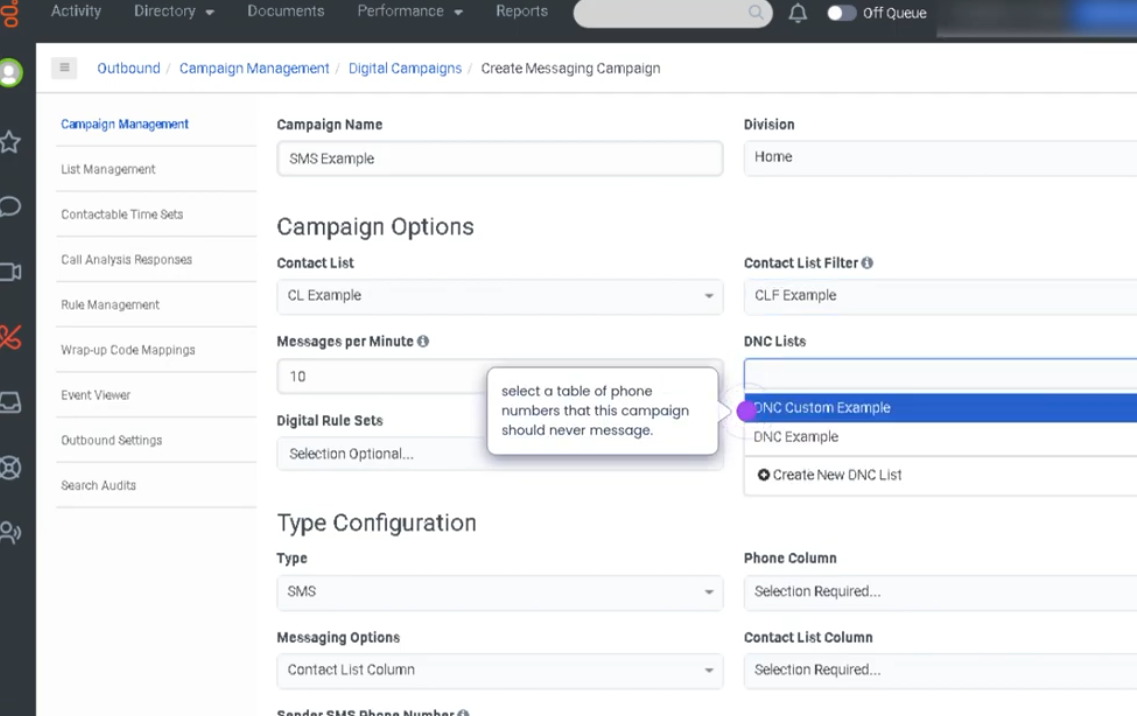

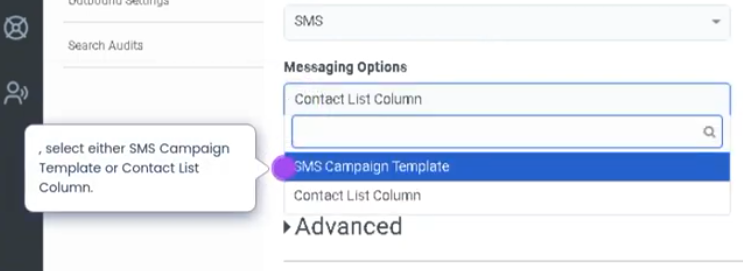
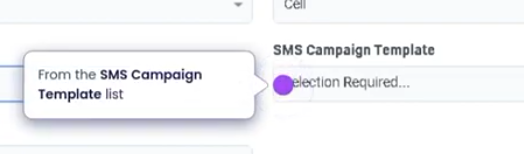
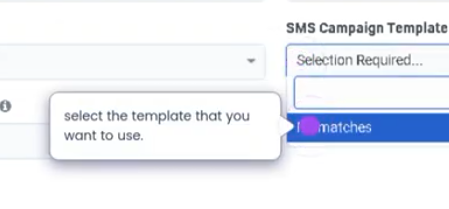
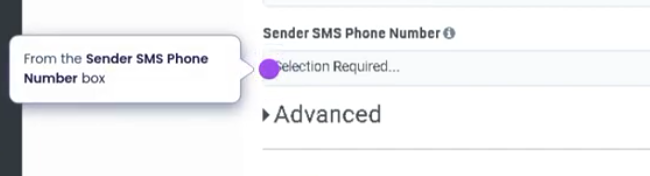

Create SMS Campaign (Genesys Cloud)
Summary
An SMS Campaign in Genesys Cloud allows organizations to send outbound text messages to customers using a contact list and messaging campaign configuration. SMS campaigns are commonly used for notifications, reminders, marketing outreach, and customer engagement.
The campaign uses contact lists, messaging templates, and campaign rules to send messages to targeted recipients. Responses from customers can be routed back to agents or queues, allowing organizations to maintain two-way messaging communication.
SMS campaigns help businesses deliver timely updates and proactive communication through a widely used mobile channel.
Utilization
| Use Case | Description |
|---|---|
| Appointment reminders | Send automated reminders to customers |
| Customer notifications | Inform customers about service updates or changes |
| Marketing promotions | Send promotional offers or announcements |
| Service alerts | Notify customers about outages or maintenance |
| Customer engagement | Enable two-way messaging with support teams |
SMS campaigns enable organizations to reach customers quickly and efficiently through mobile messaging.
Best Practices
| Practice | Reason |
|---|---|
| Ensure customer consent before sending SMS | Maintains regulatory compliance |
| Keep messages short and clear | Improves readability and response rates |
| Use approved messaging templates | Ensures consistent communication |
| Schedule campaigns at appropriate times | Avoids contacting customers outside acceptable hours |
| Segment contact lists carefully | Ensures messages are sent to relevant recipients |
| Monitor campaign performance | Helps improve future messaging campaigns |
Example Scenarios
Scenario 1 – Appointment Reminder Campaign
Organization prepares contact list
↓
SMS campaign created
↓
Reminder message template selected
↓
Campaign sends reminders to customers
↓
Customers receive notification on mobile devices
Scenario 2 – Promotional Outreach
Marketing team launches promotional campaign
↓
Contact list filtered for target audience
↓
SMS messages sent with promotion details
↓
Customers receive offer information
Scenario 3 – Two-Way Customer Engagement
Customer receives SMS notification
↓
Customer replies with question
↓
Interaction routed to messaging queue
↓
Agent responds to customer message
Key Benefits
| Benefit | Explanation |
|---|---|
| Rapid customer communication | Messages delivered instantly to mobile devices |
| High engagement rates | SMS typically has higher open rates than email |
| Two-way interaction capability | Customers can respond directly to messages |
| Scalable communication | Large groups of customers can be reached simultaneously |
| Integrated routing | Responses can be handled through Genesys Cloud queues |
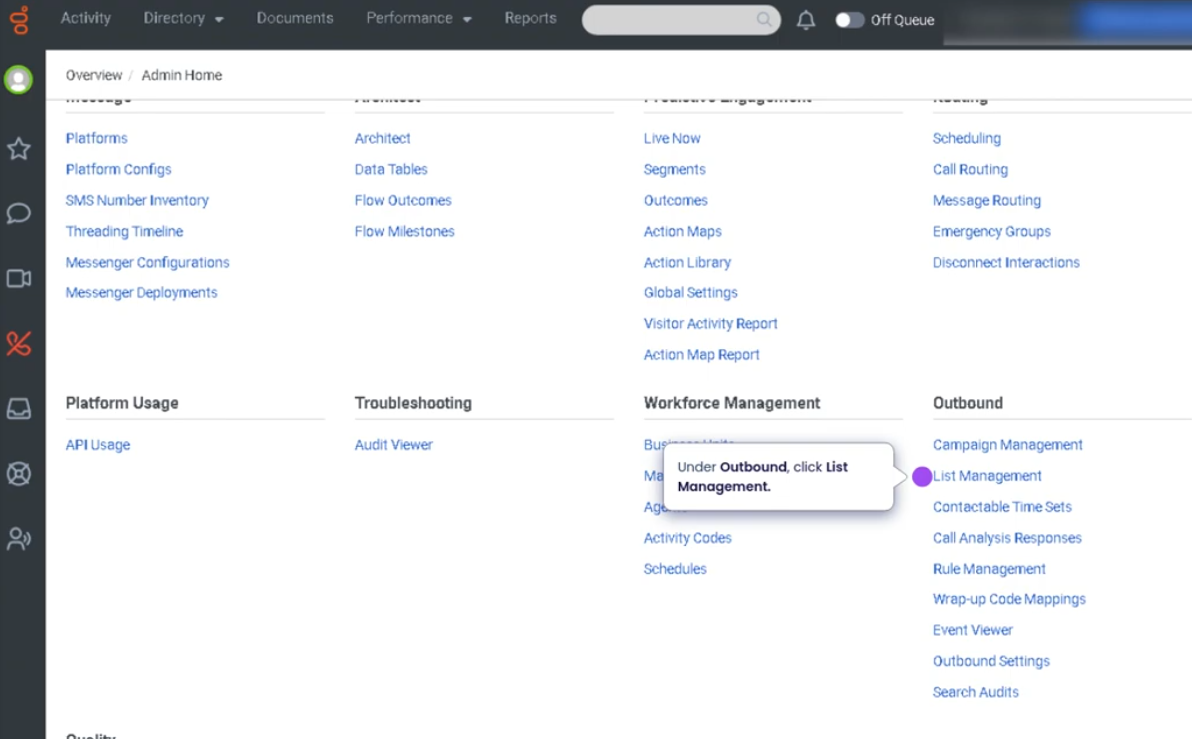
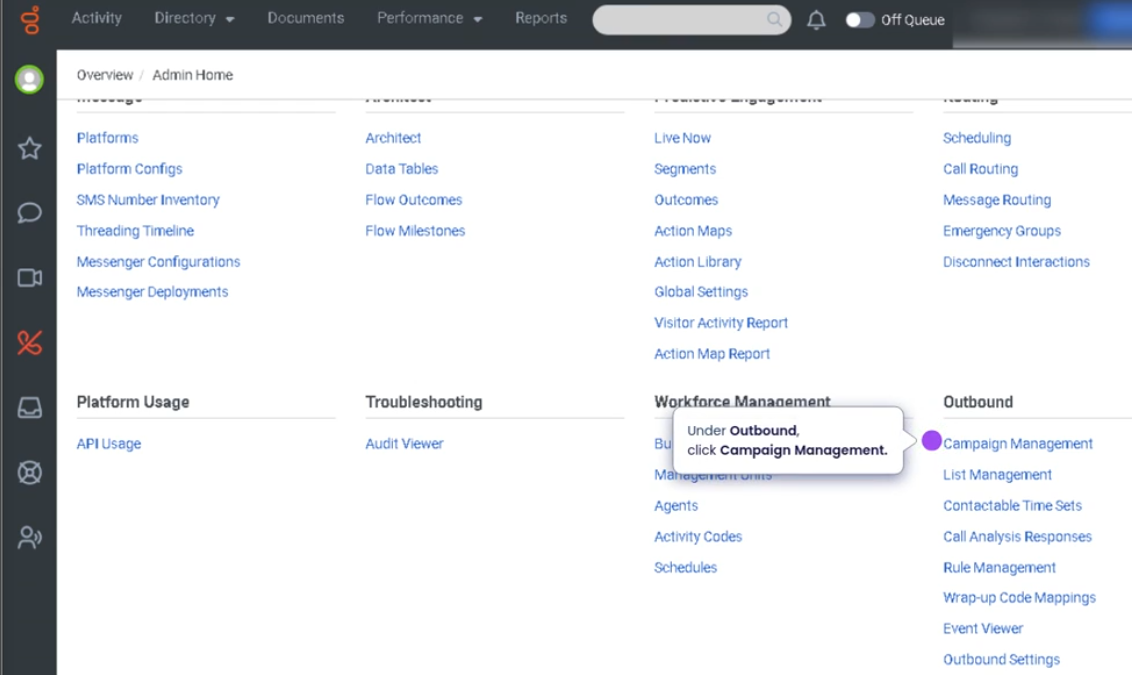
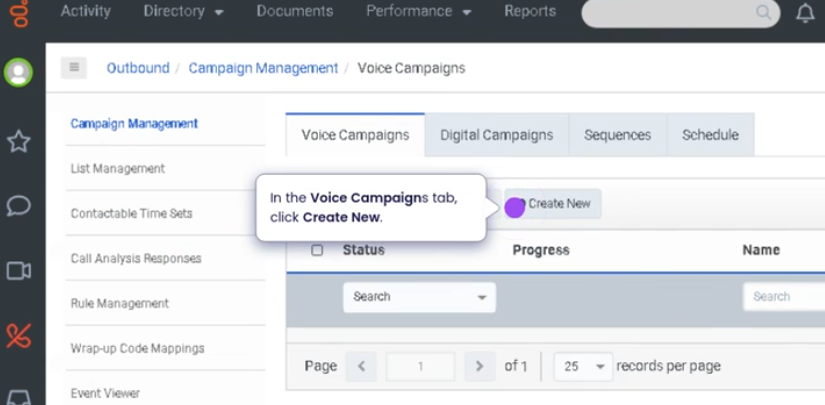
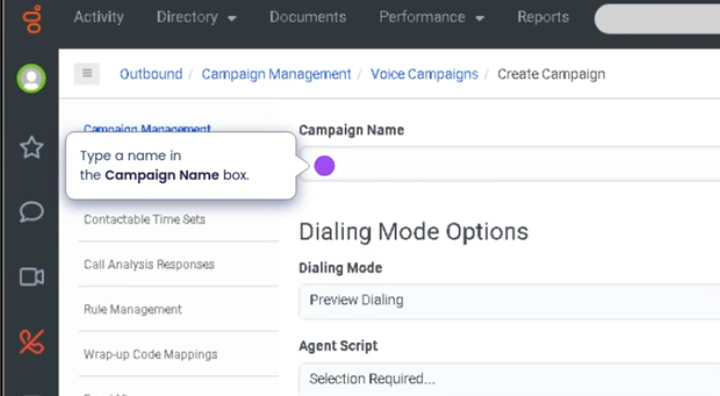
Genesys Cloud - How to - Outbound - Agentless Campaign
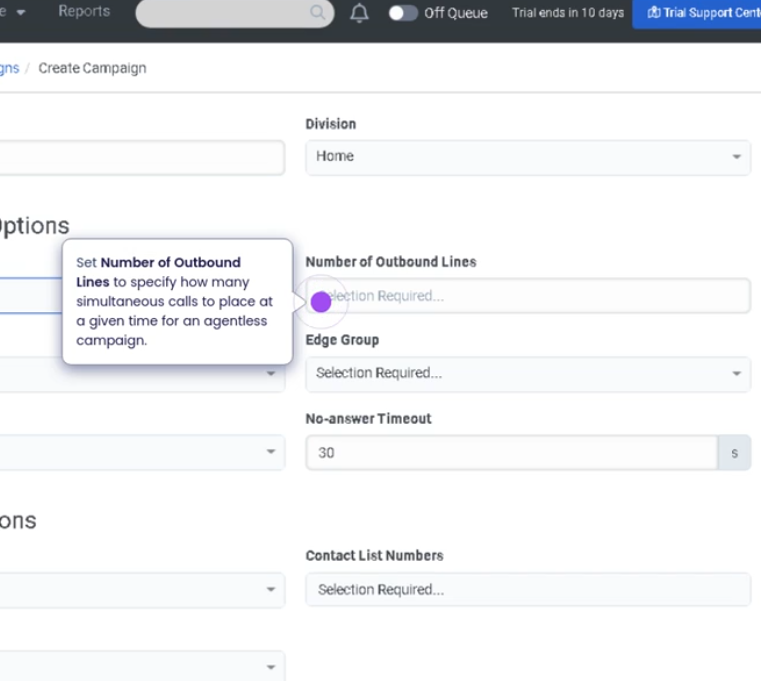
The maximum number of outbound lines is influenced by several operational components:
| Component | Description |
|---|---|
| Telephony capacity | Available SIP trunks or carrier channels |
| Dialing mode | Predictive, Power, Progressive, or Agentless dialing |
| Agent availability | Number of agents ready to handle calls |
| Campaign configuration | Dialing rules and pacing settings |
| System limits | Platform limits configured by Genesys Cloud |
| Compliance rules | Regulations that restrict dialing behavior |
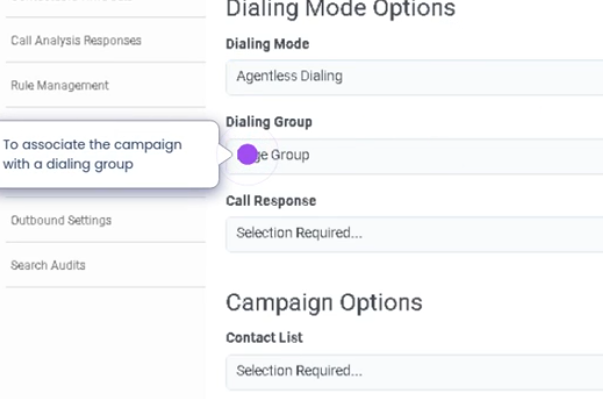
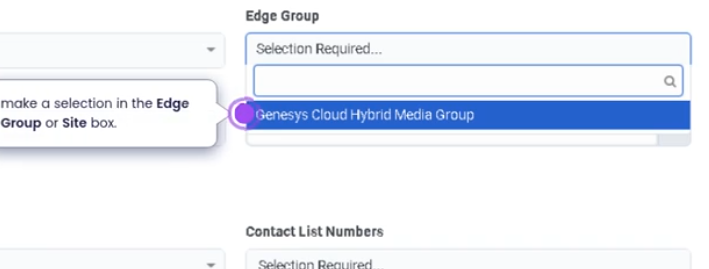
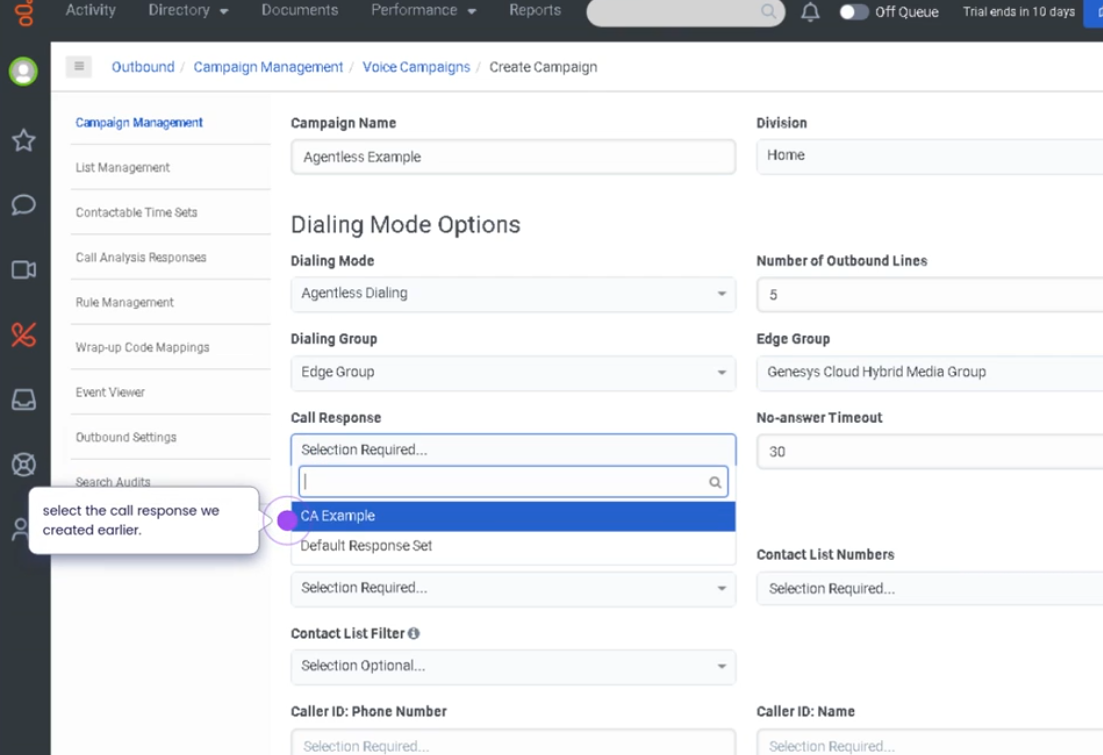
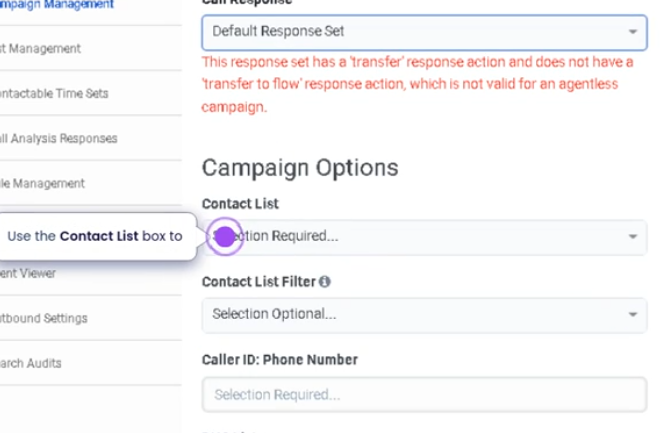
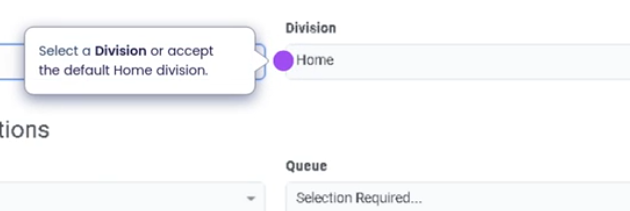
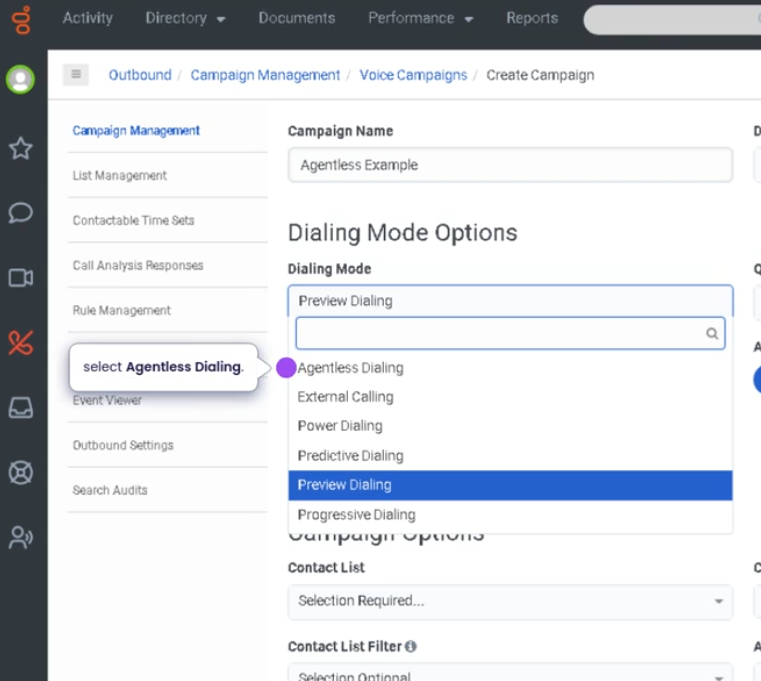
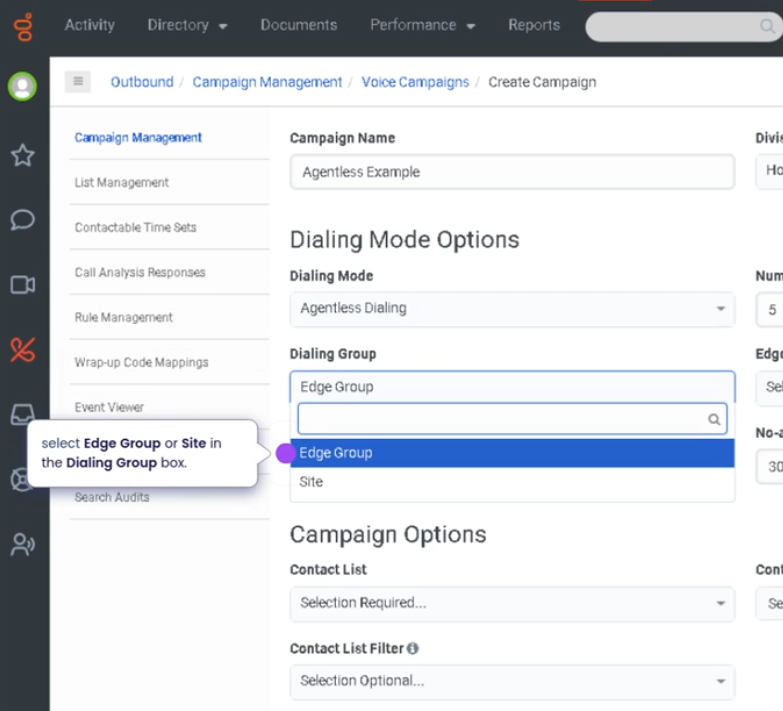
Create Agentless Campaign (Genesys Cloud)
Summary
An Agentless Campaign in Genesys Cloud is an outbound dialing campaign that automatically delivers pre-recorded messages or notifications to contacts without requiring an agent to participate in the call. These campaigns are commonly used for broadcast notifications, reminders, alerts, and informational announcements.
Agentless campaigns use contact lists, dialing rules, and pre-recorded audio messages to communicate with customers at scale. Since no agent is involved, the system automatically plays the message when the call is answered.
This feature is commonly used in proactive customer communication strategies, especially when large numbers of customers must be contacted quickly.
Utilization
| Use Case | Description |
|---|---|
| Appointment reminders | Automatically notify customers of upcoming appointments |
| Service outage alerts | Inform customers about system outages or maintenance |
| Payment reminders | Notify customers about pending or overdue payments |
| Emergency notifications | Deliver urgent alerts to large customer groups |
| Marketing announcements | Broadcast product updates or promotional campaigns |
Agentless campaigns allow organizations to reach large audiences quickly without requiring agent participation.
Best Practices
| Practice | Reason |
|---|---|
| Ensure customer consent for automated calls | Maintains regulatory compliance |
| Use clear and concise recorded messages | Ensures customers understand the message |
| Verify contact list accuracy before launching campaign | Prevents dialing incorrect numbers |
| Schedule campaigns during acceptable contact hours | Avoids customer dissatisfaction |
| Monitor campaign results and call outcomes | Helps evaluate campaign effectiveness |
| Avoid excessive campaign frequency | Prevents customer frustration |
Example Scenarios
Scenario 1 – Appointment Reminder Broadcast
Healthcare provider prepares contact list
↓
Administrator creates agentless campaign
↓
Pre-recorded appointment reminder selected
↓
System automatically dials contacts
↓
Customers receive reminder message
Scenario 2 – Service Outage Notification
Utility company experiences service outage
↓
Administrator launches agentless campaign
↓
Recorded alert message configured
↓
System calls affected customers
↓
Customers receive outage notification
Scenario 3 – Payment Reminder Notification
Billing department identifies overdue accounts
↓
Contact list created
↓
Agentless campaign configured with reminder message
↓
System delivers automated calls to customers
Key Benefits
| Benefit | Explanation |
|---|---|
| Scalable communication | Large groups of customers can be contacted quickly |
| No agent involvement required | Automated calls reduce workload on agents |
| Fast message delivery | Notifications reach customers immediately |
| Operational efficiency | Ideal for broadcast-style communications |
| Integrated campaign management | Managed within Genesys Cloud outbound dialing framework |
Create a skill expression group
Lab: Create a Skill Expression Group
Book: Genesys Cloud How-To → Groups, Users & Roles Reference page: Groups (People & Permissions) — Chapter 2: People & Access Navigation: Admin → Directory → Groups → Skill Expression tab
Before You Start
| Requirement | Why |
|---|---|
| ACD Skills must already exist in the org | You can only build expressions against skills that have been created |
| Skills must be assigned to at least some users | Otherwise the group will populate empty |
| Division decided | You cannot change a group's division after creation |
Step 1: Navigate to Groups
- Click Admin
- Under Directory, click Groups
Step 2: Access Skill Expressions
- Click the Skill Expression tab (next to the General tab at the top of the Groups page)
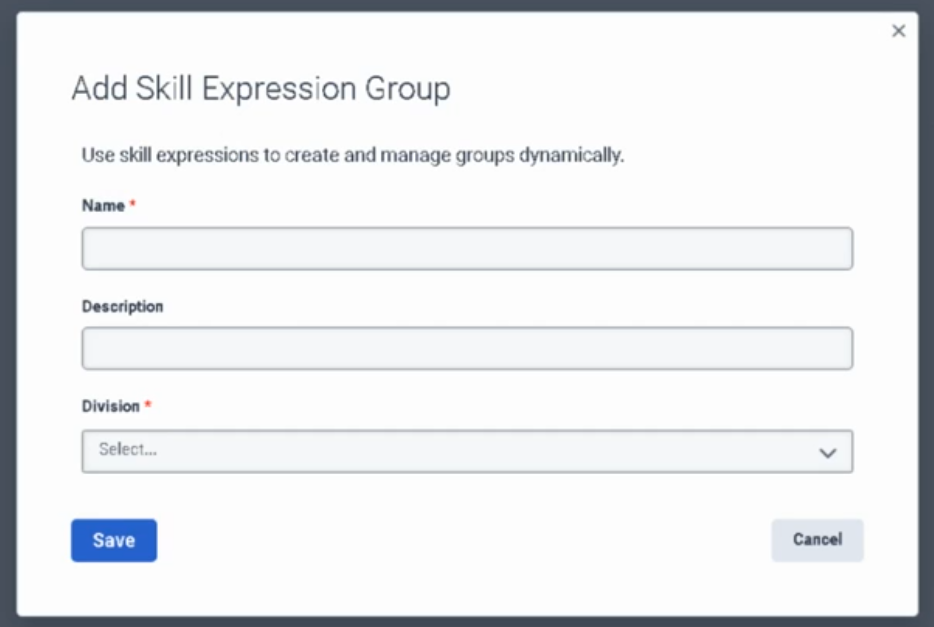
- Click Add Skill Expression Group
Step 3: Basic Configuration
| Field | Notes |
|---|---|
| Name | Clear, descriptive name (e.g., "Level 3 VoIP Engineers", "Spanish Bilingual Agents") |
| Description | Optional — explain the purpose or the skill logic being used |
| Division | Select the division this group belongs to |
Click Save.
Step 4: Build the Skill Expression Logic
- You are now on the group's Membership tab
- On the right side, click Build Skill Expression
- Click Add to create your first condition
Step 5: Define the First Condition
For each condition, configure three fields:
| Field | Options |
|---|---|
| Skill | Type the ACD skill name (e.g., "SIP", "Spanish", "Troubleshooting") |
| Operator | == Equal to / > Greater than / >= Greater than or equal to |
| Skill Level | Proficiency level 1–5 |
Example: Spanish >= 3 → includes all agents with Spanish skill at level 3, 4, or 5
Step 6: Add Sub-Conditions (Optional)
To filter by multiple skills:
- Click Add again to add another condition
- Choose the logical connector:
- AND — agent must meet all conditions
- OR — agent must meet at least one condition
- Define the additional skill, operator, and level
Example multi-condition expression:
Spanish >= 3
AND
SIP >= 2
→ Only agents who have Spanish level 3+ AND SIP level 2+ are included
Example OR expression:
French >= 2
OR
Spanish >= 2
→ Agents who speak either French or Spanish at level 2+ are included
Step 7: Save
Click Save.
The group will now automatically populate with all agents whose ACD skill assignments match the expression. No manual member management required.
What Happens After Saving
- Membership updates approximately 1 minute after any agent's skills change
- New agents assigned the matching skills are automatically added
- Agents whose skills drop below the threshold are automatically removed
- Membership is read-only — you cannot manually add or remove members from a Skill Expression Group
Key Limits (Reference)
| Limit | Value |
|---|---|
| Max Skill Expression Groups per org | 300 |
| Max primary conditions per group | 10 |
| Max sub-conditions per primary condition | 10 |
Troubleshooting
| Issue | Check |
|---|---|
| Group shows no members | Verify the ACD skill name is spelled exactly as configured; verify agents have the skill assigned at the correct level |
| Group not updating after skill change | Wait ~1 minute; skill expression groups do not update instantly |
| Cannot find skill in expression builder | The skill may not exist yet — create it first under Admin → Contact Center → ACD Skills |
| Cannot manually add a member | Expected behaviour — Skill Expression Groups are fully automatic; use a General Group if you need manual control |
See Also
- Groups (People & Permissions) — full reference including group types, limits, and general group creation
- Lab: Create a Queue — assigning skill expression groups to queues as members
- User Profile Management — where ACD Skills are assigned to individual agents