Genesys Cloud - How To - Basic Navigation for Agents
- Genesys Cloud - Admin - Released Evaluations
- Genesys Cloud - Admin - Change Web Apperance - Preferences
- Genesys Cloud - Admin - Create a group workspace
- Genesys Cloud - Admin - Development and feedback module
- Genesys Cloud - Admin - Drop a shift for someone else
- Genesys Cloud - Admin - Favorites
- Genesys Cloud - Admin - First login
- Genesys Cloud - Admin - Logout
- Genesys Cloud - Admin - My Evaluations
- Genesys Cloud - Admin - My queues and activity view
- Genesys Cloud - Admin - My Schedule
- Genesys Cloud - Admin - My status view
- Genesys Cloud - Admin - Pick up extra shift
- Genesys Cloud - Admin - Request to trade a shift
- Genesys Cloud - Admin - Time off request
- Genesys cloud - Admin - Upload file to workspace
- Genesys Cloud - Admin - Your Schedule
- Genesys Cloud - Agent - Accept ACD Calls
- Genesys Cloud - Agent - Accept and respond to a social media interaction
- Genesys Cloud - Agent - Accept and respond to message interaction
- Genesys Cloud - Agent - Accept and respond to SMS Interactions
- Genesys Cloud - Agent - Change Presence and Status
- Genesys Cloud - Agent - Choose Queues to Work
- Genesys Cloud - Agent - Email interaction
- Genesys Cloud - Agent - Fordward calls
- Genesys Cloud - Agent - How to place a call on behalf of a queue
- Genesys Cloud - Agent - Schedule callbacks during Voice Interaction
- Genesys Cloud - Agent - Select a Phone
Genesys Cloud - Admin - Released Evaluations
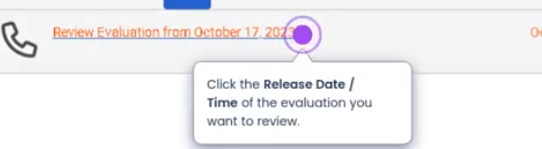
Released Evaluations (Genesys Cloud Quality Management)
Summary
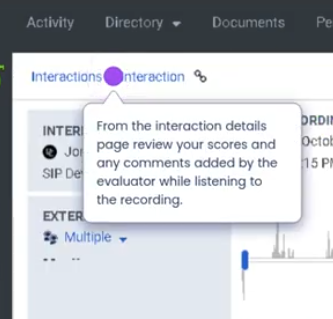
Released Evaluations in Genesys Cloud refer to quality evaluations that have been completed by a supervisor or evaluator and made available to the agent for review. Once an evaluation is released, the agent can view the scorecard, feedback, and scoring details related to a specific interaction.
Released evaluations are an important part of Quality Management (QM) because they provide transparency into performance assessments, coaching opportunities, and improvement areas based on recorded interactions such as voice, chat, email, or messaging.
Utilization
| Use Case | Description |
|---|---|
| Performance review | Agents review evaluation scores and feedback from supervisors |
| Coaching and training | Supervisors use evaluations to identify improvement opportunities |
| Quality assurance tracking | Organizations monitor service quality and compliance |
| Interaction analysis | Evaluations help identify patterns in customer interactions |
| Agent development | Agents use feedback to improve communication and service skills |
Released evaluations ensure that agents can review and understand performance expectations and scoring criteria.
Best Practices
| Practice | Reason |
|---|---|
| Review evaluations promptly | Helps agents understand feedback while interactions are still fresh |
| Carefully read evaluator comments | Provides context behind scoring decisions |
| Use evaluations for self-improvement | Identifies opportunities to improve service quality |
| Discuss unclear feedback with supervisors | Promotes learning and alignment on expectations |
| Track evaluation trends over time | Helps agents monitor performance improvement |
| Follow coaching recommendations | Supports continuous development and quality improvement |
Example Scenarios
Scenario 1 – Agent Reviews Performance Evaluation
Supervisor evaluates recorded interaction
↓
Evaluation is completed and released
↓
Agent receives notification
↓
Agent opens Released Evaluations view
↓
Agent reviews score and feedback
Scenario 2 – Coaching Session Based on Evaluation
Evaluator completes interaction evaluation
↓
Evaluation released to agent
↓
Agent reviews evaluation results
↓
Supervisor schedules coaching session
↓
Agent receives guidance for improvement
Scenario 3 – Performance Trend Monitoring
Agent reviews multiple released evaluations
↓
Agent identifies recurring feedback themes
↓
Agent adjusts communication approach
↓
Future evaluations show improved performance
Key Benefits
| Benefit | Explanation |
|---|---|
| Transparent performance feedback | Agents clearly see how interactions are evaluated |
| Continuous improvement | Supports coaching and skill development |
| Standardized quality scoring | Ensures consistent evaluation criteria |
| Improved customer experience | Quality feedback leads to better interactions |
| Accountability and learning | Agents understand strengths and improvement areas |
Genesys Cloud - Admin - Change Web Apperance - Preferences
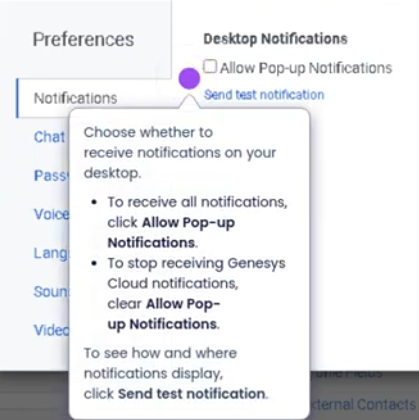
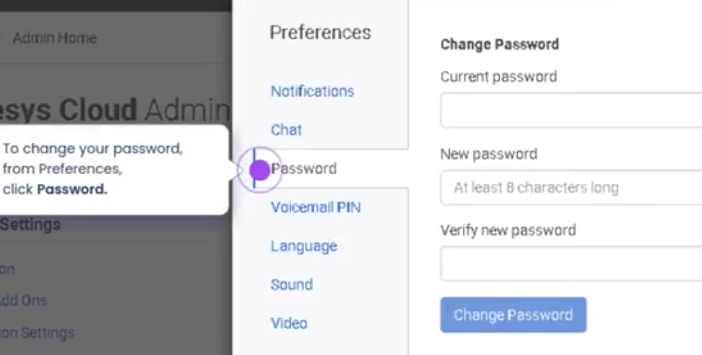
Access Preferences from sidebar, click your profile picture
Notifications

Click Preferences

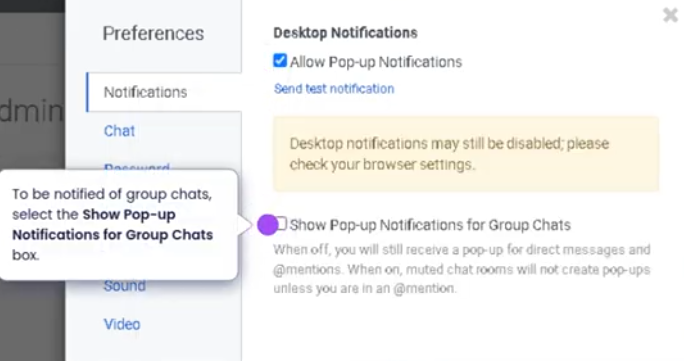
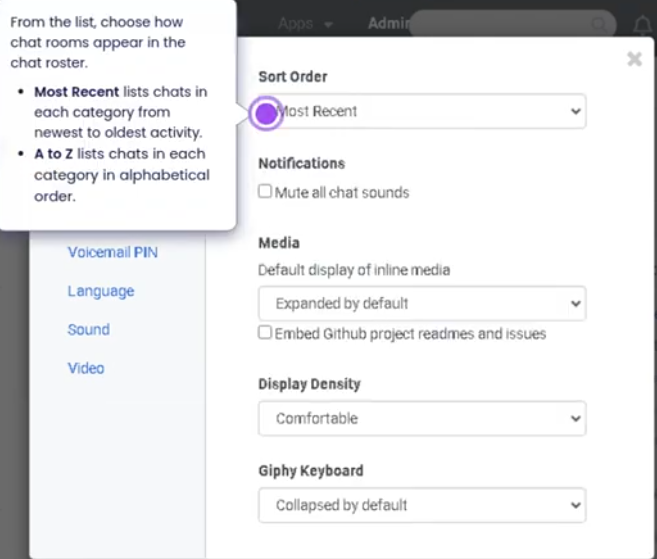
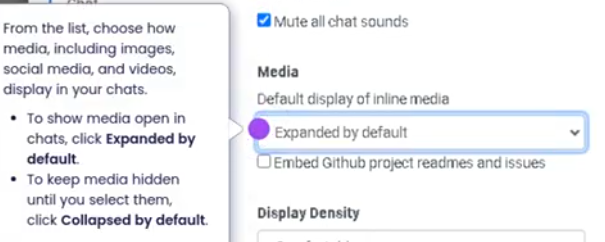
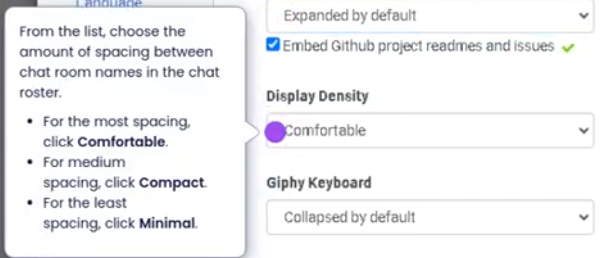
Chat preferences

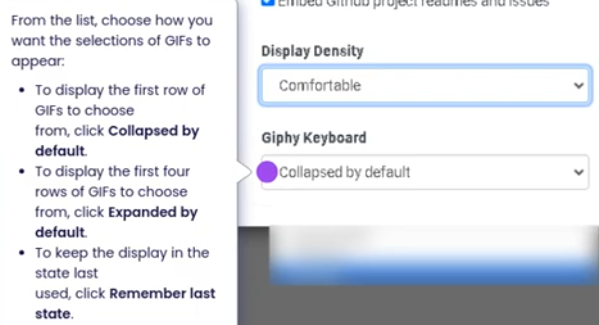
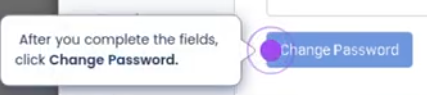
Reset Password
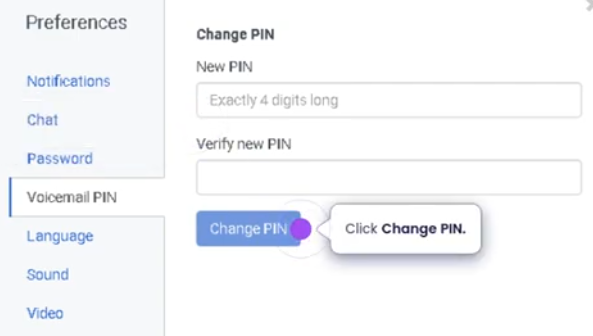
Voicemail Pin
Type in your new PIN and Change Pin
Language Preference
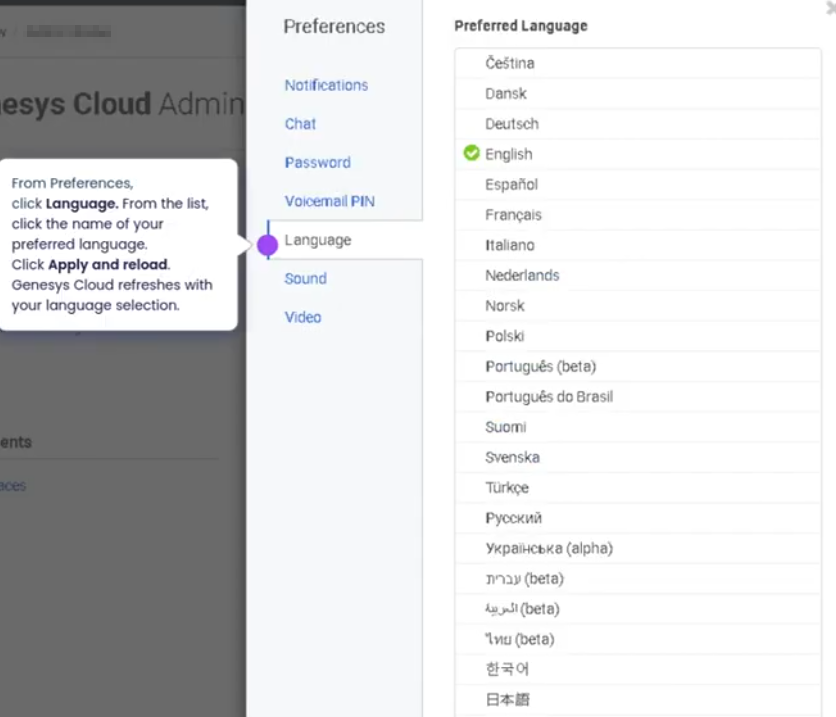
Sound Preference
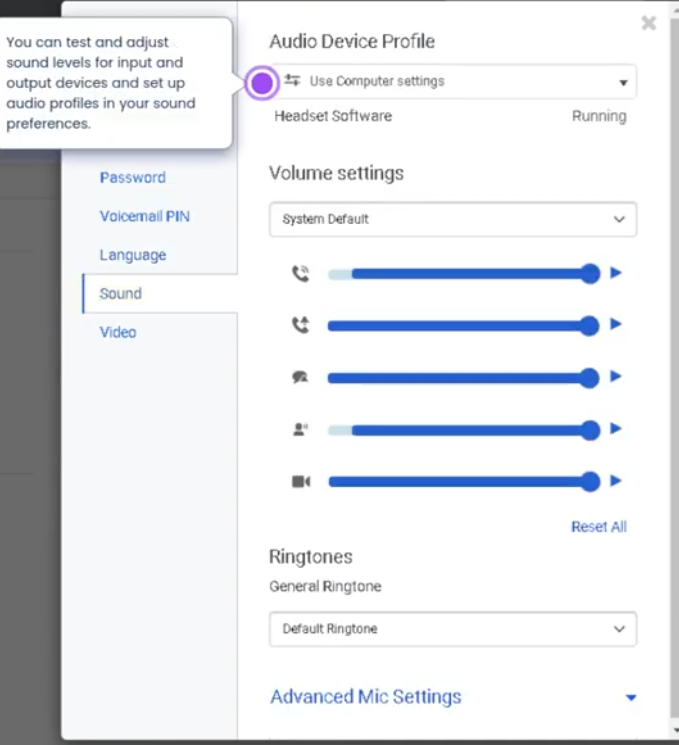
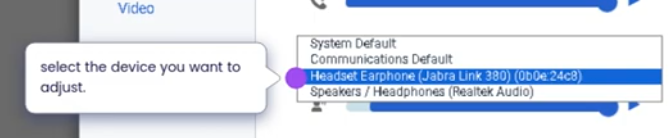
To select a headset
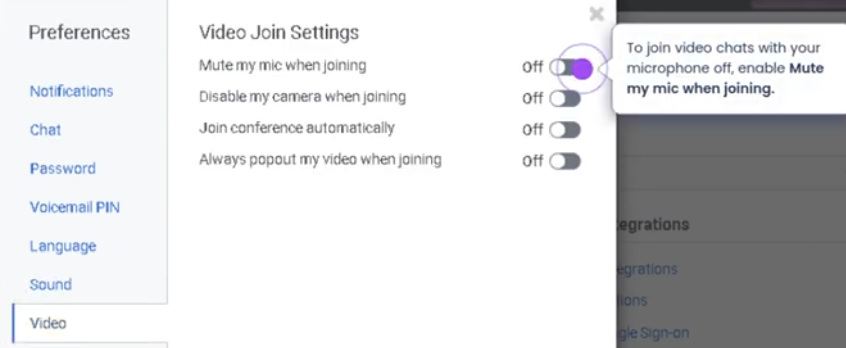
Video settings
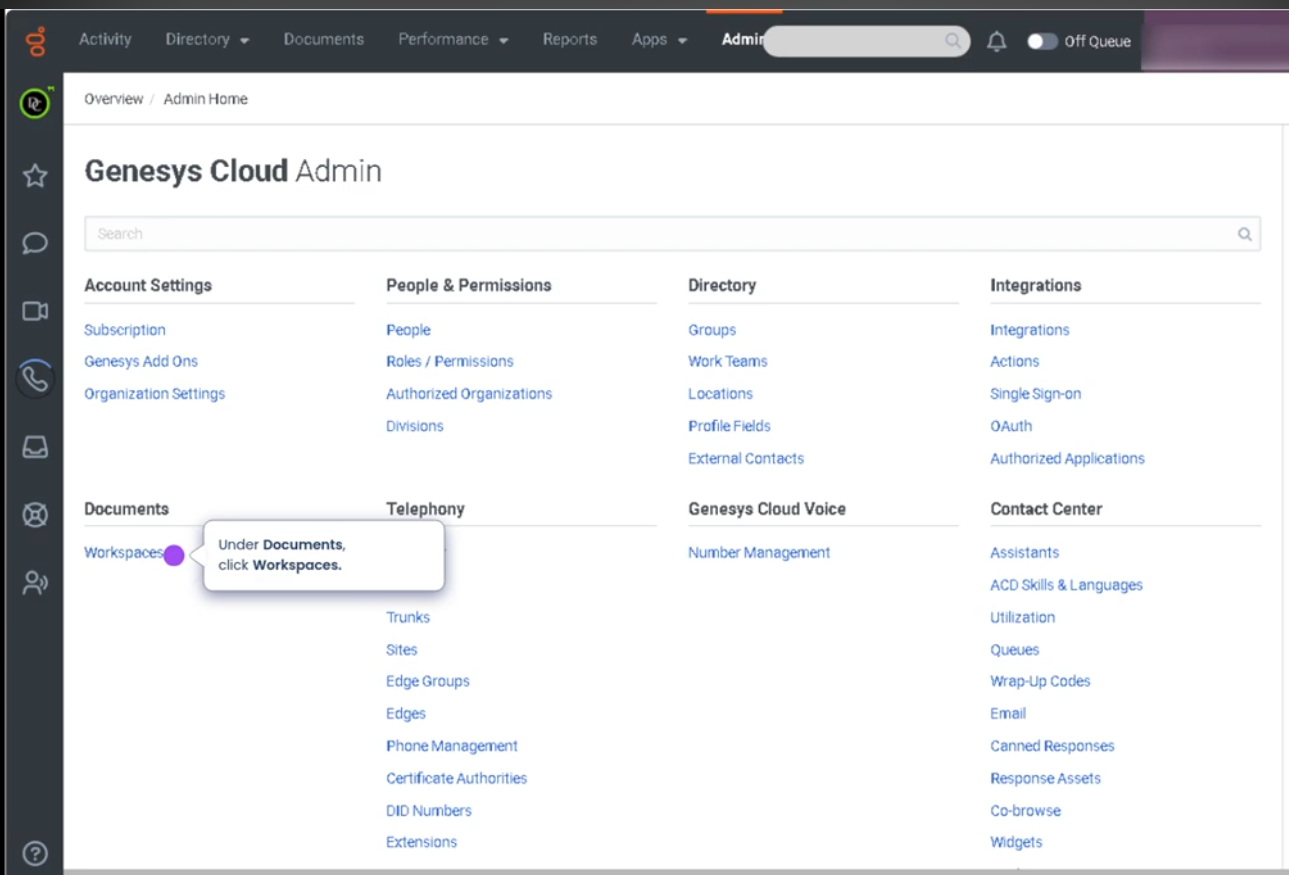
Genesys Cloud - Admin - Create a group workspace
Workspaces (Groups) in Genesys Cloud
Workspaces in Genesys Cloud are created using Groups.
A workspace provides a shared collaboration environment where members can communicate, share files, and coordinate work inside the platform.
Purpose of Workspaces
| Purpose | Description | Example |
|---|---|---|
| Team Collaboration | Provides a shared communication space for a team | Support Team |
| Operational Coordination | Allows teams to coordinate incidents or daily operations | NOC Operations |
| Project Communication | Dedicated space for project teams | Migration Project |
| Knowledge Sharing | Members share files, links, and information | Engineering Workspace |
Workspace Components
| Component | Description |
|---|---|
| Name | Identifies the workspace |
| Description | Explains the purpose of the workspace |
| Members | Users who belong to the workspace |
| Owners | Users who manage the workspace |
| Visibility | Determines if the workspace is public or private |
| Tags | Labels used to organize and search workspaces |
Example Workspace Configuration
| Field | Example |
|---|---|
| Workspace Name | Platform-NOC |
| Description | Network Operations coordination workspace |
| Visibility | Private |
| Owners | NOC Manager |
| Members | Network Engineers |
| Tags | noc, infrastructure |
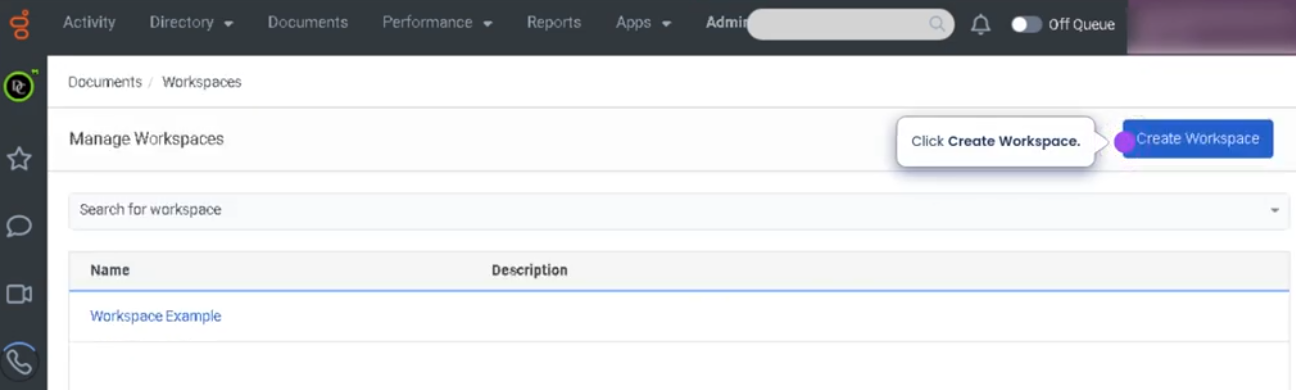
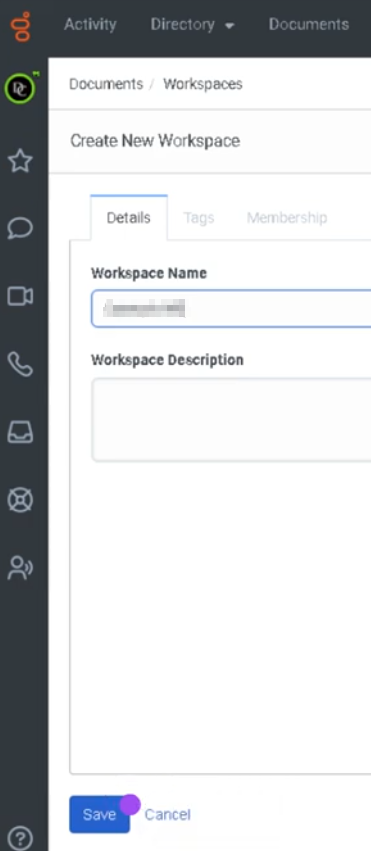
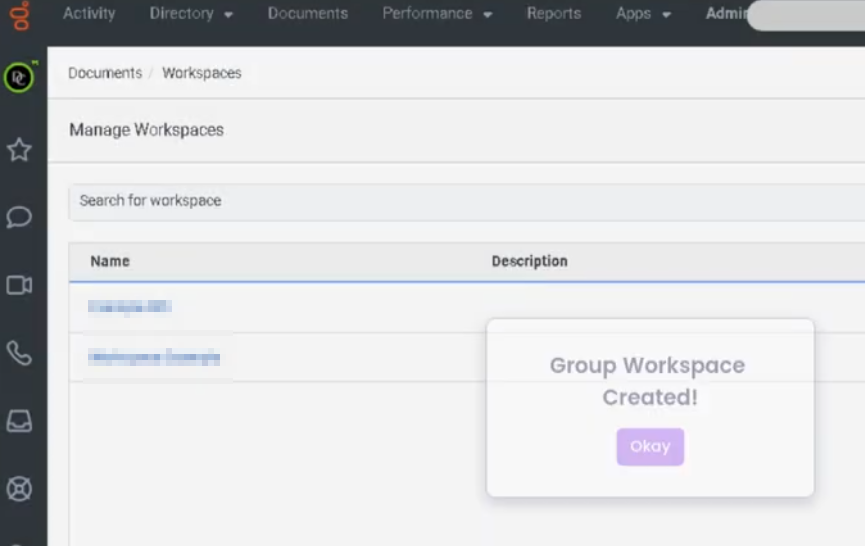
How to Create a Workspace
Example Workspace Structure
| Workspace | Purpose |
|---|---|
| Support-Tier1 | Customer support coordination |
| Dialer-Operations | Outbound dialing operations |
| Network-NOC | Infrastructure monitoring |
| Engineering-Voice | Telephony engineering collaboration |
Best Practices
| Practice | Reason |
|---|---|
| Use clear workspace names | Helps users identify the purpose |
| Limit workspace owners | Prevents configuration conflicts |
| Assign relevant members only | Keeps communication focused |
| Use tags for organization | Improves search and filtering |
Key Notes
| Statement | Explanation |
|---|---|
| Workspaces are implemented as Groups | Genesys Cloud uses groups as collaboration spaces |
| Membership controls access | Users must be members to participate in private workspaces |
| Owners manage the workspace | Owners can modify configuration and membership |
| Workspaces support collaboration | Enables messaging and shared information across teams |
How to Implement
| Step | Procedure |
|---|---|
| 1 | Log in to Genesys Cloud with administrator privileges |
| 2 | Navigate to Admin |
| 3 | Select Directory |
| 4 | Click Groups |
| 5 | Select Create Group |
| 6 | Enter group name and description |
| 7 | Configure visibility settings |
| 8 | Assign owners |
| 9 | Add members |
| 10 | Click Save |
Step by Step
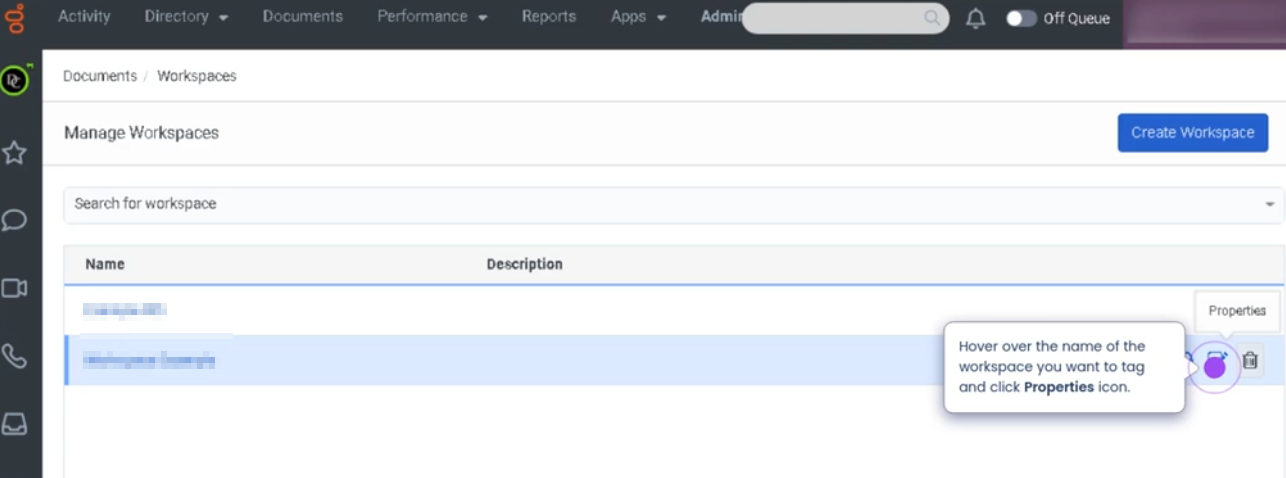
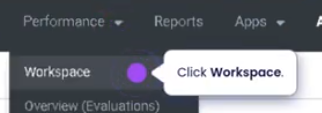
Navigate to Workspaces
Create workspace
Type in the workspace name and workspace description and save
Workspace created
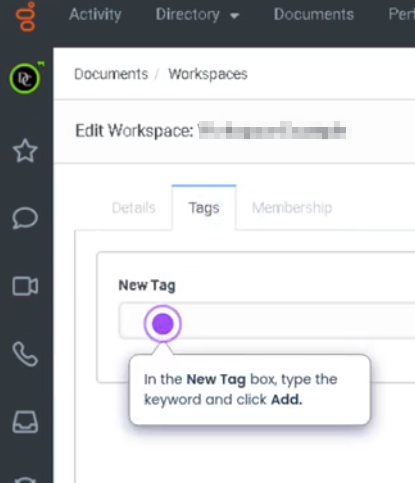
TAGS
In Genesys Cloud, tags are metadata labels applied to groups (workspaces) to make them easier to organize, search, filter, and manage across the platform. They are especially useful in environments with many teams, departments, and operational groups.
Why Use Tags
| Purpose | Description | Example |
|---|---|---|
| Organization | Categorize groups by function or department | support, engineering |
| Search | Quickly locate groups using filters | incident, dialer |
| Scalability | Helps manage large environments with many groups | project, migration |
| Classification | Identify region or business unit | na, latam, emea |
Common Tag Categories
| Category | Example Tags | Use Case |
|---|---|---|
| Department | support, sales, engineering | Organize by team |
| Function | incident, escalation, dialer | Operational classification |
| Region | na, latam, emea | Geographic grouping |
| Project | migration, ai, analytics | Temporary collaboration spaces |
Example Workspace Tag Configuration
| Workspace Name | Tags |
|---|---|
| Support Tier 1 | support, escalation |
| Network Operations | noc, infrastructure |
| Outbound Dialer Team | dialer, outbound |
| Platform Engineering | engineering, voice |
Tag Best Practices
| Practice | Reason |
|---|---|
| Use lowercase tags | Prevents duplicate variations |
| Keep tags short | Easier filtering and readability |
| Standardize naming | Ensures consistency across teams |
| Limit tag count | 3–5 tags per workspace is recommended |
Example Tag Structure for Large Environments
| Tag Type | Example |
|---|---|
| Department | support |
| Function | incident |
| Region | latam |
| Project | migration |
Add tags to a group workspace

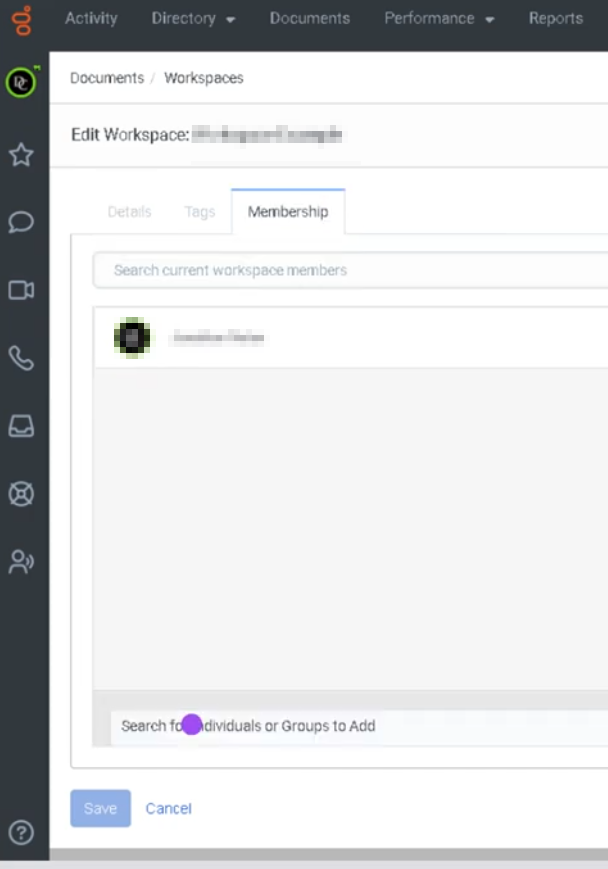
Why You Need to Assign Users to Workspaces (Membership)
Brief Summary
You assign users to a workspace (group membership) so they can access and participate in that workspace.
Membership controls who can see the group, join conversations, receive notifications, and collaborate with the team.
If a workspace is Private, users must be members to access it.
Why Membership Is Required
| Reason | Explanation |
|---|---|
| Access Control | Only members can access private workspaces |
| Collaboration | Members can participate in workspace conversations |
| Notifications | Members receive activity updates from the workspace |
| Team Organization | Ensures communication stays within the appropriate team |
Access Levels
| Role | Description | Typical Use Case |
|---|---|---|
| Owner | Full administrative control of the workspace. Can edit the group, manage members, and delete the group. | Team leads, supervisors, administrators |
| Contributor | Can participate in conversations, share files, and collaborate within the workspace. Cannot manage group configuration. | Regular team members |
| Viewer | Can view workspace content but cannot actively contribute or post messages. | Stakeholders, auditors, observers |
Role Permissions Overview
| Capability | Owner | Contributor | Viewer |
|---|---|---|---|
| View Workspace | ✓ | ✓ | ✓ |
| Participate in Conversations | ✓ | ✓ | ✗ |
| Share Files / Content | ✓ | ✓ | ✗ |
| Add or Remove Members | ✓ | ✗ | ✗ |
| Modify Group Settings | ✓ | ✗ | ✗ |
| Delete Workspace | ✓ | ✗ | ✗ |
Best Practice
| Recommendation | Reason |
|---|---|
| Limit Owners | Prevents accidental configuration changes |
| Use Contributor for most users | Enables collaboration without administrative control |
| Use Viewer for monitoring roles | Allows oversight without interaction |
Assign users

Genesys Cloud - Admin - Development and feedback module
Development and Feedback Module (Genesys Cloud)
Summary
The Development and Feedback module in Genesys Cloud is part of the Performance Management and Coaching framework. It allows supervisors and managers to provide structured feedback, coaching, and development plans to agents based on performance metrics, interaction evaluations, and operational observations.
This module supports continuous improvement by enabling agents to receive actionable feedback, track progress, and review development activities related to their performance. It integrates with other Genesys Cloud tools such as Quality Management (QM), evaluations, and performance dashboards.
Utilization
| Use Case | Description |
|---|---|
| Performance improvement | Supervisors provide coaching and improvement recommendations |
| Agent development | Managers create development plans to enhance agent skills |
| Feedback delivery | Agents receive structured feedback on performance |
| Performance tracking | Organizations monitor agent improvement over time |
| Training alignment | Coaching sessions can align with training programs |
The Development and Feedback module helps organizations build stronger agent performance through structured coaching and performance reviews.
Best Practices
| Practice | Reason |
|---|---|
| Provide timely feedback | Ensures agents remember the interaction and context |
| Focus feedback on specific behaviors | Helps agents understand exactly what needs improvement |
| Use objective performance data | Maintains fairness and transparency |
| Combine feedback with coaching sessions | Reinforces learning and development |
| Encourage agent participation | Promotes engagement and ownership of improvement |
| Track progress over time | Helps supervisors measure improvement and effectiveness |
Example Scenarios
Scenario 1 – Supervisor Provides Coaching Feedback
Supervisor reviews agent performance metrics
↓
Supervisor identifies improvement opportunity
↓
Supervisor creates feedback entry in Development module
↓
Agent reviews feedback and recommendations
Scenario 2 – Agent Performance Development Plan
Agent receives multiple evaluation results
↓
Supervisor identifies recurring performance theme
↓
Supervisor creates development plan
↓
Agent follows recommended training and coaching
↓
Performance improves over time
Scenario 3 – Follow-Up Coaching Session
Supervisor reviews previous feedback
↓
Supervisor schedules coaching discussion
↓
Agent reviews feedback before meeting
↓
Supervisor and agent discuss improvement strategies
Key Benefits
| Benefit | Explanation |
|---|---|
| Continuous agent improvement | Structured feedback helps agents develop skills |
| Transparent performance evaluation | Agents clearly understand expectations |
| Coaching-driven culture | Encourages constructive performance discussions |
| Data-supported development | Feedback can be tied to metrics and evaluations |
| Increased service quality | Improved agent performance leads to better customer experiences |
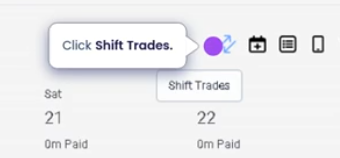
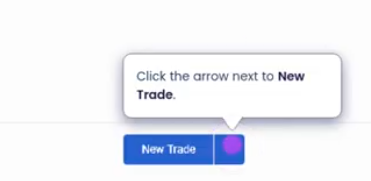
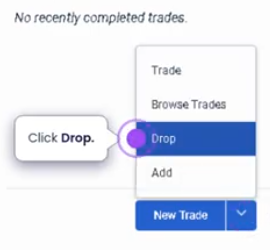
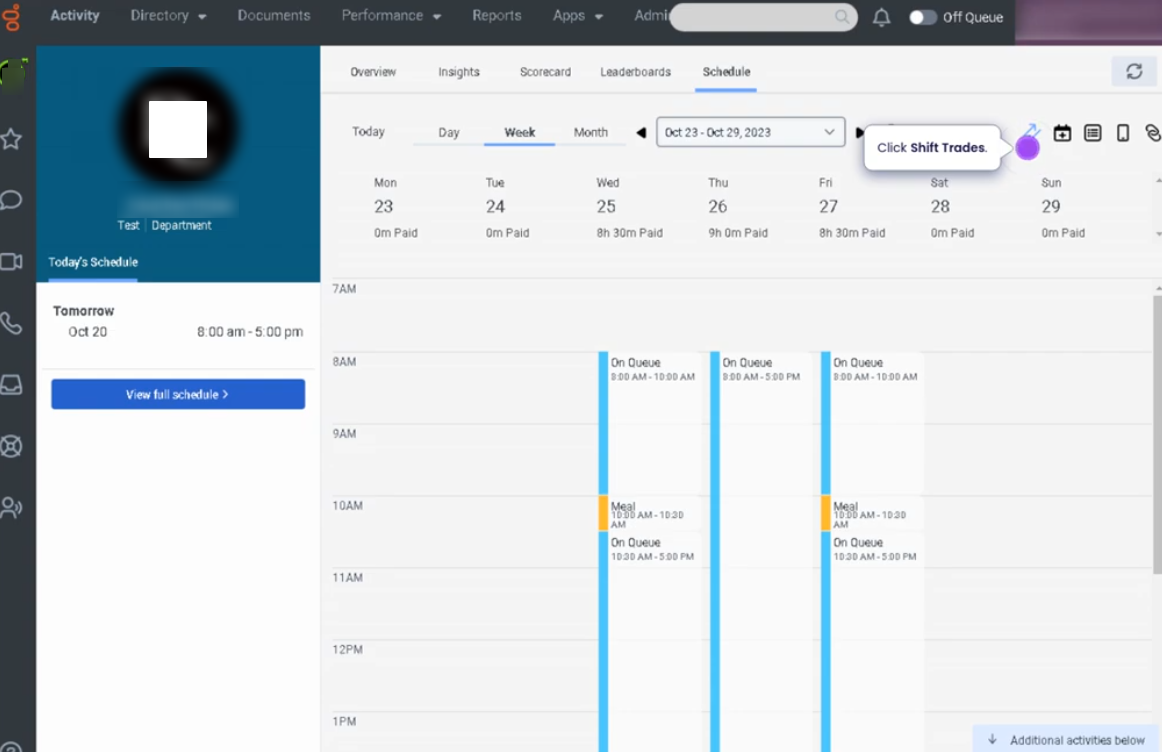
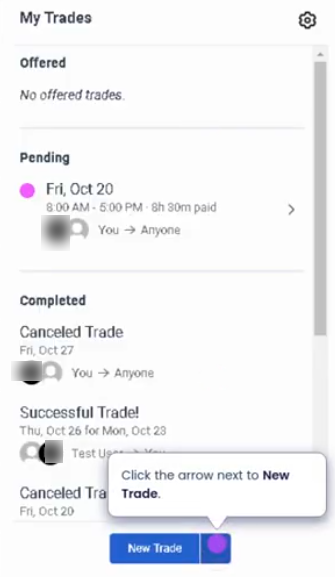
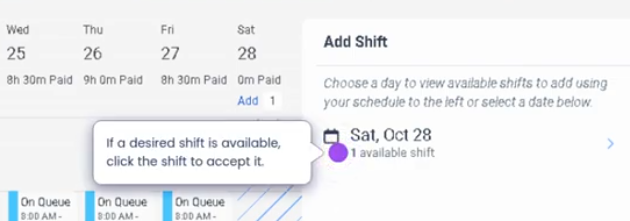
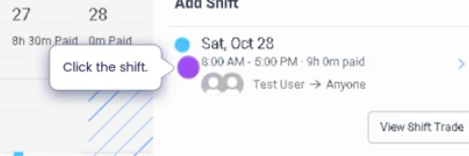
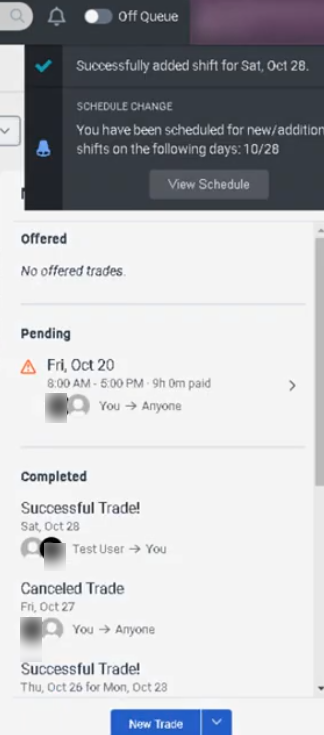
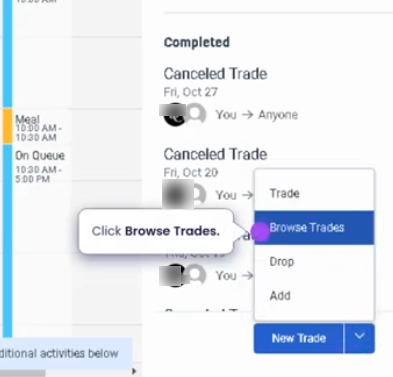
Genesys Cloud - Admin - Drop a shift for someone else
Click shift trades
Click the arrow to new trade
Click drop
Click drop on your schedule view
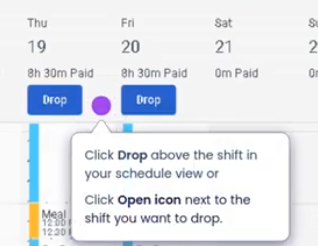
Request to drop
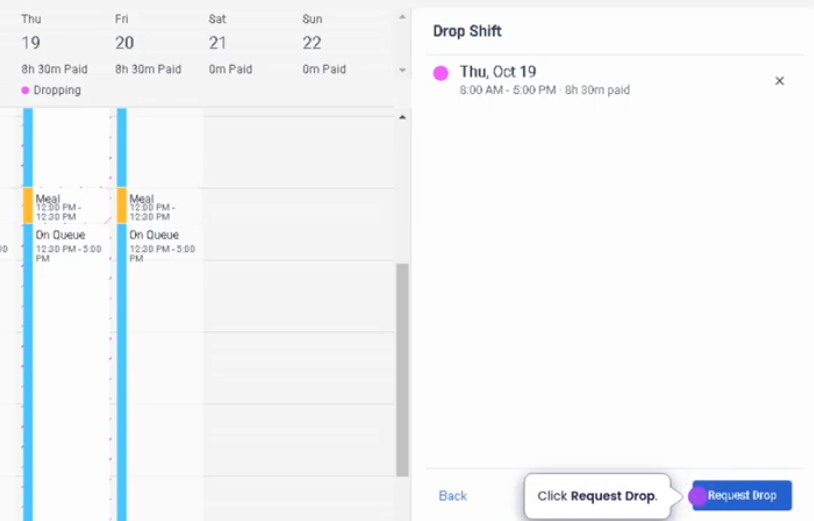
Confirmation message

Drop a Shift for Someone Else (Genesys Cloud)
Summary
Dropping a shift for someone else in Genesys Cloud Workforce Management (WFM) allows an agent to release a scheduled shift so that another qualified agent can claim or pick up the shift. This feature provides flexibility in workforce scheduling while ensuring that staffing levels remain within operational requirements.
The shift drop process typically requires approval or validation through configured workforce management rules, which may include staffing thresholds, skill requirements, or supervisor approval.
Utilization
| Use Case | Description |
|---|---|
| Schedule flexibility | Agents can release shifts when they are unable to work |
| Shift coverage | Other agents can claim available shifts to maintain staffing levels |
| Workforce balancing | Helps maintain required staffing without manual schedule changes |
| Personal schedule adjustments | Agents can manage unexpected personal conflicts |
| Workforce collaboration | Enables teams to support each other by covering shifts |
Shift dropping helps organizations maintain service coverage while providing agents with more control over their schedules.
Best Practices
| Practice | Reason |
|---|---|
| Drop shifts as early as possible | Provides more time for other agents to claim the shift |
| Verify workforce policies before dropping shifts | Ensures compliance with organizational scheduling rules |
| Communicate with team members when necessary | Increases the likelihood that the shift will be picked up |
| Avoid frequent last-minute drops | Prevents staffing disruptions |
| Ensure eligibility requirements are met | Some organizations restrict shift drops based on rules or time windows |
| Monitor shift status after dropping | Confirms whether the shift has been claimed or requires supervisor action |
Example Scenarios
Scenario 1 – Agent Cannot Work Scheduled Shift
Agent reviews upcoming schedule
↓
Agent identifies conflict with assigned shift
↓
Agent submits request to drop shift
↓
Shift becomes available for other agents
↓
Another qualified agent claims the shift
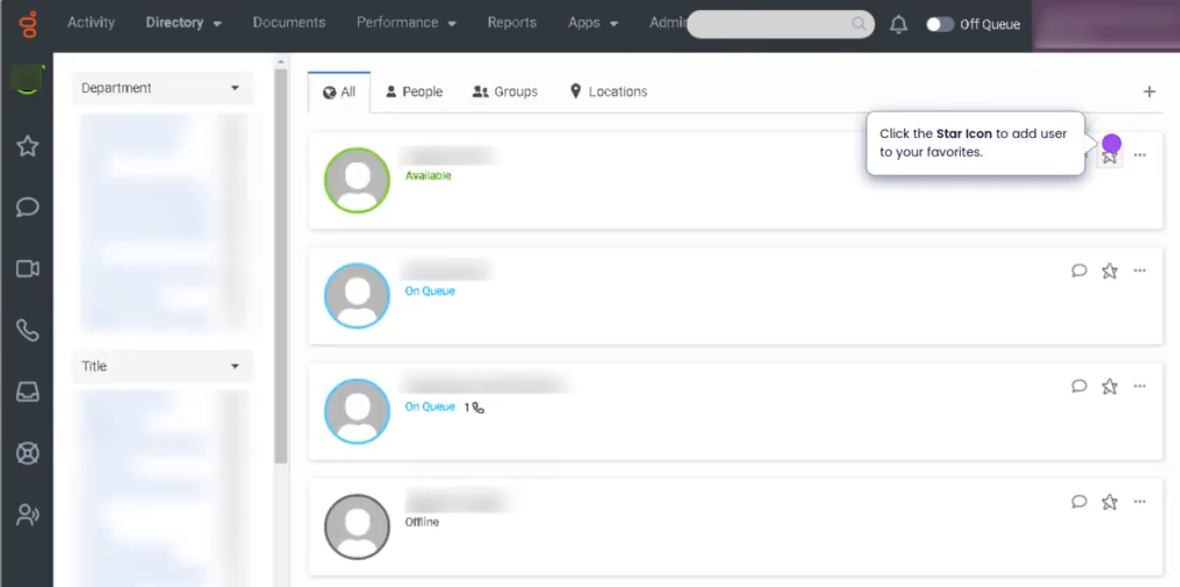
Genesys Cloud - Admin - Favorites

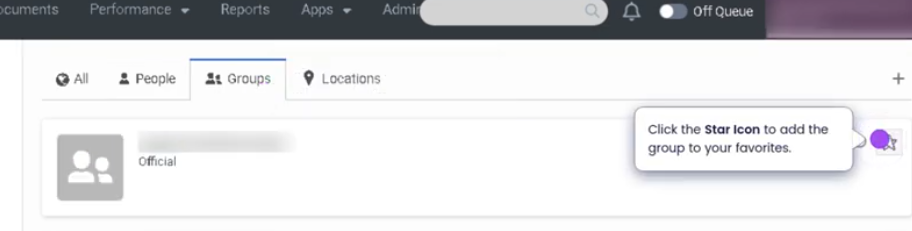
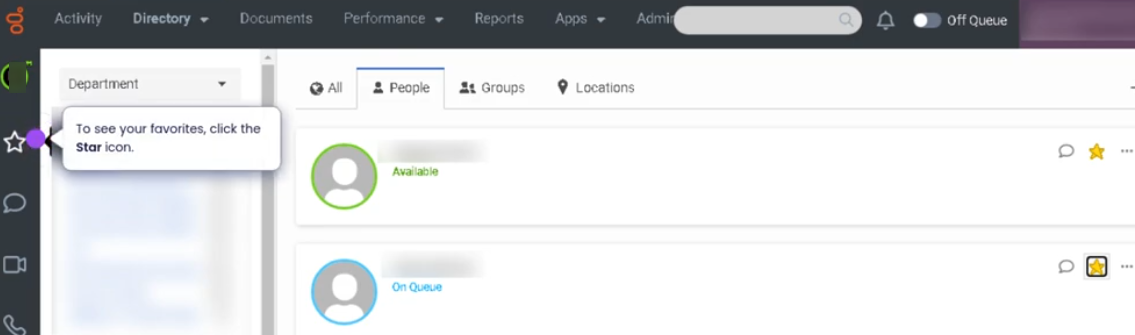
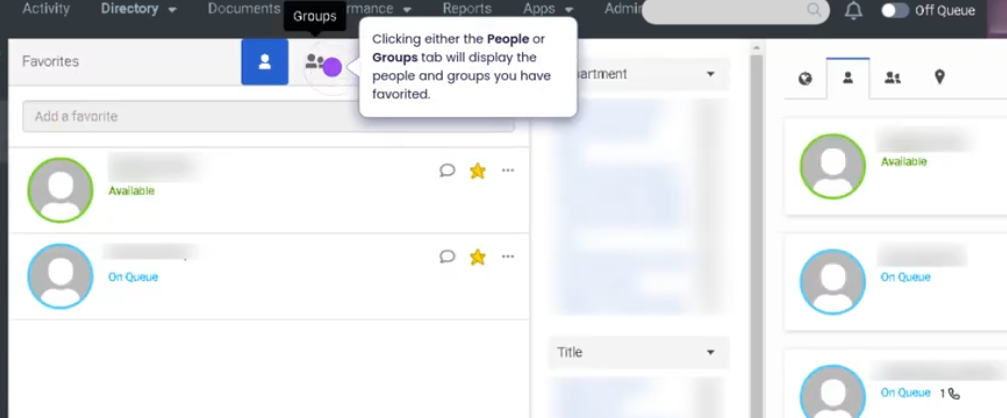
Favorites (Genesys Cloud)
Summary
The Favorites feature in Genesys Cloud allows users to mark frequently contacted coworkers, agents, or resources for quick access within the platform. By adding contacts to Favorites, users can easily locate them for internal communication, call transfers, consultations, or collaboration without searching through the full directory.
Favorites appear in the Agent Workspace or directory panel, enabling faster navigation and improving operational efficiency when working with team members or commonly used contacts.
Utilization
| Use Case | Description |
|---|---|
| Quick contact access | Agents quickly locate supervisors or team members |
| Frequent call transfers | Common transfer destinations added to Favorites |
| Internal collaboration | Agents contact teammates during interactions |
| Escalation support | Supervisors or specialists added for rapid escalation |
| Operational efficiency | Reduces time spent searching through the directory |
Using Favorites helps agents streamline internal communication during customer interactions.
Best Practices
| Practice | Reason |
|---|---|
| Add frequently contacted users to Favorites | Speeds up collaboration and call handling |
| Include supervisors or escalation contacts | Makes escalation easier during interactions |
| Keep Favorites organized and relevant | Prevents clutter and confusion |
| Review Favorites periodically | Ensures contacts remain current |
| Use Favorites during transfers or consultations | Improves efficiency while assisting customers |
Example Scenarios
Scenario 1 – Agent Transfers Call to Specialist
Customer requires specialized assistance
↓
Agent opens Favorites list
↓
Agent selects specialist from Favorites
↓
Call transferred quickly
Scenario 2 – Agent Consults Supervisor
Agent handling complex customer issue
↓
Agent opens Favorites list
↓
Agent selects supervisor
↓
Agent initiates consultation
Scenario 3 – Quick Internal Communication
Agent needs help locating information
↓
Agent opens Favorites panel
↓
Agent selects teammate
↓
Agent sends message or initiates call
Key Benefits
| Benefit | Explanation |
|---|---|
| Faster collaboration | Frequently contacted users are easily accessible |
| Improved agent efficiency | Reduces time spent searching the directory |
| Better interaction handling | Helps agents transfer or consult quickly |
| Simplified navigation | Agents can quickly find important contacts |
| Supports escalation workflows | Specialists and supervisors are readily available |
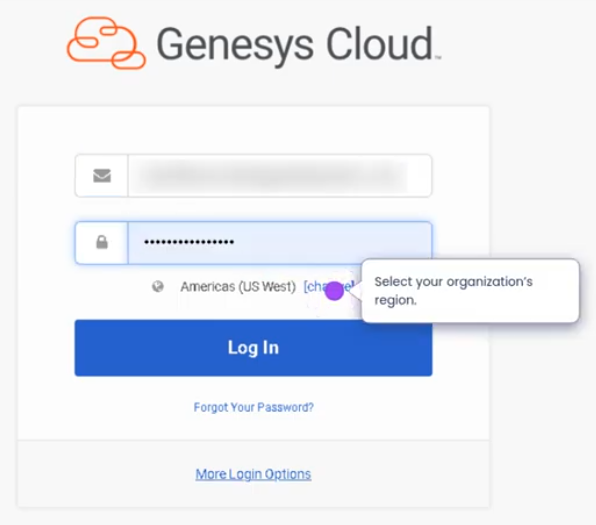
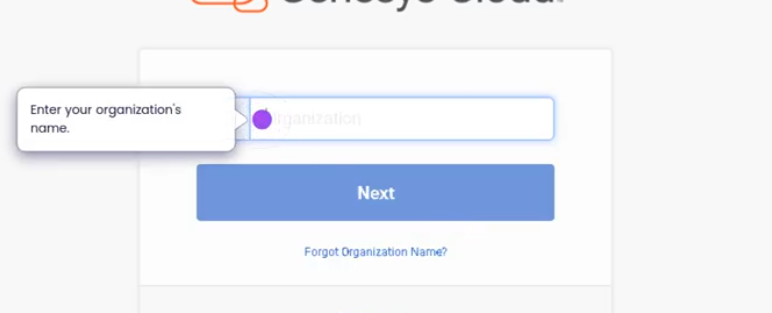
Genesys Cloud - Admin - First login


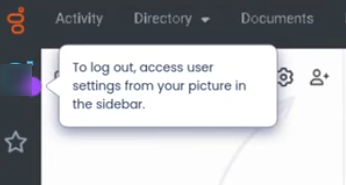
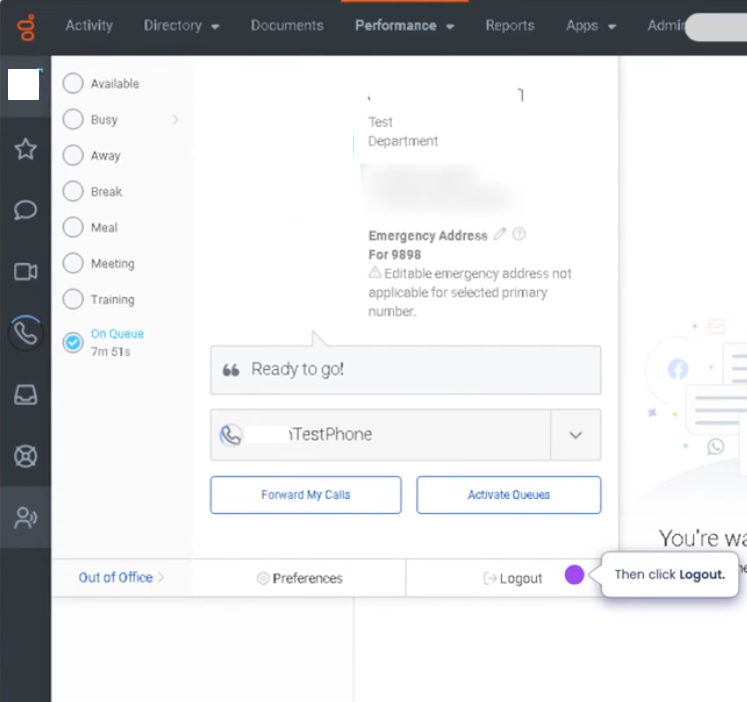
Genesys Cloud - Admin - Logout
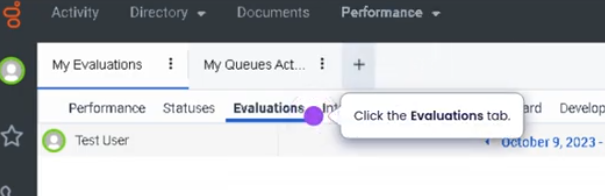
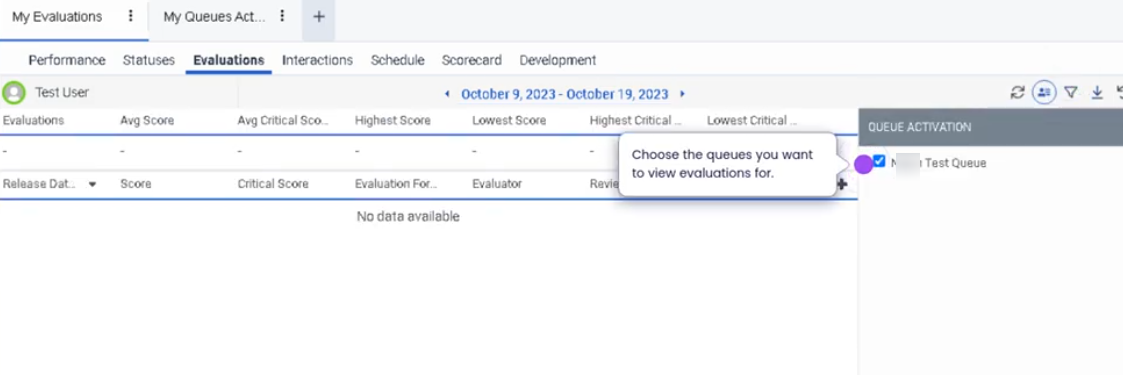
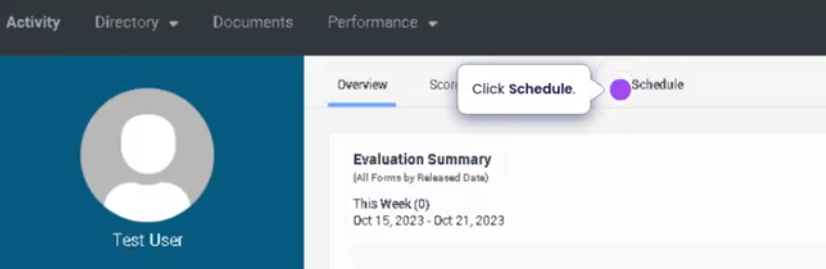
Genesys Cloud - Admin - My Evaluations
[ ](https://wiki.tinod.net/uploads/images/gallery/2026-03/iMd4r1iZssFDSTJ2-image-1773264123601.png
 )
)

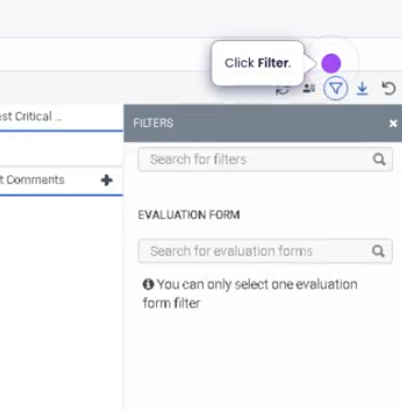
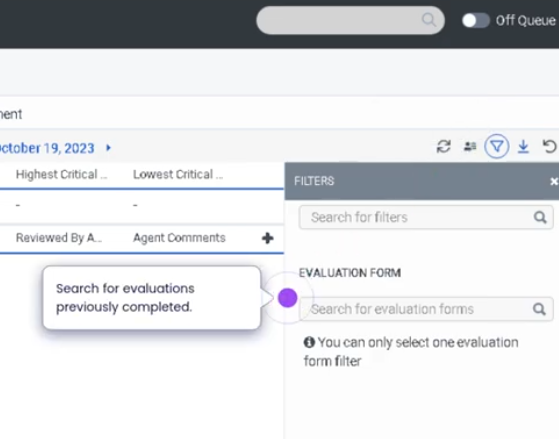
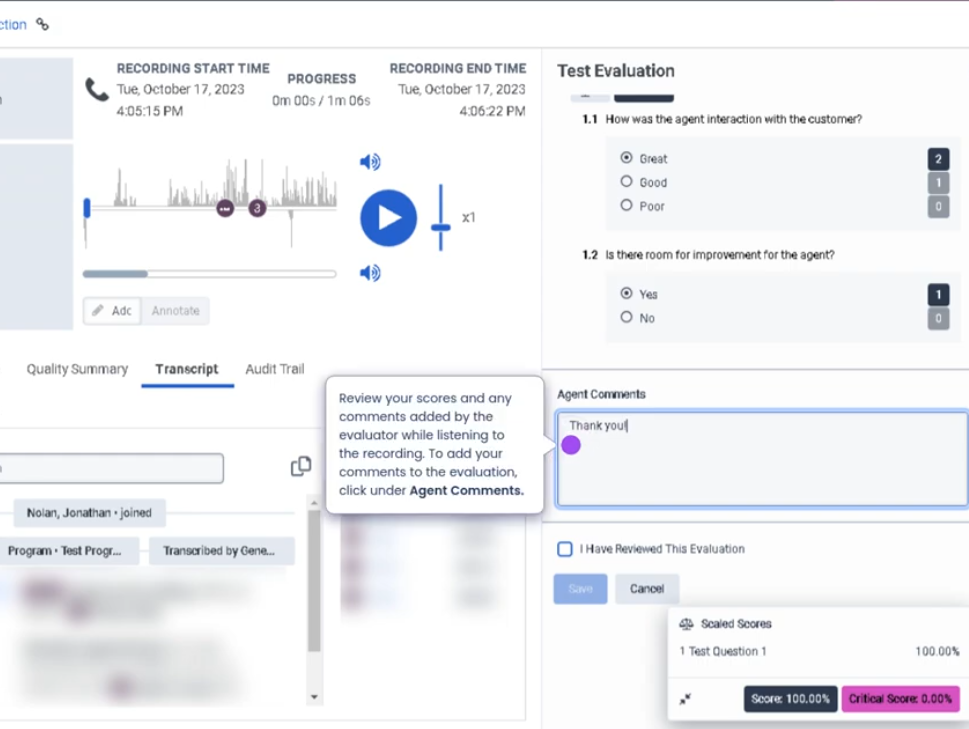
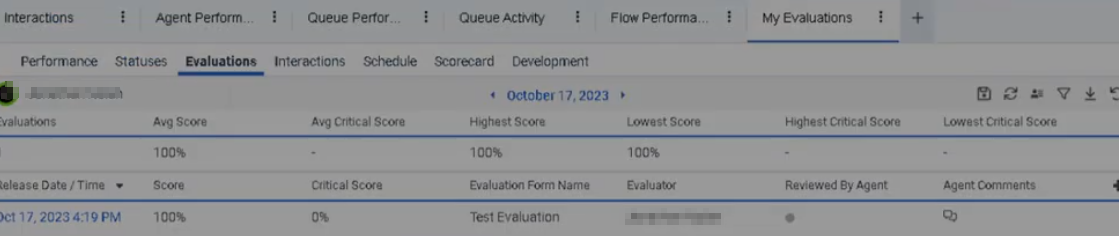
My Evaluations (Genesys Cloud Quality Management)
Summary
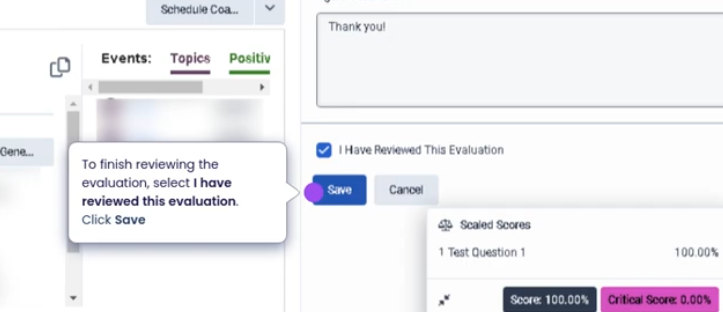
The My Evaluations section in Genesys Cloud allows agents to review quality evaluations that supervisors or quality analysts have completed on their interactions. These evaluations are part of the Quality Management (QM) framework and are used to assess agent performance based on predefined evaluation forms and scoring criteria.
Agents can view scores, evaluator comments, questions from the evaluation form, and interaction recordings or transcripts, depending on configuration. This feature promotes transparency and helps agents understand how their interactions are measured and where improvements can be made.
Utilization
| Use Case | Description |
|---|---|
| Performance review | Agents review scores assigned to evaluated interactions |
| Self-improvement | Agents identify strengths and improvement areas |
| Coaching preparation | Agents review evaluations before coaching sessions |
| Quality assurance tracking | Supervisors and agents monitor performance trends |
| Interaction learning | Agents replay recordings to understand feedback |
The My Evaluations view allows agents to stay informed about quality standards and personal performance metrics.
Best Practices
| Practice | Reason |
|---|---|
| Review evaluations regularly | Helps agents stay aware of performance expectations |
| Read evaluator comments carefully | Provides context behind scoring decisions |
| Listen to interaction recordings when available | Helps understand what occurred during the interaction |
| Identify recurring feedback patterns | Supports long-term improvement |
| Discuss unclear feedback with supervisors | Ensures proper understanding of expectations |
| Apply coaching recommendations | Improves service quality and evaluation scores |
Example Scenarios
Scenario 1 – Agent Reviews Evaluation Score
Supervisor evaluates recorded interaction
↓
Evaluation is released to the agent
↓
Agent opens My Evaluations view
↓
Agent reviews scorecard and feedback
Scenario 2 – Preparing for Coaching Session
Agent receives notification of evaluation
↓
Agent reviews scoring details
↓
Agent listens to interaction recording
↓
Agent prepares questions for supervisor
Scenario 3 – Identifying Performance Trends
Agent reviews multiple evaluations
↓
Agent notices recurring feedback
↓
Agent adjusts communication approach
↓
Future evaluations reflect improvement
Key Benefits
| Benefit | Explanation |
|---|---|
| Transparent performance feedback | Agents can clearly see how interactions are evaluated |
| Continuous improvement | Helps agents refine communication and service skills |
| Coaching support | Evaluations serve as a basis for coaching sessions |
| Quality standard alignment | Ensures agents follow organizational service guidelines |
| Performance visibility | Agents track personal development over time |
Genesys Cloud - Admin - My queues and activity view
My Queue and Activity View (Genesys Cloud)
Summary
The My Queue and Activity view in Genesys Cloud provides agents with real-time visibility into the queues they are assigned to and the current activity levels within those queues. This view allows agents to monitor queue workload, understand interaction demand, and track their personal participation in queue activity.
Agents can see information such as active interactions, waiting interactions, queue membership, and their participation status. This visibility helps agents stay aware of operational demand and respond appropriately when handling interactions.
Utilization
| Use Case | Description |
|---|---|
| Queue workload awareness | Agents can monitor the number of interactions waiting in queues |
| Queue membership visibility | Shows the queues the agent is assigned to |
| Interaction demand monitoring | Helps agents understand current queue activity |
| Operational transparency | Provides insight into contact center workload in real time |
| Performance awareness | Agents can track their participation in queue activity |
Using the My Queue and Activity view helps agents maintain awareness of current service demand and operational priorities.
Best Practices
| Practice | Reason |
|---|---|
| Monitor queue activity regularly | Helps agents anticipate incoming interactions |
| Stay in Available status when workload is high | Supports queue performance and service levels |
| Understand assigned queues | Ensures agents are aware of which queues they support |
| Coordinate with supervisors during high volumes | Helps maintain operational balance |
| Use the view to understand workload trends | Improves situational awareness during shifts |
Example Scenarios
Scenario 1 – Monitoring Queue Demand
Agent opens My Queue and Activity view
↓
Agent sees increased number of waiting interactions
↓
Agent prepares to receive additional interactions
↓
Agent remains available to support queue demand
Scenario 2 – Agent Assigned to Multiple Queues
Agent checks My Queue and Activity view
↓
Agent sees activity levels across assigned queues
↓
Agent understands where interactions are coming from
↓
Agent manages interactions accordingly
Scenario 3 – High Interaction Volume
Contact center experiences high call volume
↓
Agents monitor queue activity levels
↓
Agents remain available to handle interactions
↓
Supervisors adjust staffing if necessary
Key Benefits
| Benefit | Explanation |
|---|---|
| Real-time queue visibility | Agents can see current interaction demand |
| Improved situational awareness | Helps agents understand operational workload |
| Supports service levels | Encourages agents to remain available during high demand |
| Queue transparency | Shows which queues agents are supporting |
| Operational efficiency | Helps teams respond quickly to changing workloads |
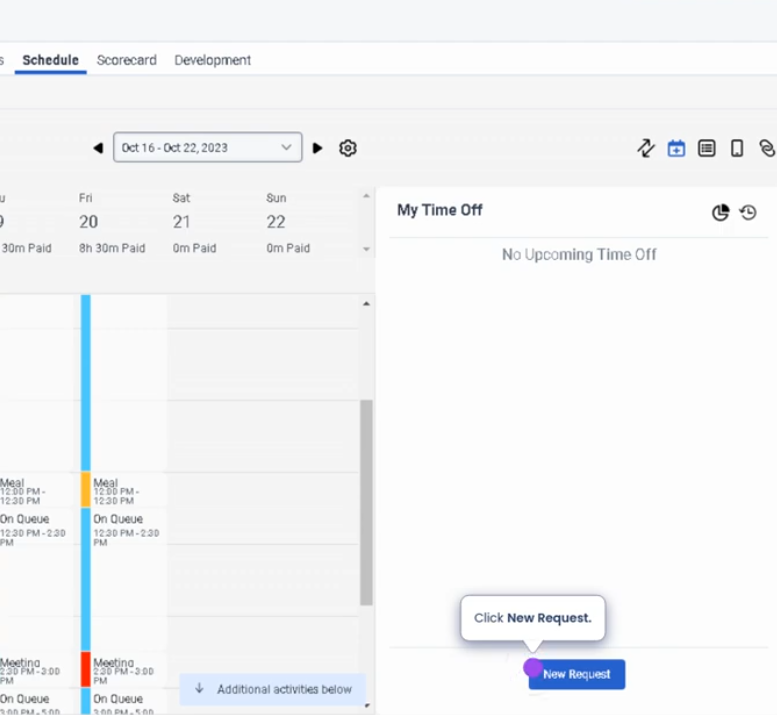
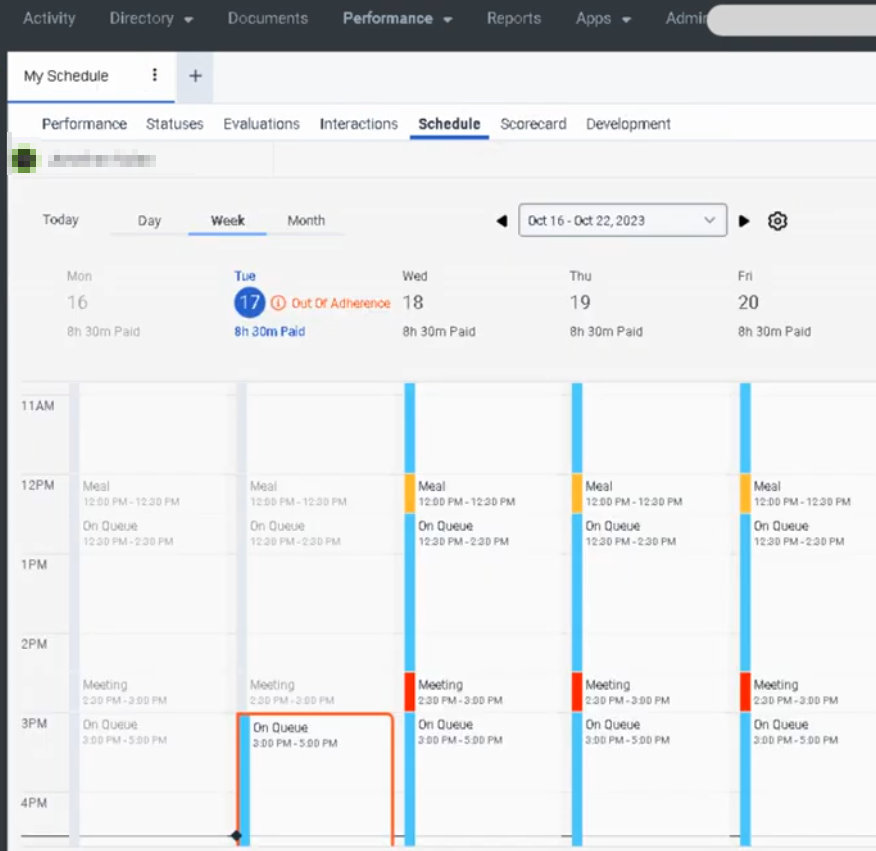
Genesys Cloud - Admin - My Schedule
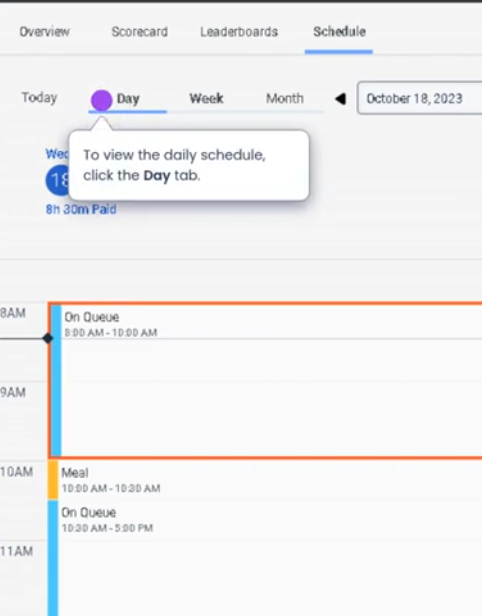
On you profile click on schedule
You can navigate with calendar drop down menu
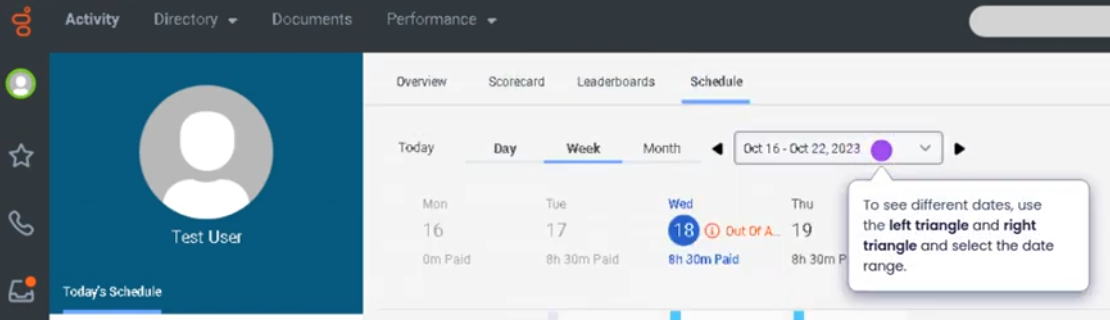
You can also view by day, week, month.
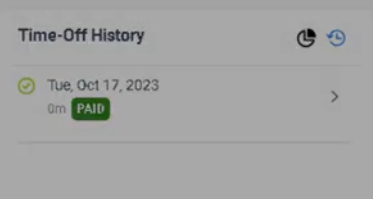
To request time off

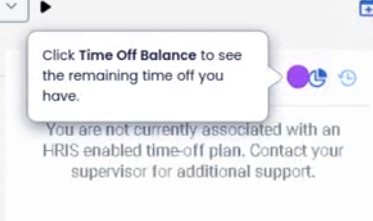
Check time off balance
My Schedule (Genesys Cloud Workforce Management)
Definition
My Schedule in Genesys Cloud is a Workforce Management (WFM) view that allows an agent to see their own assigned work schedule and planned activities. It displays the time blocks for different activities such as handling interactions, breaks, meetings, training, or offline tasks.
This view helps agents understand their daily workload, follow their assigned activities, and maintain schedule adherence.
Source: Genesys Documentation
Summary
| Item | Description |
|---|---|
| Feature | My Schedule |
| Module | Workforce Management (WFM) |
| Purpose | Allows agents to view their personal work schedule |
| Primary Users | Agents |
| Data Displayed | Scheduled activities, time blocks, and planned tasks |
Source: Genesys Documentation
Best Practices
| Best Practice | Explanation |
|---|---|
| Check schedule before shift | Helps agents prepare for their workday |
| Follow assigned activities | Improves schedule adherence and workforce efficiency |
| Monitor upcoming breaks | Ensures compliance with scheduled rest periods |
| Stay aware of schedule changes | Schedules may be updated by Workforce Management |
| Align agent status with scheduled activity | Helps supervisors track adherence accurately |
Source: Genesys Documentation / Operational Best Practice
Genesys Cloud - Admin - My status view
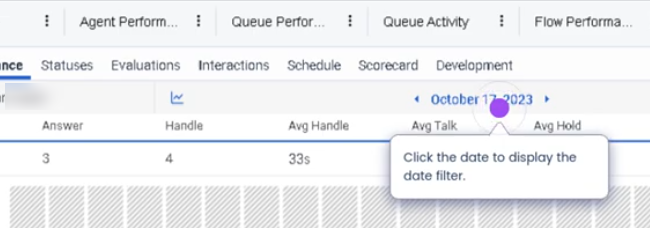
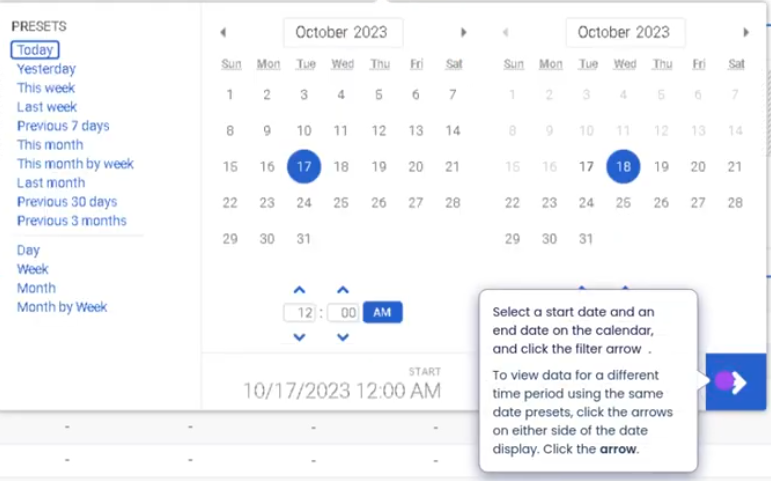
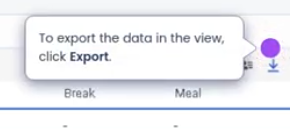
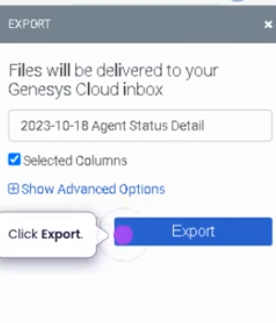
Go to performance

Select your workspace
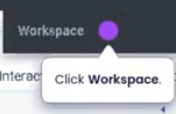
Click statuses tab
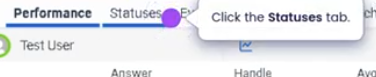
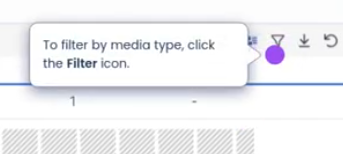
To export data
My Status View (Genesys Cloud)
Summary
The My Status view in Genesys Cloud allows agents to monitor and control their current availability status within the contact center. This view shows whether the agent is available to receive interactions or currently in a non-routable state such as break, meeting, training, or offline.
Managing status correctly is critical for queue routing, workforce management adherence, and real-time reporting. When an agent changes their status, Genesys Cloud immediately updates their availability in the routing engine and operational dashboards.
Utilization
| Use Case | Description |
|---|---|
| Availability control | Agents mark themselves Available to receive interactions |
| Break or non-working states | Agents change status to break, meeting, lunch, or training |
| Workforce adherence | Supervisors track adherence against scheduled activities |
| Interaction routing | Routing engine uses agent status to determine availability |
| Personal activity tracking | Agents view how long they have been in a specific status |
Proper use of status helps ensure accurate reporting, effective queue routing, and adherence to workforce schedules.
Best Practices
| Practice | Reason |
|---|---|
| Set status accurately before leaving the workstation | Prevents missed or misrouted interactions |
| Return to Available when ready to receive interactions | Ensures proper routing and staffing coverage |
| Follow WFM schedule adherence guidelines | Maintains staffing levels and operational planning |
| Avoid manually forcing statuses outside policy | Prevents inaccurate reporting |
| Use the correct break or activity status | Helps supervisors track adherence and performance |
Example Scenarios
Scenario 1 – Agent Starting Shift
Agent logs into Genesys Cloud
↓
Agent checks My Status view
↓
Agent changes status to Available
↓
Routing engine begins sending interactions
Scenario 2 – Agent Taking Scheduled Break
Agent finishes interaction
↓
Agent changes status to Break
↓
Routing engine temporarily stops sending interactions
↓
Agent returns and switches back to Available
Scenario 3 – Supervisor Monitoring Status
Supervisor monitors agent dashboard
↓
Agent status displayed in real-time
↓
Supervisor identifies agents in Available, Busy, or Break
↓
Staffing decisions made based on real-time availability
Key Benefits
| Benefit | Explanation |
|---|---|
| Real-time availability tracking | Supervisors and routing engine see agent status instantly |
| Accurate interaction routing | Only available agents receive interactions |
| Workforce adherence visibility | Supports schedule compliance and reporting |
| Operational transparency | Teams can quickly identify agent availability |
| Improved service levels | Ensures the correct number of agents are available to handle interactions |
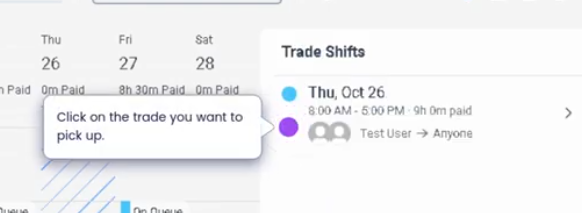
Genesys Cloud - Admin - Pick up extra shift

## Pick Up an Extra Shift (Genesys Cloud Workforce Management)
### Summary
The **Pick Up an Extra Shift** feature in Genesys Cloud Workforce Management (WFM) allows agents to **voluntarily claim available shifts that were previously dropped or made available by the system or supervisors**. This capability helps organizations maintain staffing levels while giving agents the opportunity to **increase working hours or assist during high-demand periods**.
Extra shifts appear in the **WFM schedule or shift marketplace**, where eligible agents can review and claim them based on predefined staffing rules, skills, and availability requirements.
---
## Utilization
| Use Case | Description |
|---|---|
| High call volume coverage | Agents pick up additional shifts to support increased demand |
| Shift marketplace participation | Agents claim shifts that other team members dropped |
| Overtime opportunities | Agents add extra work hours when available |
| Workforce flexibility | Contact centers quickly fill staffing gaps |
| Skill-based coverage | Extra shifts can be claimed by agents with required skills |
Picking up extra shifts helps maintain **operational continuity and service level performance** while offering agents flexibility.
---
## Best Practices
| Practice | Reason |
|---|---|
| Review shift details before claiming | Ensures the shift fits your schedule and role |
| Confirm eligibility requirements | Some shifts require specific skills or queue assignments |
| Avoid overcommitting to extra shifts | Helps maintain productivity and prevent burnout |
| Monitor schedule updates after claiming | Ensures the shift is successfully assigned |
| Follow workforce management policies | Maintains compliance with staffing and scheduling rules |
| Communicate with supervisors if needed | Helps coordinate staffing coverage during high demand |
---
## Example Scenarios
### Scenario 1 – Filling a Dropped Shift
```text
Agent drops scheduled shift
↓
Shift becomes available in shift marketplace
↓
Another agent reviews available shifts
↓
Agent claims the extra shift
↓
Schedule updates automatically
Scenario 2 – Supervisor Opens Extra Shifts for High Volume
Contact center anticipates high call volume
↓
Supervisor publishes additional shifts
↓
Agents view extra shifts in WFM
↓
Agents claim available shifts
↓
Staffing levels increase
Scenario 3 – Agent Voluntarily Picks Up Overtime
Agent checks upcoming schedule
↓
Agent sees open shift available
↓
Agent selects and claims the shift
↓
Schedule updates with additional work hours
Key Benefits
| Benefit | Explanation |
|---|---|
| Improved staffing coverage | Helps fill gaps caused by absences or demand spikes |
| Flexible work opportunities | Agents can increase hours when desired |
| Faster schedule adjustments | Open shifts can be claimed without manual supervisor assignment |
| Supports service level goals | Additional staffing helps maintain response times |
| Encourages team collaboration | Agents help support the team during peak periods |
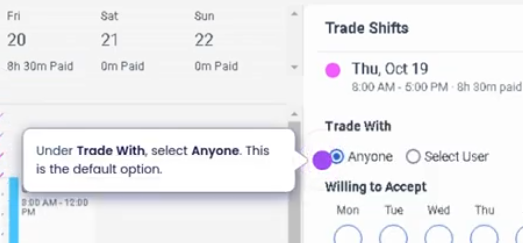
Genesys Cloud - Admin - Request to trade a shift
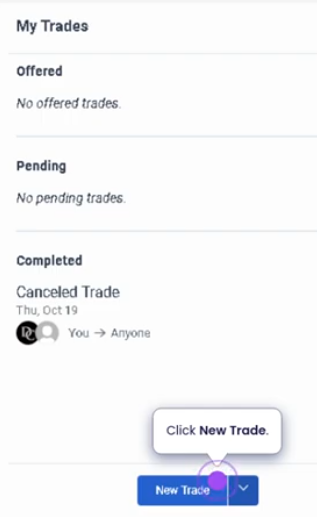
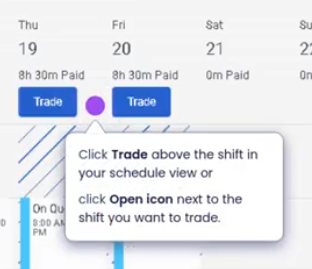
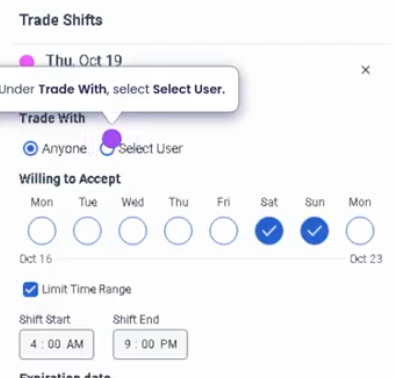
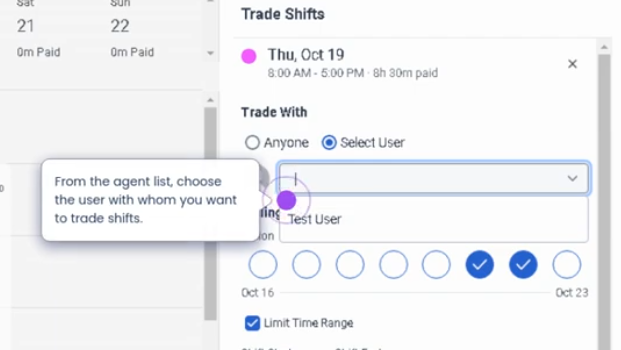
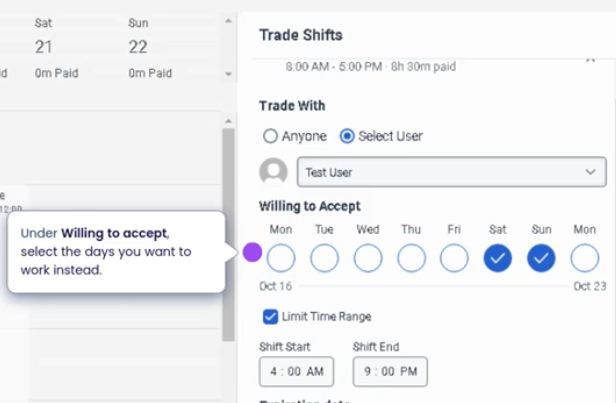
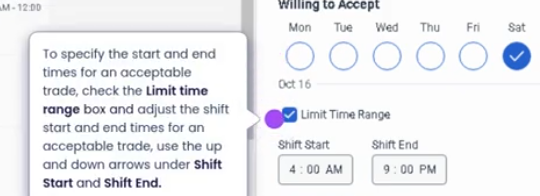

you can also request a trade shift with anyone
Accept shift trade request
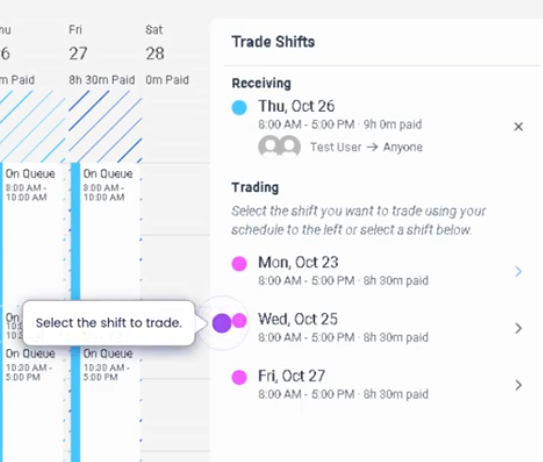
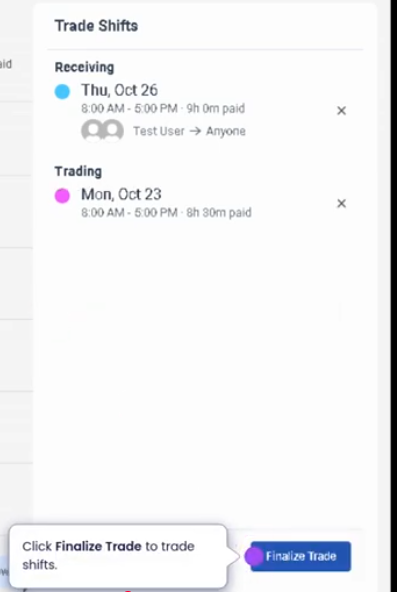
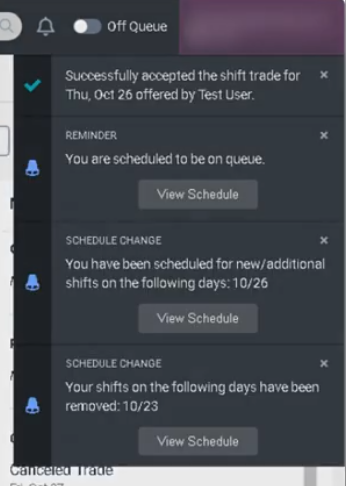
Trading a Shift with a Specific Person (Genesys Cloud)
Summary
Trading a shift with a specific person in Genesys Cloud Workforce Management (WFM) allows an agent to request a schedule swap with another agent for a particular shift. Instead of posting the shift to a general shift trade board, the request is directed to one specific agent who can accept or decline the trade.
This capability helps teams manage schedule changes while maintaining coverage requirements, staffing rules, and adherence to workforce policies configured in Workforce Management.
Utilization
| Use Case | Description |
|---|---|
| Personal schedule conflicts | An agent needs coverage for a shift due to appointments or personal obligations |
| Team collaboration | Agents coordinate directly with colleagues to swap shifts |
| Last-minute coverage | Allows agents to quickly resolve coverage gaps with trusted teammates |
| Work-life balance | Provides flexibility while maintaining staffing requirements |
| Supervisor-approved schedule adjustments | Shift swaps remain governed by WFM validation rules |
When a shift trade is requested, Genesys Cloud validates that the swap meets scheduling constraints, including staffing requirements and agent eligibility.
Best Practices
| Practice | Reason |
|---|---|
| Confirm availability with the other agent before sending the request | Increases the chance the request is accepted quickly |
| Verify both agents have the required skills | Ensures the swap passes workforce management validation |
| Use shift trade early when possible | Gives time for approval and avoids coverage risk |
| Follow team scheduling policies | Prevents violations of labor rules or staffing plans |
| Monitor notifications for acceptance or rejection | Allows quick follow-up if the trade is declined |
| Avoid excessive shift trading | Maintains schedule stability and forecasting accuracy |
Example Scenarios
Scenario 1 – Personal Appointment
Agent scheduled for evening shift
↓
Agent has personal appointment
↓
Agent requests shift trade with teammate
↓
Teammate accepts the trade
↓
Genesys Cloud validates and updates schedules
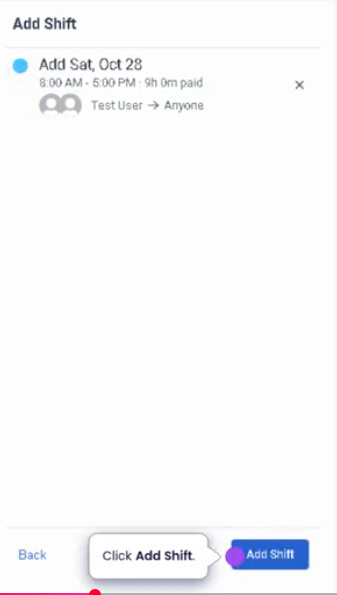
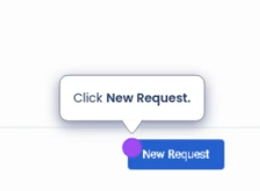
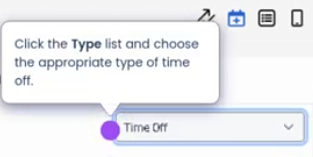
Genesys Cloud - Admin - Time off request
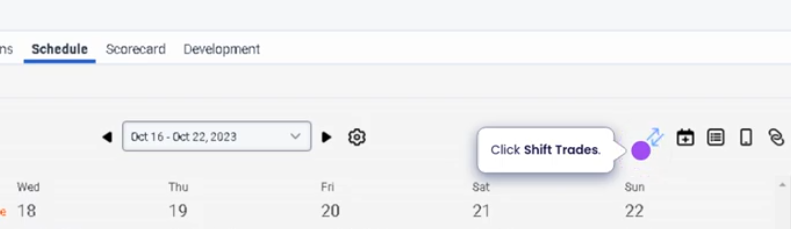
On SChedule - Click new request
Click shift trades
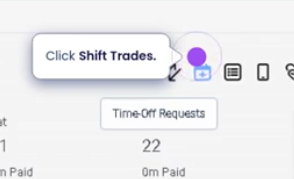
Click new request
Select type
Submit a full day time off
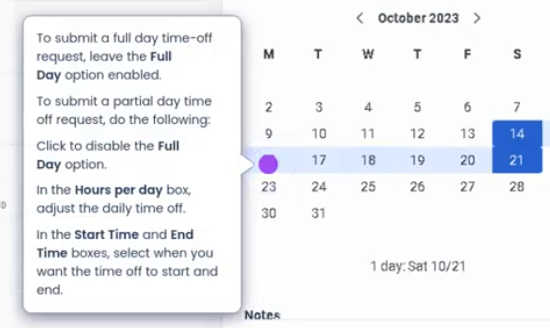
Enter notes
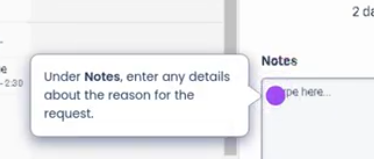
Click save
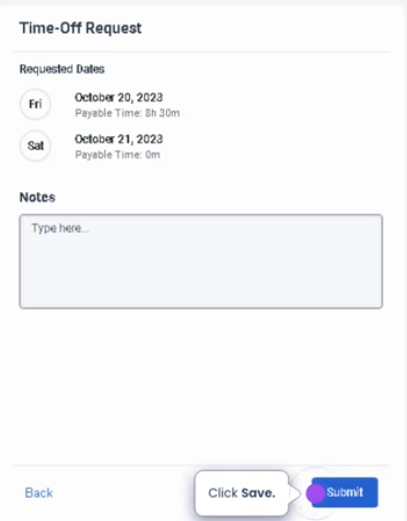
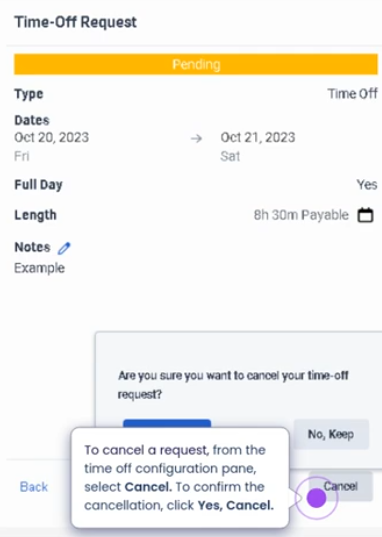
To edit time off request

Requesting Time Off (Genesys Cloud)
Summary
Requesting time off in Genesys Cloud Workforce Management (WFM) allows agents to submit requests for scheduled leave such as vacation, personal time, or other approved absence types. These requests are reviewed and validated against staffing requirements, scheduling rules, and time-off limits configured by workforce administrators.
The time-off request process helps organizations maintain service-level coverage while providing agents with flexibility to manage their schedules.
Utilization
| Use Case | Description |
|---|---|
| Vacation planning | Agents request time off for planned vacation periods |
| Personal appointments | Agents request short-term leave for appointments or personal commitments |
| Sick leave | Agents notify management of illness or unexpected absence |
| Planned schedule changes | Agents request future schedule adjustments in advance |
| Workforce scheduling compliance | Ensures requests align with staffing and forecast requirements |
Time-off requests are validated against capacity limits and workforce planning rules to ensure the contact center maintains appropriate staffing levels.
Best Practices
| Practice | Reason |
|---|---|
| Submit requests as early as possible | Increases likelihood of approval before staffing limits are reached |
| Verify team policies and blackout periods | Prevents requests during restricted scheduling windows |
| Monitor request status | Allows agents to respond quickly if adjustments are required |
| Use the correct time-off type | Ensures accurate reporting and workforce planning |
| Avoid submitting multiple overlapping requests | Prevents scheduling conflicts |
| Communicate with supervisors if the request is urgent | Helps ensure timely review and approval |
Example Scenarios
Scenario 1 – Planned Vacation
Agent plans vacation weeks in advance
↓
Agent submits time-off request in WFM
↓
System validates staffing requirements
↓
Supervisor reviews and approves request
↓
Schedule updates to reflect approved time off
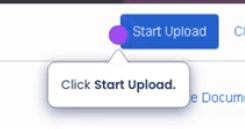
Genesys cloud - Admin - Upload file to workspace
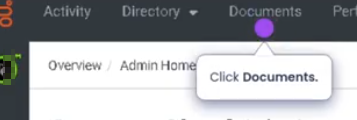
Go to Documents
Find the workspace
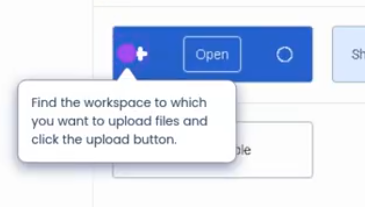
Click upload

Select files
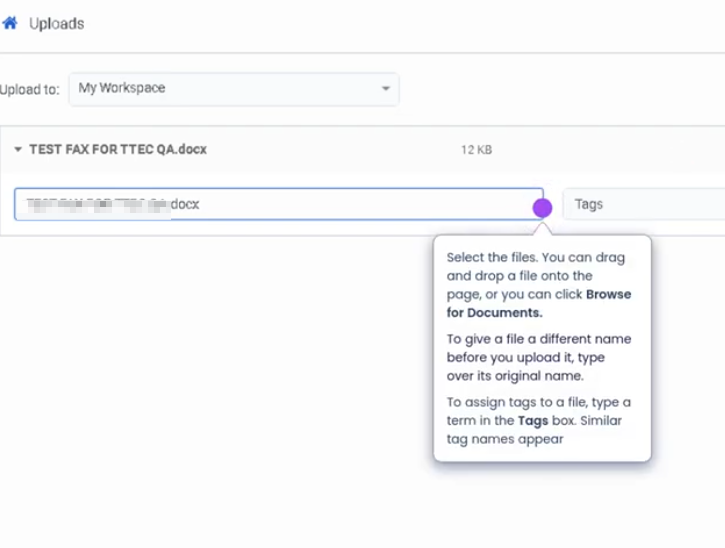
Start upload
Add Files to a Workspace (Genesys Cloud)
Summary
Adding files to a Workspace in Genesys Cloud allows teams to store, share, and collaborate on documents within the platform. Workspaces provide a centralized location where users can upload files such as guides, scripts, reports, or operational documents that are relevant to a team or project.
Files stored in a workspace can be accessed by members of that workspace, helping teams maintain consistent information, collaboration, and document availability without relying on external storage systems.
Utilization
| Use Case | Description |
|---|---|
| Team documentation | Store operational procedures, guides, or internal documentation |
| Training materials | Provide agents access to onboarding documents and reference guides |
| Collaboration | Share files among team members working on the same project |
| Knowledge sharing | Distribute job aids, scripts, or troubleshooting documentation |
| Internal communication | Share presentations, announcements, or operational updates |
Workspaces allow teams to maintain a centralized repository of shared files that can be accessed directly within Genesys Cloud.
Best Practices
| Practice | Reason |
|---|---|
| Organize files using clear naming conventions | Makes documents easier to locate and manage |
| Upload only relevant documents | Prevents clutter and improves workspace usability |
| Maintain version control | Ensures team members use the most current document |
| Restrict access to appropriate members | Protects sensitive or operational information |
| Periodically review workspace files | Removes outdated or unnecessary documents |
| Use descriptive file names | Helps users quickly identify the document’s purpose |
Example Scenarios
Scenario 1 – Sharing Agent Training Material
Training team creates onboarding documentation
↓
Files uploaded to a shared workspace
↓
New agents access the workspace
↓
Agents review training materials during onboarding
Genesys Cloud - Admin - Your Schedule
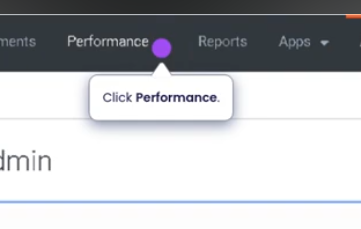
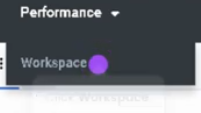
Navigate to Performance
Workspace
Schedule tab

Your Schedule (Genesys Cloud Workforce Management)
Definition
Your Schedule in Genesys Cloud is a Workforce Management (WFM) view that allows supervisors or authorized users to see the scheduled activities of another agent. It displays the planned work activities assigned to an agent, such as handling interactions, breaks, meetings, or training sessions.
This view helps supervisors monitor staffing coverage, verify schedules, and compare planned activities with real-time agent status.
Summary
| Item | Description |
|---|---|
| Feature | Your Schedule |
| Module | Workforce Management (WFM) |
| Purpose | View another agent's assigned schedule |
| Primary Users | Supervisors, Workforce Managers |
| Data Displayed | Scheduled activities, time blocks, and assigned tasks |
Best Practices
| Best Practice | Explanation |
|---|---|
| Monitor adherence regularly | Compare scheduled activity with the agent's real-time status |
| Verify coverage during peak hours | Ensure agents are scheduled during forecasted demand |
| Use schedule views for staffing adjustments | Identify gaps or overstaffing situations |
| Communicate schedule changes clearly | Inform agents if WFM updates their schedules |
| Review schedules daily | Helps supervisors proactively manage operations |
Source: Genesys Documentation / Operational Best Practice
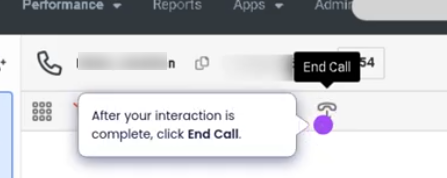
Genesys Cloud - Agent - Accept ACD Calls

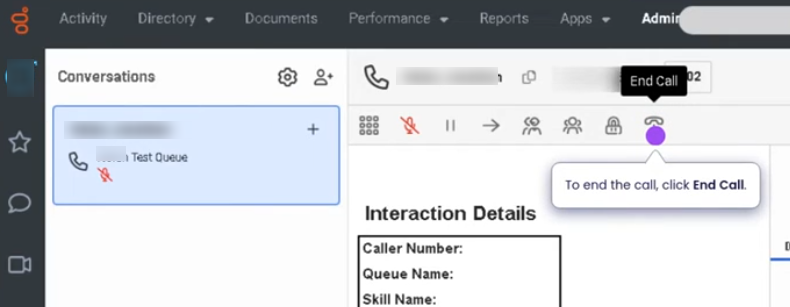
ACD Calls (Automatic Call Distribution) – Genesys Cloud
Summary
ACD Calls in Genesys Cloud are inbound voice interactions that are automatically routed to available agents through configured queues using the Automatic Call Distribution (ACD) engine. The routing process uses defined rules such as skills, priorities, agent availability, routing methods, and queue membership to determine which agent should receive the call.
ACD ensures that customer calls are distributed efficiently across agents while maintaining service level targets and operational efficiency.
Utilization
| Use Case | Description |
|---|---|
| Customer support hotlines | Incoming customer calls routed to support agents |
| Sales call routing | Calls distributed to sales representatives based on availability or skills |
| Technical support queues | Calls directed to specialized agents with specific skills |
| Multi-queue environments | Calls routed through multiple queues depending on routing rules |
| Priority call handling | VIP or high-priority calls routed according to queue priority settings |
ACD calls are the primary voice interaction method in a contact center, ensuring customers reach the correct agent efficiently.
Best Practices
| Practice | Reason |
|---|---|
| Configure appropriate queue routing methods | Ensures calls are distributed efficiently among agents |
| Maintain accurate agent skills and queue assignments | Improves call routing accuracy |
| Monitor service levels and queue metrics | Helps maintain customer experience and response times |
| Use call flows for proper IVR routing | Ensures callers reach the correct queue |
| Ensure agents manage their status correctly | Only available agents should receive ACD calls |
| Implement call prioritization if needed | Supports urgent or high-value customer interactions |
Example Scenarios
Scenario 1 – Customer Calls Support Line
Customer dials support phone number
↓
Call enters IVR call flow
↓
Customer selects support option
↓
Call routed to support queue
↓
ACD engine assigns call to available agent
Scenario 2 – Skill-Based Routing
Customer calls technical support
↓
Call routed to technical support queue
↓
ACD evaluates agent skills
↓
Call assigned to agent with matching technical skill
Scenario 3 – High Call Volume Handling
Multiple customers call simultaneously
↓
Calls enter queue
↓
ACD distributes calls among available agents
↓
Queue metrics update in real time
Key Benefits
| Benefit | Explanation |
|---|---|
| Efficient call distribution | Calls are automatically routed to available agents |
| Improved customer experience | Customers reach appropriate agents faster |
| Skill-based routing capabilities | Ensures calls are handled by qualified agents |
| Real-time queue management | Supervisors can monitor queue performance |
| Scalable call handling | Supports high call volumes across multiple agents |
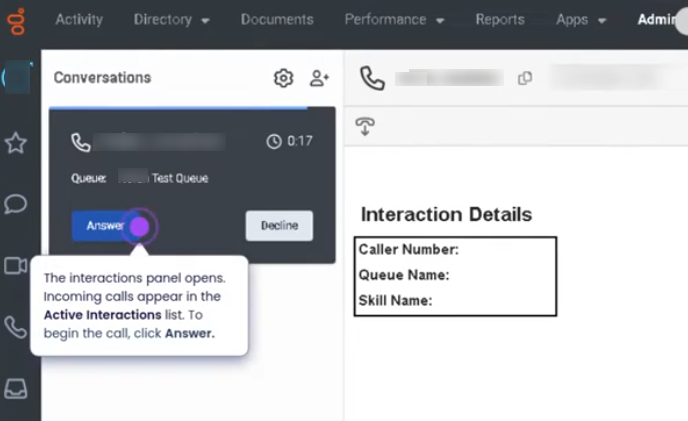
Genesys Cloud - Agent - Accept and respond to a social media interaction
Logon to a queue as agent
Interaction panel
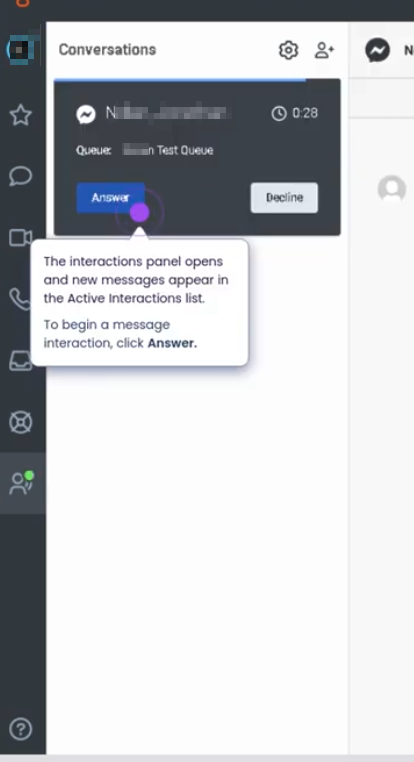
Reply to message
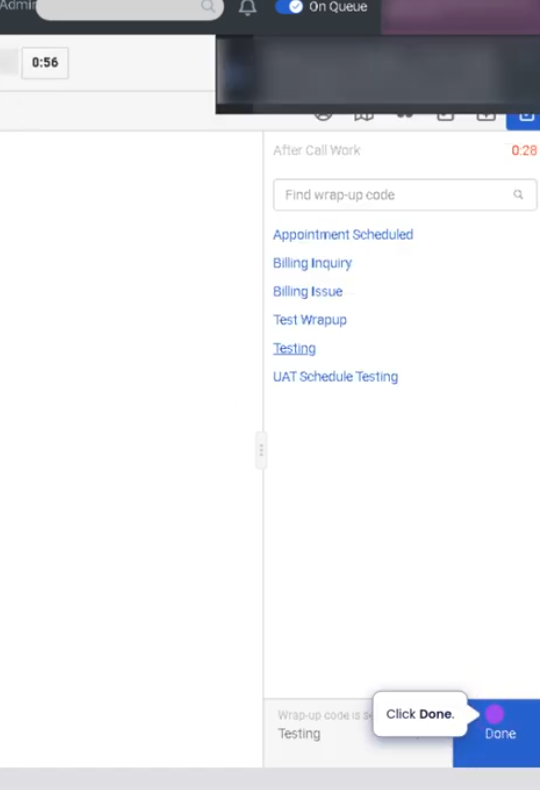
End interaction
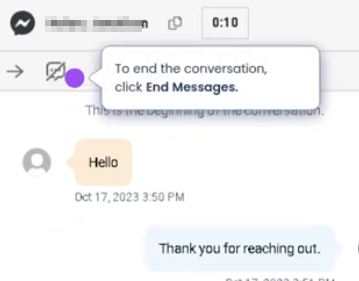
Disposition interaction
Summary
Accepting and responding to social media interactions in Genesys Cloud allows agents to engage with customers through social platforms such as Facebook, X (Twitter), Instagram, or other supported social integrations. These interactions are routed to agents through queues, similar to voice or messaging interactions, and can be managed directly within the Agent Workspace.
Utilization
| Use Case | Description |
|---|---|
| Customer support through social platforms | Agents respond to customer inquiries posted on social media |
| Brand reputation management | Organizations address public complaints or feedback quickly |
| Digital customer engagement | Customers interact with support teams through preferred social channels |
| Queue-based routing | Social media interactions are routed through support queues |
| Public and private responses | Agents may respond publicly or through direct messaging depending on the platform |
Best Practices
| Practice | Reason |
|---|---|
| Respond promptly to social media interactions | Public posts can impact brand reputation if left unanswered |
| Maintain professional tone and brand voice | Responses are often visible to a public audience |
| Review the entire conversation thread before responding | Ensures accurate and relevant responses |
| Use private messaging for sensitive information | Protects customer privacy and security |
| Escalate complex issues when necessary | Prevents misinformation and improves resolution quality |
| Follow company social media policies | Ensures consistent and compliant communication |
Example Scenarios
Scenario 1 – Customer Complaint on Social Media
Customer posts complaint on social media
↓
Interaction captured and routed to support queue
↓
Agent receives notification
↓
Agent accepts the interaction
↓
Agent responds publicly to acknowledge issue
Scenario 2 – Direct Message Support Request
Customer sends direct message through social platform
↓
Interaction routed to social support queue
↓
Agent accepts interaction in Agent Workspace
↓
Agent responds to customer message
Scenario 3 – Public Post Escalation
Customer posts urgent complaint publicly
↓
Interaction routed to social media support queue
↓
Agent accepts interaction
↓
Agent acknowledges publicly and moves conversation to private message
↓
Issue resolved through private communication
Key Benefits
| Benefit | Explanation |
|---|---|
| Centralized social engagement | Agents manage social interactions alongside other channels |
| Faster response to public feedback | Helps protect brand reputation |
| Structured queue routing | Ensures interactions reach the appropriate team |
| Improved customer accessibility | Customers can contact support through social platforms |
| Integrated reporting | Social interactions are tracked within Genesys Cloud analytics |
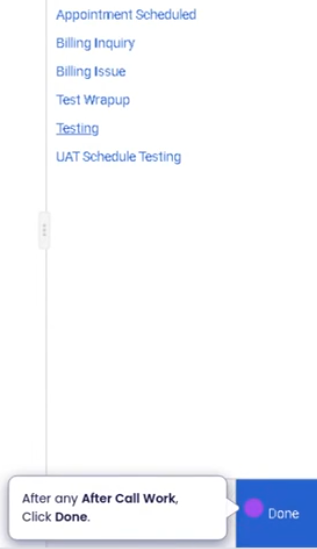
Genesys Cloud - Agent - Accept and respond to message interaction
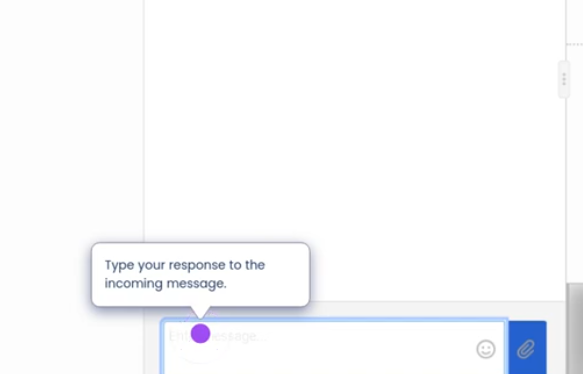
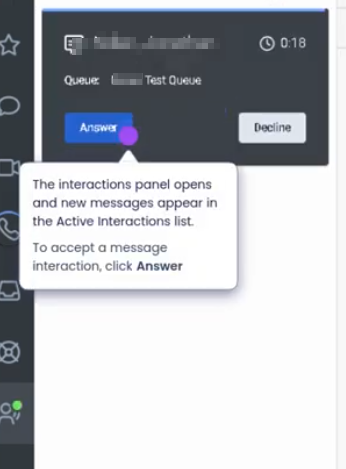
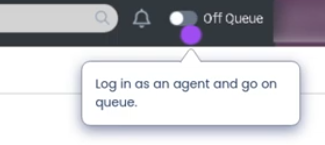
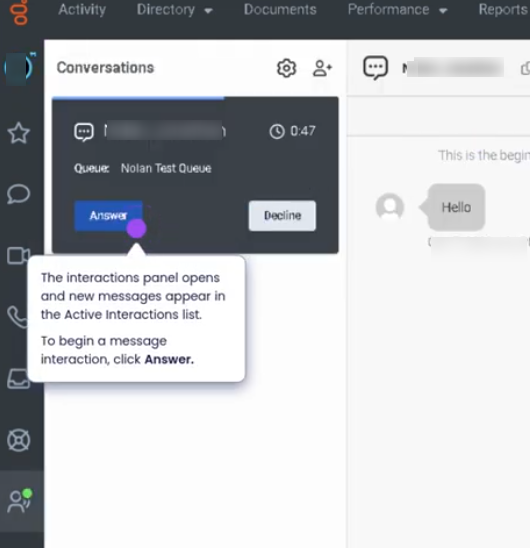
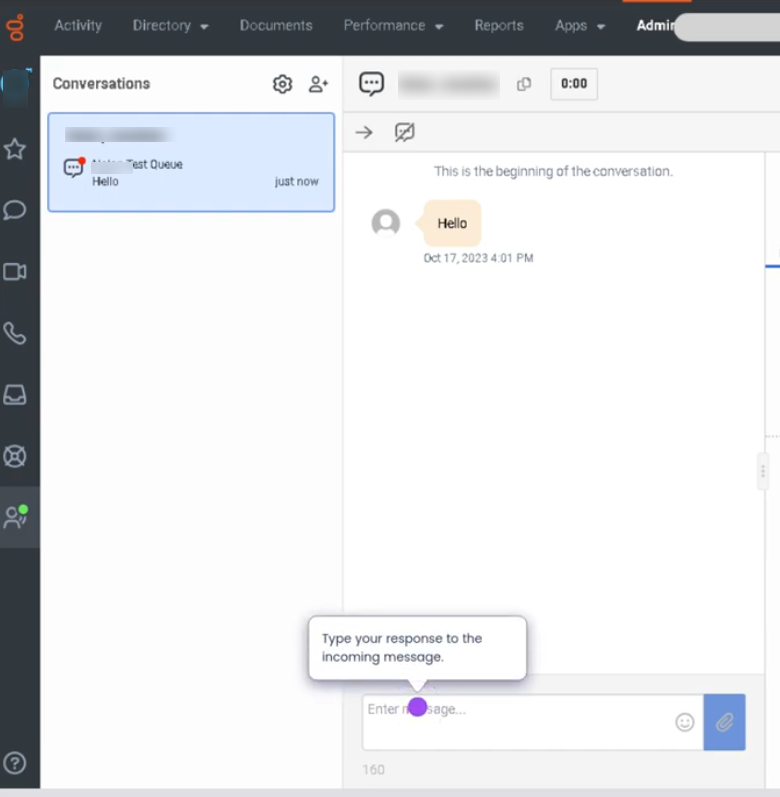
Login as agent
Answer Interaction
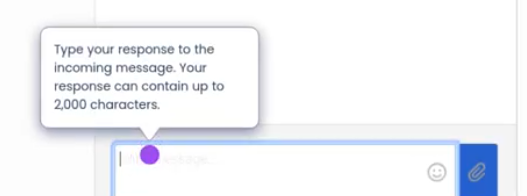
Type your response to the incoming message
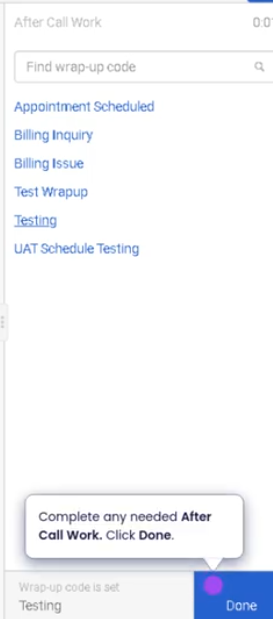
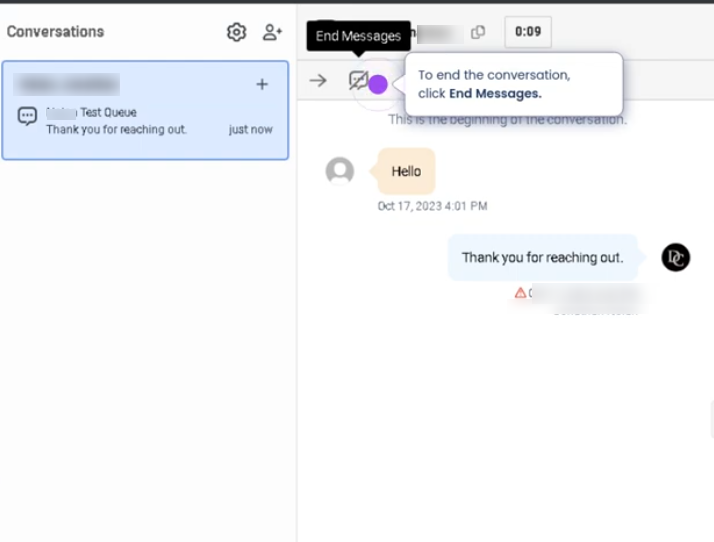
To end the interaction click end message

Disposition call and end
Requesting Time Off (Genesys Cloud)
Summary
Requesting time off in Genesys Cloud Workforce Management (WFM) allows agents to submit requests for scheduled leave such as vacation, personal time, or other approved absence types. These requests are reviewed and validated against staffing requirements, scheduling rules, and time-off limits configured by workforce administrators.
The time-off request process helps organizations maintain service-level coverage while providing agents with flexibility to manage their schedules.
Utilization
| Use Case | Description |
|---|---|
| Vacation planning | Agents request time off for planned vacation periods |
| Personal appointments | Agents request short-term leave for appointments or personal commitments |
| Sick leave | Agents notify management of illness or unexpected absence |
| Planned schedule changes | Agents request future schedule adjustments in advance |
| Workforce scheduling compliance | Ensures requests align with staffing and forecast requirements |
Time-off requests are validated against capacity limits and workforce planning rules to ensure the contact center maintains appropriate staffing levels.
Best Practices
| Practice | Reason |
|---|---|
| Submit requests as early as possible | Increases likelihood of approval before staffing limits are reached |
| Verify team policies and blackout periods | Prevents requests during restricted scheduling windows |
| Monitor request status | Allows agents to respond quickly if adjustments are required |
| Use the correct time-off type | Ensures accurate reporting and workforce planning |
| Avoid submitting multiple overlapping requests | Prevents scheduling conflicts |
| Communicate with supervisors if the request is urgent | Helps ensure timely review and approval |
Example Scenarios
Scenario 1 – Planned Vacation
Agent plans vacation weeks in advance
↓
Agent submits time-off request in WFM
↓
System validates staffing requirements
↓
Supervisor reviews and approves request
↓
Schedule updates to reflect approved time off
Scenario 2 – Personal Appointment
Agent needs time off for medical appointment
↓
Agent submits a partial-day time-off request
↓
System checks available time-off capacity
↓
Request is approved and schedule updated
Scenario 3 – Sick Leave Notification
Agent becomes ill before scheduled shift
↓
Agent submits a time-off request for the shift
↓
Supervisor reviews request
↓
Schedule reflects absence and staffing is adjusted
Key Benefits
| Benefit | Explanation |
|---|---|
| Improved schedule management | Agents can plan time off without disrupting staffing |
| Workforce compliance | Requests are validated against staffing rules |
| Better visibility for supervisors | Managers can track and approve requests efficiently |
| Enhanced employee satisfaction | Provides flexibility while maintaining operational coverage |
Genesys Cloud - Agent - Accept and respond to SMS Interactions

SMS Interactions (Genesys Cloud)
Summary
SMS Interactions in Genesys Cloud allow organizations to communicate with customers through text messaging channels directly from the contact center platform. SMS interactions are routed through queues, enabling agents to manage conversations similarly to chat, messaging, or voice interactions.
Agents can accept, respond, and manage SMS conversations within the Agent Workspace, while supervisors can monitor performance, track interaction metrics, and maintain service quality. SMS communication provides customers with a convenient and asynchronous way to interact with support teams.
Utilization
| Use Case | Description |
|---|---|
| Customer support via text messaging | Customers send inquiries or requests through SMS |
| Appointment reminders | Businesses send automated notifications or confirmations |
| Customer follow-ups | Agents follow up on cases or service requests |
| Marketing or notification campaigns | Organizations send informational messages or alerts |
| Two-way customer engagement | Customers can respond and continue the conversation with an agent |
SMS interactions enable organizations to extend customer support to mobile messaging channels, improving accessibility and response flexibility.
Best Practices
| Practice | Reason |
|---|---|
| Respond quickly to incoming SMS messages | Customers expect fast responses when using text messaging |
| Use clear and concise language | SMS messages should be short and easy to understand |
| Avoid sharing sensitive information through SMS | SMS is not always considered a secure communication channel |
| Maintain professional tone | Ensures brand consistency and positive customer experience |
| Confirm resolution before closing the conversation | Prevents unresolved issues |
| Use templates or canned responses when appropriate | Improves efficiency and consistency |
Example Scenarios
Scenario 1 – Customer Sends SMS Support Request
Customer sends SMS message to support number
↓
Genesys Cloud receives the message
↓
Interaction routed to SMS support queue
↓
Agent accepts the SMS interaction
↓
Agent responds to the customer via text
Scenario 2 – Follow-Up via SMS
Customer previously contacted support
↓
Agent sends SMS follow-up message
↓
Customer replies with additional information
↓
Agent continues conversation until issue is resolved
Scenario 3 – Appointment Confirmation
Organization sends automated SMS reminder
↓
Customer receives notification
↓
Customer replies to confirm or reschedule
↓
Agent reviews and responds if necessary
Key Benefits
| Benefit | Explanation |
|---|---|
| Convenient communication channel | Customers can interact using mobile devices |
| Asynchronous messaging | Conversations can continue even if agents or customers step away |
| Increased customer engagement | Many customers prefer text messaging over voice calls |
| Queue-based routing | SMS interactions follow standard contact center routing rules |
| Interaction tracking | SMS conversations are recorded and available for reporting |
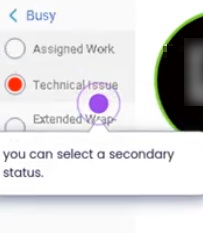
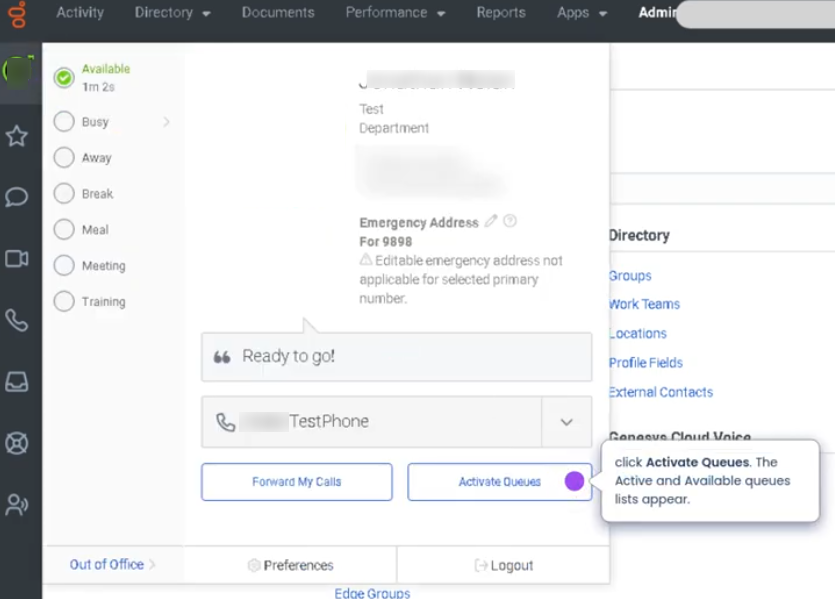
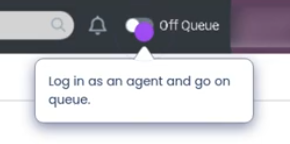
Genesys Cloud - Agent - Change Presence and Status
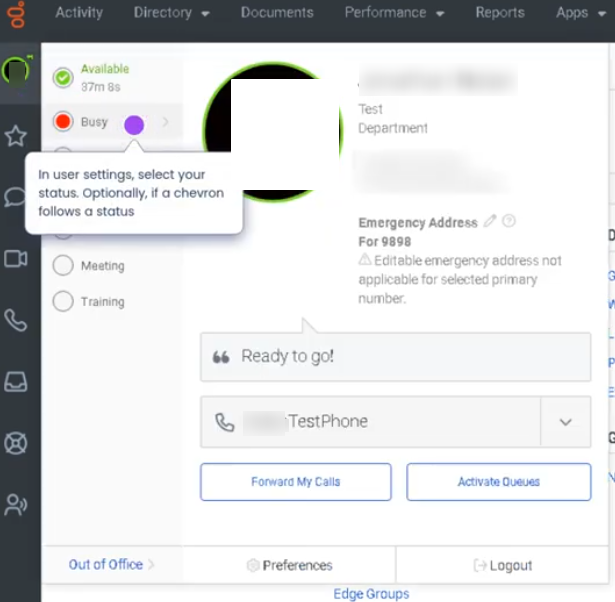
Change Presence and Status (Genesys Cloud)
Summary
The Change Presence and Status feature in Genesys Cloud allows users to control their availability and activity state within the platform. Presence indicates a user’s general availability across collaboration tools (such as Available, Busy, Away, or Offline), while Status reflects the user’s routing availability for interactions (such as Available, Break, Meal, Meeting, or Training).
Together, these settings help the platform determine whether an agent can receive interactions and allow supervisors and coworkers to understand the agent’s current availability.
Utilization
| Use Case | Description |
|---|---|
| Starting a work shift | Agent sets presence to Available and status to Available to begin receiving interactions |
| Temporary break | Agent updates status to Break or Meal to prevent new interactions |
| Meetings or training | Agent changes status to Meeting or Training during scheduled activities |
| Remote collaboration visibility | Presence allows coworkers to see if the user is available to communicate |
| Workforce management adherence | Status changes align with scheduled WFM activities |
Changing presence and status helps maintain accurate routing, operational visibility, and workforce adherence.
Best Practices
| Practice | Reason |
|---|---|
| Set presence and status correctly before leaving workstation | Prevents missed interactions |
| Change status before taking breaks or meetings | Ensures calls are not routed unexpectedly |
| Follow workforce schedule activities | Helps maintain adherence metrics |
| Return to Available promptly when ready | Maintains queue coverage and service levels |
| Avoid incorrect manual status changes | Prevents inaccurate reporting |
| Communicate status changes when necessary | Helps supervisors manage staffing levels |
Example Scenarios
Scenario 1 – Agent Beginning Shift
Agent logs into Genesys Cloud
↓
Agent selects presence as Available
↓
Agent sets routing status to Available
↓
Routing engine begins sending interactions
Scenario 2 – Agent Taking Break
Agent completes current interaction
↓
Agent changes status to Break
↓
Routing engine stops sending interactions
↓
Agent returns and sets status to Available
Scenario 3 – Scheduled Meeting
Agent receives meeting notification
↓
Agent updates status to Meeting
↓
Supervisor sees updated agent availability
↓
Agent returns and switches back to Available
Key Benefits
| Benefit | Explanation |
|---|---|
| Accurate interaction routing | Ensures only available agents receive interactions |
| Workforce adherence visibility | Supervisors track schedule compliance |
| Improved operational transparency | Teams can see agent availability |
| Better staffing management | Status updates help supervisors manage workloads |
| Collaboration awareness | Presence helps coworkers know when someone is available |
Genesys Cloud - Agent - Choose Queues to Work
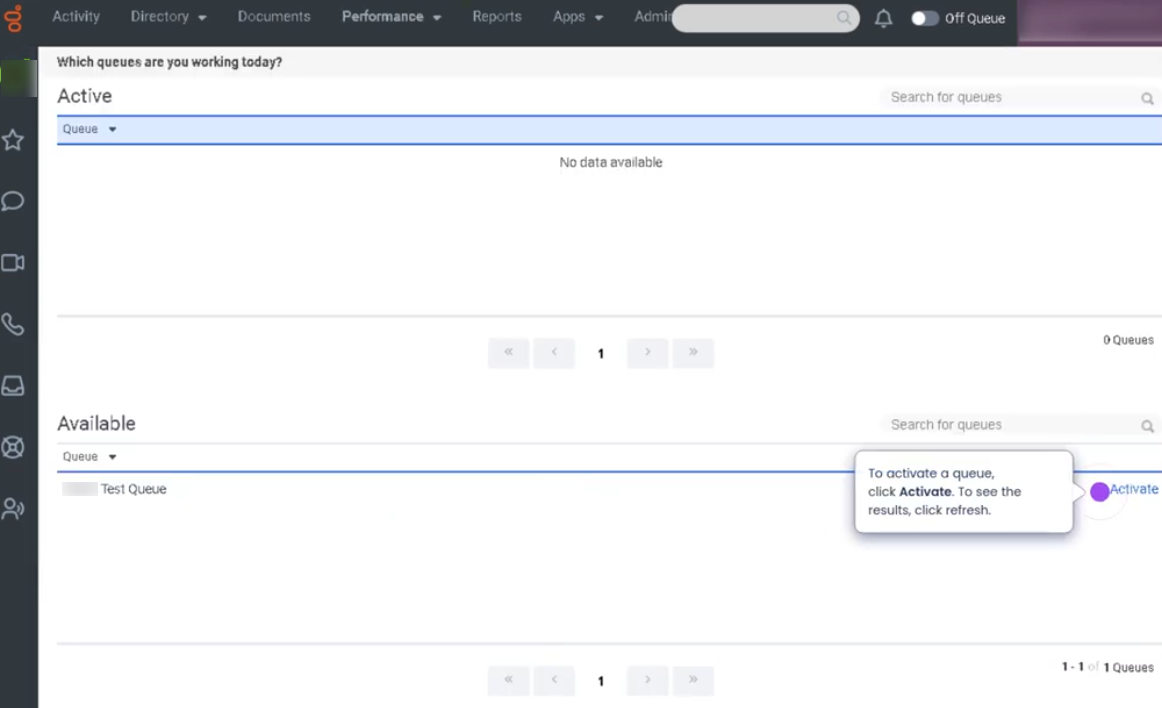
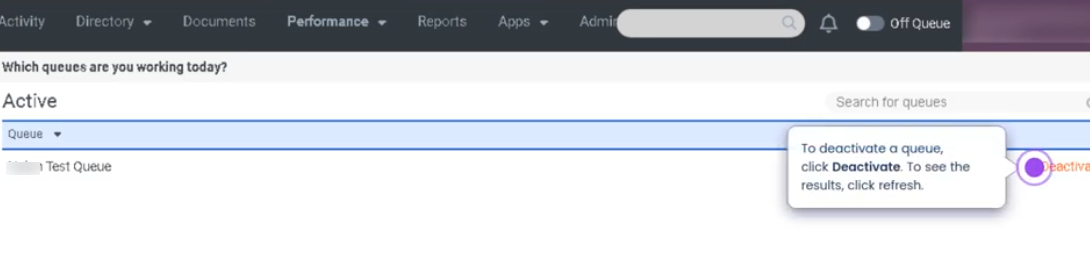
Choose Queues to Work (Genesys Cloud)
Summary
The Choose Queues to Work feature in Genesys Cloud allows agents to select which assigned queues they will actively receive interactions from during their session. Agents may belong to multiple queues, but they can control which ones they are currently working based on workload, skills, or operational instructions.
By enabling or disabling specific queues, agents help optimize interaction routing and workload management while still remaining available for the queues they are responsible for.
Utilization
| Use Case | Description |
|---|---|
| Multi-queue agents | Agents assigned to multiple queues choose which ones they are actively working |
| Skill-based support | Agents enable queues aligned with their expertise |
| Operational load balancing | Supervisors instruct agents to activate specific queues during high volume |
| Temporary queue participation | Agents join additional queues during peak demand |
| Focused work sessions | Agents disable certain queues to concentrate on specific interaction types |
This feature allows organizations to maintain flexible routing strategies and dynamic staffing adjustments.
Best Practices
| Practice | Reason |
|---|---|
| Only enable queues you are trained to support | Ensures customers reach qualified agents |
| Verify queue selections at login | Prevents missed interactions |
| Follow supervisor instructions during high volume | Helps maintain service levels |
| Avoid disabling queues during active staffing needs | Prevents delays in customer support |
| Regularly review queue assignments | Ensures agents remain aligned with operational priorities |
| Stay Available when working selected queues | Allows the routing engine to deliver interactions |
Example Scenarios
Scenario 1 – Agent Assigned to Multiple Queues
Agent logs into Genesys Cloud
↓
Agent opens queue selector
↓
Agent enables Sales and Customer Support queues
↓
Agent begins receiving interactions from both queues
Scenario 2 – Peak Volume Support
Supervisor identifies high call volume in Support queue
↓
Supervisor asks agents to enable Support queue
↓
Agents update queue selection
↓
Routing engine distributes interactions accordingly
Scenario 3 – Focused Queue Work
Agent normally supports multiple queues
↓
Agent temporarily disables secondary queues
↓
Agent focuses on primary queue interactions
↓
Queue performance improves for priority workload
Key Benefits
| Benefit | Explanation |
|---|---|
| Flexible queue participation | Agents can control which queues they actively support |
| Improved routing efficiency | Interactions are directed to agents who enabled the queue |
| Better workload management | Teams can adapt to changing demand |
| Operational transparency | Agents clearly see which queues they are working |
| Supports multi-skill environments | Enables dynamic queue participation for skilled agents |
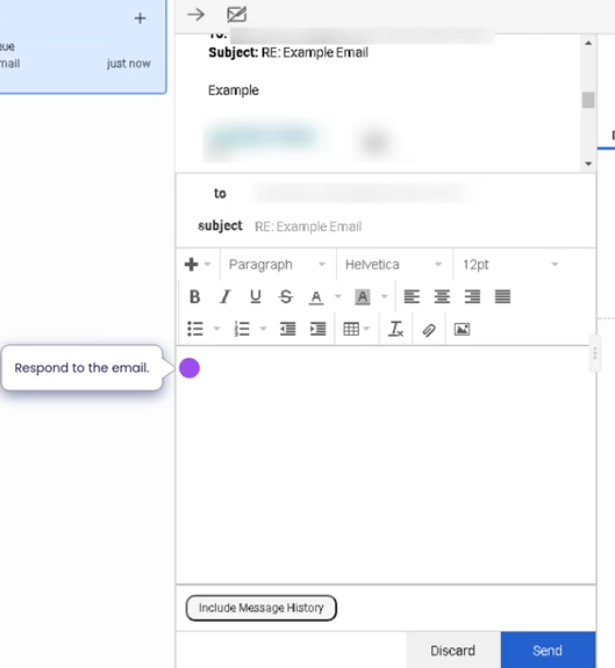
Genesys Cloud - Agent - Email interaction
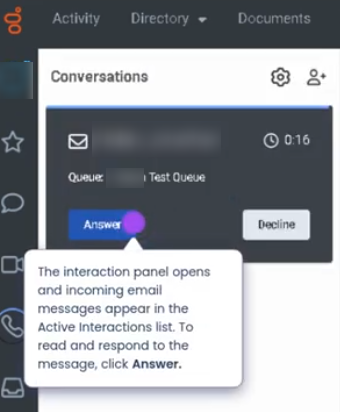

Email Interactions (Genesys Cloud)
Summary
Email Interactions in Genesys Cloud allow agents to handle customer communications through email channels directly within the Agent Workspace. Emails are treated as interactions and are routed through queues using the Automatic Contact Distribution (ACD) engine, similar to voice, chat, or messaging interactions.
Agents can accept incoming emails, review the message content, compose responses, attach files, and manage conversation threads while maintaining a full history of the interaction. Email interactions are commonly used for customer support, service requests, follow-ups, and documentation-based communication.
Utilization
| Use Case | Description |
|---|---|
| Customer support requests | Customers send inquiries through email |
| Case management | Agents respond to issues requiring detailed explanations |
| Documentation sharing | Agents provide instructions, files, or confirmations |
| Follow-up communication | Agents send updates regarding ongoing cases |
| Asynchronous support | Customers and agents respond without needing real-time availability |
Email interactions help organizations provide structured and traceable communication for complex customer inquiries.
Best Practices
| Practice | Reason |
|---|---|
| Carefully read the full email thread before responding | Ensures the response addresses the complete issue |
| Maintain professional and clear language | Email responses represent the organization's brand |
| Use templates or canned responses when appropriate | Improves response efficiency and consistency |
| Verify attachments before sending | Prevents sending incorrect or sensitive files |
| Include clear instructions and next steps | Helps customers resolve issues quickly |
| Proofread emails before sending | Avoids miscommunication and errors |
Example Scenarios
Scenario 1 – Customer Submits Email Support Request
Customer sends email to support address
↓
Email interaction enters Genesys Cloud
↓
Routing engine assigns email to queue
↓
Agent accepts email interaction
↓
Agent reviews message and sends response
Scenario 2 – Agent Provides Detailed Support Instructions
Customer requests help via email
↓
Agent receives email interaction
↓
Agent reviews customer issue
↓
Agent sends step-by-step instructions
Scenario 3 – Follow-Up Communication
Agent resolves customer issue
↓
Agent sends confirmation email
↓
Customer replies with additional question
↓
Agent continues email thread until resolution
Key Benefits
| Benefit | Explanation |
|---|---|
| Asynchronous communication | Customers and agents can respond at different times |
| Detailed documentation | Email threads provide a record of communication |
| Queue-based routing | Emails are distributed using the ACD system |
| Improved case handling | Complex issues can be addressed with detailed responses |
| Integrated interaction management | Email interactions are tracked within Genesys Cloud analytics |
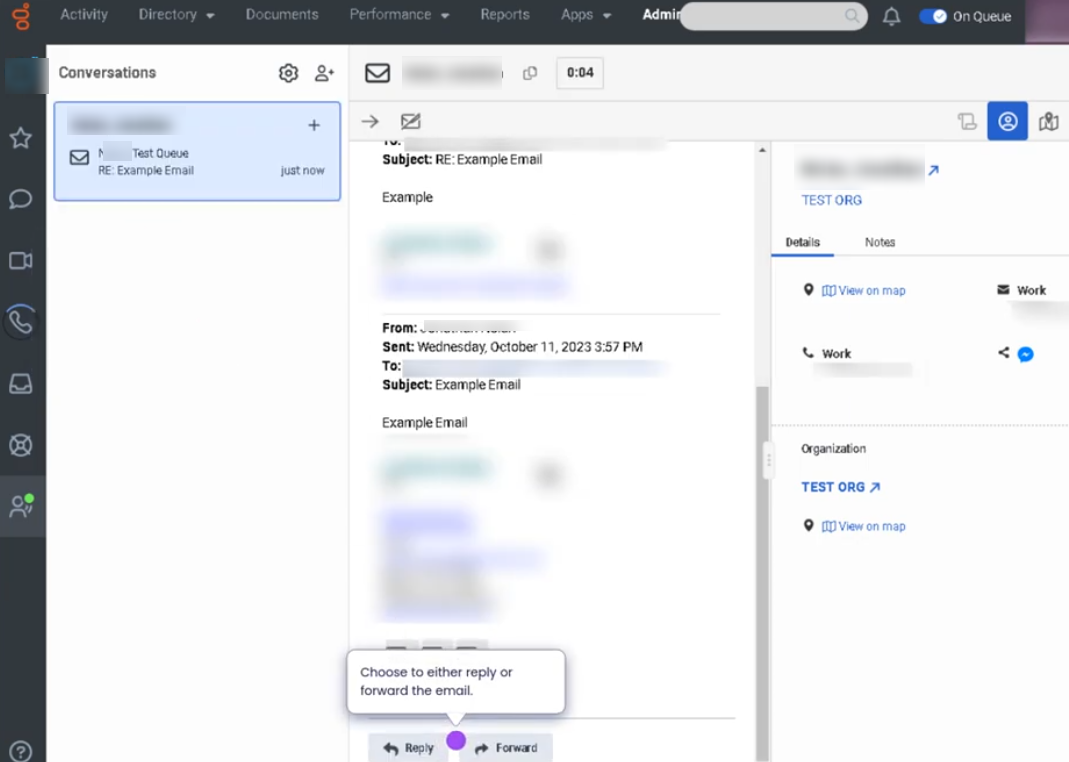
Genesys Cloud - Agent - Fordward calls
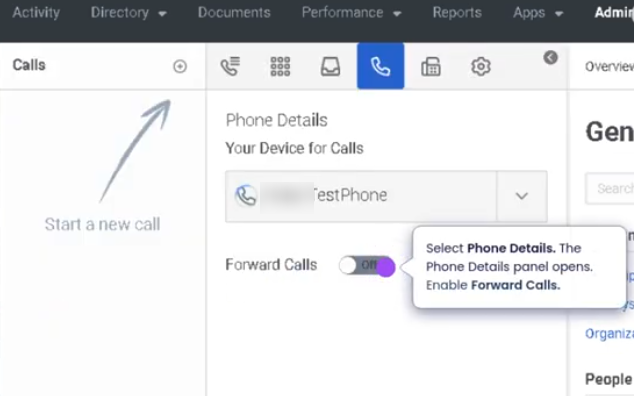
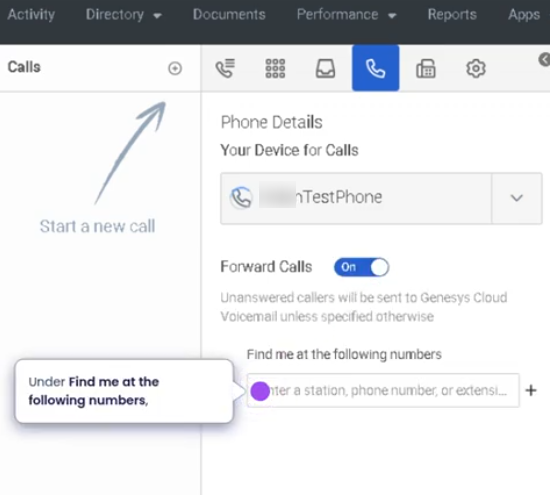
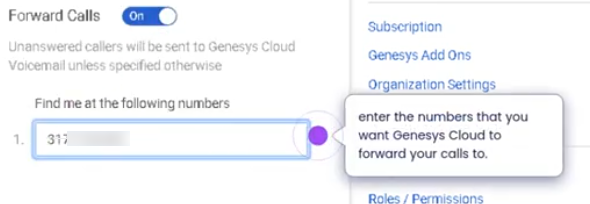
Forward Your Calls (Genesys Cloud)
Summary
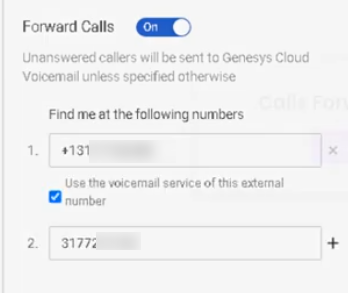
The Forward Your Calls feature in Genesys Cloud allows users to redirect incoming calls from their assigned extension or phone to another destination. The destination can be another Genesys Cloud user, a queue, or an external phone number such as a mobile device.
When forwarding to an external number, users can choose to use the voicemail service of that external number. In this case, if the call is not answered by the external destination, the call will be handled by the external device’s voicemail system instead of the Genesys Cloud voicemail.
This feature ensures that calls are still answered or recorded even when the user is away from their workstation or working remotely.
Utilization
| Use Case | Description |
|---|---|
| Temporary absence | User forwards calls to another user or phone while unavailable |
| Remote work | Calls forwarded to a mobile phone or external device |
| After-hours coverage | Calls redirected to another phone or team member |
| Travel or offsite work | Users forward calls to an external phone number |
| External voicemail handling | Calls forwarded to a mobile device that manages voicemail |
Forwarding calls helps ensure continuous call coverage and minimizes missed customer interactions.
Best Practices
| Practice | Reason |
|---|---|
| Verify the external phone number before enabling forwarding | Prevents calls from being misrouted |
| Inform the receiving person or team when forwarding calls | Ensures someone is ready to handle the calls |
| Use external voicemail when appropriate | Allows callers to leave messages when unavailable |
| Disable forwarding when returning to normal operations | Ensures calls return to the correct user |
| Avoid forwarding sensitive business calls to unsecured devices | Protects customer and company data |
| Test the forwarding configuration | Confirms that calls route correctly |
Example Scenarios
Scenario 1 – Agent Working Remotely
Agent leaves office
↓
Agent enables call forwarding
↓
Calls forwarded to mobile phone
↓
Agent answers calls from mobile device
Scenario 2 – External Voicemail Handling
Customer calls agent extension
↓
Call forwarding sends call to external phone
↓
External phone does not answer
↓
External voicemail service records the message
Scenario 3 – Temporary Coverage
Agent attending meeting
↓
Agent forwards calls to colleague
↓
Colleague answers incoming calls
↓
Customers continue receiving support
Key Benefits
| Benefit | Explanation |
|---|---|
| Continuous call coverage | Calls are redirected when the user is unavailable |
| Remote work flexibility | Users can receive calls on external devices |
| Voicemail fallback | External voicemail can capture missed calls |
| Reduced missed calls | Ensures callers reach someone or leave a message |
| Simple call management | Users can easily enable or disable call forwarding |
Genesys Cloud - Agent - How to place a call on behalf of a queue
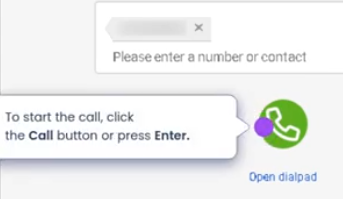
Navigate to interactions

Click to start a conversation

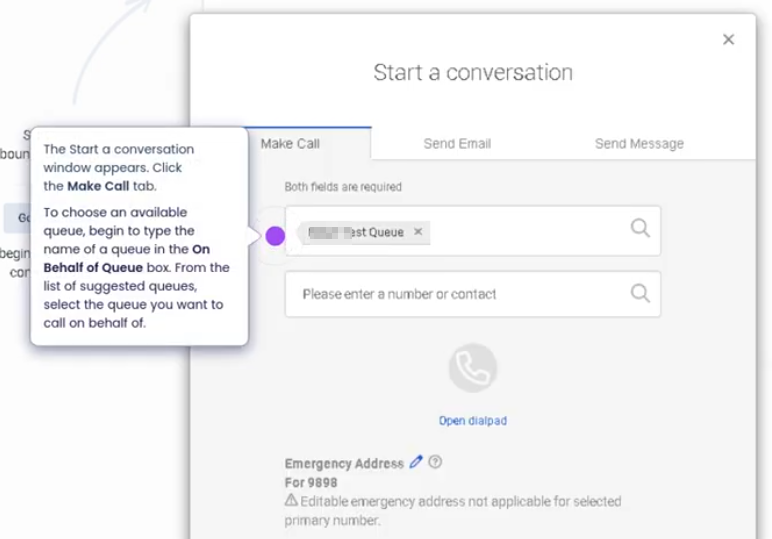
Enter number and start the call
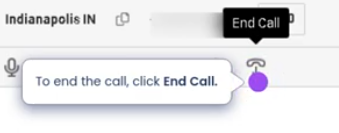
To end a call
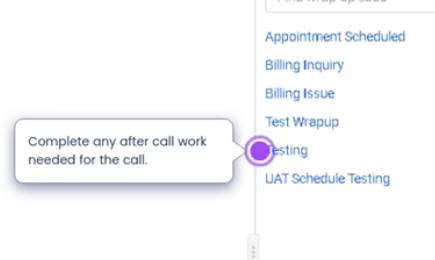
Disposition the call
Placing a Call on Behalf of a Queue
Summary
Placing a call on behalf of a queue in Genesys Cloud allows an agent to make an outbound call that is associated with a specific queue for reporting and operational tracking, even if the agent is not actively receiving ACD interactions from that queue at the moment.
This feature is commonly used for follow-ups, callbacks, or outbound communication related to interactions that originated from a queue. When the call is placed using the On Behalf of Queue field, the interaction is recorded in reporting as part of that queue’s activity, ensuring accurate metrics and historical tracking.
Utilization
| Use Case | Description |
|---|---|
| Customer Follow-ups | Agents call customers back after resolving an issue or completing research related to a queue interaction |
| Scheduled Callbacks | Agents return calls that were previously scheduled or requested through queue workflows |
| Queue-Based Ownership | Calls remain associated with the responsible queue for accurate reporting |
| Case or Ticket Follow-up | Agents contact customers related to support tickets originating from queue interactions |
| Supervisor Escalations | Supervisors can call customers directly while still associating the call with the appropriate queue |
Best Practices
| Practice | Reason |
|---|---|
| Always select the correct queue | Ensures accurate reporting and queue-level analytics |
| Use for follow-ups tied to a queue interaction | Maintains operational visibility for support teams |
| Avoid using it for personal outbound calls | Queue metrics may become inaccurate |
| Document the purpose of the call in notes | Helps maintain interaction history context |
| Train agents on when to use this feature | Prevents misuse and preserves reporting integrity |
| Use consistent queue naming conventions | Makes it easier for agents to select the correct queue quickly |
Example Scenarios
Scenario 1 – Customer Support Follow-up
Customer calls support queue
↓
Issue requires investigation
↓
Agent researches solution
↓
Agent places outbound call on behalf of the Support Queue
↓
Call is recorded as part of queue activity
Scenario 2 – Callback After Missed Call
Customer abandons call in Billing Queue
↓
Agent reviews queue activity
↓
Agent places call on behalf of Billing Queue
↓
Customer receives callback
↓
Interaction is tracked under Billing Queue
Scenario 3 – Ticket-Based Customer Communication
Customer creates support ticket
↓
Ticket assigned to Technical Support Queue
↓
Agent calls customer on behalf of Technical Support Queue
↓
Call activity remains linked to queue metrics
Key Benefits
| Benefit | Explanation |
|---|---|
| Accurate Queue Reporting | Outbound calls are attributed to the correct queue |
| Improved Operational Visibility | Supervisors can track follow-up activity per queue |
| Better Customer Experience | Agents can easily perform callbacks tied to the original queue interaction |
| Workflow Consistency | Maintains alignment between inbound queue interactions and outbound follow-up calls |
Genesys Cloud - Agent - Schedule callbacks during Voice Interaction
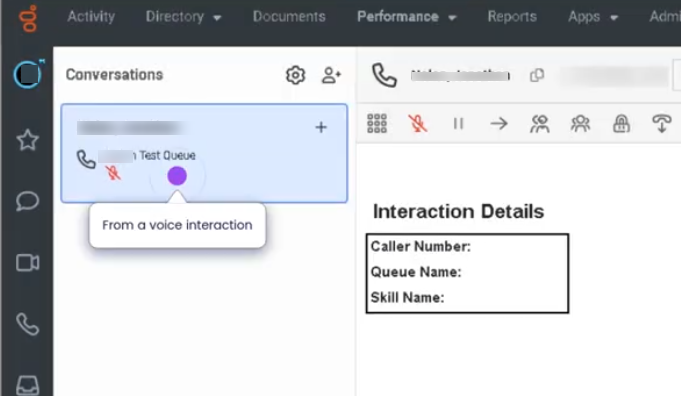

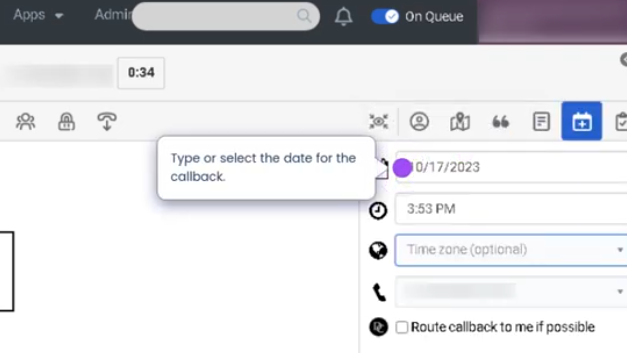
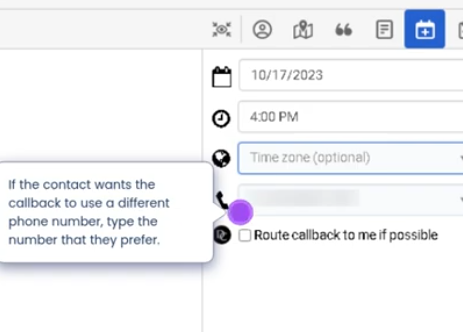
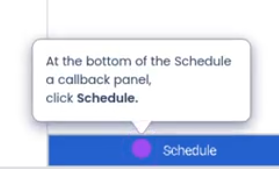
Schedule Callbacks During Voice Interaction (Genesys Cloud)
Summary
The Schedule Callback feature in Genesys Cloud allows agents to arrange a return call for a customer during an active voice interaction. Instead of requiring the customer to remain on hold or wait in queue, the agent can schedule a callback for a specific date and time. The callback is then placed automatically by the system or delivered to the appropriate queue when the scheduled time arrives.
This functionality improves the customer experience by reducing wait times and provides a structured way for agents to follow up with customers when immediate assistance is not possible.
Utilization
| Use Case | Description |
|---|---|
| Long wait times | Customers can request a callback instead of waiting in queue |
| Follow-up support | Agent schedules a callback after researching a solution |
| Escalation handling | Callback scheduled with a specialized team |
| Customer convenience | Customer selects a more convenient time to be contacted |
| High call volume | Contact center reduces queue congestion by scheduling callbacks |
Scheduling callbacks helps maintain customer satisfaction and operational efficiency by ensuring customers receive assistance without waiting on hold.
Best Practices
| Practice | Reason |
|---|---|
| Confirm the callback number with the customer | Ensures the system calls the correct number |
| Schedule callbacks within operating hours | Prevents calls being attempted when agents are unavailable |
| Provide a clear callback time window | Sets accurate expectations for the customer |
| Document callback details in interaction notes | Helps the next agent understand the issue |
| Verify the correct queue or skill group | Ensures the callback reaches the right team |
| Avoid excessive callback scheduling | Helps maintain balanced queue performance |
Example Scenarios
Scenario 1 – Customer Requests Callback Instead of Waiting
Customer calls support line
↓
Customer experiences long queue wait
↓
Agent offers callback option
↓
Agent schedules callback for later time
↓
System places callback when scheduled
Scenario 2 – Agent Needs Time to Research Issue
Agent receives complex customer issue
↓
Agent needs time to investigate
↓
Agent schedules callback for later in the day
↓
Customer receives return call with resolution
Scenario 3 – Callback Routed Through Queue
Agent schedules callback
↓
System stores callback request
↓
Scheduled time arrives
↓
Callback enters queue
↓
Available agent receives interaction
Key Benefits
| Benefit | Explanation |
|---|---|
| Reduced hold times | Customers avoid waiting in long queues |
| Improved customer satisfaction | Customers receive a return call at a convenient time |
| Better queue management | Callbacks help manage high call volumes |
| Structured follow-ups | Ensures issues are addressed after initial contact |
| Efficient agent workload | Allows agents to schedule follow-up interactions effectively |
Genesys Cloud - Agent - Select a Phone
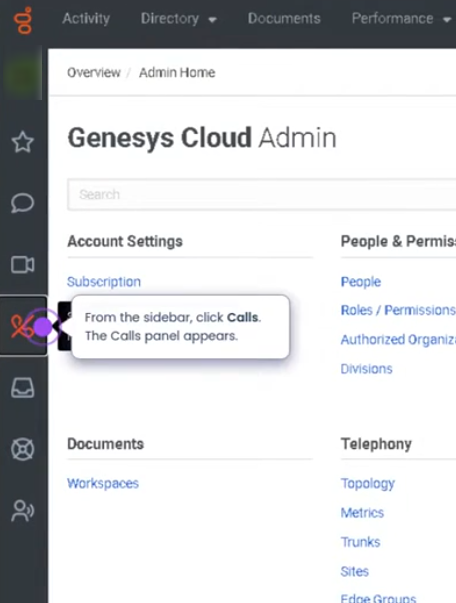
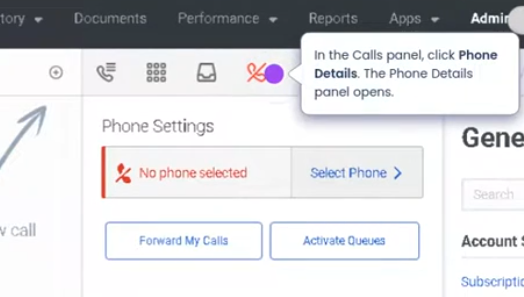
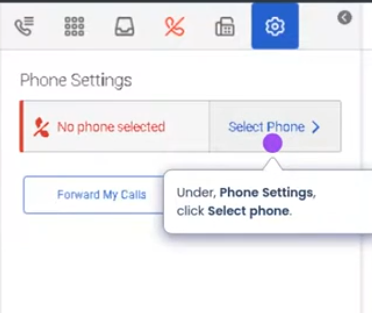


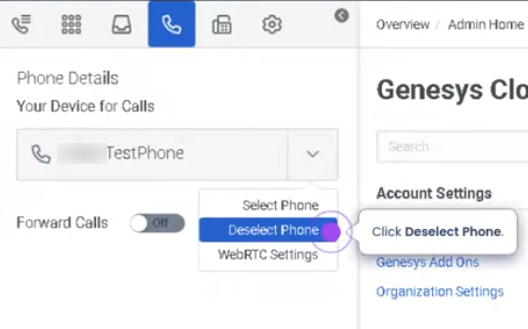
Select a Phone (Genesys Cloud)
Summary
The Select a Phone feature in Genesys Cloud allows agents to choose the device or endpoint they will use to handle voice interactions during their session. Before making or receiving calls, agents must select a phone type such as WebRTC phone, desk phone, or remote phone from the phone selector in the Calls panel.
Selecting the correct phone ensures that voice interactions are routed to the appropriate device and that the agent can properly manage inbound and outbound calls.
Utilization
| Use Case | Description |
|---|---|
| Agent starting shift | Agent selects a phone device before handling calls |
| Remote work environment | Agent chooses WebRTC phone for browser-based calling |
| Desk phone users | Agent selects assigned physical phone |
| Temporary workstation usage | Agent selects a different phone depending on location |
| Call routing readiness | System requires a phone selection to route voice interactions |
Selecting a phone ensures that Genesys Cloud knows where to deliver voice interactions for that agent session.
Best Practices
| Practice | Reason |
|---|---|
| Select a phone before changing status to Available | Ensures the agent can receive ACD calls |
| Verify audio devices when using WebRTC | Prevents call audio issues |
| Use the correct assigned phone | Avoids routing calls to the wrong device |
| Confirm phone selection at login | Prevents missed interactions |
| Recheck phone selection if switching workstations | Ensures calls are routed correctly |
| Test the phone device if issues occur | Helps validate microphone and speaker functionality |
Example Scenarios
Scenario 1 – Agent Starting Workday
Agent logs into Genesys Cloud
↓
Agent opens Calls panel
↓
Agent selects assigned phone
↓
Agent changes status to Available
↓
System begins routing voice interactions
Scenario 2 – Remote Agent Using WebRTC
Agent logs in from home workstation
↓
Agent selects WebRTC phone
↓
Agent verifies headset and microphone
↓
Agent begins receiving calls
Scenario 3 – Switching Workstations
Agent logs into Genesys Cloud on a different workstation
↓
Agent opens phone selector
↓
Agent selects the appropriate phone
↓
Agent resumes handling calls
Key Benefits
| Benefit | Explanation |
|---|---|
| Proper call routing | Ensures calls reach the correct device |
| Flexible endpoint usage | Agents can choose between WebRTC, desk phones, or remote phones |
| Supports remote and hybrid work | Enables browser-based calling from any workstation |
| Reduces call handling issues | Correct phone selection prevents missed or misrouted calls |
| Improves operational readiness | Agents can quickly prepare to receive interactions |