7. - Telephony & Infrastructure
- Certificate Authorities
- DID & Toll-Free Numbers
- Edges & Edge Groups
- Extensions
- Sites
- Topology
- Trunks
- WebRTC Phone Management
- Phone Management
- E911 and Emergency Locations
- Telephony Connection Options — BYOC Cloud vs BYOC Premises
Certificate Authorities
What Are Certificate Authorities?
⚠️ This page applies primarily to BYOC Premises deployments. For BYOC Cloud TLS trunk configuration, refer to the BYOC Cloud TLS trunk transport documentation instead.
Certificate Types
| Type | Who Manages It | Purpose | Editable? |
|---|---|---|---|
| Managed | Genesys | Creates trusted TLS connections for the Edge and managed phones; allows remote SIP devices to trust secure connections to external trunks connected to the Edge | No — cannot be added, edited, or deleted |
| Remote | Customer (you) | Imported CA that allows the Edge to trust a remote TLS endpoint such as an SBC or PBX | Yes — can be added, edited, and deleted |
ℹ️ There is only one managed certificate per organization. Genesys maintains it automatically.
Navigation
| Task | Path |
|---|---|
| Open Certificate Authorities | Admin → Telephony → Certificate Authorities |
| Add remote certificate authority | Certificate Authorities → Add |
| Edit remote certificate authority | Certificate Authorities → select entry → Edit |
| Delete remote certificate authority | Certificate Authorities → select entry → Delete |
Required permission: Telephony > Plugin > All
Adding a Remote Certificate Authority
| Step | Action |
|---|---|
| Step 1 | Navigate to Admin → Telephony → Certificate Authorities |
| Step 2 | Click Add |
| Step 3 | Choose import method: Upload from computer or Paste text from a file |
| Step 4 | Upload the .crt file or paste the certificate text |
| Step 5 | In Select Service for Use, choose the appropriate telephony service(s) |
| Step 6 | Click Save Certificate Authority |
| Step 7 | Test the secure TLS connection to the remote endpoint |
UI Fields
| Field | Description |
|---|---|
| Type column | Identifies whether the CA is Managed or Remote |
| Common Name | Certificate authority common name |
| Add Certificate Authority | Import method selector — Upload from computer or Paste text from a file |
| Browse | Opens file browser to locate the .crt file |
| Enter Your Certificate Authority | Text box for pasted certificate contents |
| Select Service for Use | Associates the CA with one or more telephony services |
| Save Certificate Authority | Saves the new or edited remote CA |
Key Rules
| Rule | Detail |
|---|---|
| Managed CAs are read-only | Cannot be added, edited, or deleted |
| Remote CAs are fully manageable | Add, edit service associations, or delete as needed |
| Supported import formats | .crt file upload or pasted certificate text |
| BYOC Premises scope | This feature area is for BYOC Premises; BYOC Cloud has its own TLS trunk documentation |
When to Use a Remote Certificate Authority
| Situation | Action |
|---|---|
| BYOC Premises Edge must trust a remote SBC or PBX TLS endpoint | Import remote CA |
| Remote carrier presents a certificate signed by an internal/private CA | Import remote CA |
| Managed phones require trusted TLS | Use the Genesys-managed CA — no action needed |
| BYOC Cloud TLS trunk setup | Do NOT use this page — use BYOC Cloud TLS trunk transport documentation |
Troubleshooting
| Issue | Cause | Resolution |
|---|---|---|
| Remote TLS endpoint not trusted | Required remote CA not imported | Import the correct CA and assign service usage |
| Cannot edit certificate authority | Selected CA is of type Managed | Managed CAs are read-only — only Remote CAs can be edited |
| Service still fails after import | Wrong certificate or wrong service association | Recheck the certificate chain and selected service(s) |
| Admin cannot access CA management | Missing permission | Grant Telephony > Plugin > All |
| Used wrong workflow for BYOC Cloud | This page is for BYOC Premises | Use the BYOC Cloud TLS trunk transport documentation instead |
Quick Reference
| Question | Answer |
|---|---|
| What two certificate types exist? | Managed and Remote |
| Who manages the Managed CA? | Genesys |
| What is a Remote CA used for? | Allows the Edge to trust a remote TLS endpoint |
| How can a remote CA be imported? | Upload from computer or paste text from a file |
| Can Managed CAs be edited? | No |
| Does this apply to BYOC Cloud? | No — BYOC Cloud has its own TLS trunk documentation |
See Also
- Trunks — configure SIP connectivity; TLS transport is selected per trunk
- Edges & Edge Groups — BYOC Premises media appliances that rely on CA trust
- Sites — telephony routing configuration
Screenshots

Create New
DID & Toll-Free Numbers
What Are DID and Toll-Free Numbers?
DID (Direct Inward Dial) and toll-free numbers are the inbound phone numbers your organization uses. They must be added to Genesys Cloud as inventory before they can be assigned to a person, phone, or call flow.
| Number Type | Description |
|---|---|
| DID | Geographic number with a local area code; used for direct user or department dialing |
| Toll-Free | Non-geographic number (800, 833, 844, 855, 866, 877, 888); typically used for public-facing inbound access |
Both DID and toll-free numbers are managed in the same workflow under Admin → Telephony → DID Numbers.
Two Main Areas
| Tab | Purpose |
|---|---|
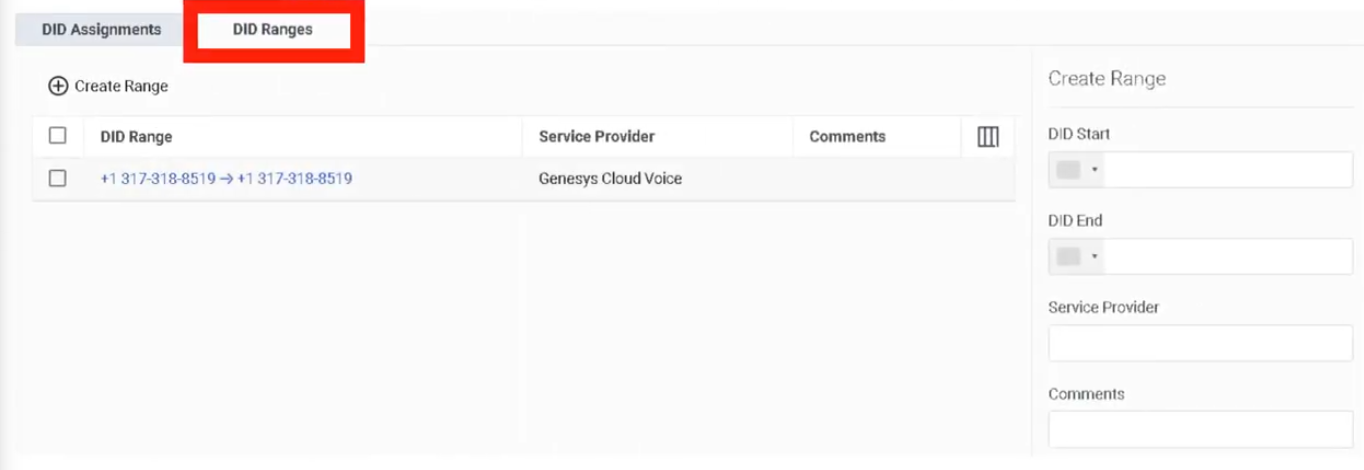
| DID Ranges | Add and manage blocks of DID or toll-free numbers |
| DID Assignments | Assign individual numbers to a person, phone, or call flow; view and manage current assignments |
Navigation
| Task | Path |
|---|---|
| Open DID Numbers | Admin → Telephony → DID Numbers |
| Open DID Ranges | DID Numbers → DID Ranges tab |
| Create a range | DID Ranges → Create Range |
| Open DID Assignments | DID Numbers → DID Assignments tab |
| Assign a number | DID Assignments → select number → Assign |
| Unassign a number | DID Assignments → select assigned number → Unassign |
Step 1: Create a DID or Toll-Free Range
Numbers must be added as a range before they can be assigned.
| Step | Action |
|---|---|
| Step 1 | Navigate to Admin → Telephony → DID Numbers |
| Step 2 | Open the DID Ranges tab |
| Step 3 | Click Create Range |
| Step 4 | In DID Start, select the country and enter the first number |
| Step 5 | In DID End, select the same country and enter the last number |
| Step 6 | Enter the Service Provider (carrier/provider name) |
| Step 7 | Save the range |
Range Creation Fields
| Field | Description |
|---|---|
| DID Start | First number in the range — country selector + number |
| DID End | Last number in the range — same country as Start |
| Service Provider | Carrier or provider name associated with this block |
ℹ️ For a single number, enter the same value in both Start and End.
Step 2: Assign a Number
Once numbers are in inventory, assign them from the DID Assignments tab.
| Step | Action |
|---|---|
| Step 1 | Open the DID Assignments tab |
| Step 2 | Locate the desired number (search or filter by assignment status) |
| Step 3 | Select the number |
| Step 4 | Choose the assignment target type |
| Step 5 | Select the specific Person, Phone, or Call Flow |
| Step 6 | Save the assignment |
| Step 7 | Test inbound routing |
Assignment Target Types
| Target | Use Case |
|---|---|
| Person | Assign a direct number to a specific user |
| Phone | Assign a number to a specific device |
| Call Flow | Assign a number to an inbound Architect flow (IVR / queue entry point) |
Common Assignment Scenarios
| Scenario | Target |
|---|---|
| Employee direct inward dial | Person |
| Main inbound IVR number | Call Flow |
| Shared lobby or reception device | Phone |
| Public-facing toll-free number | Call Flow |
| Branded toll-free for a department | Call Flow |
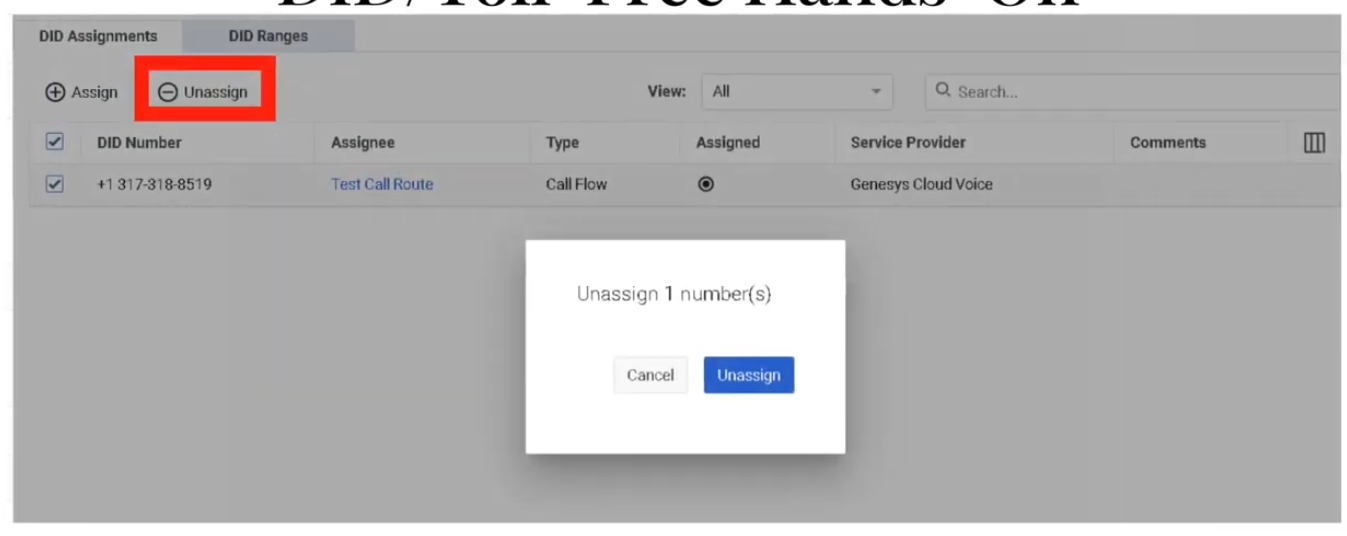
Unassigning a Number
Select the assigned number in DID Assignments and choose Unassign. The number returns to available inventory and can be reassigned.
Troubleshooting
| Issue | Cause | Resolution |
|---|---|---|
| Number not visible | Range not created or not imported | Recheck DID Ranges and provider data |
| Number cannot be assigned | Already assigned or not in available inventory | Filter by assignment status; unassign first if needed |
| Calls do not reach destination | Wrong assignment target or downstream routing issue | Verify the assignment target and its call flow/phone/user setup |
| Wrong user or flow receives calls | Incorrect assignment | Unassign and reassign correctly |
| Toll-free not available | Number not yet purchased, ported, or activated | Confirm procurement or porting status with carrier |
Quick Reference
| Question | Answer |
|---|---|
| Where do you manage DID and toll-free numbers? | Admin → Telephony → DID Numbers |
| What are the two main tabs? | DID Ranges and DID Assignments |
| What can a number be assigned to? | A person, a phone, or a call flow |
| What fields are needed to create a range? | DID Start, DID End, and Service Provider |
| Can toll-free numbers be managed here too? | Yes — same workflow |
| What must happen before a number can be assigned? | It must exist in a DID Range |
Naming Convention
| Resource | Example |
|---|---|
| DID Range (provider) | CarrierA_US_DID_Block_01 |
| Toll-Free main entry | US_TF_Main_Inbound |
See Also
- Call Routing & Message Routing — DID numbers are associated with inbound call routes
- Architect Overview — call flows are the assignment target for main inbound numbers
- Extensions — separate from DIDs; extensions are internal-only dialing numbers
- Architectural Build Order — DID numbers are configured in Phase 2
Screenshots
To unassign
DID Ranges
Edges & Edge Groups
What Are Edges?
An Edge is a BYOC Premises network appliance that handles local media and provides telephony services including media server, SIP registrar, and SIP proxy functions. Edges are the core infrastructure component of BYOC Premises deployments.
ℹ️ Edges and Edge Groups are a BYOC Premises concept. They do not apply to BYOC Cloud or Genesys Cloud Voice deployments.
What Are Edge Groups?
An Edge Group is a set of BYOC Premises Edges directly connected over a high-bandwidth, low-latency network (LAN or WAN). Edges in the same group can share trunks and related telephony resources with each other.
| Resource Types That Can Be Shared | Examples |
|---|---|
| Phone trunks | SIP phone trunks |
| Communication provider trunks | Carrier SIP trunks |
| External gateways | SBC/gateway resources |
| SIP carriers and VoIP gateways | Shared across grouped Edges |
⚠️ Different Edge Groups do not share resources with each other. Only group Edges that are on a suitably low-latency, high-bandwidth link.
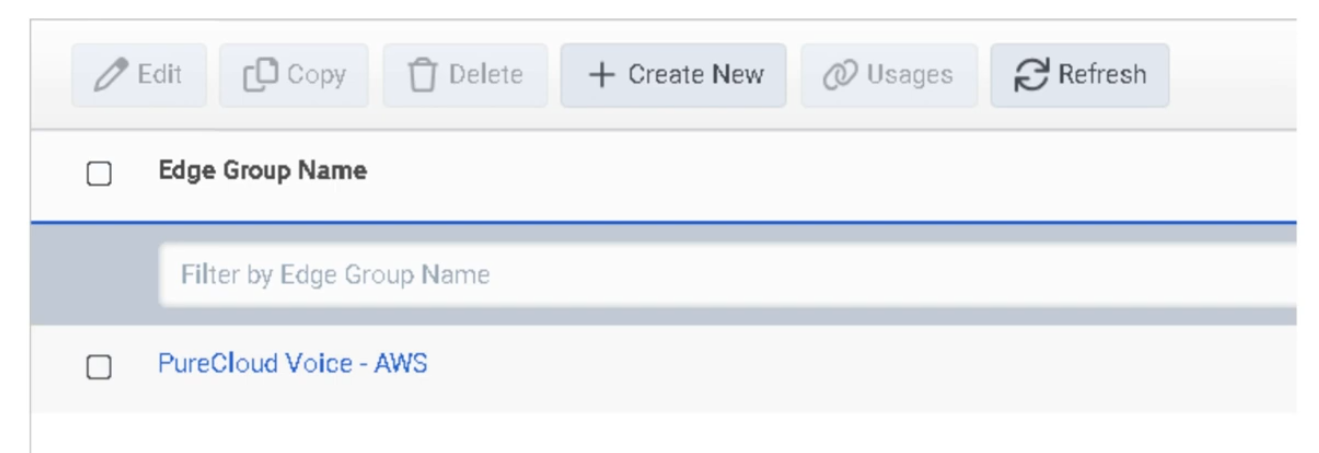
Navigation
| Task | Path |
|---|---|
| Open Edges | Admin → Telephony → Edges |
| Provision new Edge | Edges → Provision New Edge |
| View Edge details | Edges → select Edge → information panel |
| Open Edge Groups | Admin → Telephony → Edge Groups |
| Create Edge Group | Edge Groups → Create |
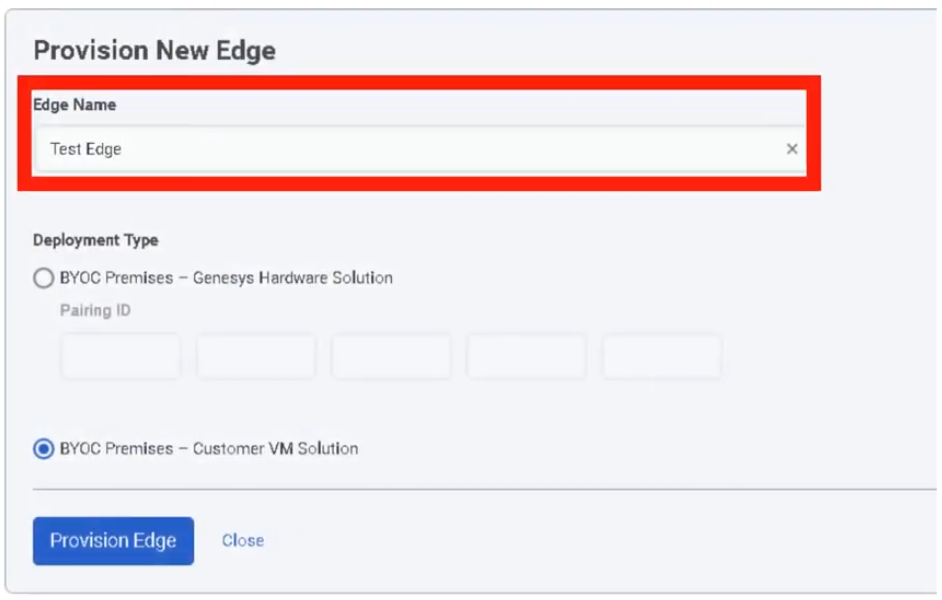
Provisioning an Edge
| Step | Action |
|---|---|
| Step 1 | Navigate to Admin → Telephony → Edges |
| Step 2 | Click Provision New Edge |
| Step 3 | Enter Edge Name |
| Step 4 | Select the hardware solution type (e.g. BYOC Premises – Customer Hardware Solution) |
| Step 5 | Enter Serial Number and confirm it |
| Step 6 | Click Provision Edge |
| Step 7 | Configure the Edge's network interface(s) |
| Step 8 | Associate with the correct Site and Edge Group |
Edge Provisioning Fields
| Field | Description |
|---|---|
| Edge Name | Identifier for the Edge |
| Hardware Solution Type | Selects the Edge model/solution (e.g. Customer Hardware Solution) |
| Serial Number | Physical hardware serial number |
| Confirm Serial Number | Confirmation field to prevent entry errors |
Edge Information Panel
After provisioning, the Edge information panel shows:
| Field | Description |
|---|---|
| Connectivity status | Cloud connectivity and operational state |
| Trunk status | Associated trunk state |
| Software version | Installed/staged version |
| Hardware model | Edge hardware model |
| Serial number | Hardware serial number |
| Pairing ID | Used during provisioning |
| Metrics | Call capacity and CPS visibility |
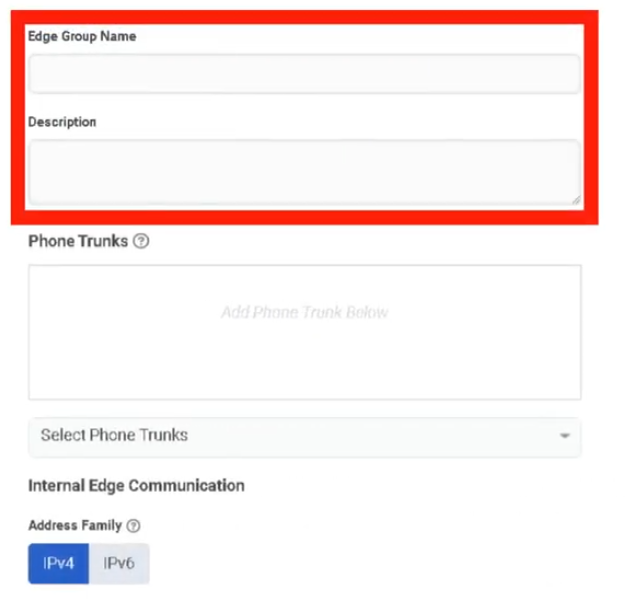
Creating an Edge Group
| Step | Action |
|---|---|
| Step 1 | Navigate to Admin → Telephony → Edge Groups |
| Step 2 | Click Create |
| Step 3 | Enter the Edge Group Name |
| Step 4 | Add one or more Edges to the group |
| Step 5 | Associate trunk(s) as needed |
| Step 6 | Save |
ℹ️ Plan sites and trunks before creating Edge Groups. Genesys recommends determining required trunks and sites first.
Redundancy
Genesys recommends N+1 redundancy for BYOC Premises Edges. Managed phones register with both a primary and secondary Edge. If the primary Edge becomes unavailable, phones switch to the secondary — though UI lag of up to 15 seconds may occur during the transition.
For proper load distribution, keep Edge call capacities similar within the same design.
Edge Security
| Security Feature | Description |
|---|---|
| Mutual TLS | Edge control communications use mTLS/HTTPS to Genesys Cloud |
| Outbound-only connections | Edges initiate connections outbound — no need to expose the Edge directly on the internet |
| CA trust | Related to Certificate Authorities configuration for remote TLS endpoints |
Key Design Rules
| Rule | Detail |
|---|---|
| Network requirement | Edge Groups require high-bandwidth, low-latency LAN or WAN between grouped Edges |
| Cross-group isolation | Different Edge Groups do not share resources |
| Build order | Create sites and plan trunks before grouping Edges |
| Capacity | Keep Edge capacities similar for predictable load distribution and failover |
Troubleshooting
| Issue | Cause | Resolution |
|---|---|---|
| Edge offline / unavailable | Network, pairing, software, or service issue | Check Edge information panel, connectivity, software version, and network path |
| Trunks not shared across Edges | Edges not in same Edge Group or network latency too high | Verify Edge Group membership and low-latency connectivity |
| Phones fail over unexpectedly | Primary Edge unavailable | Validate primary/secondary Edge design and registration behavior |
| Calls fail after update | Edge software change or maintenance timing issue | Review staged/installed version; schedule updates with call draining |
| Edge not provisioning | Incorrect hardware type or serial entry | Verify hardware type and serial number before reprovisioning |
Quick Reference
| Question | Answer |
|---|---|
| What is an Edge? | A BYOC Premises media appliance — media server, SIP registrar, and SIP proxy |
| What is an Edge Group? | A set of BYOC Premises Edges on a high-bandwidth, low-latency network that share trunks and resources |
| What fields are used to provision an Edge? | Name and serial number |
| Why use Edge Groups? | To share trunks/resources and support local routing and resiliency |
| What redundancy model does Genesys recommend? | N+1 |
| Do different Edge Groups share resources? | No |
Naming Convention
| Resource | Example |
|---|---|
| Edge | MTY_Edge_01 |
| Edge | MTY_Edge_02 |
| Edge Group | MTY_Core_Group |
| Customer Hardware Edge | MTY_CHS_Edge_01 |
Pattern: <Location>_<ObjectType>_<Sequence>
See Also
- Sites — Edges are assigned within site-based telephony design
- Trunks — External SIP trunks attach to Edges and are shared through Edge Groups
- Certificate Authorities — required for TLS trust between Edge and remote endpoints
- Topology — visualize Edge status and phone-to-edge assignments
- Architectural Build Order — Edges are built in Phase 2
Screenshots

Extensions
What Are Extensions?
Extensions are internal dialing numbers that allow users to reach each other within the organization without using a full DID number. Before an extension can be assigned to a user, it must first exist in an Extension Pool.
Two Main Areas
| Tab | Purpose |
|---|---|
| Extension Pools | Create and manage the inventory of available extension numbers |
| Assignments | Search and review how extensions are currently assigned to users |
The Pool-First Model
Create Extension Pool
↓
Assign Pool to a Division
↓
Extensions become available for assignment
↓
Assign extension to user via Contact Information
⚠️ You cannot assign an extension to a user until it exists in an Extension Pool.
Navigation
| Task | Path |
|---|---|
| Open Extensions | Admin → Telephony → Extensions |
| Open Extension Pools | Extensions → Extension Pools tab |
| Open Assignments | Extensions → Assignments tab |
| Add extension(s) | Extension Pools → Add |
| Assign to user | Admin → People and Permissions → People → [User] → Contact Information |
Required permissions:
Telephony > Plugin > AllTelephony > Extensions > Add, Edit, View, and Delete
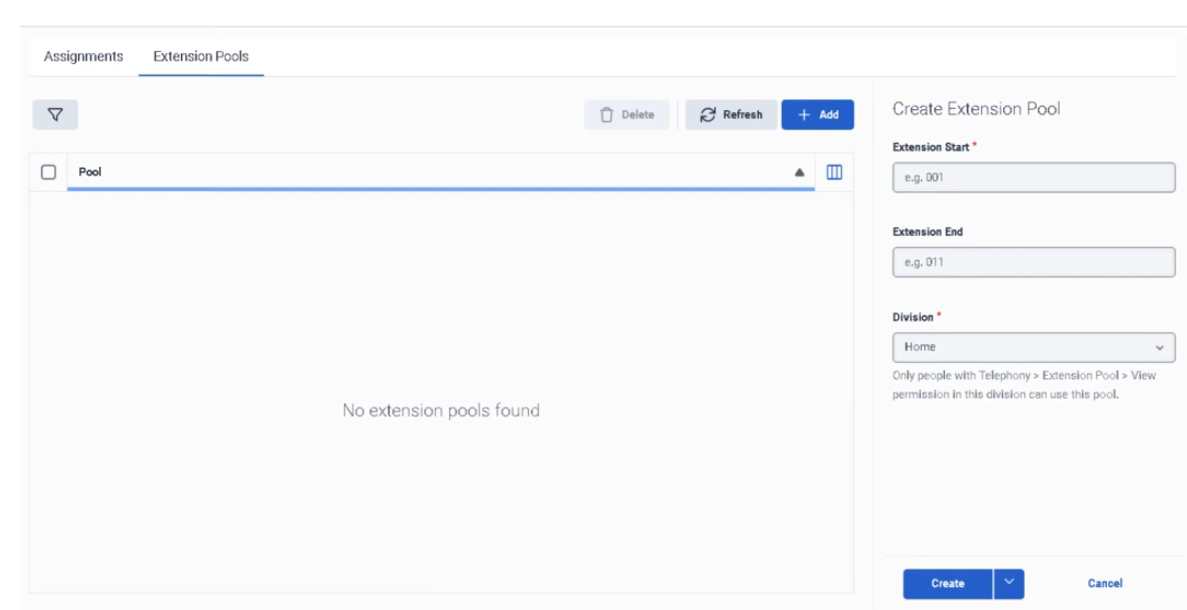
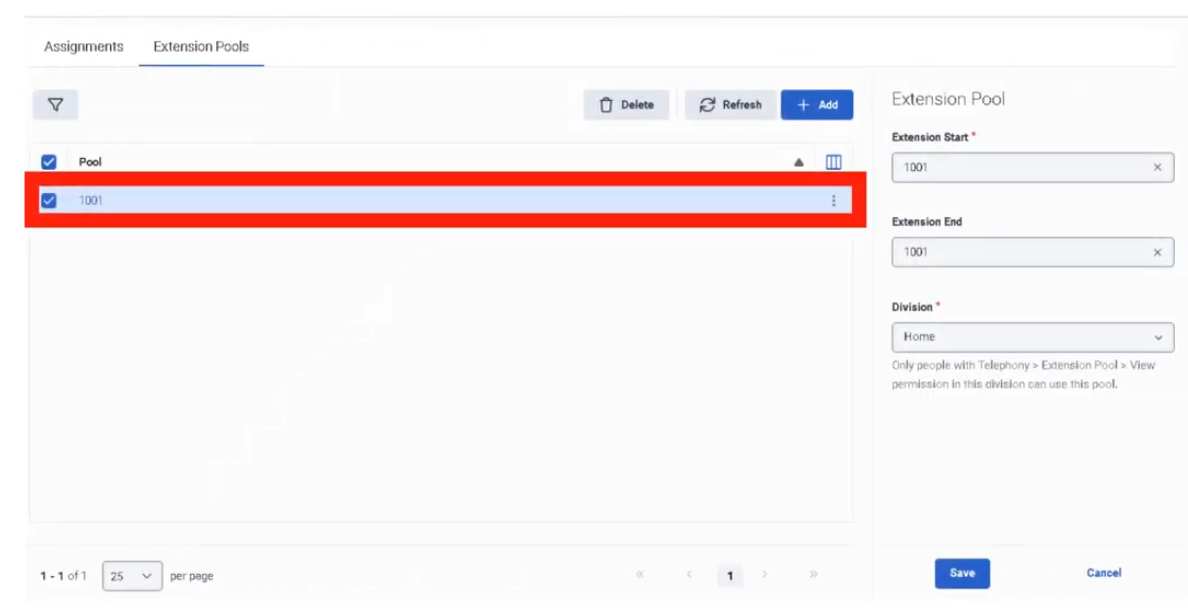
Step 1: Create an Extension Pool
| Step | Action |
|---|---|
| Step 1 | Navigate to Admin → Telephony → Extensions |
| Step 2 | Open the Extension Pools tab |
| Step 3 | Click Add |
| Step 4 | Enter Extension Start (single number, or first in a range) |
| Step 5 | Enter Extension End — leave blank for a single extension, or fill for a range |
| Step 6 | Select the Division |
| Step 7 | Click Create |
Extension Pool Fields
| Field | Description |
|---|---|
| Extension Start | Single extension number, or first number in a range |
| Extension End | Last number in a range; leave blank for a single extension |
| Division | Access-control boundary for this pool |
Step 2: Assign Extension to a User
Extensions are assigned through the user's profile, not from the Extensions page directly.
| Step | Action |
|---|---|
| Step 1 | Navigate to Admin → People and Permissions → People |
| Step 2 | Search for the user and open Edit Person |
| Step 3 | Open the Person Details tab |
| Step 4 | Click View Edit Mode |
| Step 5 | In Contact Information, click Edit |
| Step 6 | Under Phone, enter the extension in the ext. field of an empty Work Phone entry |
| Step 7 | Click Save |
| Step 8 | Return to Extensions → Assignments to confirm the extension appears |
⚠️ Critical: Enter the extension only in a Work Phone entry that does not already have a phone number. Adding an extension to an entry that already contains a number prevents Genesys Cloud from generating a dial plan for the user, and the extension will not appear in the Assignments page.
Key Rules
| Rule | Detail |
|---|---|
| Pool first | Extension must exist in a pool before it can be assigned |
| Unique extensions | Duplicate extension numbers are not allowed |
| Empty Work Phone entry | Extension must be entered in an empty Work Phone slot, not alongside an existing number |
| DID and extension are separate | If a user has both, they must be separate phone entries |
| Range deletion | If an extension was added as part of a range, the entire range may need to be deleted — you cannot delete a single number from within a range |
| Assigned range deletion | Cannot delete an extension pool while any extension in its range is assigned to a user |
| Propagation delay | After assigning an extension, it can take up to 60 minutes before it is accessible in a Dial By Extension action |
Assignments View
The Assignments tab lets you:
- Search by extension number
- View which user each extension is assigned to
- Open the user's profile directly from search results
- Customize visible columns and row density
Troubleshooting
| Issue | Cause | Resolution |
|---|---|---|
| Extension not assignable | Not added to an Extension Pool | Add it to Extension Pools first |
| Duplicate extension error | Same number already exists | Use a unique extension |
| Extension not visible in Assignments | Entered in a Work Phone entry that already had a number | Remove and re-enter in an empty Work Phone entry |
| Cannot delete extension | Belongs to a range or is currently assigned | Remove the user assignment first, or delete the entire range |
| User not receiving calls by extension | Profile or dial-plan issue | Verify pool membership, user profile entry, and permissions |
| Dial By Extension not working immediately | Propagation delay | Wait up to 60 minutes and retest |
Quick Reference
| Question | Answer |
|---|---|
| Where do you manage extensions? | Admin → Telephony → Extensions |
| What are the two main areas? | Extension Pools and Assignments |
| What must happen before assigning an extension? | It must be added to an Extension Pool |
| Can duplicate extensions exist? | No |
| Where is the extension assigned to a user? | In the user's Contact Information, in the ext. field |
| Can you delete one number from a range? | Not if it was originally entered as part of a range |
| How long can Dial By Extension take to recognize a new extension? | Up to 60 minutes |
Naming Convention
| Resource | Example |
|---|---|
| Extension Pool | Support_Ext_Pool_4100_4199 |
| Extension Pool | Sales_Ext_Pool_4200_4299 |
Pattern: <Division>_Ext_Pool_<Start>_<End>
See Also
- DID & Toll-Free Numbers — external numbers; different from internal extensions
- User Profile Management — Contact Information is where extensions are assigned to users
- Divisions & Access Control — divisions are required when creating extension pools
- Architectural Build Order — extensions are assigned during Phase 3 (People)
Screenshots
Sites
What Is a Site?
A site is the home of a set of phones. It defines the telephony dialing properties, call classification rules, and outbound routing rules for the phones assigned to it. Every phone in Genesys Cloud belongs to a site, and the site determines where calls go and how numbers are interpreted.
Sites are used across all telephony deployment models: BYOC Cloud, Genesys Cloud Voice, and BYOC Premises.
⚠️ The Media Model (Cloud or Premises) cannot be changed after site creation. Choose carefully.
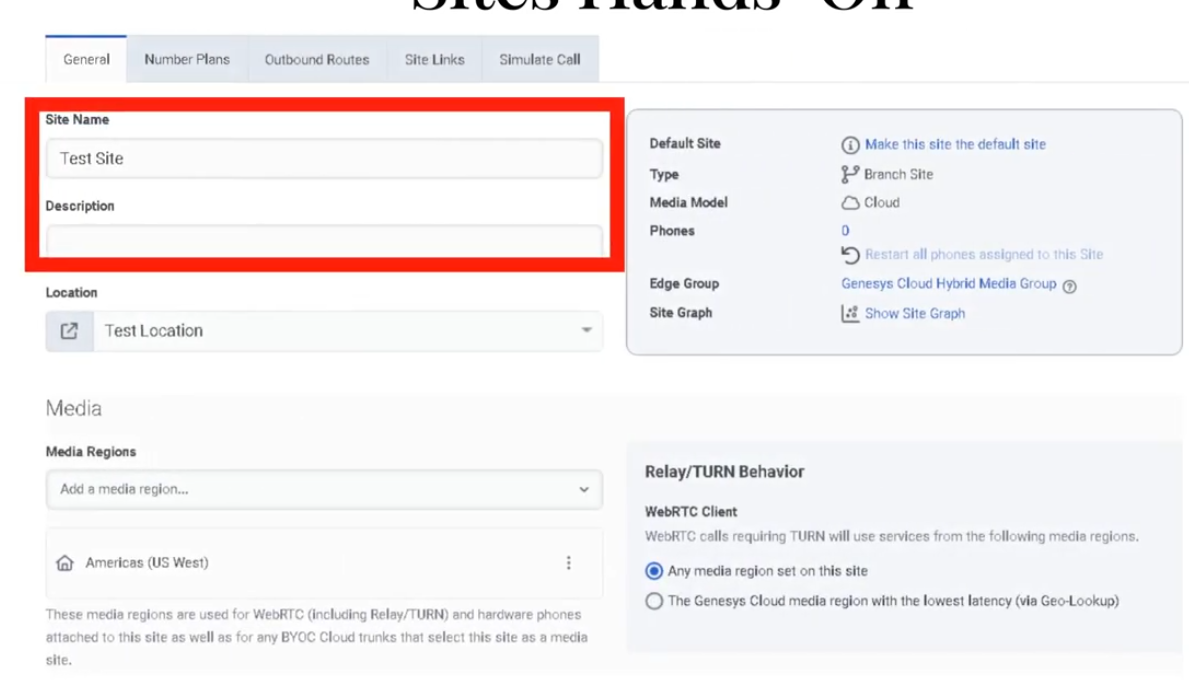
Site Tabs
| Tab | Purpose |
|---|---|
| General | Description, default site toggle, media regions, Relay/TURN behavior, outbound caller ID |
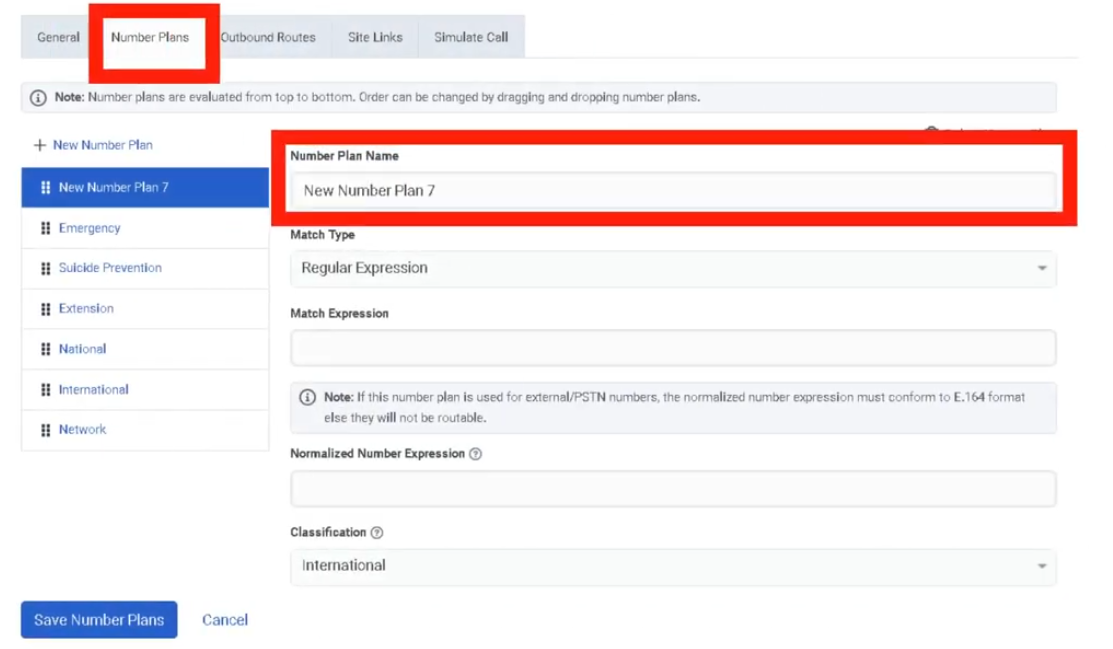
| Number Plans | Classify and normalize dialed numbers; default plans provided; max 200 per site |
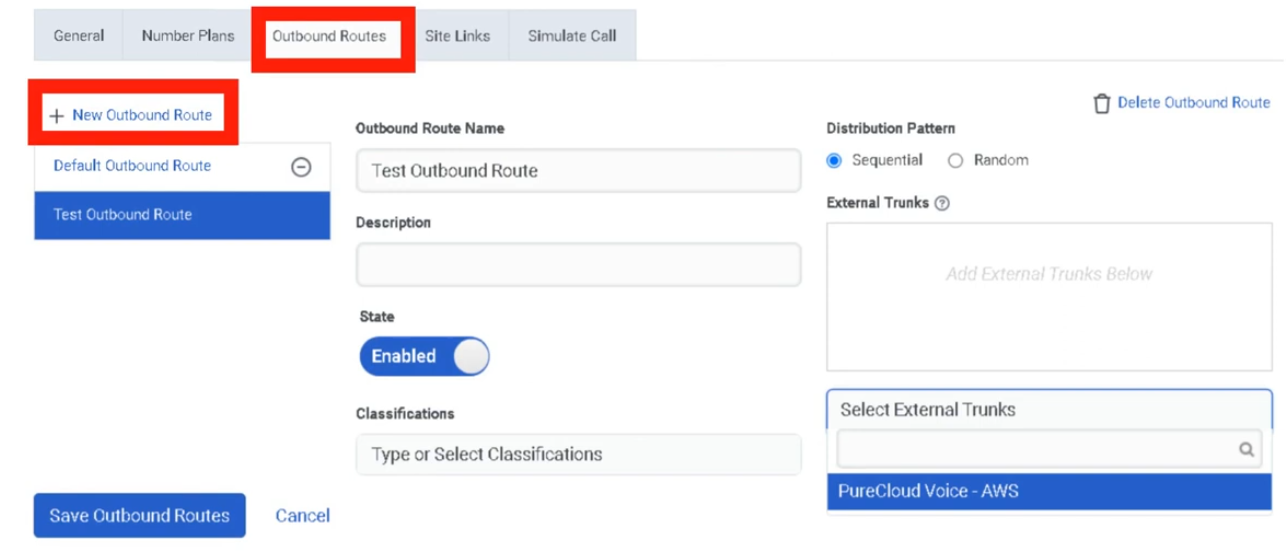
| Outbound Routes | Route calls to external trunks; Sequential or Random distribution |
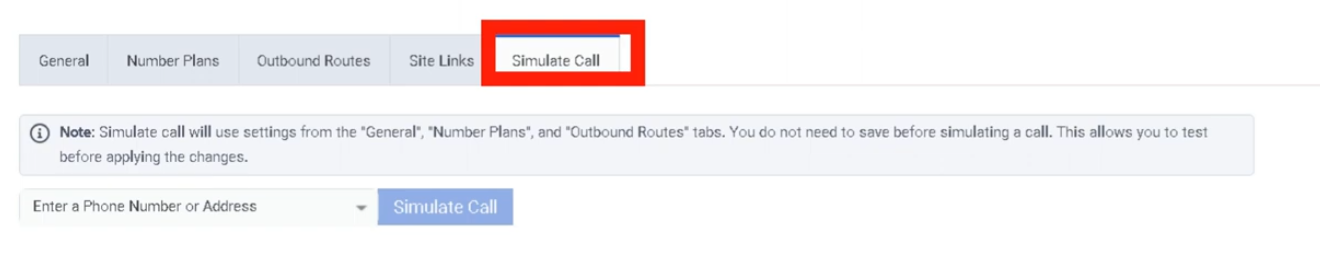
| Simulate Call | Validate routing configuration without placing an actual call |
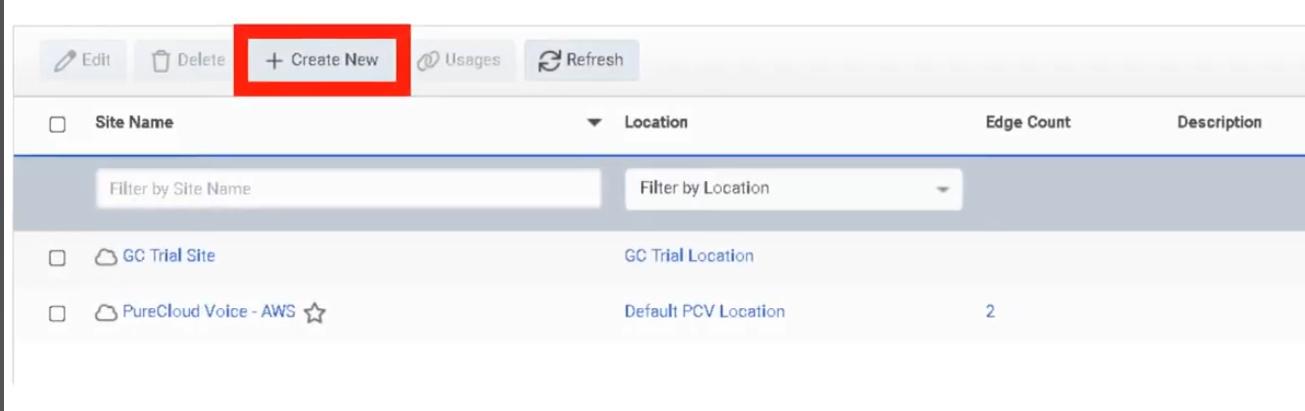
Navigation
| Task | Path |
|---|---|
| Open sites | Admin → Telephony → Sites |
| Create site | Sites → Create New |
| Configure General settings | Sites → [Site] → General |
| Add number plans | Sites → [Site] → Number Plans |
| Create outbound route | Sites → [Site] → Outbound Routes |
| Run call simulator | Sites → [Site] → Simulate Call |
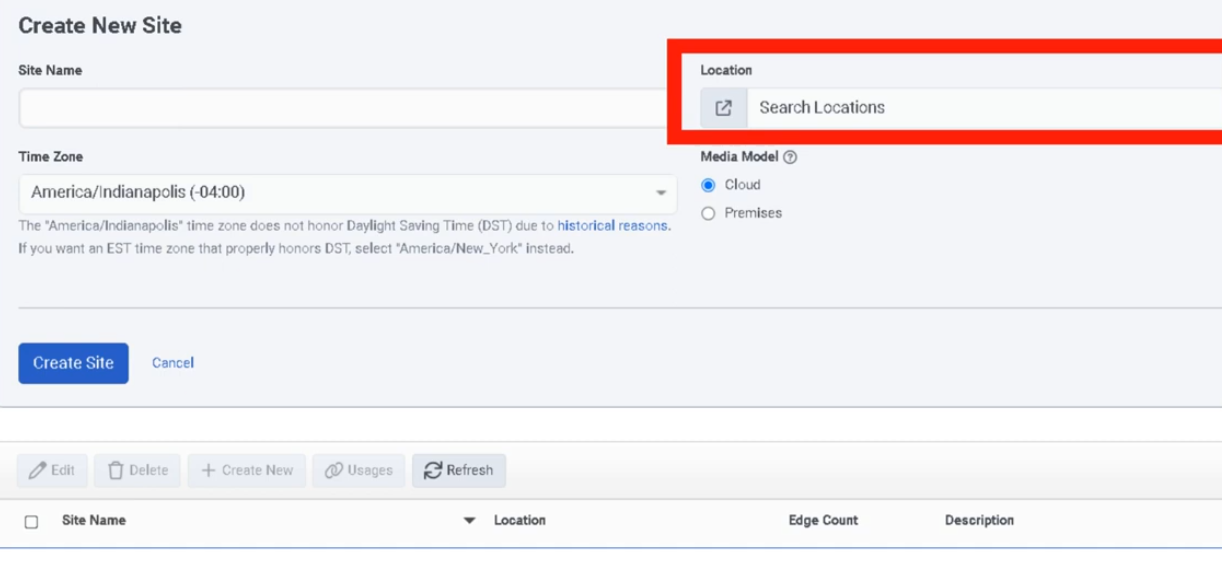
Creating a Site — Field Reference
Create Form
| Field | Description | Notes |
|---|---|---|
| Site Name | Unique name for the site | Required |
| Location | Location assigned to the site | Only locations marked as available for sites appear; required |
| Time Zone | Time zone for the site | Required |
| Media Model | Cloud or Premises | Cannot be changed after creation |
General Tab
| Field | Description | Notes |
|---|---|---|
| Description | Free-text description | Optional |
| Make this Site my default Site | Sets org-wide default | Only one default site allowed |
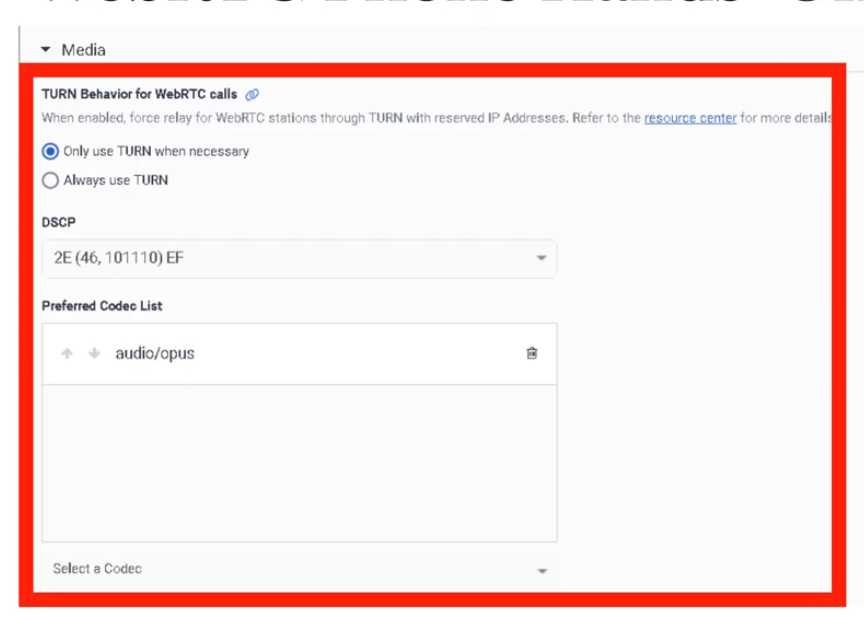
| Media Regions | Select media regions for WebRTC / Global Media Fabric | Relevant for WebRTC deployments |
| Relay/TURN Behavior | Controls TURN relay region selection for WebRTC calls | Two options: Any media region set on this site / Lowest latency via Geo-Lookup |
| Caller Address | Outbound caller number | Must be in E.164 format |
| Caller Name | Outbound caller name | Text |
Number Plans Tab
Genesys provides default number plans. Custom plans can be added to control what users can dial and how numbers are normalized before route selection. Maximum of 200 number plans per site.
Outbound Routes Tab
| Field | Description |
|---|---|
| Route Name | Name for the outbound route |
| Classification | Number plan classification this route handles |
| External Trunk(s) | One or more trunks the route uses |
| Distribution | Sequential (ordered failover) or Random (load distribution) |
| State | Enable/disable the route |
Simulate Call Tab
Enter a destination number or SIP address and click Simulate. The tool validates:
- Number normalization
- Number plan classification
- Outbound route selection
- Trunk settings
- In-service Edges (BYOC Premises)
- Destination site
ℹ️ Simulate Call validates configuration but does not place an actual call.
Media Model Selection
| Deployment | Media Model |
|---|---|
| BYOC Cloud | Cloud |
| Genesys Cloud Voice | Cloud |
| BYOC Premises | Premises |
Step-by-Step: Create a Site
| Step | Action |
|---|---|
| Step 1 | Navigate to Admin → Telephony → Sites |
| Step 2 | Click Create New |
| Step 3 | Enter Site Name, select Location, Time Zone, and Media Model |
| Step 4 | Click Create Site |
| Step 5 | On General, add description and optionally set as default site |
| Step 6 | Configure Caller Address (E.164) and Caller Name |
| Step 7 | Configure Media Regions and Relay/TURN Behavior if using WebRTC |
| Step 8 | Add number plans on Number Plans tab |
| Step 9 | Create one or more outbound routes on Outbound Routes tab |
| Step 10 | Run Simulate Call to validate routing before going live |
Key Constraints
| Constraint | Detail |
|---|---|
| Media Model | Cannot be changed after creation |
| Location availability | Only locations marked available for sites appear in the selector |
| Default site | Only one site can be the default |
| Number plans per site | Maximum 200 |
| Caller Address format | Must be E.164 (e.g. +528181234567) |
Troubleshooting
| Issue | Cause | Resolution |
|---|---|---|
| Location not visible in selector | Location not marked as available for sites | Update the location setting |
| Caller ID not displaying correctly | Caller Address not in E.164 or overridden by Prioritized Caller Selection | Recheck format and caller selection config |
| Calls not routing | Number plan or outbound route mismatch | Use Simulate Call to trace normalization, classification, and route selection |
| No route selected | Route disabled or no matching classification | Verify route state, classification, and selected trunks |
| Simulator shows failure | Site, trunk, Edge, or destination settings incomplete | Review each simulator output field in order |
Quick Reference
| Question | Answer |
|---|---|
| What is a Site? | The home of a set of phones; defines classification, routing, and dialing rules |
| What are the four tabs? | General, Number Plans, Outbound Routes, Simulate Call |
| What media models exist? | Cloud and Premises |
| Can you change the media model later? | No |
| What does Simulate Call do? | Validates routing config without placing a real call |
| What distribution patterns exist for outbound routes? | Sequential and Random |
| What format must Caller Address use? | E.164 |
Naming Convention
| Resource | Example |
|---|---|
| Cloud site | MTY_Main_Cloud |
| Premises site | MTY_Branch_Prem |
| Outbound route | PSTN_Main |
| Number plan | MX_National_Dialing |
Pattern: <Location>_<Purpose>_<MediaModel>
See Also
- Trunks — create trunks before configuring outbound routes
- Locations & Floor Plans — locations must exist before creating sites
- Edges & Edge Groups — BYOC Premises sites use Edge assignments
- WebRTC Phone Management — Media Regions and Relay/TURN Behavior are configured here
- Architectural Build Order — Sites are built in Phase 2
Screenshots
Topology
What Is Topology?
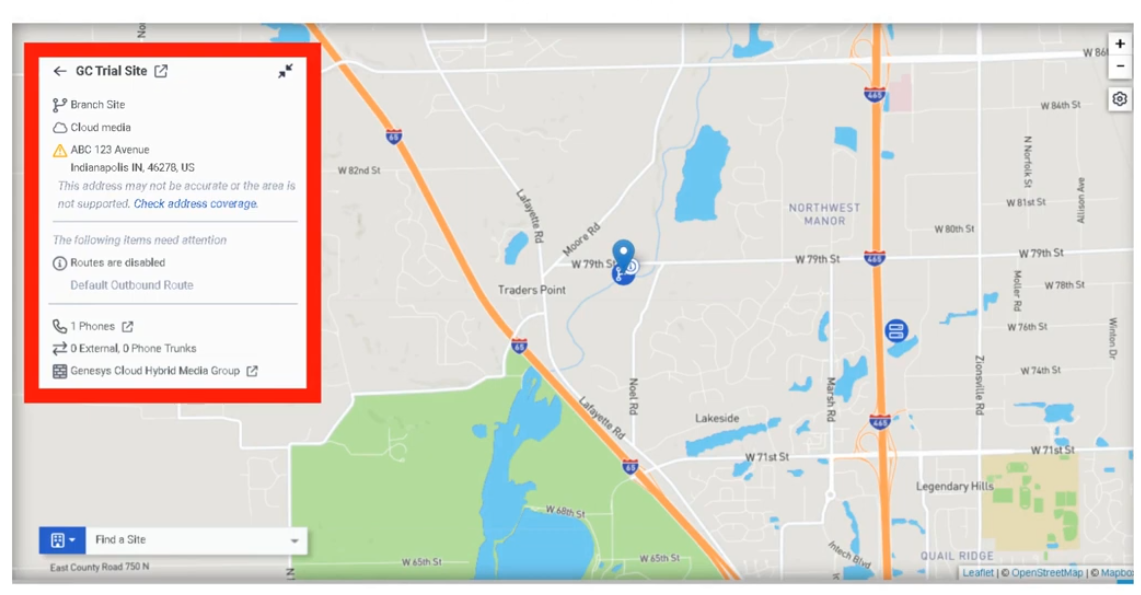
Topology is the administrative map view of the Genesys Cloud telephony network. It displays how telephony components relate to each other — sites, phones, edges, and trunks — and is especially useful for troubleshooting offline or out-of-service edges and validating phone-to-edge assignments.
ℹ️ Topology is a monitoring and diagnostic tool, not a provisioning wizard. Changes to telephony objects are made in their respective admin pages; Topology is where you confirm the result.
Navigation
| Task | Path |
|---|---|
| Open Topology | Admin → Telephony → Topology |
| Drill into an object | Click any site, edge, trunk, or phone in the map |
| Troubleshoot edges | Select the edge object to view status details |
What Topology Shows
| Object | Description |
|---|---|
| Sites | Logical telephony routing entities |
| Edges | Media-handling devices in the telephony environment |
| Trunks | Carrier or PBX connectivity into Genesys Cloud |
| Phones | Endpoints and their edge/site assignments |
| Phone-to-Edge Assignments | Shows which phones connect to which edges, including primary and secondary site relationships |
| Status Indicators | Visual state of objects — helps identify offline or out-of-service edges |
How to Use Topology
| Step | Action |
|---|---|
| Step 1 | Navigate to Admin → Telephony → Topology |
| Step 2 | Review the map for your organization's telephony objects |
| Step 3 | Look for offline or out-of-service edge indicators |
| Step 4 | Click into a suspect object to drill down into its details |
| Step 5 | Enable phone-to-edge assignment view to validate primary/secondary site relationships |
| Step 6 | Use findings to continue troubleshooting in the relevant admin page (Sites, Trunks, Edges) |
Key Use Cases
| Scenario | Description |
|---|---|
| Incident triage | Quickly visualize where a telephony problem exists before diving into logs |
| Post-change validation | Confirm expected object relationships after site, trunk, or edge changes |
| Resiliency review | Validate phone-to-edge assignments and primary/secondary site design |
| Edge troubleshooting | Identify offline or out-of-service edges at a glance |
| Onboarding review | Confirm a new telephony deployment is connected as designed |
Troubleshooting
| Issue | Cause | Resolution |
|---|---|---|
| Edge appears offline | Edge, network, or service issue | Drill into the edge; continue in Admin → Telephony → Edges |
| Phones not where expected | Assignment or site relationship misconfiguration | Review phone-to-edge assignments and site design |
| Map looks incomplete | Telephony objects not yet configured or not in expected state | Verify sites, trunks, edges, and phones exist and are correctly assigned |
| Trunk/site relationship unclear | Naming inconsistency or design ambiguity | Standardize naming; compare with site/trunk config pages |
Best Practices
| Practice | Reason |
|---|---|
| Review Topology after major telephony changes | Visually confirms that relationships updated as expected |
| Use Topology early when troubleshooting | Narrows the fault domain before deeper investigation |
| Validate phone-to-edge assignments regularly | Prevents unnoticed resiliency or registration issues |
| Keep site and trunk naming consistent | Makes the map easier to read and interpret |
| Use Topology for visibility; use admin pages for fixes | Topology shows the problem — the fix happens elsewhere |
Quick Reference
| Question | Answer |
|---|---|
| What does Topology show? | Sites, phones, edges, and trunks in a visual map |
| What is it mainly used for? | Visualization and troubleshooting |
| Can you make changes in Topology? | No — it is read-only for monitoring and diagnostics |
| What edge issue does it help with? | Identifying offline or out-of-service edges |
| Does it show resiliency design? | Yes — phone-to-edge assignments show primary/secondary site relationships |
See Also
- Sites — configure telephony routing and dial plans
- Trunks — configure carrier/PBX SIP connectivity
- Edges & Edge Groups — manage BYOC Premises media appliances
- WebRTC Phone Management — manage softphone endpoints
Screenshots

Trunks
What Are Trunks?
A trunk is the SIP communications link between Genesys Cloud and an external carrier or PBX. Trunks carry inbound and outbound SIP signaling and are consumed by Sites via Outbound Routes to send calls to the PSTN or connected telephony infrastructure.
Trunk Types
| Trunk Type | Deployment Model | Used For |
|---|---|---|
| BYOC Carrier | BYOC Cloud | Third-party SIP carrier connectivity over the public internet |
| BYOC PBX | BYOC Cloud | SIP interconnect with an existing IP-PBX over the public internet |
| External SIP | BYOC Premises | On-premises SIP carrier or PBX connectivity through an Edge |
ℹ️ BYOC Carrier and BYOC PBX are for BYOC Cloud. External SIP is for BYOC Premises. Do not mix deployment models.
Navigation
| Task | Path |
|---|---|
| Open trunks | Admin → Telephony → Trunks |
| Open BYOC Cloud trunks | Admin → Telephony → BYOC Cloud → Trunks |
| Create a trunk | Trunks → Create Trunk |
| Edit a trunk | Trunks → select trunk → Edit |
| Use trunk in routing | Admin → Telephony → Sites → [Site] → Outbound Routes |
Creating a BYOC Carrier Trunk — Field Reference
| Field | Description | Notes |
|---|---|---|
| Name | Trunk name | Use a descriptive, consistent naming convention |
| Type | BYOC Carrier / BYOC PBX / External SIP | Determined by your deployment model |
| Subtype | Vendor/carrier profile where applicable | Optional |
| State | Operational state | Set to In Service when ready for production |
| Transport Protocol | SIP transport used to send calls | UDP / TCP / TLS — does not control inbound protocol |
| Inbound SIP Termination Identifier | Regionally unique ID for inbound SIP routing | Required for BYOC Carrier; confirm with carrier |
| Outbound Request URI | Controls SIP request routing for outbound calls | Carrier-specific |
| SIP Servers / Proxies | Remote SIP server or proxy addresses | Carrier-provided |
| Digest Authentication | SIP authentication | Enable if required by the carrier or PBX |
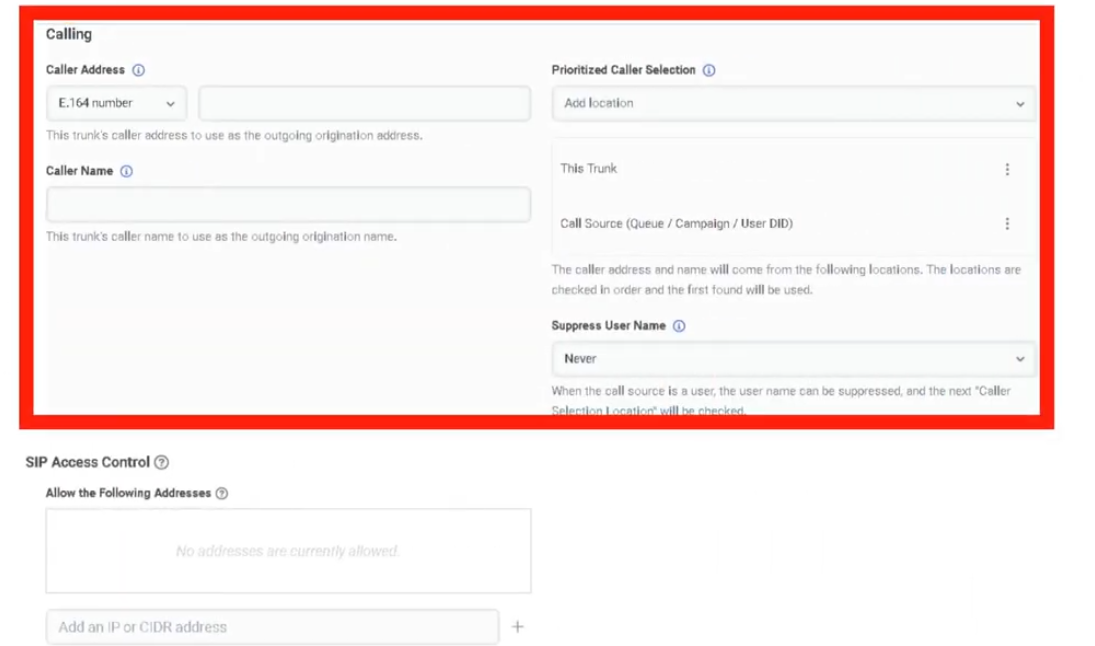
| Caller Address / Caller ID | Outbound caller number | E.164 format |
| Caller Name | Outbound caller name | Text |
| SIP Access Control | IP allowlist for inbound SIP signaling | Restrict to carrier signaling IPs only |
| PBX Passthrough | Enables PBX passthrough where supported | Optional |
| Custom SIP Headers | Additional SIP header configuration | Optional |
Transport Protocol Behaviour
| Protocol | Notes |
|---|---|
| UDP | Standard, connectionless — widely supported |
| TCP | Connection-oriented, more reliable for SIP |
| TLS | Encrypted SIP signaling; pairs with SRTP for full call security |
⚠️ For BYOC Cloud, the transport protocol setting controls how Genesys sends calls on the trunk. It is not enforced on calls received on that trunk.
Step-by-Step: Create a BYOC Carrier Trunk
| Step | Action |
|---|---|
| Step 1 | Navigate to Admin → Telephony → BYOC Cloud → Trunks |
| Step 2 | Click Create Trunk |
| Step 3 | Select BYOC Carrier as the trunk type |
| Step 4 | Enter the trunk Name |
| Step 5 | Set State to In Service |
| Step 6 | Select Transport Protocol |
| Step 7 | Enter the Inbound SIP Termination Identifier |
| Step 8 | Configure Outbound Request URI |
| Step 9 | Enter SIP Servers / Proxies |
| Step 10 | Enable Digest Authentication if required |
| Step 11 | Under Calling, set Caller ID and Caller Name |
| Step 12 | Configure SIP Access Control IP rules |
| Step 13 | Save the trunk |
| Step 14 | Add the trunk to a Site → Outbound Route |
| Step 15 | Validate with test calls or Simulate Call |
Dependencies
| Component | Purpose |
|---|---|
| Sites | Outbound routes on sites reference external trunks |
| Number Plans | Classify dialed numbers before route/trunk selection |
| Outbound Routes | Select one or more trunks with Sequential or Random distribution |
| Carrier / PBX | Remote SIP endpoint the trunk connects to |
| Certificate Authorities | Required when using TLS trunks (BYOC Premises) |
Troubleshooting
| Issue | Cause | Resolution |
|---|---|---|
| Trunk not sending calls | Wrong transport protocol or routing config | Recheck protocol, URI, and remote endpoint requirements |
| Inbound calls fail | Incorrect inbound SIP identifier | Validate inbound SIP termination identifier with carrier |
| Secure calls fail | TLS/certificate mismatch | Validate TLS support and certificate/trust configuration |
| Unauthorized SIP traffic | SIP ACL not configured | Restrict signaling IPs using SIP Access Control |
| Wrong outbound identity | Caller ID/name misconfigured | Recheck Calling section values |
| Route not selecting trunk | Number plan or outbound route misconfiguration | Validate number plans, route classification, trunk selection |
Quick Reference
| Question | Answer |
|---|---|
| What trunk types exist? | BYOC Carrier, BYOC PBX, External SIP |
| Which are for BYOC Cloud? | BYOC Carrier and BYOC PBX |
| Which is for BYOC Premises? | External SIP |
| What transport protocols are supported? | UDP, TCP, TLS |
| What does SIP Access Control do? | Permits signaling only from specific IP addresses |
| What is the Inbound SIP Termination Identifier? | A regionally unique ID used for inbound SIP routing on BYOC Carrier |
Naming Convention
| Resource | Example |
|---|---|
| Carrier trunk | CarrierA_BYOCCarrier_Prod |
| PBX trunk | CorpPBX_BYOCPBX_Test |
| Premises SIP trunk | HQ_ExternalSIP_Primary |
Pattern: <Provider>_<TrunkType>_<Environment>
See Also
- Sites — outbound routes are configured here and reference trunks
- Certificate Authorities — required for TLS trunk trust (BYOC Premises)
- Edges & Edge Groups — BYOC Premises trunks attach to Edges
- Architectural Build Order — trunks are built in Phase 2
Screenshots
WebRTC Phone Management
What Is a WebRTC Phone?
A Genesys Cloud WebRTC phone is a browser or desktop app-based softphone that lets users place and receive calls directly in the Genesys Cloud client — no physical desk phone required. It is the most common phone type for contact center agents, remote users, and fast deployments.
Provisioning Model
WebRTC phones are provisioned in two steps:
Step 1: Create Base Settings
↓
Step 2: Create the Phone object
Base Settings is a shared configuration profile that defines how the WebRTC phone behaves. The Phone is the individual user-assigned record that uses those settings. Always build Base Settings first.
Navigation
| Task | Path |
|---|---|
| Open Phone Management | Admin → Telephony → Phone Management |
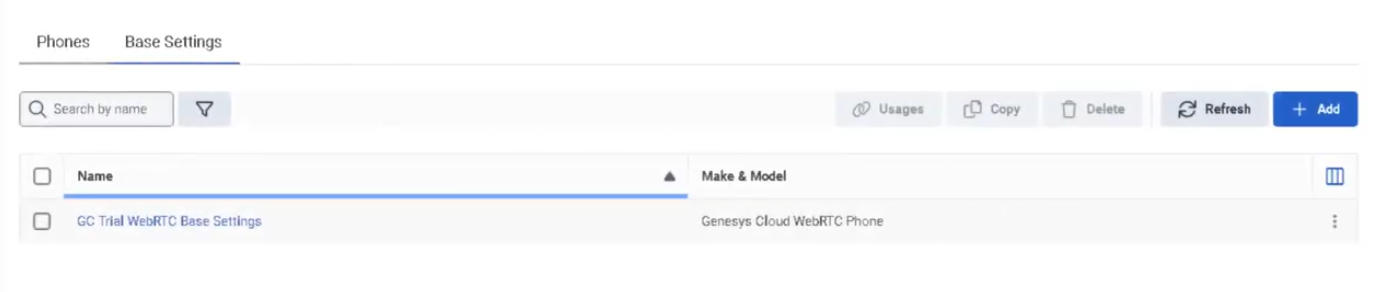
| Create WebRTC Base Settings | Phone Management → Base Settings tab → Add |
| Create WebRTC Phone | Phone Management → Phones tab → Create New |
| Configure global WebRTC behavior | Admin → Telephony → Global Telephony Settings |
| Configure site media behavior | Admin → Telephony → Sites → [Site] → General |
| User selects WebRTC phone | Genesys Cloud client → Calls panel → phone selector |
Required permission: Telephony > Plugin > All
Step 1: Create Base Settings
| Step | Action |
|---|---|
| Step 1 | Navigate to Admin → Telephony → Phone Management |
| Step 2 | Open the Base Settings tab |
| Step 3 | Click Add |
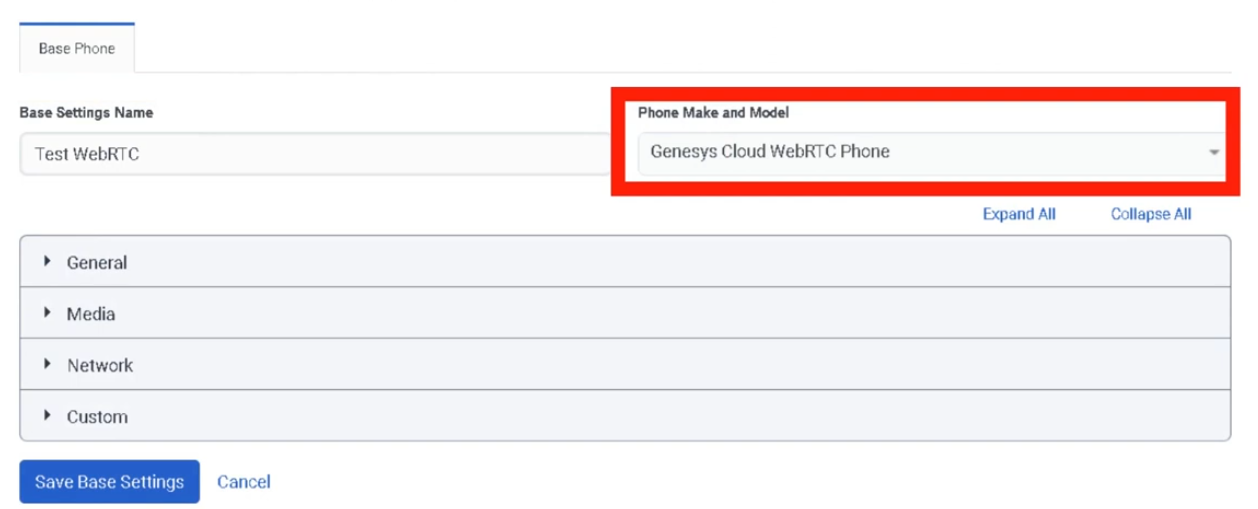
| Step 4 | Enter a Base Settings Name |
| Step 5 | In Phone Make and Model, select Genesys Cloud WebRTC Phone |
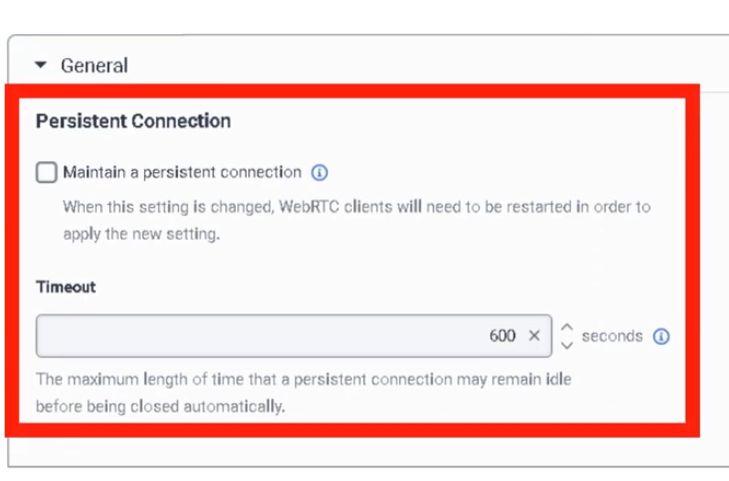
| Step 6 | Enable Persistent Connection if needed |
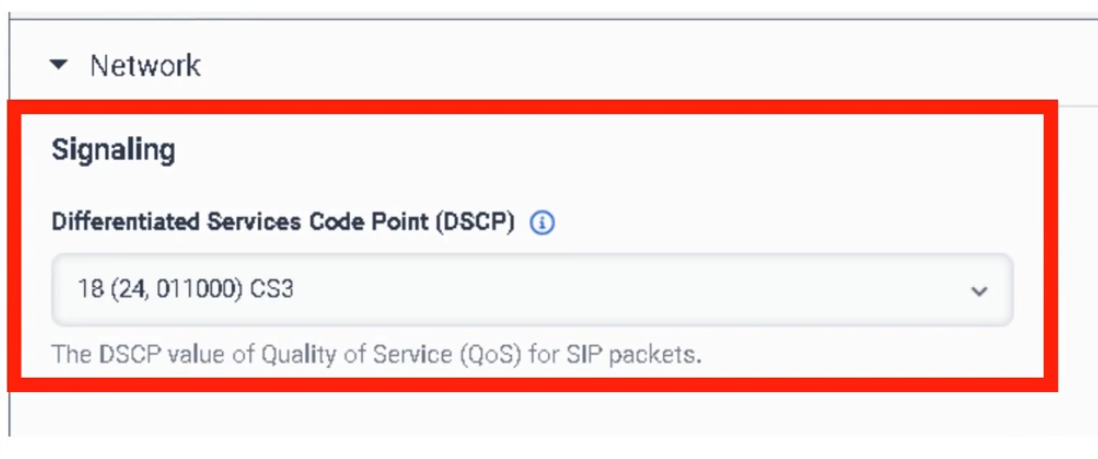
| Step 7 | Configure Transport DSCP Value and Media DSCP Value |
| Step 8 | Click Save Base Settings |
Base Settings Fields
| Field | Description | Notes |
|---|---|---|
| Base Settings Name | Name for this configuration profile | Use a descriptive name e.g. Support_WebRTC_Standard |
| Phone Make and Model | Select the phone type | Choose Genesys Cloud WebRTC Phone |
| Persistent Connection | Keeps the WebRTC connection open after calls end | Improves subsequent call handling speed |
| Persistent Connection Timeout | How long the connection stays active | Configure based on call volume patterns |
| Transport DSCP Value | QoS marking for SIP signaling traffic | Align with enterprise voice network policy |
| Media DSCP Value | QoS marking for audio/media traffic | Align with enterprise voice network policy |
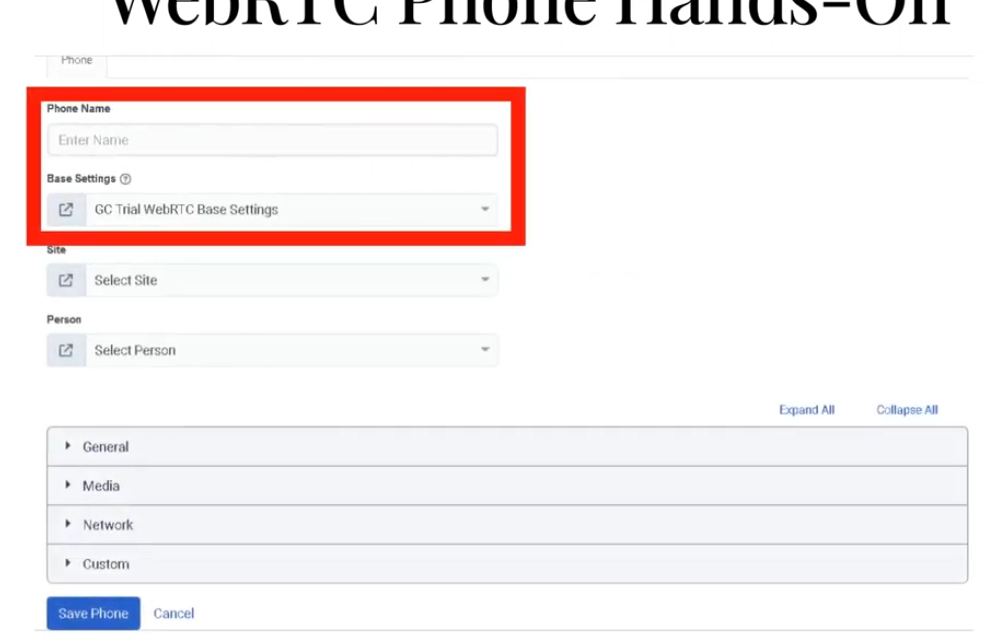
Step 2: Create the Phone
| Step | Action |
|---|---|
| Step 1 | In Phone Management, open the Phones tab |
| Step 2 | Click Create New |
| Step 3 | Enter the Phone Name |
| Step 4 | Select the Site |
| Step 5 | Select the Base Settings profile created in Step 1 |
| Step 6 | Assign the User |
| Step 7 | Click Save |
| Step 8 | Have the user select the WebRTC phone in the client and test calling |
Persistent Connection
Keeping the WebRTC connection open after a call ends allows subsequent calls to alert faster because the connection is already established.
| Setting | Behaviour |
|---|---|
| Disabled | Connection closes after each call; next call requires fresh connection setup |
| Enabled | Connection stays open for the timeout period; subsequent calls alert immediately |
⚠️ Important: If you enable Persistent Connection after users are already logged in, they must log out and back in for the setting to apply. Genesys recommends making this change outside business hours.
QoS / DSCP
DSCP values mark WebRTC SIP and media traffic so your network can prioritize it. Set these values to match your organization's enterprise voice QoS policy.
| DSCP Field | Applies To |
|---|---|
| Transport DSCP | SIP signaling traffic |
| Media DSCP | Audio/RTP media traffic |
Site-Level WebRTC Media Settings
These are configured on the Site, not in Base Settings. Validate these for every site that will host WebRTC users.
| Field | Options | Description |
|---|---|---|
| Media Regions | Available Home/Core/Satellite regions | Select and prioritize regions for WebRTC / Global Media Fabric |
| Relay/TURN Behavior | Any media region set on this site / Lowest latency via Geo-Lookup | Controls how Genesys selects TURN relay regions for WebRTC calls that need relay services |
| Relay/TURN Option | Best For |
|---|---|
| Any media region set on this site | Strict control — limits TURN relay to configured regions only |
| Lowest latency via Geo-Lookup | Best performance — Genesys dynamically selects lowest-latency TURN region |
⚠️ Forcing TURN relay can reduce resiliency and force RTP through relay services when not otherwise necessary.
User Experience
Users select and manage the WebRTC phone from the Calls panel in the Genesys Cloud client:
- Choose microphone and speaker device
- Adjust volume
- Run audio diagnostics
ℹ️ Recommend using a quality headset rather than laptop built-in speakers and microphone to avoid echo and audio quality issues.
Troubleshooting
| Issue | Cause | Resolution |
|---|---|---|
| User cannot answer calls reliably | Persistent connection disabled or not applied | Enable it; have user log out and back in |
| No audio | Wrong microphone/speaker selected | Verify audio devices in WebRTC phone client settings |
| Poor call quality | DSCP/network/headset issue | Check QoS policy, headset, and local network |
| WebRTC phone not visible to user | Phone not created or not assigned to correct user | Recheck phone assignment |
| Calls do not route | Site/routing configuration issue | Validate site, number plans, and trunks |
| Settings change not applied | User session retained old settings | Log out and back in |
| Unexpected TURN/media path | Site Media Regions or Relay/TURN Behavior misconfigured | Review assigned Site's General tab |
Quick Reference
| Question | Answer |
|---|---|
| How do you add a WebRTC phone? | Create Base Settings first, then create the Phone |
| What model do you select? | Genesys Cloud WebRTC Phone |
| Why enable Persistent Connection? | Improves subsequent call handling speed |
| Where is Relay/TURN Behavior configured? | On the Site, not in Base Settings |
| What should users do after Persistent Connection is enabled later? | Log out and back in |
Naming Convention
| Resource | Example |
|---|---|
| Base Settings | Support_WebRTC_Standard |
| Base Settings | Sales_WebRTC_Remote |
| Phone | AgentName_WebRTC |
Pattern: <BusinessArea>_WebRTC_<Purpose>
See Also
- Sites — Media Regions and Relay/TURN Behavior are configured here
- Topology — confirm phone-to-edge assignments and site relationships
- Architectural Build Order — phones are assigned in Phase 3 (People)
Screenshots
Now Add a phone

Phone Management
| Section | Description |
|---|---|
| Feature Area | Telephony Infrastructure |
| Navigation | Admin → Telephony → Phone Management |
| Alt Navigation | Menu → Digital and Telephony → Telephony → Phone Management |
| Primary Function | Configure, provision, and manage the physical and software phones used by agents to make and receive calls |
Genesys Cloud supports multiple phone types. Phone Management is where administrators create phone records, assign base settings, connect phones to sites, and manage provisioning.
Study Notes
| Topic | Explanation |
|---|---|
| Phone Management | Admin area for creating and managing phone configurations — assigns phones to users and sites |
| Base Settings | A reusable configuration profile applied to phones — defines codec, DTMF method, TLS settings, Quality of Service, and more |
| Site | A logical grouping of telephony resources (trunks, number plans, outbound routes) — phones are assigned to a site |
| Provisioning | The process of automatically delivering a phone's configuration from Genesys Cloud to the physical device |
| Zero Touch Provisioning (ZTP) | Managed phones can self-configure by contacting the Genesys provisioning server on first boot |
| Hardware ID | The identifier used to associate a phone record with a physical device (e.g., MAC address for hardware phones, FQDN for softphones) |
| Line Keys | Configurable buttons on a hardware phone — can be assigned to speed dial, BLF (Busy Lamp Field), or line registrations |
| HELD | HTTP-Enabled Location Delivery — protocol allowing Poly phones to retrieve precise location from a LIS server for E911 accuracy |
Four Phone Categories
| Category | Description | Configuration | Use Case |
|---|---|---|---|
| Managed | Genesys Cloud controls the full configuration — provisioned via HTTPS with TLS and redundancy | Configured entirely in Genesys Cloud via Phone Management and Base Settings | Hardware desk phones (Poly VVX, Poly Edge E, AudioCodes) |
| Unmanaged | Phone registers with Genesys Cloud but is configured externally | Only basic SIP connection info in Genesys Cloud; uses a generic SIP base settings profile | Any SIP-compliant device; FXS analog adapters |
| WebRTC | Browser-based softphone — no hardware or separate software required | Enabled per-user; headset connected to computer | Agents working in browser; remote workers |
| Remote | An external phone number or SIP address (e.g., cell phone) | Configured as a remote number — calls are bridged to the remote device when an interaction is accepted | Mobile workers; home phones; non-networked devices |
Managed vs Unmanaged — Key Differences
| Attribute | Managed | Unmanaged |
|---|---|---|
| Configuration source | Genesys Cloud (provisioned via HTTPS) | External to Genesys Cloud |
| Default base settings profiles | Yes — Genesys provides model-specific defaults | No — uses generic SIP profile |
| TLS / SRTP | Automatic via provisioning | Possible but requires manual configuration |
| Redundancy (primary + secondary SIP) | Automatic | Possible but not automatic |
| Mutual authentication (Genesys Cloud Voice) | Standard | Not supported |
| ZTP support | Yes | No |
| Examples | Poly Edge E, Poly VVX, AudioCodes | Generic SIP devices, FXS adapters |
WebRTC Phones
| Attribute | Detail |
|---|---|
| No hardware required | Runs entirely in the browser |
| No software download | Built into Genesys Cloud web app |
| Setup | Enable WebRTC phone per user; connect a headset |
| Creates a dedicated phone line | Provisioning a WebRTC phone creates a specific phone line for that user |
| Recommended for | Remote workers, browser-first environments |
Remote Phones
| Attribute | Detail |
|---|---|
| What it is | An external phone number or SIP address used to connect a user to Genesys Cloud calls |
| How it works | When a call is placed/answered in the browser, Genesys Cloud calls the remote number to bridge the connection |
| Routing | Follows the site's numbering plans and outbound routes |
| Typical use | Mobile workers, agents who use personal cell phones |
Navigation and Configuration
| Task | Path |
|---|---|
| Open Phone Management | Admin → Telephony → Phone Management |
| View/manage phones | Phone Management → Phones tab |
| View/manage base settings | Phone Management → Base Settings tab |
| Add a phone | Phone Management → Phones → Add Phone |
| Assign base settings to a phone | Select phone → choose Base Settings profile |
| Assign phone to a site | Select phone → choose Site |
| Restart a phone | Phone Management → select phone → Restart |
| Log out a phone | Phone Management → select phone → Log Out |
| Migrate base settings | Phone Management → select phones → Migrate Base Settings |
Base Settings
Base Settings are reusable configuration templates applied to one or more phones of the same model. They define:
| Setting Category | Examples |
|---|---|
| General | Dynamic Reload (auto-updates without manual restart) |
| Media / Quality of Service | DSCP value for RTP packets; RTP Audio Port Start Range (default 4000; range 1024–65,535) |
| Codecs | Preferred codec list (MIME format, priority-ordered) |
| DTMF | RTP Events (out-of-band, RFC 4733 — default) or In-band Audio; payload type 96–127 for RTP Events |
| Security | TLS certificate authority selection; mutual authentication |
| Provisioning | Firmware version; firmware update settings |
| E911 / HELD | Enable HELD; provide LIS URL and Emergency Routing Service Account ID (for Poly VVX, CCX, Edge E) |
Managed Phone Provisioning Process
Phone powers on
↓
Phone contacts Genesys Cloud provisioning server (HTTPS)
↓
Genesys Cloud delivers configuration (base settings, line keys, TLS certs, SIP credentials)
↓
Phone registers with Genesys Cloud SIP infrastructure
↓
Phone is ready — appears as Online in Phone Management
Supported Managed Phone Brands (Examples)
| Brand | Example Models |
|---|---|
| Poly (formerly Polycom) | Poly Edge E Series (E100/E220/E300/E320/E350/E400/E450/E500/E550) · VVX Series · SoundPoint IP · SoundStation |
| AudioCodes | Various models (note: some AudioCodes models are incompatible with Genesys Cloud Voice/BYOC Cloud) |
| Spectralink | 84-Series (incompatible with Genesys Cloud Voice/BYOC Cloud) |
Compatibility note: Most managed phones are compatible with Genesys Cloud Voice and BYOC Cloud. Some AudioCodes models and certain older SoundPoint models are incompatible — refer to the Genesys Cloud Voice / BYOC Cloud compatible phones matrix before purchasing.
Phone Management Operations
| Operation | Description |
|---|---|
| Add Phone | Create a new phone record; assign name, base settings, site, and hardware ID |
| Import Phones | Bulk import via CSV |
| Restart Phone | Sends a restart command to the managed phone over the network |
| Log Out Phone | Logs the user off the phone remotely |
| Migrate Base Settings | Move phones to a different base settings profile (e.g., after a model upgrade) |
| Edit Phone | Change name, base settings, site assignment, line key configuration |
| Check Status | View online/offline status for each phone |
| Filter | Filter phone list by site, base settings, status, or name |
Permissions
| Permission | Purpose |
|---|---|
Telephony > Plugin > All |
Full access to telephony admin including Phone Management |
Telephony > SitesManagedPhones > View/Add/Edit/Delete |
Phone-specific permissions |
Key Takeaways
| Topic | Summary |
|---|---|
| Phone categories | Managed · Unmanaged · WebRTC · Remote |
| Managed phones | Fully provisioned by Genesys Cloud via HTTPS — TLS, redundancy, ZTP automatic |
| Unmanaged phones | Configured externally; only SIP registration info in Genesys Cloud; uses generic profile |
| WebRTC | Browser-based; no hardware; headset required; per-user enablement |
| Remote | External number (cell phone, SIP address) bridged to calls |
| Base Settings | Reusable profile — codec, DTMF, TLS, QoS, firmware, HELD |
| Navigation | Admin → Telephony → Phone Management |
| Phones tab | Manage individual phone records |
| Base Settings tab | Manage configuration templates |
E911 and Emergency Locations
| Section | Description |
|---|---|
| Feature Area | Telephony Infrastructure |
| Navigation (Sites / Number Plans) | Admin → Telephony → Sites → [site] → Number Plans tab |
| Navigation (E911 Kari's Law) | Contact Genesys Cloud Voice support directly to configure Kari's Law notifications |
| Navigation (HELD for Poly phones) | Admin → Telephony → Trunks → External Trunks → [trunk] → General → Outbound → Location Conveyance |
| Navigation (Location Details) | Admin → Telephony → Locations (for physical address configuration) |
| Primary Function | Route emergency calls (911) to the correct Public Safety Answering Point (PSAP) based on the caller's location, and comply with Kari's Law requirements |
Study Notes
| Topic | Explanation |
|---|---|
| E911 | Enhanced 911 — automatically transmits the caller's address and telephone number to the emergency dispatcher when 911 is dialed; no need for the caller to state their location |
| Traditional 911 | Caller must identify their location manually |
| PSAP | Public Safety Answering Point — the regional emergency services dispatch center that receives 911 calls |
| Kari's Law | US federal law (effective February 16, 2018) — requires multi-line telephone systems (MLTS) to: (1) allow direct 911 dialing without a prefix, and (2) send a notification to a designated person when 911 is dialed |
| MLTS | Multi-Line Telephone System — any phone system with multiple lines; contact centers are MLTS operators |
| Location Details | Configuration in Genesys Cloud that stores a physical location address — used for E911 routing and Kari's Law notifications |
| HELD | HTTP-Enabled Location Delivery — protocol that allows Poly phones to query a Location Information Server (LIS) for their precise network-based location at call time |
| LIS | Location Information Service — a server that maps network location data (IP, MAC) to a civic address for E911 purposes |
Kari's Law Requirements (US Only)
Kari's Law applies to Genesys Cloud Voice customers in the United States.
| Requirement | Genesys Cloud Voice Behavior |
|---|---|
| Direct 911 dialing (no prefix) | Automatically satisfied — no customer action required |
| Notification to designated location when 911 is dialed | Requires configuration — must be set up with Genesys Cloud Voice support |
How to Configure Kari's Law Compliance (Genesys Cloud Voice)
- Contact Genesys Cloud Voice support
- Provide the following:
- Full location address (US addresses only — Canadian addresses do not support notification)
- Email addresses or email-as-text addresses to notify when 911 is dialed (e.g.,
user@company.com,5551234567@txt.att.net)
Notification is triggered based on the physical location address configured in Location Details.
Configuring Emergency Numbers in Sites
For all telephony options, emergency numbers are configured at the site level.
| Step | Path |
|---|---|
| Open Admin | Admin → Telephony → Sites |
| Select site | Choose the appropriate site |
| Open Number Plans tab | Click Number Plans |
| Select Emergency plan | Click on the Emergency number plan in the list |
| Enter emergency number | Type the emergency services number (e.g., 911 for the US) |
| Kari's Law note | US users must not alter the 911 number with a prefix or any other modification |
Warning: Do not assign an emergency number plan to a BYOC trunk unless you have verified with your carrier that they provide emergency services and that the carrier has the correct location for your phone numbers.
BYOC and Emergency Services
Genesys Cloud Voice includes built-in E911 support. BYOC customers must arrange E911 separately:
| Option | E911 Approach |
|---|---|
| Genesys Cloud Voice | E911 included — configured through Location Details and Kari's Law setup with Genesys support |
| BYOC Cloud | Must check with your carrier — carrier must support E911 for your numbers and locations |
| BYOC Premises | Must check with your carrier — same requirement; also need to verify site-level number plan configuration |
For BYOC E911 setup: Admin → Telephony → Trunks → BYOC trunk → configure as directed by your carrier
Reference article: "Set up emergency services with BYOC" in the Genesys Cloud Resource Center.
HELD — HTTP-Enabled Location Delivery (Poly Phones)
HELD allows Poly phones to retrieve their precise network location from a LIS server and include it in the SIP INVITE when a 911 call is placed, enabling more accurate emergency routing.
Supported phones: Poly VVX, Poly CCX, Poly Edge E
HELD Configuration Steps
| Step | Where |
|---|---|
| 1. Enable Location Conveyance on trunk | Admin → Telephony → Trunks → External Trunks → [trunk] → General → Outbound → check Location Conveyance |
| 2. Enter Emergency Routing Service Account ID | From your emergency service provider (or token ID if token authentication is required) |
| 3. Enter Location Information Server URL | URL to send HELD requests to |
| 4. Enable HELD in phone Base Settings | Admin → Telephony → Phone Management → Base Settings → [Poly base settings] → enable HELD |
How E911 Works — Genesys Cloud Voice
Agent dials 911
↓
Genesys Cloud Voice looks up the physical location address associated with the agent's number / location
↓
Call routed to appropriate PSAP for that address
↓
PSAP receives caller's address and telephone number automatically (E911)
↓
Kari's Law notification sent to designated email/SMS addresses
Locations Configuration
Physical location addresses are configured in:
Admin → Telephony → Locations
Each location stores:
- Full physical street address
- Used by E911 routing (Genesys Cloud Voice)
- Used by Kari's Law notification configuration
- Assigned to sites, phones, or users as appropriate
E911 for Remote Workers
Remote workers present a challenge because their physical location is not fixed. Genesys Cloud Voice provides E911 configuration options for remote workers — the physical location address must be kept current for accurate PSAP routing.
| Consideration | Detail |
|---|---|
| Accurate location data required | Inaccurate location may route the 911 call to the wrong PSAP — potentially causing delays |
| National fallback | If E911 cannot locate the caller, the call may route to a national emergency response service (less accurate, slower) |
| Remote workers | Must have their location updated when they change physical locations |
Key Takeaways
| Topic | Summary |
|---|---|
| E911 vs 911 | E911 automatically transmits caller address and number to PSAP; traditional 911 requires caller to state location |
| Kari's Law | US federal law — MLTS must allow direct 911 dialing AND notify a designated person when 911 is dialed |
| Kari's Law — Genesys Cloud Voice | Direct 911 dialing is automatic; notification requires setup with Genesys Voice support |
| Kari's Law — BYOC | Customer must check with their carrier |
| Emergency number config | Admin → Telephony → Sites → Number Plans → Emergency plan |
| BYOC warning | Do not assign emergency number plan to BYOC trunk without verifying carrier support |
| HELD | Protocol for Poly phones to deliver precise location to E911 — configured on trunk + base settings |
| Supported HELD phones | Poly VVX · Poly CCX · Poly Edge E |
| Locations | Admin → Telephony → Locations — stores physical addresses for E911 and Kari's Law |
Telephony Connection Options — BYOC Cloud vs BYOC Premises
| Section | Description |
|---|---|
| Feature Area | Telephony Infrastructure |
| Navigation | Admin → Telephony → Trunks |
| Alt Navigation | Menu → Digital and Telephony → Telephony → Trunks |
| Primary Function | Connect Genesys Cloud to a third-party telecommunications carrier using SIP trunks |
Genesys Cloud offers three telephony connection options. Understanding the differences between them — and between the two BYOC variants in particular — is a common exam topic.
Three Telephony Connection Options
| Option | Description | Who Controls the Carrier? |
|---|---|---|
| Genesys Cloud Voice | Genesys-provided telephony service over AWS infrastructure — fully managed by Genesys | Genesys provides the carrier service |
| BYOC Cloud | Customer brings their own carrier; SIP trunks terminate in Genesys Cloud's AWS-based Media Tier over the public internet | Customer — uses their own carrier contract |
| BYOC Premises | Customer brings their own carrier; SIP trunks terminate at a premises-based Edge hardware device | Customer — uses their own carrier contract + their own on-premises Edge hardware |
Study Notes
| Topic | Explanation |
|---|---|
| BYOC | Bring Your Own Carrier — allows organizations to keep their existing carrier contract while using Genesys Cloud for contact center functionality |
| SIP Trunk | A virtual phone line over IP that connects Genesys Cloud to the PSTN (public telephone network) via a carrier |
| BYOC Cloud | Cloud-to-cloud — SIP trunks connect a third-party carrier directly to Genesys Cloud's Media Tier (AWS) over the public internet |
| BYOC Premises | Hybrid — SIP trunks connect a third-party carrier to a Genesys Cloud Edge appliance installed on the customer's premises |
| Genesys Cloud Edge | A physical hardware device installed on the customer's premises — required for BYOC Premises |
| Media Tier | Genesys Cloud's AWS-based media processing infrastructure — where BYOC Cloud SIP trunks terminate |
| Trunk Type | BYOC Cloud uses BYOC Carrier or BYOC PBX trunk types; BYOC Premises uses External SIP trunk type |
BYOC Cloud vs BYOC Premises — Side-by-Side Comparison (Exam Critical)
| Attribute | BYOC Cloud | BYOC Premises |
|---|---|---|
| Where SIP trunks terminate | Genesys Cloud Media Tier (AWS, cloud) | Genesys Cloud Edge (on-premises hardware) |
| Connectivity | Over the public internet | On-premises network + internet for cloud connectivity |
| Hardware required | None — fully cloud-based | Yes — Genesys Cloud Edge appliance |
| Trunk types used | BYOC Carrier · BYOC PBX | External SIP |
| Third-party device | Can be a cloud-based carrier OR a premises-based carrier device / SBC | Can connect to a premises-based carrier device (SBC/SIP gateway) or cloud-based carrier device |
| E911 | Customer must verify E911 support with carrier | Customer must verify E911 support with carrier |
| Kari's Law | Customer must check with carrier for compliance | Customer must check with carrier for compliance |
| BYOC Premises hardware deprecation | N/A | Genesys Hardware Solution end of support: December 1, 2026 (announced March 2025) |
Trunk Types in Detail
| Trunk Type | Used With | Description |
|---|---|---|
| BYOC Carrier | BYOC Cloud | SIP trunk to a third-party carrier (telephone company) |
| BYOC PBX | BYOC Cloud | SIP trunk to a third-party PBX (private branch exchange) |
| External SIP | BYOC Premises | SIP trunk from a premises-based Edge device to a third-party system |
| SIP Phone Trunk | All | Internal trunk type for SIP phones |
| WebRTC Phone Trunk | All | Internal trunk type for WebRTC phones |
BYOC Cloud — How It Works
Third-party carrier (cloud or premises-based)
↓ (SIP trunk over public internet)
Genesys Cloud Media Tier (AWS)
↓
Genesys Cloud contact center features
↓
Agent desktop (WebRTC or managed/unmanaged phone)
Configuration: Admin → Telephony → Trunks → External Trunks → Add → BYOC Carrier or BYOC PBX
BYOC Premises — How It Works
Third-party carrier (cloud or on-premises SBC/gateway)
↓ (SIP trunk to Edge appliance)
Genesys Cloud Edge (on-premises hardware)
↓ (internet connection to Genesys Cloud)
Genesys Cloud contact center features
↓
Agent desktop (phone on same premises network or WebRTC)
Configuration: Admin → Telephony → Trunks → External Trunks → Add → External SIP
Genesys Cloud Edge (BYOC Premises Hardware)
The Edge is the on-premises appliance that bridges the customer's local SIP trunks to Genesys Cloud. It handles media processing and call control locally before relaying to the cloud.
| Hardware Solution | Notes |
|---|---|
| Genesys Hardware Solution | Deprecated — End of Support: December 1, 2026 |
| Customer-provided Edge (virtual or third-party hardware) | Customers should plan migration to alternative Edge solutions before the EOS date |
If you are on Genesys-provided BYOC Premises hardware, plan your migration strategy before December 1, 2026.
Emergency Services with BYOC
Unlike Genesys Cloud Voice (which includes built-in E911 via AWS), BYOC customers must work with their carrier for emergency services compliance:
| Scenario | E911 Approach |
|---|---|
| BYOC Cloud | Check with your carrier — the carrier must support E911 for the numbers and locations in use |
| BYOC Premises | Check with your carrier — same requirement; carrier must support E911 |
| BYOC + Kari's Law (US) | Check with your carrier — Genesys Cloud Voice handles this natively; BYOC requires carrier verification |
| BYOC Premises + Site configuration | Configure emergency number plan in Admin → Telephony → Sites → Number Plans — do not assign an emergency number plan to a BYOC trunk unless the carrier has confirmed support |
When to Use Each Option
| Scenario | Recommended Option |
|---|---|
| Fastest, simplest deployment with no existing carrier contract | Genesys Cloud Voice |
| Organization has an existing carrier contract they want to keep | BYOC Cloud |
| Organization needs on-premises media processing or local survivability (within a site) | BYOC Premises |
| Fully cloud-native strategy with own carrier | BYOC Cloud |
| Hybrid deployment needing both cloud and on-premises | BYOC Premises (possibly in combination with other options) |
Note: As of June 2025, Genesys deprecated Remote Survivability for BYOC Premises Edges, citing inability to reliably deliver IVR flows and AI features during internet outages.
Permissions
| Permission | Purpose |
|---|---|
Telephony > Plugin > All |
Full access to telephony configuration |
Telephony > SipTrunk > View/Add/Edit/Delete |
Trunk-specific permissions |
Key Takeaways
| Topic | Summary |
|---|---|
| Three options | Genesys Cloud Voice · BYOC Cloud · BYOC Premises |
| BYOC Cloud | Carrier SIP trunks → Genesys AWS Media Tier · No on-premises hardware · Trunk types: BYOC Carrier / BYOC PBX |
| BYOC Premises | Carrier SIP trunks → on-premises Edge appliance → Genesys Cloud · Requires Edge hardware · Trunk type: External SIP |
| Key distinction | Where SIP trunks terminate — cloud (BYOC Cloud) vs on-premises Edge (BYOC Premises) |
| E911 | Both BYOC options require carrier verification — not built-in like Genesys Cloud Voice |
| Premises hardware deprecation | Genesys Hardware Solution for BYOC Premises: EOS December 1, 2026 |
| Remote Survivability | Deprecated as of June 2025 — no longer supported for BYOC Premises Edges |