6. - Platform Operations
- Disconnect Interactions
- API Usage
- Integration Management
- OAuth Clients
- Authorized Applications
- Single Sign-On (SSO)
- Audit Viewer
- GDPR and Data Subject Requests
Disconnect Interactions
What Is the Disconnect Interactions Tool?
The Disconnect Interactions tool allows administrators to manually terminate an interaction that is stuck in the system — one that remains active in queues, real-time views, or reports even though the customer and agent have both disconnected.
This is a break-glass operational tool, not a routine configuration item.
When to Use It
| Symptom | Likely Cause |
|---|---|
| Interaction shows active in real-time dashboard after agent ended the call | System failed to clear interaction state |
| Queue statistics show an interaction that cannot be answered | Interaction stuck in queue with no active parties |
| Agent stuck in ACW or handling state for a call that ended | WebRTC session or signaling not closed cleanly |
| Ghost interaction visible in Performance Views | Platform sync delay or session persistence issue |
Common root causes: persistent WebRTC sessions, SIP signaling not terminating cleanly, interactions left on hold with no parties, platform synchronization issues.
⚠️ Risk: If an interaction is still genuinely active (customer still on hold, agent still connected), using this tool will immediately drop the call. Always verify the interaction is truly stuck before disconnecting.
How to Use It
- Admin → Routing → Disconnect Interactions
- Locate the Interaction ID of the problematic interaction
- Enter the Interaction ID in the input field
- Click Disconnect Interaction
- Verify the interaction no longer appears in real-time views or queue statistics
Finding the Interaction ID
The Interaction ID is a UUID-format string. Find it from:
| Source | How |
|---|---|
| Real-time Performance Views | Click the stuck interaction → copy the Interaction ID from the details panel |
| Interaction Details report | Search by agent, queue, or time range → find the interaction |
| Analytics API | Query for active interactions if the UI doesn't surface it easily |
What Happens When You Disconnect
- The interaction is immediately terminated
- It is removed from queue statistics and real-time views
- The system logs the disconnection
- If the interaction was genuinely still active, the call is dropped — no warning is given to the customer or agent
Limitations
| Limitation | Detail |
|---|---|
| Some interactions cannot be disconnected | System-level lock or platform state prevents it |
| Dashboard may not update instantly | Real-time views have a refresh delay — wait a moment before concluding it didn't work |
| Root cause is not resolved | The tool terminates the stuck interaction but does not fix the underlying cause (WebRTC issue, network problem, etc.) |
| Requires escalation | If the tool fails, contact Genesys Cloud Customer Care with the Interaction ID |
Operational Workflow
Stuck interaction identified in real-time view or queue
↓
Validate — confirm no active parties (agent + customer both gone)
↓
Locate Interaction ID
↓
Admin → Routing → Disconnect Interactions
↓
Enter ID → Disconnect Interaction
↓
Verify interaction removed from views
↓
Document the incident (ID, time, root cause if known)
↓
If persists → escalate to Genesys Customer Care
Troubleshooting
| Issue | Cause | Fix |
|---|---|---|
| Interaction cannot be disconnected | Platform-level state lock | Escalate to Genesys Customer Care with Interaction ID |
| Interaction still visible after disconnect | Dashboard refresh delay | Wait 30–60 seconds and refresh the view |
| Interaction ID not found | Wrong ID copied | Re-verify the ID from interaction details or analytics |
| Multiple stuck interactions simultaneously | Systemic WebRTC or network issue | Investigate root cause; check Edge health and network connectivity |
Troubleshooting Checklist
| Check | ✓ |
|---|---|
| Confirmed interaction is actually stuck (not active) | ☐ |
| Interaction ID captured from performance view or reports | ☐ |
| Disconnect tool accessed at Admin → Routing | ☐ |
| Interaction ID entered and disconnect executed | ☐ |
| Verified interaction no longer in queue or real-time view | ☐ |
| Incident documented | ☐ |
| Escalated to Genesys Care if tool failed | ☐ |
Key Facts for Exam / Interview
| Question | Answer |
|---|---|
| Where is the Disconnect Interactions tool? | Admin → Routing → Disconnect Interactions |
| What is required to use it? | The Interaction ID of the stuck interaction |
| What happens immediately when you disconnect? | The interaction is terminated and removed from active sessions |
| What if the tool doesn't work? | Escalate to Genesys Cloud Customer Care |
| What is the risk of using this tool carelessly? | Disconnecting a genuinely active call drops the customer without warning |
See Also
- Platform Usage & Monitoring — real-time views where stuck interactions are typically spotted
- Queue & Routing Management — queue statistics affected by stuck interactions
- Architect Overview — WebRTC and SIP session handling context
API Usage
| Topic | Detail |
|---|---|
| Navigation (Admin Report) | Admin → Platform Usage → API Usage |
| Navigation (Alt) | Menu → IT and Integrations → API Usage |
| Navigation (Analytics View) | Performance > Workspace > Other > API Usage or Menu → Analytics → Analytics Workspace → API Usage |
| Purpose | Monitor API request consumption, identify high-volume clients, detect failures, stay within the Genesys Cloud Fair Use Policy |
| Required Permission | OAuth > Client > View |
| Data Calculation | Daily aggregate — all requests 00:00:00–23:59:59 UTC |
| Current Day | Not included — report always lags by one day |
| Timezone Note | Dates display in local time but are calculated in UTC — date shown may differ from client-side date |
✅ Verified against Genesys Cloud Resource Center — March 2026
Overview
Genesys Cloud provides two separate tools for monitoring API usage — the API Usage Report (Admin UI) and the API Usage View (Analytics Workspace). Both tools require the same permission, cover the same data sources, and exclude the same request types. This page covers both.
The API Usage report shows how many API requests your contact center makes and which clients generate those requests. If you exceed the Fair Use Policy for APIs, this report helps determine which clients make the most requests and which request types your organization uses most — allowing you to streamline API usage and avoid or plan for overages.
What Is Included
| Source | Included |
|---|---|
| Custom or third-party application integrations | ✅ Yes |
| AppFoundry applications | ✅ Yes |
| Data Actions calling the Genesys Cloud Public API | ✅ Yes |
| Embeddable Framework applications | ✅ Yes (subject to API usage allocations) |
| PUT, POST, GET, DELETE calls | ✅ Yes |
What Is Excluded
| Source | Excluded |
|---|---|
| Genesys Cloud browser, web, and mobile app internal requests | ❌ Not included |
| Outbound Data Actions calling external platforms | ❌ Not included |
| Genesys Cloud for Chrome | ❌ Not included |
| Genesys Cloud for Firefox | ❌ Not included |
| Genesys Cloud for Salesforce | ❌ Not included |
| Genesys Cloud for Zendesk | ❌ Not included |
API Usage Report — Dashboard Overview
The API Usage dashboard is divided into three main sections: Most Active Requests, OAuth Client Requests, and URL Requests. Each section contains graphs and shows the count of total API requests and total OAuth clients.

Section 1 — Most Active Requests
Top 5 Requests by OAuth Client
Displays the top five clients that made the most API requests in the selected time period. Helps identify the number of successful and failed API calls per client. Exportable as CSV.

HTTP Response Status Codes
Displays the total number of successful or failed API calls by status — across all clients.
| Status Code | Meaning |
|---|---|
| 200 | Request succeeded |
| 300 | Redirect — user can select a preferred representation |
| 400 | Bad request — malformed syntax the server cannot understand |
| 429 | Too many requests — rate limiting triggered |
| 500 | Server error — unexpected condition prevented fulfillment |
⚠️ Note: The documented status codes in this dashboard are 200, 300, 400, 429, and 500. Common codes like 401 and 404 are not broken out separately in this view.

Top 5 Requested URLs
Displays the five API endpoints receiving the highest number of requests. Helps identify endpoints with failed API calls and reduce unnecessary API traffic. High usage may indicate inefficient polling or integration design.

Section 2 — OAuth Client Requests
Request Counts by OAuth Client
Shows a count of API calls made by the selected OAuth clients during the selected timeframe. Identifies which integrations are responsible for the most API traffic.

HTTP Response Status Codes — Per Client View
Breaks down successful and failed responses per OAuth client. Useful for diagnosing integration-specific authentication or request issues:
- Many 400 responses → integration sending malformed requests
- Many 429 responses → client exceeding rate limits
- Many 500 responses → server-side issue with specific endpoint

Request URL Counts by OAuth Client
Displays all URLs that resulted in high API calls per client. Helps identify which endpoints each client is accessing and where failures are concentrated.
💡 Click OAuth Client Settings → Client URL View Selections to specify exactly which OAuth clients and URLs appear in these graphs. Selections persist until manually reset.

Section 3 — URL Requests
URL Requests (Detail List)
Displays a list of API requests by URL — individual endpoints used, request frequency, and HTTP response outcomes. Helpful for deep analysis of API usage patterns.
💡 Click URL Request Settings → Template URL View Selections to specify which URLs appear in this section's graphs. Selections persist until manually reset.

Total Successful vs. Failed Requests
Summarizes the overall success and failure rates for all API requests. A spike in failed requests may indicate authentication failures, endpoint configuration errors, or integration outages.

Dashboard Panel Summary
| Panel | Section | What It Shows |
|---|---|---|
| Top 5 Requests by OAuth Client | Most Active Requests | Clients generating highest request volume |
| HTTP Response Status Codes | Most Active Requests | 200/300/400/429/500 distribution across all calls |
| Top 5 Requested URLs | Most Active Requests | Most frequently called API endpoints |
| Request Counts by OAuth Client | OAuth Client Requests | Per-client API call counts |
| HTTP Response Status Codes (per client) | OAuth Client Requests | Success/failure breakdown per OAuth client |
| Request URL Counts by OAuth Client | OAuth Client Requests | Which endpoints each client is calling |
| URL Requests | URL Requests | Detailed per-endpoint request list |
| Total Success / Fail | URL Requests | Overall platform request health |
API Usage View (Analytics Workspace)
The API Usage View is a separate tool from the Admin report. Navigate to:
Performance > Workspace > Other > API Usage, orMenu → Analytics → Analytics Workspace → API Usage
The view contains a graph and two main filterable sections:
- OAuth Clients — Lists all clients that made API requests in the selected period. Click a client to cross-highlight its requests in the API Requests section.
- API Requests — Lists all PUT, POST, GET, DELETE calls. Click a request to highlight which clients made it.
Each section has four default columns: client/request name, number of requests, percentage of total requests, and a visual bar. When you apply a filter by clicking a row, a fifth column appears showing the filtered percentage alongside the overall total.
⚠️ You can only filter by one OAuth client or one API request at a time.
⚠️ The graph does not display data when you select a single day as the date range — use multi-day ranges to see the graph.
💡 Click Save to persist your filter and date selections in the view.
Filtering & Export
| Feature | Detail |
|---|---|
| Date Range Presets | Previous 7 days, Previous 30 days, This month, Last month, Previous 3 months |
| Custom Date Range | Configurable start and end date |
| Current Day | Never included — no date range shows today's data |
| Export | Click Export API Usage Data → downloads CSV |
| OAuth Client Filter | Click OAuth Client Settings to select specific clients for Section 2 graphs |
| URL Filter | Click URL Request Settings to select specific endpoints for Section 3 graphs |
| Save View Settings | Available in the API Usage View — persists filter and date selections |
Best Practices
| Practice | Reason |
|---|---|
| Monitor API usage regularly | Prevent exceeding fair use limits |
| Limit unnecessary API calls | Improve platform performance |
| Use caching strategies | Reduce repeated requests to the same endpoint |
| Optimize integration polling intervals | Avoid excessive traffic from scheduled jobs |
| Investigate 429 errors immediately | Rate limiting can break integrations silently |
| Monitor failed API requests | Detect integration issues before they impact agents |
Troubleshooting
| Issue | Cause | Resolution |
|---|---|---|
| Excessive API usage | Integration polling too frequently | Adjust polling interval or add caching |
| High 400 error rate | Malformed API requests | Verify endpoint and request format |
| High 429 error rate | Rate limit exceeded | Reduce request frequency or spread load over time |
| High 500 error rate | Server-side issue | Check Genesys Cloud status page; review endpoint |
| Unknown API traffic | Unrecognized OAuth client generating calls | Investigate OAuth clients in Admin → Integrations → OAuth |
| Data appears on wrong date | UTC vs. local time zone offset | Remember report dates are calculated in UTC |
| Graph not showing in View | Single day selected as date range | Select a multi-day date range to display the graph |
Exam Cheat Sheet
| Question | Answer |
|---|---|
| What does the API Usage report show? | API request activity across integrations and OAuth clients |
| What HTTP methods are tracked? | GET, POST, PUT, DELETE |
| What are the documented status codes in this dashboard? | 200, 300, 400, 429, 500 |
| What does a 429 status code mean? | Too many requests — rate limiting triggered |
| Does the report include today's data? | No — never includes data for the current day |
| What timezone is data calculated in? | UTC — displayed in local time, but calculated in UTC |
| What is excluded from the report? | Internal Genesys UI requests, outbound Data Actions to external platforms, and all embedded clients (Chrome, Firefox, Salesforce, Zendesk) |
| Are Embeddable Framework apps tracked? | Yes — they are subject to API usage allocations |
| What permission is required? | OAuth > Client > View |
| What are the two tools for API usage monitoring? | Admin Report (Admin → Platform Usage → API Usage) and Analytics View (Performance > Workspace > Other > API Usage) |
| What happens to the graph when you select 1 day in the View? | The graph does not display — use a multi-day range |
| What does the OAuth Client Settings button do? | Filters which clients and URLs appear in the OAuth Client Requests section graphs |
| Where is the second Admin navigation path? | Menu → IT and Integrations → API Usage |
See Also
- Fair Use Policy for APIs — limits that this report helps you monitor against
- Roles & Permissions —
OAuth > Client > Viewpermission details - About Platform Usage — broader platform consumption monitoring
- Resource Usage on Your Invoice — billing alignment with UTC usage calculations
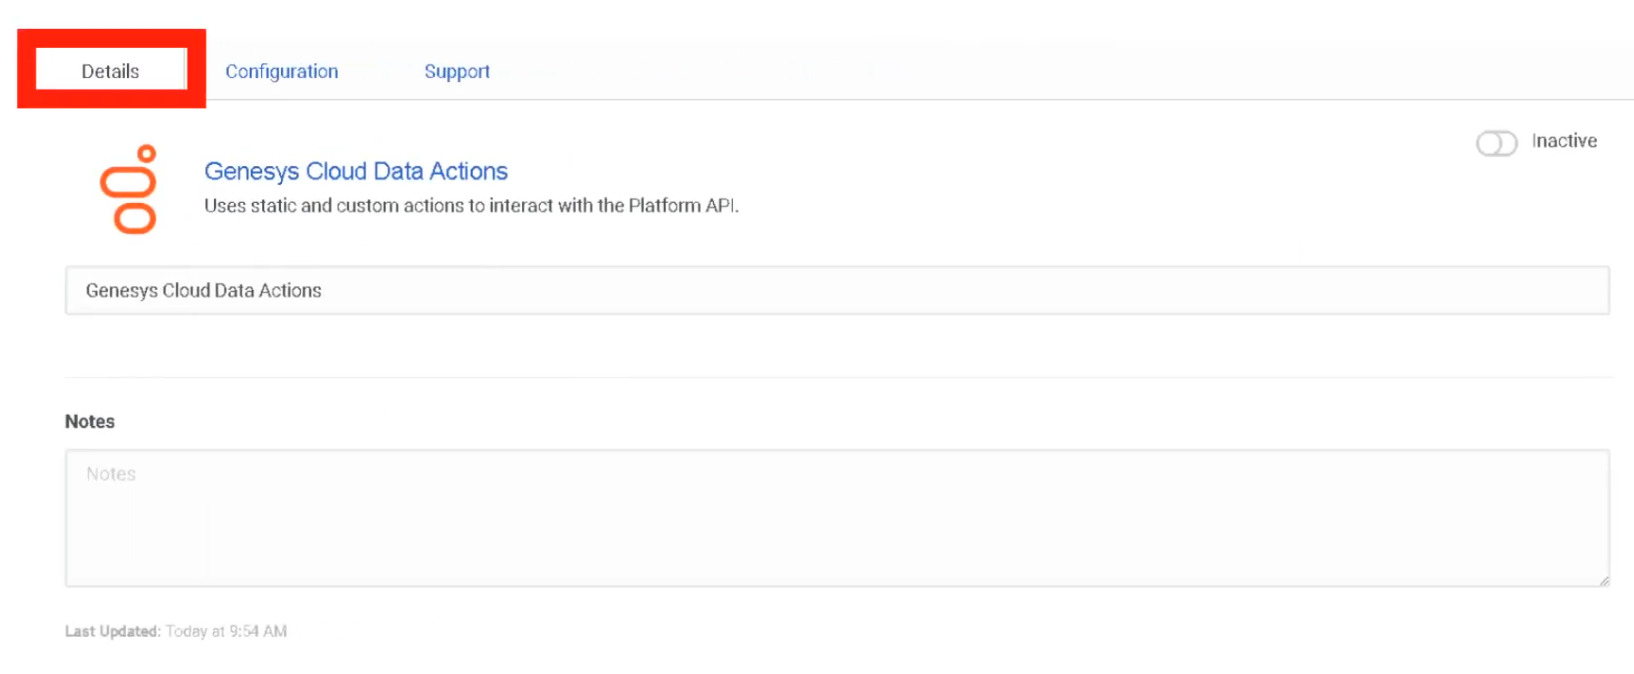
Integration Management
| Section | Description |
|---|---|
| Module Context | Integration Management covers OAuth Clients, Authorized Applications, and Single Sign-On (SSO) in Genesys Cloud Administration. |
| Admin Location | Admin → Integrations |
| Purpose | Enables secure API authentication, third-party application connectivity, and enterprise identity federation. |
OAuth Clients
Overview
| Topic | Explanation |
|---|---|
| OAuth Client | An application registered in Genesys Cloud that can request access tokens to call Platform APIs. |
| OAuth Standard | Genesys Cloud implements the OAuth 2.0 authorization framework for secure API authorization. |
| Access Token | Temporary credential used to authenticate API calls. |
| Token Lifetime | Configurable between 300 seconds and 172,800 seconds (2 days). |
| OAuth Scopes | Define the level of access an application has to organization data. |
| Role-Based Access | OAuth permissions are determined by roles assigned to the OAuth client. |
| Integration Role | OAuth clients are commonly used for integrations, data actions, AppFoundry apps, and external systems. |
OAuth allows organizations to share information with applications without sharing user credentials, and uses scopes and roles to restrict access to resources.
Navigation
| Task | Navigation |
|---|---|
| View OAuth Clients | Admin → Integrations → OAuth |
| Create OAuth Client | Admin → Integrations → OAuth → Add Client |
| Review Authorized Apps | Admin → Integrations → Authorized Applications |
Configuration Fields
| Field | Description | Example |
|---|---|---|
| App Name | Name displayed when authorization occurs | CRM_Integration_Client |
| Description | Brief description of the OAuth client purpose | Salesforce Data Sync |
| Token Duration | Lifetime of OAuth access tokens (300–172,800 seconds) | 3600 |
| Grant Types | Defines how an application obtains a token | Client Credentials |
| Roles | Permissions assigned to the OAuth client | Master Admin |
| Client ID | Unique identifier generated automatically | Generated |
| Client Secret | Secret key used to authenticate token requests | Generated |
| Authorized Redirect URI | Used with Authorization Code or Implicit grants | https://app.example.com/callback |
Grant Types
| Grant Type | Description | Typical Use |
|---|---|---|
| Client Credentials | Machine-to-machine authentication; no user context | Server integrations, data actions |
| Authorization Code | User-delegated access with redirect | Web apps requiring user context |
| Implicit | Simplified flow for browser-based apps | Legacy browser apps |
| SAML2 Bearer | SSO-based token exchange | Federated identity scenarios |
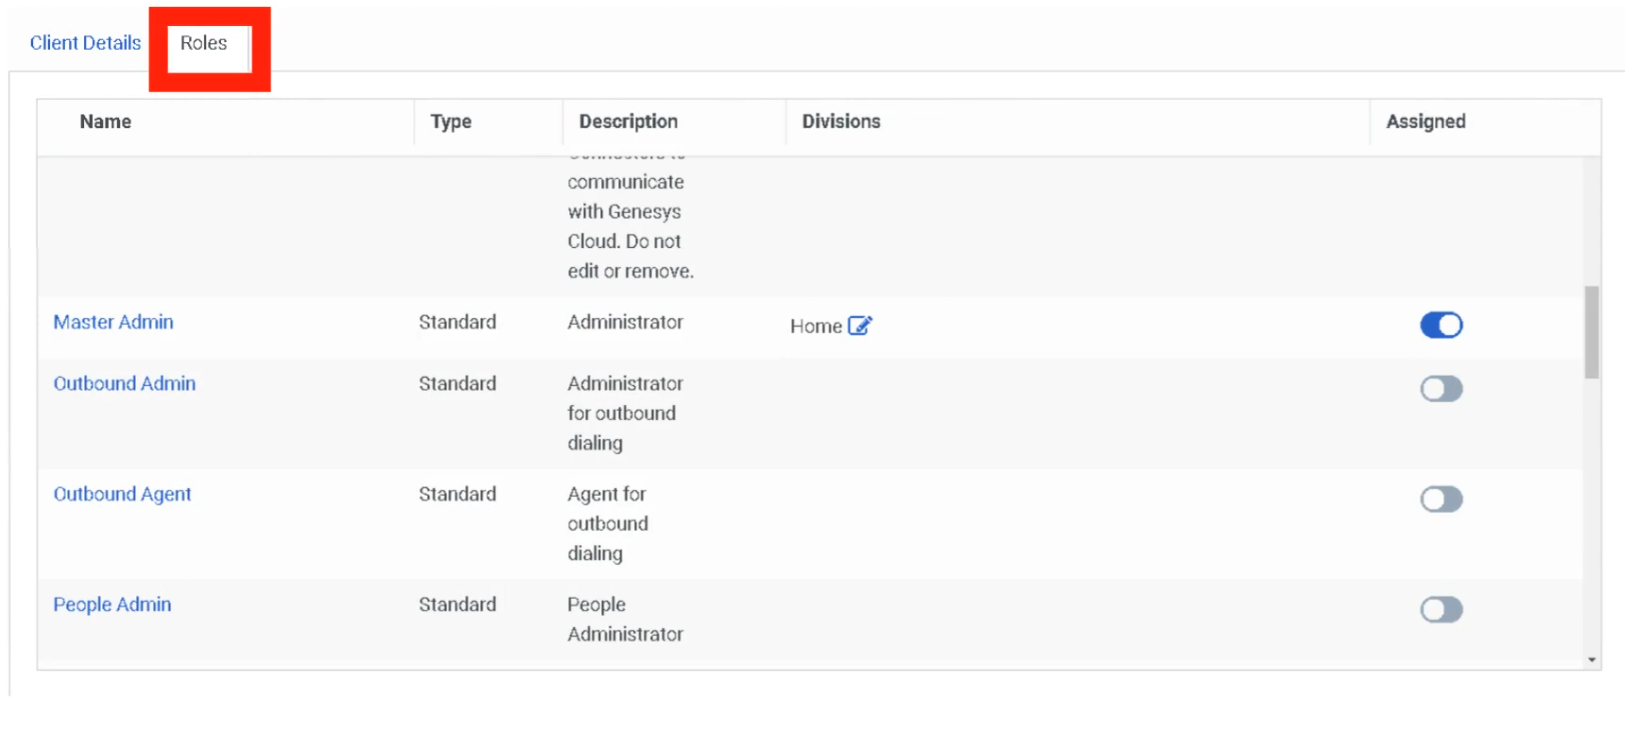
⚠️ After selecting Client Credentials, a Roles tab appears — assign the minimum required role. Use least-privilege roles in production.
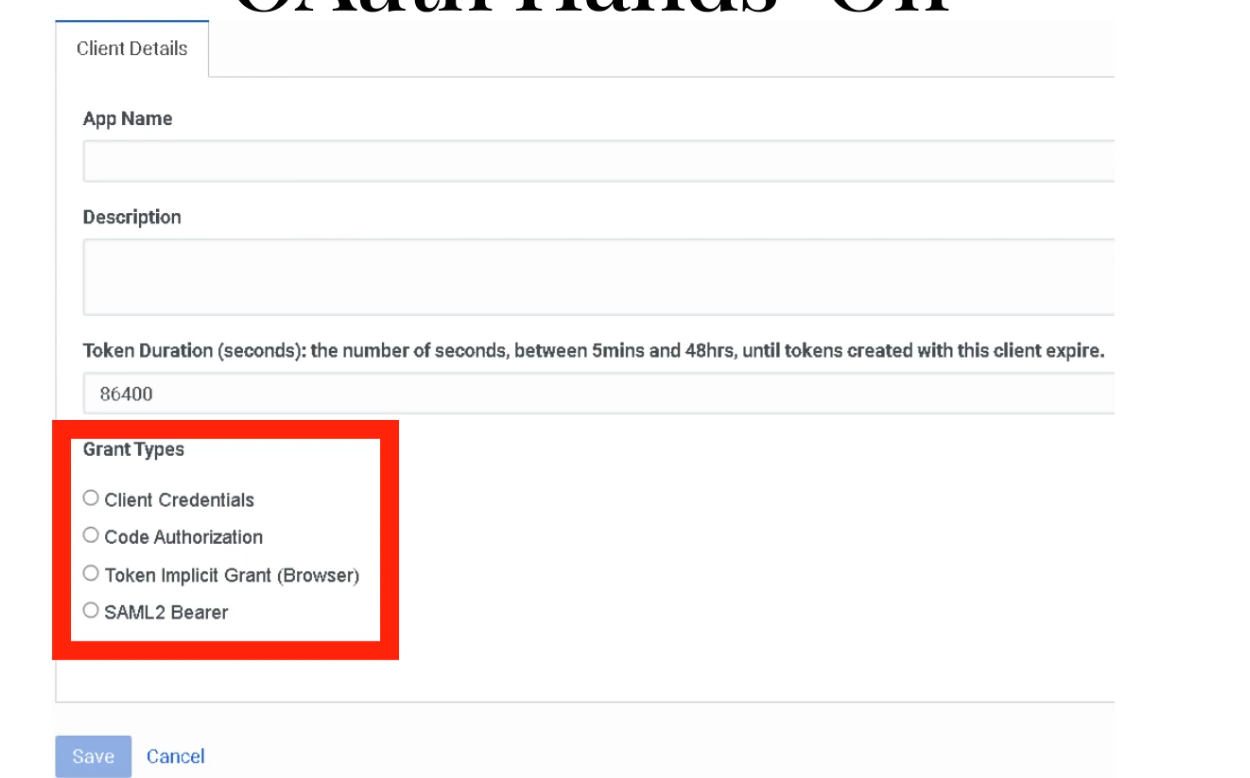
After selecting Client Credentials, the Roles tab appears — assign Master Admin or a least-privilege role.
Implementation Steps
| Step | Action |
|---|---|
| Step 1 | Navigate to Admin → Integrations → OAuth |
| Step 2 | Click Add Client |
| Step 3 | Enter application name and description |
| Step 4 | Configure token expiration |
| Step 5 | Select OAuth grant type |
| Step 6 | Assign roles to the OAuth client |
| Step 7 | Save configuration |
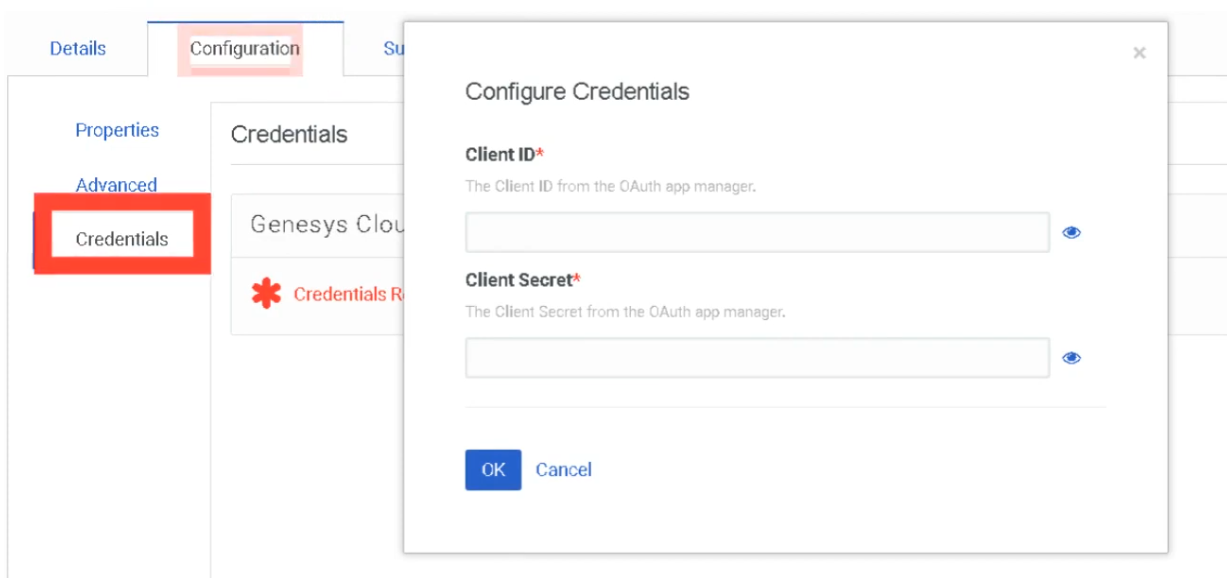
| Step 8 | Copy generated Client ID and Client Secret — store securely |
Creating an Integration Using OAuth Credentials
After creating an OAuth client, use the credentials to configure an integration:
Add the integration using the OAuth credentials:
Creating a Data Action
After the integration is configured, create a Data Action to call APIs from Architect flows:


End-to-End Flow: OAuth → Integration → Data Action → Architect
External System
↓
OAuth Client Authentication
↓
Access Token Issued
↓
Integration / Data Action
↓
Architect Flow
↓
Customer Interaction
Security Considerations
| Security Control | Description |
|---|---|
| Least Privilege Access | Assign minimal permissions to OAuth clients |
| Token Expiration | Shorter token lifetimes reduce exposure |
| Secure Storage | Store client secrets in secure vaults |
| API Monitoring | Track requests via Platform Usage dashboard |
| Credential Protection | Client ID + Secret function like a username/password — protect accordingly |
Troubleshooting
| Issue | Cause | Resolution |
|---|---|---|
| Token request fails | Invalid client credentials | Verify client ID and secret |
| API access denied | Missing role permissions | Assign correct roles |
| Token expired | Token lifetime exceeded | Request new token |
| Authentication errors | Incorrect grant type | Verify OAuth configuration |
| Integration failure | Credentials not configured | Update integration credentials |
Interview Cheat Sheet
| Question | Answer |
|---|---|
| What is OAuth used for in Genesys Cloud? | Authenticate applications and authorize API access |
| What is an OAuth access token? | Temporary credential used to authenticate API requests |
| What grant types are supported? | Client Credentials, Authorization Code, Implicit, SAML2 Bearer |
| What controls API access permissions? | OAuth client roles and scopes |
| Maximum token lifetime? | 172,800 seconds |
Authorized Applications
Overview
| Topic | Explanation |
|---|---|
| Authorized Application | An application that has been granted permission to access Genesys Cloud via OAuth. |
| Application State | Applications can be Pending, Approved, or Revoked. |
| Scopes | Define the specific permissions granted to an application. |
| Security Importance | Allows administrators to control external application access and revoke permissions when necessary. |
Navigation
| Task | Navigation |
|---|---|
| View Authorized Applications | Admin → Integrations → Authorized Applications |
| Edit Application Permissions | Click ⋮ (three dots) beside the application |
| Revoke Application Access | Select Revoke from application menu |
Configuration Fields
| Field | Description | Example |
|---|---|---|
| App Name | Name of the OAuth client application | CRM_Integration_App |
| Scopes | Permissions granted to the application | analytics:read |
| State | Current authorization status | Approved |
| Roles | Roles assigned to the application | Master Admin |
| Actions Menu | Options to edit or revoke access | Edit / Revoke |
Application States
| State | Meaning |
|---|---|
| Pending | Application has requested access but not yet approved |
| Approved | Application is authorized to access Genesys Cloud APIs |
| Revoked | Application access has been removed; API calls are immediately blocked |
⚠️ Revoking an application immediately blocks all API access. Use with caution for active integrations.
Best Practices
| Practice | Reason |
|---|---|
| Regularly review authorized apps | Ensure only trusted applications have access |
| Apply least privilege roles | Limit application permissions |
| Revoke unused applications | Reduce security risk |
| Monitor API activity | Detect unusual usage patterns |
| Document integrations | Maintain governance over external access |
Interview Cheat Sheet
| Question | Answer |
|---|---|
| What are Authorized Applications? | Applications granted OAuth permission to access Genesys Cloud APIs |
| What controls application permissions? | OAuth scopes and assigned roles |
| Where are authorized apps managed? | Admin → Integrations → Authorized Applications |
| What happens if an app is revoked? | It can no longer access the platform APIs — immediately |
Single Sign-On (SSO)
Overview
| Topic | Explanation |
|---|---|
| Single Sign-On | Authentication method allowing users to log into Genesys Cloud using corporate identity provider credentials. |
| Identity Provider (IdP) | External authentication service such as Azure AD, Okta, Google Workspace, or OneLogin. |
| Service Provider (SP) | Genesys Cloud acts as the service provider in SSO integrations. |
| Protocol | SAML 2.0 — the only supported SSO protocol. |
| Authentication Flows | Supports Service Provider–initiated and Identity Provider–initiated login flows. |
| User Requirement | Users must already exist in Genesys Cloud before SSO authentication will work. |
| Certificate Risk | Expired IdP certificates will break authentication for all SSO users. |
Navigation
| Task | Navigation |
|---|---|
| Configure SSO | Admin → Integrations → Single Sign-On |
| Add Identity Provider | Admin → Integrations → Single Sign-On → Add Identity Provider |
| Download Genesys Certificate | Available within the SSO configuration page |

Configuration Fields
| Field | Description | Example |
|---|---|---|
| Identity Provider Name | Name of the configured SSO provider | AzureAD_SSO |
| Display Name | Name displayed on login page | Company SSO |
| Identity Provider Type | External authentication service | Azure AD |
| SAML Metadata File | XML configuration file provided by IdP | idp_metadata.xml |
| Issuer URI | Unique identifier of the IdP | https://login.microsoftonline.com |
| SSO URL | URL used to authenticate users | https://login.microsoftonline.com/... |
| Logout URL | Optional logout redirect URL | https://login.microsoftonline.com/logout |
| Certificate | Security certificate for validating SAML responses | Base64 certificate |
SSO Authentication Flow
User Login Request
↓
Redirect to Identity Provider
↓
User Authentication (+ MFA if configured in IdP)
↓
SAML Assertion Sent to Genesys Cloud
↓
Genesys Cloud Validates Assertion
↓
User Access Granted
Implementation Steps
| Step | Action |
|---|---|
| Step 1 | Obtain SAML metadata XML from identity provider |
| Step 2 | Navigate to Admin → Integrations → Single Sign-On |
| Step 3 | Click Add Identity Provider |
| Step 4 | Import SAML metadata file |
| Step 5 | Configure login display settings (name, logo) |
| Step 6 | Save configuration |
| Step 7 | Test authentication before enabling for all users |
| Step 8 | Enable SSO for organization users |
Limitations & Constraints
| Constraint | Description |
|---|---|
| Protocol Support | Only SAML 2.0 is supported — no OIDC or WS-Federation |
| User Provisioning | Users must exist in Genesys Cloud before they can authenticate via SSO |
| IdP Configuration | Requires configuration on both IdP and Genesys Cloud sides |
| Certificate Expiration | Expired certificates break authentication for all SSO users — monitor and rotate proactively |
Troubleshooting
| Issue | Cause | Resolution |
|---|---|---|
| SSO login failure | Incorrect SAML configuration | Verify metadata configuration |
| Invalid assertion | Certificate mismatch | Update SAML certificate |
| User cannot authenticate | User not provisioned in Genesys Cloud | Create the user first |
| Login redirect loop | Incorrect IdP URL | Verify identity provider configuration |
| SSO test fails | Incorrect metadata | Re-import metadata file |
Interview Cheat Sheet
| Question | Answer |
|---|---|
| What is SSO in Genesys Cloud? | Authentication using corporate identity providers instead of separate Genesys credentials |
| Which protocol is supported? | SAML 2.0 only |
| What must exist before SSO works? | The user account must already exist in Genesys Cloud |
| Where is SSO configured? | Admin → Integrations → Single Sign-On |
| What breaks SSO? | Expired certificates or users not provisioned in Genesys Cloud |
OAuth Clients
| Topic | Detail |
|---|---|
| Navigation | Admin → Integrations → OAuth |
| Purpose | Register applications that need secure API access to Genesys Cloud without exposing user credentials |
| Standard | OAuth 2.0 authorization framework |
| Token Lifetime | 300 seconds (5 min) to 172,800 seconds (48 hrs) — SCIM integration up to 450 days |
✅ Verified against Genesys Cloud Resource Center — March 2026
Overview
An OAuth Client is an application registered in Genesys Cloud that can request access tokens to call Platform APIs. OAuth allows organizations to share information with applications without sharing user credentials, using scopes and roles to restrict access to specific resources.
OAuth is required for: Integrations, Data Actions, AppFoundry apps, custom external applications, and automation scripts.
Grant Types
The grant type defines how an application obtains an access token. This is the most important decision when creating an OAuth client.
| Grant Type | Authentication Steps | Best For | Status |
|---|---|---|---|
| Client Credentials | Single-step — no user interaction | Server-to-server integrations, Data Actions, scheduled jobs, Windows Services | ✅ Current — most common for admin integrations |
| Authorization Code / PKCE | Two-step — user authenticates, then code exchanged for token | Server-side web apps, thin desktop clients, maximum security | ✅ Current — recommended for user-facing apps |
| SAML2 Bearer | Uses SAML assertion from Identity Provider | SSO-integrated environments | ✅ Current |
| Token Implicit Grant (Browser) | Single-step browser-based | Legacy JavaScript/desktop apps | ⚠️ DEPRECATED — see below |
⚠️ Implicit Grant Deprecation
| Date | Action |
|---|---|
| May 2026 | Token Implicit Grant option removed from new OAuth client creation |
| May 2027 | Existing OAuth clients using Implicit Grant stop working — must migrate |
| Action Required | Migrate all Implicit Grant clients to Authorization Code with PKCE before May 2027 |
PKCE (Proof Key for Code Exchange) is already supported in Genesys Cloud and is the recommended replacement — it provides stronger security by preventing authorization code interception.
Configuration Fields
| Field | Description | Notes |
|---|---|---|
| App Name | Display name shown during authorization | e.g., CRM_Integration_Client |
| Description | Brief purpose of this client | Optional but recommended for governance |
| Token Duration | Lifetime of access tokens in seconds | 300–172,800s; Genesys recommends 64,800s (18 hours) for agent workday alignment; HIPAA orgs enforce 15-min idle timeout |
| Grant Type | How the token is obtained | See Grant Types table above |
| Roles | Permissions assigned to this client | Only available for Client Credentials grant — Roles tab appears after selecting Client Credentials |
| Divisions | Scope of resource access per role | Assign alongside each role |
| Authorized Redirect URIs | Where auth codes are posted after login | Required for non-Client Credentials grants; max 125 URIs |
| OAuth Scopes | Fine-grained permission scopes | Required for non-Client Credentials grants |
| Client ID | Auto-generated unique identifier | Copy and store — used in integration configuration |
| Client Secret | Auto-generated password for token requests | ⚠️ One-time viewable — only shown at creation or when regenerated; store securely immediately |
⚠️ Client Secret — Critical Security Note (November 2025)
The Client Secret is only visible once — at the moment of creation or when you explicitly regenerate it. It no longer appears in API responses after that point. If you lose it, you must regenerate a new one (which invalidates the old one).
Creating an OAuth Client
After selecting Client Credentials, the Roles tab appears — assign Master Admin or least-privilege role:
OAuth → Integration → Data Action → Architect Flow
The full integration chain shows how OAuth credentials power everything downstream:
OAuth Client Created (Client ID + Secret)
↓
Integration Configured (credentials entered here)
↓
Data Action Created (uses the integration)
↓
Architect Flow (calls the Data Action)
↓
Customer Interaction (result returned to flow)
Step 1 — Create the Integration
Enter the OAuth credentials into the Integration configuration:
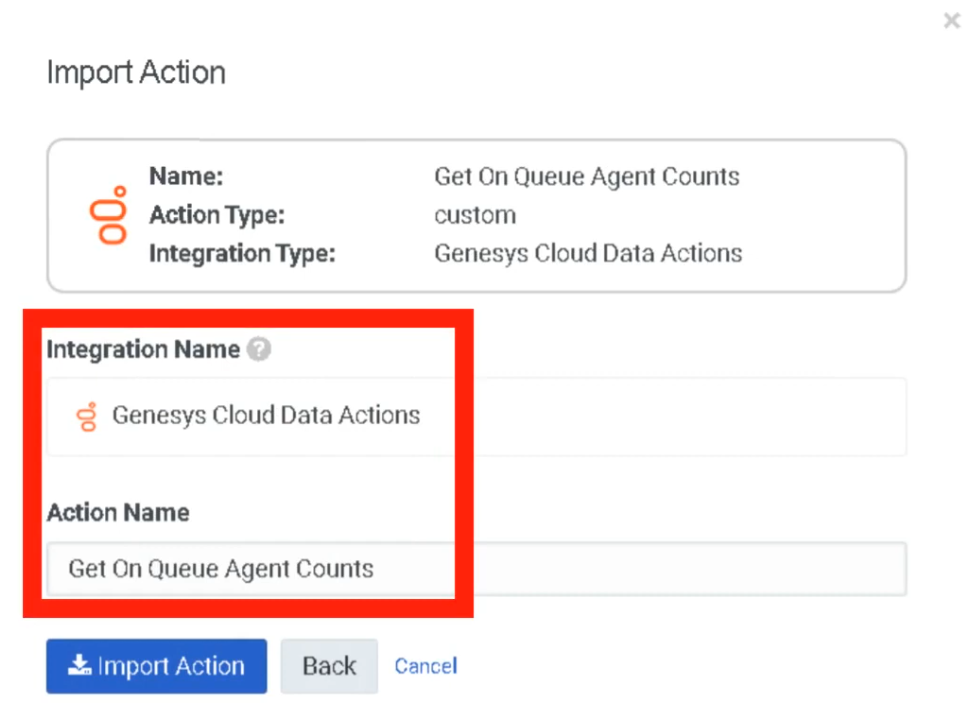
Step 2 — Create a Data Action
Token Request Example (Client Credentials)
POST /oauth/token
Host: login.mypurecloud.com
Authorization: Basic BASE64(client_id:client_secret)
Content-Type: application/x-www-form-urlencoded
grant_type=client_credentials
Security Best Practices
| Practice | Reason |
|---|---|
| Use least-privilege roles | Minimize blast radius if credentials are compromised |
| Store Client Secret in a secure vault immediately | It cannot be retrieved after creation — only regenerated |
| Set shortest acceptable token lifetime | Reduces window of exposure for a leaked token |
| Use PKCE instead of Implicit Grant | More secure — prevents authorization code interception |
| Rotate secrets periodically | Reduces risk from long-term credential exposure |
| Monitor via Platform Usage dashboard | Detect abnormal API call patterns |
| Document all OAuth clients | Maintain governance — know what every client is used for |
Troubleshooting
| Issue | Likely Cause | Resolution |
|---|---|---|
| Token request fails | Wrong Client ID or Secret | Verify credentials — regenerate secret if lost |
| API access denied | Role missing required permission | Assign correct role to OAuth client |
| Token expired | Lifetime exceeded | Reduce token duration or implement token refresh logic |
| Roles tab not visible | Grant type is not Client Credentials | Switch grant type — Roles only appear for Client Credentials |
| Secret not visible after creation | Expected — security change Nov 2025 | Copy at creation time; regenerate if lost |
| Integration fails after secret rotation | Old secret cached | Update integration configuration with new secret |
Interview Cheat Sheet
| Question | Answer |
|---|---|
| What is OAuth used for in Genesys Cloud? | Authenticate applications and authorize API access without exposing user credentials |
| What are the current supported grant types? | Client Credentials, Authorization Code / PKCE, SAML2 Bearer (Implicit Grant deprecated May 2026) |
| Which grant type is most common for admin integrations? | Client Credentials |
| When does the Roles tab appear? | Only after selecting Client Credentials as the grant type |
| What is the token lifetime range? | 300 seconds (5 min) to 172,800 seconds (48 hrs); SCIM up to 450 days |
| What is Genesys' recommended token duration? | 64,800 seconds (18 hours) — aligns with a typical agent workday |
| What happens to the Client Secret after creation? | It is only viewable once — copy it immediately; regenerate if lost |
| What is PKCE? | Proof Key for Code Exchange — replacement for Implicit Grant; prevents auth code interception |
| What is the max number of redirect URIs? | 125 |
| When must Implicit Grant clients migrate to PKCE? | By May 2027 |
Authorized Applications
| Section | Detail |
|---|---|
| Navigation | Admin → Integrations → Authorized Applications |
| Alt Navigation | Menu → IT and Integrations → Authorized Applications |
| Required Permission | OAuth > Client > Authorize |
| Purpose | View, modify, and revoke OAuth application access to your Genesys Cloud organization |
| Module Context | Part of Integration Management in Genesys Cloud |
✅ Verified against Genesys Cloud Resource Center — March 2026
Overview
💡 Authorized Applications vs. Authorized Organizations: These are two different features. Authorized Organizations grants user access across orgs (pairing). Authorized Applications grants application access via OAuth scopes — used for integrations, AppFoundry apps, and third-party tools.
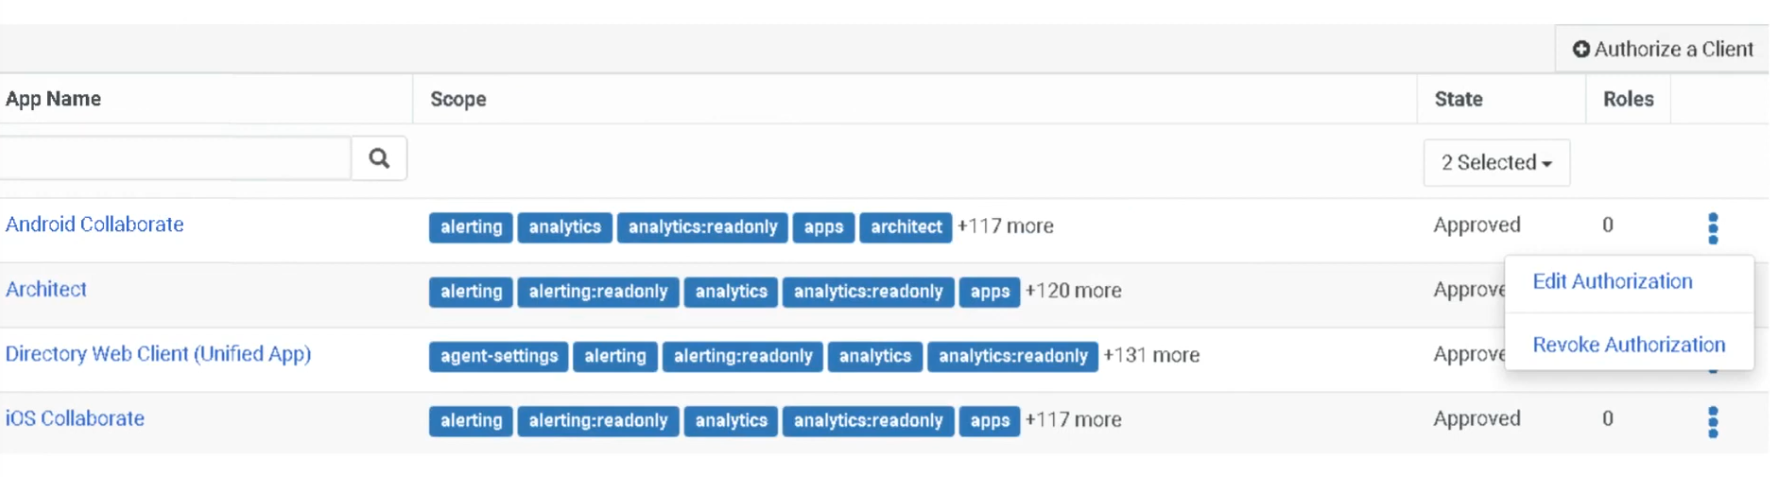
Authorized Applications View — Columns
| Column | Description |
|---|---|
| App Name | Name of the authorized OAuth client application. Click the name to edit its scope or revoke its authorization. |
| Scope | The OAuth scopes granted to the application. Scopes define exactly what the app is allowed to do within your org. |
| State | Current authorization status of the application — Approved, Pending, or Revoked. Use the State dropdown to filter by status. |
| Role | Displays the number of roles available to the application (not the role names). |
| Actions | Click More (⋮) to open the action menu — options are Edit Authorization or Revoke Authorization. |
Application States
| State | Meaning |
|---|---|
| Approved | Application is authorized and can obtain access tokens |
| Pending | Authorization request has been submitted but not yet approved |
| Revoked | Authorization has been removed — app cannot obtain access tokens |
⚠️ Revocation is permanent and cannot be undone. A revoked application cannot get a new access token. To restore access, you must fully reauthorize the application from scratch.
Key Concepts
| Topic | Explanation |
|---|---|
| Authorized Application | An application that has been granted permission to access Genesys Cloud via OAuth |
| OAuth Client | The credential set (Client ID / Secret) that an application uses to authenticate and request tokens |
| Scopes | Define the specific API permissions granted to an application — limit what the app can access or do on behalf of a user or org |
| Roles | Determine the level of access the application has within Genesys Cloud (assigned per application, visible as a count in the view) |
| Revocation | Immediately and permanently blocks the application from obtaining access tokens — reauthorization required to restore |
Navigation
| Task | Steps |
|---|---|
| View Authorized Applications | Admin → Integrations → Authorized Applications |
| Edit Application Scopes | Click More (⋮) beside the application → Edit Authorization → select/deselect scopes → Save |
| Revoke Application Access | Click More (⋮) beside the application → Revoke Authorization → confirm Revoke |
| Filter by Application State | Use the State dropdown to filter by Approved, Pending, or Revoked |
| Open App Details | Click the application name directly |
Editing Application Authorization
To modify the scopes assigned to an application:
- Locate the application in the list
- In the Actions column, click More (⋮)
- Select Edit Authorization (or click the app name directly)
- Select or deselect scopes as required
- Click Save
💡 Only modify scopes to what the application actually needs. If unsure whether a scope is required, check with the application developer before approving.
Revoking Application Authorization
- Locate the application in the list
- In the Actions column, click More (⋮)
- Select Revoke Authorization
- Confirm by clicking Revoke
⚠️ Revocation is immediate and irreversible. The app loses the ability to obtain access tokens instantly. To restore access, the application must be fully reauthorized.
Authorization Workflow
External Application
↓
OAuth Client Authentication (Client ID + Secret)
↓
Application Requests Authorization
↓
Admin Reviews & Approves in Authorized Applications
↓
Scopes Assigned
↓
Access Token Issued
↓
Application Accesses Genesys Cloud APIs
Dependencies
| Component | Purpose |
|---|---|
| OAuth Clients | Authorized applications rely on OAuth client credentials for authentication |
| Scopes | Define granular API permissions — limit app access beyond just role-based permissions |
| Roles & Permissions | Determine what actions an application can perform inside Genesys Cloud |
| Genesys Cloud Platform API | The API endpoints that authorized applications access via OAuth tokens |
| Data Actions | Architect flows may call data actions that rely on authorized OAuth apps |
| Platform Usage (API Usage) | API activity from authorized apps appears in the API Usage report and view |
Usage Scenarios
| Scenario | Description |
|---|---|
| CRM Integration | Authorize a CRM system to sync customer data with Genesys Cloud |
| Analytics Platforms | Grant read access to retrieve interaction and performance data |
| Automation Systems | Authorize tools that execute automated workflows via the Platform API |
| Custom Applications | Internal or partner-built apps requiring scoped API access |
| AppFoundry Apps | Marketplace applications authorized through this view |
Best Practices
| Practice | Reason |
|---|---|
| Regularly review authorized apps | Ensure only trusted, active applications have access |
| Apply least-privilege scopes | Limit application permissions to only what is required |
| Revoke unused or retired applications | Reduce attack surface and security risk |
| Monitor API activity | Detect unusual usage from authorized apps via the API Usage report |
| Confirm scopes with app developers | Avoid granting unnecessary permissions during authorization |
| Document all authorized integrations | Maintain governance and auditability over external access |
Security Considerations
| Security Control | Description |
|---|---|
| Scope Control | Applications can only access permitted API scopes — not the full platform |
| Role Assignment | Assign minimal required roles to limit application reach |
| Revocation Capability | Ability to revoke application access instantly if a threat is detected |
| API Monitoring | Monitor API calls from authorized apps via Platform Usage |
| Credential Protection | OAuth Client ID and Secret must be protected by the application owner |
Limitations & Constraints
| Constraint | Description |
|---|---|
| OAuth Dependency | Applications must use OAuth to appear in Authorized Applications |
| Revocation is irreversible | Once revoked, the app cannot get a token — must be reauthorized from scratch |
| Scope-only editing | Edit Authorization modifies scopes only, not other application settings |
| Role count, not names | The Role column shows the number of roles, not which roles are assigned |
Troubleshooting
| Issue | Cause | Resolution |
|---|---|---|
| Application cannot access API | Missing or incorrect scope | Edit Authorization and add the required scope |
| Authorization fails at login | OAuth client misconfigured | Verify Client ID and Secret in Admin → Integrations → OAuth |
| Access denied on API call | Role permissions insufficient | Review and assign appropriate roles to the OAuth client |
| App shows as Revoked unexpectedly | Access was revoked by an admin | Reauthorize the application from scratch |
| Integration failure after change | Authorization revoked or scope removed | Reauthorize or restore the required scope via Edit Authorization |
Exam Cheat Sheet
| Question | Answer |
|---|---|
| What are Authorized Applications? | Applications granted OAuth permission to access Genesys Cloud APIs |
| What permission is required to manage them? | OAuth > Client > Authorize |
| Where are they managed? | Admin → Integrations → Authorized Applications |
| What are the three application states? | Approved, Pending, Revoked |
| What does Edit Authorization change? | Only the OAuth scopes assigned to the application |
| What does the Role column show? | The number of roles available — not the role names |
| What happens when you revoke an app? | It immediately loses the ability to get access tokens — cannot be undone |
| How do you restore a revoked app? | Fully reauthorize it from scratch |
| How is this different from Authorized Organizations? | Authorized Organizations grants user access across orgs; Authorized Applications grants application-level API access via scopes |
| What do scopes control? | The specific API permissions an app has — an additional layer beyond role-based permissions |
See Also
- OAuth Clients (
Admin → Integrations → OAuth) — where OAuth client credentials are created and managed - Authorize an OAuth Client — process for approving a new application
- About OAuth Scopes for Applications — full scope reference on the Genesys Developer Center
- Authorized Organizations — separate feature for granting user (not application) access across orgs
- Platform Usage → API Usage — monitor API activity from authorized applications
Single Sign-On (SSO)
| Section | Detail |
|---|---|
| Navigation | Admin → Integrations → Single Sign-On |
| Alt Navigation | Menu → IT and Integrations → Single Sign-On |
| Required Permission | Single Sign-On > Provider > Add, Delete, Edit, View |
| Also Requires | Admin role in your organization's identity provider account |
| Protocol | SAML 2.0 |
| Max SSO Integrations | Up to 30 per organization (same or mixed IdPs) |
| Module Context | Part of Integration Management / Platform Access Control |
✅ Verified against Genesys Cloud Resource Center — March 2026
Overview
Genesys Cloud SSO allows users to authenticate using existing corporate identity provider (IdP) credentials instead of separate Genesys usernames and passwords. Genesys Cloud acts as the Service Provider (SP) and delegates authentication to a trusted external Identity Provider (IdP) via the SAML 2.0 protocol.
Genesys Cloud uses a client integration strategy — rather than supporting fully open-ended custom SAML integrations, it provides pre-built integrations for common providers and a Generic SSO Provider option for any IdP that supports SAML 2.0.
💡 SSO vs. OAuth: SSO authenticates users into the platform. OAuth authenticates applications and integrations to access the Platform API. They serve different purposes and work alongside each other.
Key Concepts
| Topic | Explanation |
|---|---|
| Identity Provider (IdP) | External authentication service (e.g., Microsoft Entra ID / Azure AD, Okta, Google Workspace, OneLogin) |
| Service Provider (SP) | Genesys Cloud — receives and validates SAML assertions from the IdP |
| SAML 2.0 | Open standard protocol for exchanging authentication information between IdP and SP |
| SAML Assertion | Cryptographically signed XML message the IdP sends to Genesys Cloud confirming user identity |
| Metadata File | XML file provided by the IdP containing Issuer URI, SSO URL, SLO URL, and certificate info — importing it auto-populates Genesys Cloud config fields |
| SP-Initiated SSO | User starts at Genesys Cloud login page → redirected to IdP → authenticated → returned to Genesys Cloud |
| IdP-Initiated SSO | User logs into IdP portal → selects Genesys Cloud → lands directly in the platform |
| Clock Skew Limit | The time difference between Genesys Cloud and the IdP cannot exceed 10 seconds — larger skew causes authentication failures |
Supported Identity Providers
Genesys Cloud provides pre-built integrations for the most common SAML 2.0 providers including Microsoft Entra ID (Azure AD), Okta, Google Workspace, OneLogin, and others. A Generic SSO Provider option is also available for any IdP that supports SAML 2.0.
💡 If your IdP is not listed, use the Generic SSO Provider tab. You can also submit a request to Genesys to have your provider added.
Prerequisites
| Requirement | Detail |
|---|---|
| Genesys Cloud permission | Single Sign-On > Provider > Add, Delete, Edit, View |
| Identity provider admin access | Admin role in your organization's IdP account |
| Matching email address | User email must be the same in both the IdP account and Genesys Cloud |
| IdP metadata file | XML file from your IdP containing issuer URI, SSO URL, SLO URL, and certificate |
| Encoded public certificate | X.509 certificate from your IdP for SAML signature validation |
| Users pre-provisioned | Users must already exist in Genesys Cloud before authenticating via SSO |
SSO Page Overview
The Single Sign-On page lists all configured SSO integrations with the following details per integration:
| Column | Description |
|---|---|
| Name | Login display name for the SSO integration |
| Logo | Provider logo displayed on the login page |
| Identity Provider | Name of the IdP type configured |
| Certificate Expiration | Expiry date of the X.509 certificate — monitor to prevent auth failures |
| Actions | Click More (⋮) to edit or delete the integration |
Columns can be sorted by Name, Identity Provider, and Certificate Expiration. The page also provides buttons to Add an Identity Provider and Download Genesys Certificate.
⚠️ Only 6 SSO integrations display directly on the Genesys Cloud login page. If more than 6 are configured, the additional providers appear in a dropdown list on the login page.
Creating an SSO Integration
Step-by-Step
- Click Admin → Integrations → Single Sign-On
- Click Add an Identity Provider
- Enter a name for the integration
- Select Display Name On Login Page if you want the name visible on the login screen (not available if you have more than 6 providers)
- Select or type your Identity Provider Name from the list
- Upload a logo (SVG format only, max 25 KB) — or drag and drop the file
- In the Identity Provider Data section, click Select SAML metadata to import (or drag and drop the file) — this auto-populates all required fields
- Review and confirm the populated fields
- Click Save
After saving, Genesys Cloud generates its own SAML metadata for you to provide back to your IdP.
Identity Provider Configuration Fields
| Field | Description |
|---|---|
| Issuer URI | The IdP's unique Issuer ID (entityID) |
| Single Sign-On URI | The IdP's SSO URL where authentication requests are sent |
| Single Sign-On Binding | Sign-in binding specified by the IdP |
| Sign Authentication Requests | Optional — digitally signs outbound SAML requests for added security |
| Single Logout URI | The IdP's logout URL |
| Single Logout Binding | Logout binding specified by the IdP (default: HTTP Redirect) |
| Name Identifier Format | Format specified by the IdP (use Unspecified if unknown) |
| Certificate | X.509 certificate for SAML signature validation — supports up to 5 certificates per SSO config for continuity during rotation |
💡 Importing the IdP metadata file automatically populates all of the above fields.
Certificate Management
Each SSO integration supports up to 5 X.509 certificates. This allows certificate rotation without breaking authentication — if one certificate expires or becomes invalid, Genesys Cloud uses the next valid certificate automatically.
To download the Genesys Cloud certificate to send to your IdP, click Download Genesys Certificate on the SSO page.
SAML Assertion Decryption (November 2025)
Genesys Cloud supports SAML assertion decryption, adding an additional security layer for SSO. IdPs can encrypt SAML assertions using the Genesys Cloud public encryption certificate — Genesys Cloud then decrypts the assertion securely during authentication.
- No configuration required in Genesys Cloud to enable this
- Download the Genesys Encryption Certificate from either the main SSO page or the individual provider config page and send it to your IdP to configure encrypted assertions on their end
SAML Attributes
If the following attributes are present in the SAML assertion, Genesys Cloud acts on them. All attributes are case-sensitive.
| Attribute | Behaviour |
|---|---|
| AuthorizedClientIDs | Enumerates which OAuth client IDs the authenticated user is authorized to access. If the user attempts to access an unlisted client, they are redirected back to the IdP for re-verification. Useful for controlling access to specific apps (e.g., WebRTC Media Helper, Genesys Tempo) without using the more restrictive IP Allowlist feature. |
| OrganizationName | For IdP-initiated SSO: use the org short name. For SP-initiated SSO: must match the org name selected at login. Required when one IdP manages multiple Genesys Cloud orgs. |
| ServiceName | Optional. A valid URL to redirect to after successful authentication, or one of these keywords: directory (redirects to Genesys Cloud Collaborate) or directory-admin (redirects to the Admin UI). |
SSO Authentication Workflow
User Opens Genesys Cloud Login
↓
Selects SSO Provider (SP-Initiated)
— OR —
Logs into IdP Portal (IdP-Initiated)
↓
Redirected to Identity Provider
↓
User Authenticates with Corporate Credentials
↓
IdP Sends Signed SAML Assertion to Genesys Cloud
↓
Genesys Cloud Validates Assertion (certificate + clock skew check)
↓
User Session Created — Access Granted per Genesys Roles
Genesys Cloud Metadata Exchange
Pairing requires configuration on both sides:
| Direction | What to Exchange |
|---|---|
| IdP → Genesys Cloud | IdP provides SAML metadata XML (Issuer URI, SSO URL, SLO URL, certificate) |
| Genesys Cloud → IdP | After saving, download Genesys Cloud SAML metadata and send to your IdP for their configuration |
Limitations & Constraints
| Constraint | Detail |
|---|---|
| Protocol | Only SAML 2.0 supported for SSO |
| User pre-provisioning required | Users must exist in Genesys Cloud before SSO authentication |
| Clock skew | Max 10 seconds allowed between Genesys Cloud and IdP system clocks |
| Max integrations | Up to 30 SSO configurations per org |
| Login page display limit | Only 6 SSO providers shown directly on login page; additional providers appear in dropdown |
| Logo format | SVG only, max 25 KB |
| Certificates per config | Maximum of 5 X.509 certificates per SSO integration |
| Assertion encryption | Genesys Cloud does not support assertion encryption for outbound requests — channel is TLS-encrypted instead |
| Desktop app limitation | The Genesys Cloud desktop app does not support browser extensions. Azure Conditional Access policies requiring a browser extension will not work with the desktop app — use a supported browser instead |
| Dual-side configuration | SSO requires configuration both in Genesys Cloud and in the identity provider |
Best Practices
| Practice | Reason |
|---|---|
| Use a trusted, enterprise-grade IdP | Ensures reliable and secure authentication |
| Enforce MFA at the IdP level | Adds a second factor before SAML assertion is issued |
| Upload multiple certificates proactively | Prevents auth failures during certificate rotation |
| Monitor certificate expiration dates | Expired certificates silently break SSO logins |
| Test SSO in a non-production org first | Avoid login disruptions when rolling out |
| Keep IdP and SP clock times in sync | Clock skew > 10 seconds causes authentication failures |
| Document all SSO integrations | Maintain governance, especially when managing up to 30 configs |
Troubleshooting
| Issue | Cause | Resolution |
|---|---|---|
| SSO login failure | Incorrect SAML configuration | Re-import metadata file and verify all fields |
| Invalid assertion error | Certificate mismatch | Update or upload the correct certificate |
| User cannot authenticate | User not provisioned in Genesys Cloud | Create the user account before they attempt SSO login |
| Login redirect loop | Incorrect IdP SSO URL or binding | Verify SSO URI and binding type in config |
| Clock skew error | System time difference > 10 seconds | Sync clocks between Genesys Cloud and IdP |
| SSO not working in desktop app | Browser extension required by Azure policy | Use a supported browser with the extension installed |
| More than 6 providers not visible on login | Login page limit reached | Providers 7+ appear in a dropdown — expected behaviour |
Exam Cheat Sheet
| Question | Answer |
|---|---|
| What protocol does Genesys Cloud SSO use? | SAML 2.0 |
| What permission is required to configure SSO? | Single Sign-On > Provider > Add, Delete, Edit, View |
| Where is SSO configured? | Admin → Integrations → Single Sign-On |
| How many SSO integrations can one org have? | Up to 30 |
| How many providers appear directly on the login page? | 6 — additional providers appear in a dropdown |
| What does importing a SAML metadata file do? | Auto-populates all IdP config fields |
| What is the max number of certificates per SSO config? | 5 — allows rotation without breaking authentication |
| What is the clock skew limit? | 10 seconds between IdP and Genesys Cloud |
| What are the two authentication flows? | SP-Initiated (starts at Genesys login) and IdP-Initiated (starts at IdP portal) |
| Do users need to exist in Genesys Cloud for SSO? | Yes — users must be pre-provisioned before they can SSO in |
| What is SAML assertion decryption? | A feature (added Nov 2025) where IdPs encrypt assertions using Genesys's public encryption cert — no Genesys config required |
| What does the AuthorizedClientIDs SAML attribute do? | Controls which OAuth clients an SSO-authenticated user can access |
| What logo format is required for SSO providers? | SVG only, max 25 KB |
| Does the Genesys desktop app support SSO with browser extensions? | No — Azure Conditional Access policies requiring browser extensions won't work with the desktop app |
Chapter Placement
✅ SSO belongs in the same chapter as OAuth Clients, Authorized Applications, and Authorized Organizations — all fall under Integration Management / Platform Access Control within the Platform Operations chapter. They form a cohesive set of topics covering how users and applications authenticate and gain access to Genesys Cloud.
See Also
- OAuth Clients (
Admin → Integrations → OAuth) — application-level authentication, counterpart to user-level SSO - Authorized Applications — manage OAuth application scopes and revocation
- Authorized Organizations — grant user access across Genesys Cloud orgs (pairing)
- Generic SSO Provider — configure SSO for any SAML 2.0-compatible IdP not in the pre-built list
- Configure Genesys Cloud to Authenticate with SSO Only — optionally disable native Genesys login entirely
Audit Viewer
| Section | Description |
|---|---|
| Feature Area | Troubleshooting / IT and Integrations |
| Navigation | Admin → Troubleshooting → Audit Viewer |
| Alt Navigation | Menu → IT and Integrations → Audit Viewer |
| Primary Function | Monitor, filter, and review all admin configuration change events across the Genesys Cloud organization |
| Typical Use Cases | Compliance auditing, change management, security review, troubleshooting unexpected configuration changes |
The Audit Viewer enables administrators to filter and view events that Genesys Cloud generates based on service actions for administrative functions. It provides two modes: a full-page viewer with detailed filtering and a mini footer viewer accessible from any admin page.
Study Notes
| Topic | Explanation |
|---|---|
| Audit Viewer | Tool that logs and displays admin-level configuration events across the org |
| Full-Page Viewer | Main audit interface with complete filtering and event detail — opened from Admin or Menu |
| Mini Viewer (Footer) | Lightweight version available at the bottom of any admin page; less detail than full viewer |
| Event | A logged action triggered by a user or an upstream service/API |
| Entity | The object being acted upon (e.g., a queue, a flow, a user) |
| Property Changes | Detail view shows values before and after each change |
| Related Events | Upstream or downstream events linked to the selected event |
| RemoteIP | IP address of the user who triggered the event (visible in event details) |
| Real-time vs Async | The UI viewer shows real-time query results only; async queries require the API or Amazon EventBridge |
| Amazon EventBridge | Integration that allows orgs to consume all audit events — useful for backup or ingestion into external log tooling |
Permissions
| Action | Permission Required |
|---|---|
| View audit events | Audits > Audit > View |
| View interaction audit trail (separate) | Audits > Interaction Details > View |
The Admin role is also listed as a prerequisite for full use of the Audit Viewer.
Navigation
| Task | Path |
|---|---|
| Open full-page viewer | Admin → Troubleshooting → Audit Viewer |
| Alt full-page path | Menu → IT and Integrations → Audit Viewer |
| Open mini footer viewer | Bottom of any admin page under Menu → IT and Integrations → hover → click Show audits footer |
| Close mini footer viewer | Click Hide audits footer |
| Go from footer to full page | Click Link to full page audit viewer icon in the footer |
Viewer Modes
| Mode | Description | Detail Level |
|---|---|---|
| Full-Page Viewer | Main audit log interface with date range, service filter, entity filter, user filter, and event detail panel | Full |
| Mini Viewer (Footer) | Lightweight footer panel visible from any admin page | Limited |
Filtering Options (Full-Page Viewer)
| Filter | Description |
|---|---|
| Date Range | Select Start and End dates/times. Default: current day. Maximum interval: last 14 days |
| Filter by Service | Select Service Name → Entity Type → Action to narrow results |
| Filter by Entity | Enter an Entity ID to find all events affecting a specific object (e.g., a specific queue ID) |
| Filter by User | Enter a user name to see all events performed by that user |
| Refresh | Apply filters and reload results |
Important: The UI viewer only supports queries for the last 14 days. For events older than 14 days, use the Audit APIs available in the Genesys Cloud Developer Center.
Event Detail View
Clicking any event in the results opens the Details panel, which shows:
| Detail Field | Description |
|---|---|
| Who performed the action | User name, or API / upstream service if system-generated |
| Causing event link | If an upstream service triggered the event, a related link is available |
| RemoteIP | IP address of the user who triggered the event |
| Property Changes | Before and after values for each changed property |
| Related Events | Linked upstream or downstream events — click See related audits |
Data Retention & API Access
| Method | Scope | Notes |
|---|---|---|
| Audit Viewer UI | Last 14 days (real-time query) | Date interval cannot exceed 14 days |
| Audit APIs (Developer Center) | Beyond 14 days | Use asynchronous query endpoints |
| Amazon EventBridge | All available audit events | Useful for backup or ingestion into external SIEM/log tooling |
Interaction Audit Trail (Related but Separate Feature)
The Audit Viewer covers org-wide admin changes. There is a separate Audit Trail tab on individual interactions that tracks recording and evaluation-level access:
| Attribute | Detail |
|---|---|
| Navigation | Performance → Workspace → Interactions → click interaction → Audit Trail tab → Load All Audits |
| Alt Navigation | Menu → Analytics → Analytics Workspace → Interactions tab |
| Permission Required | Audits > Interaction Details > View |
| Roles | Quality Administrator, Quality Evaluator |
| Objects tracked | Evaluations, Annotations, Recordings, Calibrations, Screen Recordings, Surveys |
Compliance Use Cases
| Regulation | How Audit Viewer Helps |
|---|---|
| GDPR | Track who accessed or changed user/contact data configurations |
| HIPAA | Verify access controls and configuration change history |
| PCI-DSS | Audit routing, recording, and security configuration changes |
| Internal Change Management | Identify who changed a queue, flow, role, or schedule and when |
Best Practices
| Practice | Reason |
|---|---|
| Review audit logs regularly | Required by many compliance frameworks |
| Use Filter by Service to scope searches | Reduces noise when investigating a specific area |
| Use Filter by Entity for targeted investigations | Quickly find all changes to a specific object by its ID |
| Export or stream to external tooling via EventBridge | Retain events beyond the 14-day UI window |
Grant Audits > Audit > View only to appropriate roles |
Audit logs contain sensitive config change history |
Key Takeaways
| Topic | Summary |
|---|---|
| Navigation | Admin → Troubleshooting → Audit Viewer or Menu → IT and Integrations → Audit Viewer |
| Permission | Audits > Audit > View |
| Viewer modes | Full-page (detailed) and mini footer (lightweight) |
| Date limit | Last 14 days in UI; older data via Audit API |
| Event details | Who, what, before/after values, RemoteIP, related events |
| Filtering | By date range, service, entity ID, or user |
| Real-time only | UI shows real-time query results; async data via API or EventBridge |
| Interaction Audit Trail | Separate feature on individual interactions — different permission and navigation |
GDPR and Data Subject Requests
| Section | Description |
|---|---|
| Feature Area | Platform Operations / Compliance |
| Navigation | API-based (Developer Center) — no dedicated Admin UI page |
| Alt Navigation (Audit Viewer) | Admin → Troubleshooting → Audit Viewer (for change-event monitoring) |
| Primary Function | Enable organizations to respond to data subject requests for access, rectification, and deletion of personal data under GDPR, CCPA, and similar regulations |
| Genesys Role | Data Processor (under GDPR Article 28) — customers are the Data Controllers |
Study Notes
| Topic | Explanation |
|---|---|
| GDPR | General Data Protection Regulation — EU regulation protecting individuals' rights over their personal data |
| Data Subject | The individual whose personal data is being processed — your contact center's customer |
| Data Controller | The organization that determines how and why personal data is processed — your organization |
| Data Processor | The vendor that processes data on behalf of the controller — Genesys Cloud |
| DPA | Data Processing Agreement — a contract required under GDPR Article 28 between controller and processor; contact dataprivacy@genesys.com |
| GDPR API | Genesys Cloud's preferred self-service mechanism for customers to respond to data subject requests |
| Rate Limits | The GDPR API is rate-limited — it is designed for individual requests, not bulk deletion |
| CCPA | California Consumer Privacy Act — data subject rights are similar to GDPR; Genesys Cloud uses the same GDPR API to respond to CCPA requests |
| No enabling required | GDPR compliance does not require any Genesys Cloud configuration to be enabled — the GDPR API is available to all customers |
| No GDPR certification | No official GDPR certification exists for cloud providers; Genesys Cloud maintains compliance through independent reviews (HIPAA audits, etc.) |
The Three Fundamental Data Subject Rights (Relevant Articles)
| GDPR Article | Right | GDPR API Request Type |
|---|---|---|
| Article 15 | Right of Access | Export — retrieve all personal data Genesys Cloud holds for this subject |
| Article 16 | Right to Rectification | Update — correct/update personal data |
| Article 17 | Right to Erasure ("Right to be Forgotten") | Delete — remove or anonymize personal data |
When the request type is Delete, some services may anonymize personal data rather than fully delete it, depending on the service. Processing happens asynchronously — the request is created and initiated but may not complete immediately.
GDPR API — Two Endpoints
1. Subjects Endpoint
Used to identify which subjects match a given search term before submitting a request.
| Attribute | Detail |
|---|---|
| Purpose | Find which individuals a search term matches — reduces risk of accidental data changes |
| Accepted search term types | Name · Address · Phone number · Email address · Social media handle |
| Returns | List of matching subjects — each is a userId, externalContactId, or dialerContactId |
| Best practice | Always use subjects endpoint first before submitting a requests endpoint call |
2. Requests Endpoint
Used to initiate an actual GDPR request (Get, Export, Update, or Delete).
| Attribute | Detail |
|---|---|
| Accepted search term types | Name · Address · Phone · Email · Social media handle · User ID · External Contact ID · Dialer Contact ID |
| Request types | Get · Export (Article 15) · Update (Article 16) · Delete (Article 17) |
| Multiple identifiers | Submit one request per identifier — if a person has name + phone + email, submit three separate requests |
| ID resolution | If a User ID or External Contact ID is provided, Genesys resolves it to the full record first |
| Processing | Asynchronous |
Services That Require a Subject to Be Included
The following services require a subject (not just a search term) in the GDPR API request:
- Outbound Dialing
- Directory
- External Contacts
Social Media Search Fields
| Channel | Searchable Fields |
|---|---|
| Twitter / X | screenName (@ handle) · id (account ID) |
scopedId · handle (username) |
|
scopedId |
|
| Apple Messages for Business | opaqueId (Apple-generated per-account identifier) |
File Attachments in ACD Interactions
Genesys Cloud does not search the contents of file attachments for personal data. Instead:
- A GDPR request using an External ID will find the conversation and any associated file attachments
- On a Delete request, associated file attachments are removed regardless of content
- Requirement: ACD interactions containing personal data in file attachments must be associated with a contact profile in External Contacts — otherwise they cannot be found via the GDPR API
Merged Contacts (Single Customer View)
If your org uses the single customer view (contact merging):
| Step | Action |
|---|---|
| Subjects endpoint | May return multiple External Contact IDs for the same person (same merge set) |
| Identify merge sets | Use External Contacts API — fetch each contact and check canonicalContact field |
| Requests endpoint | Submit only one request per merge set using the canonical contact ID |
| Behavior | GDPR API automatically duplicates the request for each contact in the merge set |
| Related requests | Each related request succeeds or fails independently — inspect each individually |
What Personal Data Should NOT Be Stored in Genesys Cloud
To ensure the GDPR API can locate and manage personal data correctly, avoid storing personal data in these locations:
| Location | Why to Avoid |
|---|---|
| Architect flow names, descriptions, state names, task names, action names | GDPR API cannot search these |
| Prompt text-to-speech values | Not searchable |
| Directory personal status | Not searchable via GDPR API |
| Custom attributes (unless associated with an External Contact) | GDPR API cannot find data in custom variables unless linked to a contact |
Response Timeframes (Approximate)
| Request Type | Approximate Processing Time |
|---|---|
| Access / Export (Article 15) | 1–2 days |
| Removal / Delete (Article 17) | Up to 14 days |
These are approximate values. Actual times may vary.
Genesys Cloud's GDPR Governance Structure
| Role | Responsibility |
|---|---|
| Chief Privacy Officer | Oversees company-wide data privacy program |
| European Data Protection Officer (DPO) | Oversees compliance with European data protection law |
| VP Security & GRC | Security and regulatory compliance oversight |
| Security & Compliance team | Holds IAPP (International Association of Privacy Professionals) certification |
GDPR and Other Regulations
| Regulation | How Genesys Cloud Addresses It |
|---|---|
| GDPR (EU) | GDPR API; data processor role; DPA available; IAPP-trained staff |
| CCPA (California) | Same GDPR API handles CCPA data subject requests — no separate configuration needed |
| HIPAA | Independent third-party audits |
| PCI DSS | Secure call flows; recording controls; policy exclusions |
| HDS (France) | Genesys Cloud has undergone independent audit to achieve HDS certification |
| LGPD (Brazil) | Aligned with GDPR principles |
Best Practices
| Practice | Reason |
|---|---|
| Always use the subjects endpoint first | Identify exact individuals before submitting a modification or deletion request |
| Submit a request per identifier | If the person has a name, phone, and email — submit three separate requests |
| Associate ACD interactions with External Contact profiles | Required for GDPR API to locate file attachments |
| Do not store PII in flow names or prompt values | GDPR API cannot search these |
| Do not use GDPR API for bulk deletion | Rate limits will restrict bulk operations — use the API for individual requests only |
| Contact dataprivacy@genesys.com for DPA | Required under GDPR Article 28 for organizations subject to GDPR |
Key Takeaways
| Topic | Summary |
|---|---|
| Genesys role | Data Processor — you are the Data Controller |
| GDPR API | Preferred self-service solution for responding to data subject requests |
| Two endpoints | Subjects (identify who) → Requests (initiate the action) |
| Request types | Export (Article 15) · Update (Article 16) · Delete (Article 17) |
| Delete behavior | Some services anonymize rather than fully delete |
| Processing | Asynchronous |
| Rate limits | Designed for individual requests only — not bulk operations |
| No UI | GDPR API is developer/API-based — no Admin UI page |
| CCPA | Same GDPR API handles CCPA requests |
| Timeframes | Access: 1–2 days; Removal: up to 14 days |