5. - Architect & Call Flows
Architect Overview
Navigation: Admin → Architect (opens in a separate browser window)
Last verified: Genesys Cloud Resource Center — March 2026
What Is Architect?
Architect is Genesys Cloud's visual flow design environment. It is where administrators build, manage, and publish the interaction routing logic that handles every inbound call, message, email, and chat that enters the contact center.
Architect operates independently from the Admin console — it opens in its own browser window and has its own toolbar, canvas, and toolbox.
⚠️ If Architect does not open, check your browser's pop-up blocker and allow pop-ups from your Genesys Cloud domain.
Accessing Architect
- Log in to Genesys Cloud
- Click Admin
- Search or scroll to Architect
- Architect opens in a new browser window
Interface Areas
| Area |
Description |
| Toolbar |
Save, validate, publish, version history, debug, and execution history controls |
| Toolbox |
Drag-and-drop action categories used to build flow logic |
| Workspace |
Flow design canvas where components are placed and connected |
| Properties Panel |
Configuration panel for the currently selected component |
| Flow Outline |
Auto-generated structural outline of the flow |
Available categories vary by flow type and license plan.
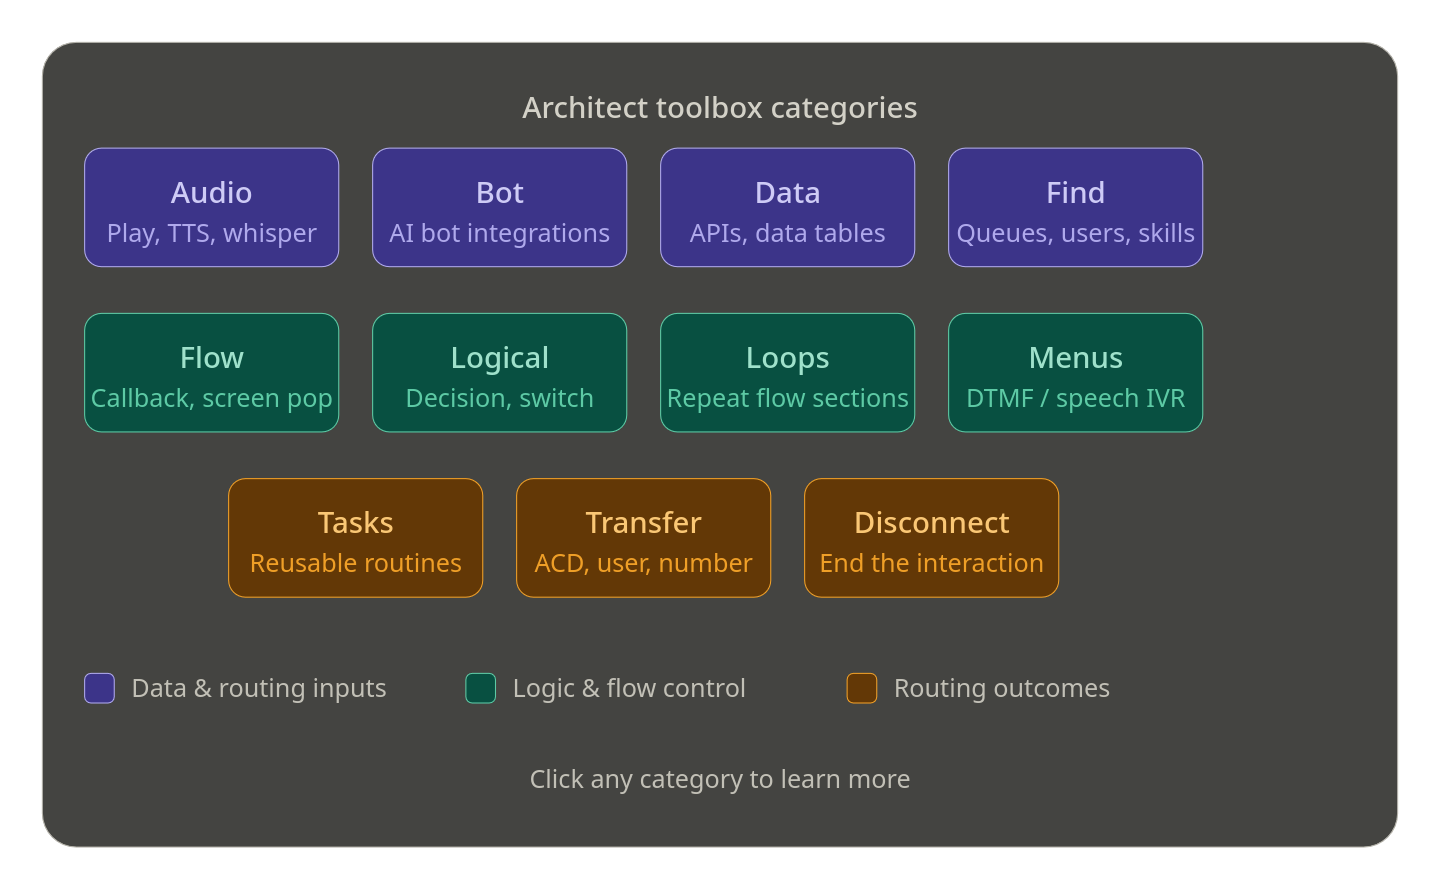
| Category |
Description |
| Audio |
Play prompts (TTS or recorded), whisper audio to agents, flush queued audio |
| Bot |
Integrate conversational AI bots (Genesys Dialog Engine or external platforms) |
| Data |
Retrieve or manipulate data via APIs, data tables, or external services — includes Call Data Action, Data Table Lookup, Update Data, Encrypt/Decrypt Data |
| Find |
Dynamically locate resources at runtime — queues, users, schedules, groups, language skills |
| Flow |
Interaction-level actions — Create Callback, Set Screen Pop, Set Wrap-Up Code, post-flow routing |
| Logical |
Decision-making and schedule-based routing — Decision (if/else), Switch, Evaluate Schedule, Evaluate Schedule Group |
| Loop |
Repeat sections of a task sequence — Loop, Next Loop, Exit Loop; supports fixed count, collection iteration, and condition-based looping |
| Menu |
IVR menus for DTMF or speech input — Menu, Repeat Menu, Previous Menu, Jump to Menu |
| Task |
Group logic into reusable routines — Task, Call Task, Jump to Reusable Task, End Task |
| Transfer |
Route callers to a destination — Transfer to ACD, Transfer to User, Transfer to Number, Transfer to Group, Transfer to Flow, Transfer to Secure Flow, Transfer to Voicemail |
| Disconnect |
End the call or interaction — terminal action when no further routing is needed |
Workspace and Canvas
| Feature |
Description |
| Canvas |
Primary drag-and-drop area where flow components are placed, arranged, and connected |
| Connections |
Visual lines representing execution paths — update automatically as components are linked or moved |
| Flow Variables |
System variables (e.g. caller ANI) and user-defined variables used to control behaviour and pass data between actions |
| Selected Component Properties |
Configuration area for the active component — variable bindings, routing targets, behaviour options |
ℹ️ Copy/paste tip: You can cut, copy, and paste components within a flow or between flows — up to 10 task editor actions at a time. Clipboard content does not persist across browser tabs.
Properties Panel
| Setting |
Description |
| Component Configuration |
Operational settings — routing behaviour, prompts, logic conditions, integration parameters |
| Input / Output Variables |
Variables used to receive or return data during execution — commonly used with Data Actions |
| Default Paths |
Fallback execution route when no specific condition is met — ensures the flow continues safely |
| Language Settings |
Multi-language prompt and behaviour configuration — languages must be enabled in Supported Languages before use at the component level |
| Component Validation |
Missing or incorrect settings highlighted in red (errors) or yellow (warnings) |
Debug and Replay Mode
Flow Management
| Feature |
Description |
| Create / Copy / Delete |
Flows can be created from scratch, copied from existing flows, or deleted — always review dependencies before deleting |
| Dependency Review |
Identifies where a flow is referenced across the platform — prevents accidental removal of flows still in use |
| Import / Export |
Export flow config files for backup or migration; distinct file extensions per flow type prevent incompatible imports |
| Check In / Check Out |
Checkout locks the flow under your account; check in saves the version and releases the lock |
| Read-Only Mode |
Applies when another user has the flow locked, you only have View permission, or you are viewing a previous version — you can export or Save As but cannot edit or publish |
| Execution History & Replay |
Monitor behaviour, troubleshoot routing issues, and analyse execution paths post-publish |
Best Practices
| Practice |
Why |
| Save and check in frequently |
Prevents losing progress; enables collaboration with other flow authors |
| Use meaningful names |
Flows, tasks, menus, and variables should be self-documenting — reduces time spent inspecting logic during troubleshooting |
| Add descriptions to flows |
Documents intent and expected behaviour for future admins |
| Keep the canvas organised |
Logical alignment and grouping improves readability in complex flows |
| Use Reusable Tasks and Menus |
Breaks large flows into modular components — simplifies maintenance and enables logic reuse |
| Validate before publishing |
Resolve all red errors; review yellow warnings even if they don't block publish |
| Test with Debug Mode |
Always test from the caller's perspective before pushing to production |
| Monitor with Execution History |
Use Replay Mode to verify behaviour and trace unexpected outcomes after calls |
| Review dependencies before deleting |
Prevents breaking other flows, queues, or integrations that reference the resource |
| Document flow logic |
Wiki entries or internal notes describing design decisions and dependencies support long-term maintainability |
Flow Types Reference
| Flow Type |
Used For |
| Inbound Call |
Handling inbound voice calls |
| Inbound Message |
SMS and digital messaging interactions |
| Inbound Email |
Inbound email handling |
| Inbound Chat |
Web chat interactions |
| Outbound |
Outbound campaign call handling |
| In-Queue Call |
Logic running while a caller waits in queue |
| Secure Call |
PCI-compliant DTMF capture flows |
| Bot |
Conversational bot flows |
See Also
- Call Flow UI – Complete Reference — left panel sections, flow configuration, and dependencies in detail
- Call Flow Components & Basics — action-by-action reference for building flows
- Prompt Management — creating and managing the audio used inside flows
- Call Routing & Message Routing — how inbound numbers and addresses connect to flows
- Lab: Explore the Architect Interface — hands-on walkthrough (How-To book)
Call Flow Components & Basics
Module 3 Study Guide | Source: Lecture + Verified against Genesys Cloud Resource Center (2025–2026)
1. What Is a Call Flow?
A call flow is a structured, visual representation of the sequence of events and actions that occur within a telephony or contact center system when handling incoming or outgoing calls.
- Determines how calls are handled, processed, and routed
- Ensures efficient operations and high-quality customer experiences
- Replaces simple "call goes to a phone" routing with intelligent, rule-based logic
- Enables: schedule-based routing, self-service options, queue management, voicemail, and more
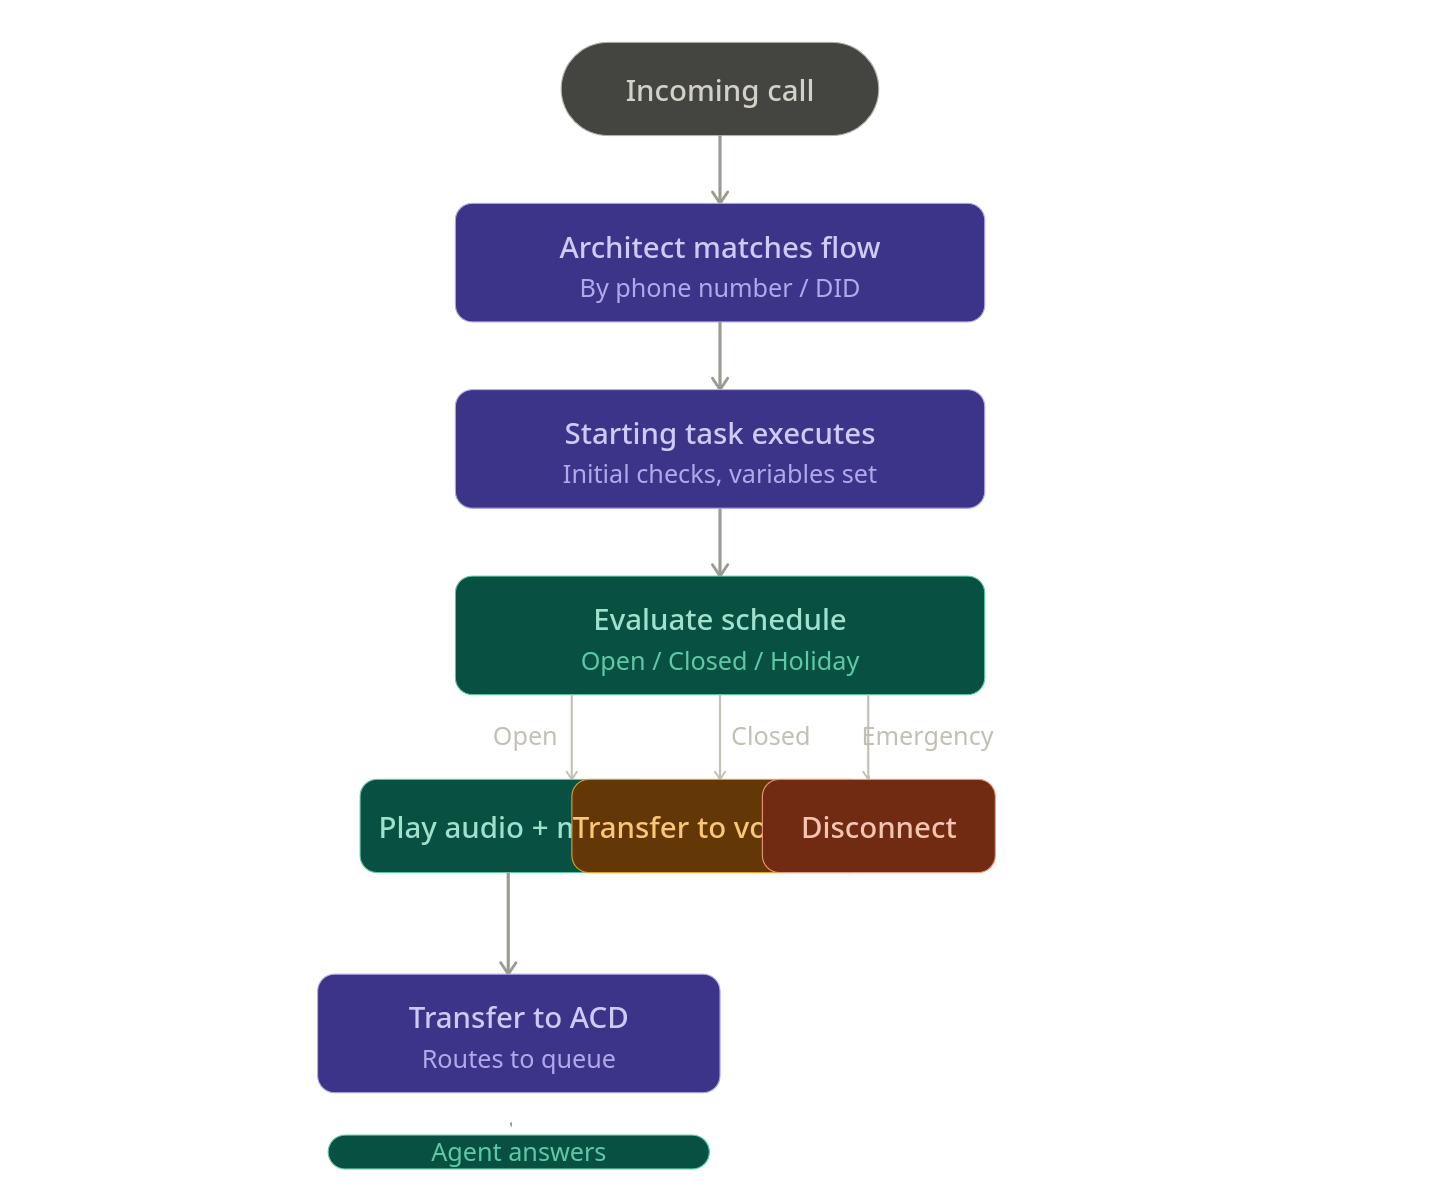
📌 Key Concept: Architect matches incoming interactions to flows based on criteria like the phone number dialed, then routes based on time, calendar, and logic rules.
2. Call Flow Components
Call flow components are pre-built, drag-and-drop elements used in Genesys Cloud Architect to build call flow logic.
They are organized in the Toolbox (right-side panel) into expandable categories:
| Category |
Purpose |
| Audio |
Play prompts or TTS to callers |
| Bot |
Integrate conversational AI bots |
| Common |
Shared/reusable utility actions |
| Data |
Retrieve or update data from APIs/tables |
| Disconnect |
End the call or interaction |
| Find |
Dynamically locate queues, users, schedules at runtime |
| Flow |
Callbacks, screen pops, wrap-up codes |
| Logical |
Decision, Switch, Schedule evaluation |
| Loops |
Repeat sections of flow logic |
| Menus |
IVR menus for caller DTMF or speech input |
| Tasks |
Group logic into reusable routines |
| Transfer |
Route callers to queues, agents, numbers, voicemail, other flows |
📌 Note (Current as of 2026): Action availability in the Toolbox varies by your Genesys Cloud license plan. The maximum number of actions Architect can run per flow invocation is 10,000 — exceeding this triggers error handling (default: disconnect).
3. Common Call Flow Components
These are the most frequently used components when building a basic call flow:

🔊 Play Audio
- Plays a pre-recorded prompt or text-to-speech (TTS) message to the caller
- Output: a prompt file uploaded to Genesys Cloud, or a TTS string
- Drag from Toolbox → Audio → Play Audio
➡️ Transfer to ACD
- Sends the interaction to a queue (group of agents) for routing
- Available in: call flow menus, inbound flows, in-queue flows, chat, email, bot flows
- Supports: priority settings, preferred agents (up to 100), language skills, ACD skills
- Has Success and Failure output paths
⚠️ Current Doc Note: In secure flows, Genesys Cloud overrides the failure path and disconnects the call using blind transfers instead of consultation transfers.
📞 Transfer to User
- Sends the call directly to a specific agent
- The selected user must have logged into Genesys Cloud at least once
🔢 Transfer to Number
- Routes the call to an external phone number (e.g., after-hours vendor, third-party support)
- Flow author presets the number; callers cannot change it
- Architect tries to use the same trunk/site as the inbound call
📬 Transfer to Voicemail
- Sends caller directly to a user's, queue's, or group's voicemail
- Voicemail interactions retain the original call priority and route to the next available agent
- Maximum voicemail length: 3 minutes
- Callers can: Send, Review, Re-record, or Cancel via DTMF or speech
- Voicemail must be enabled for the org; grayed-out users have no voicemail configured
❌ Disconnect
- Ends the call/interaction
- Used for: emergency closures, no-routing scenarios, end of flow logic
4. Connecting Components
How to Connect
- Click and drag components from the Toolbox onto the canvas
- Reposition by clicking and dragging to a new location
- Right-click an arrowhead on a component to select the next step from a context menu

Component Outputs
Each component has one or more output circles on its right side representing possible outcomes:
| Component |
Output Example |
| Play Audio |
TTS string or uploaded prompt file |
| Transfer to ACD |
Queue name |
| Transfer to Number |
External phone number |
| Menu |
One output path per DTMF key or speech option |
| Decision |
True / False paths |
Connection Properties
- Some components have connection properties (configured in the Properties Panel)
- Others (like Play Audio) have no connection properties — just an output
- Properties Panel shows on the right when a component is selected
Building the Flow
- Drag a component to the canvas
- Configure it in the Properties Panel
- Connect its output arrow(s) to the next component
- Continue until the flow ends with a Disconnect or Transfer
- Repeat as needed
5. Schedule-Based Routing Example
A common pattern using the Evaluate Schedule or Evaluate Schedule Group action:
Schedule Group
├── Open     → Play Greeting Prompt → Transfer to ACD (Support Queue)
├── Closed   → Transfer to Voicemail (Support Queue)
└── Holiday  → Transfer to External Number (Third-party vendor)
└── Emergency → Disconnect
📌 Each branch is a separate output path from the schedule component, connecting to different actions.
6. Best Practices for Designing Call Flows
| Practice |
Why It Matters |
| Keep it simple |
Easier to troubleshoot, maintain, and hand off |
| Use Reusable Tasks |
Isolate logic (schedule checks, data actions) for independent editing |
| Use Reusable Menus |
Avoid duplicating menus used in multiple places |
| Use meaningful names |
Allows quick review without drilling into every component |
| Test before deploying |
Use Architect's built-in Debug Tool before go-live |
| Consolidate Update Data actions |
Reduces flow size — multiple updates in one action vs. many single-update actions |
| Avoid duplicating Data Actions |
Call Data Action, Create Callback, and Set Screen Pop are resource-heavy |
📌 Current Doc Addition (2026): Genesys now includes a Flow Size indicator under Insights & Optimizations to help you track resource usage and optimize before publishing. Common module flows have a lower size limit than other flow types.
7. Key UI Components (Canvas)
| UI Element |
Purpose |
| Toolbox |
Source of all drag-and-drop actions |
| Canvas |
Visual workspace where flow is built |
| Properties Panel |
Configure selected component's settings |
| Output Circles |
Connection points on right side of each component |
| Arrows/Connections |
Visual paths between components |
| Debug Tool |
Test flow internally without a real phone |
| Validation |
Check for errors before publishing |
| Flow Insights |
View execution frequency overlay (read-only mode, up to 7 days of history) |
8. Additional Current Features
These are confirmed-current Genesys Cloud Architect features you may encounter:
- Flow Insights — Visual overlay showing how often each component executes; helps identify drop-off points and optimization opportunities
- Flow Size Indicator — Shows % of maximum flow size used; warns when approaching limits
- AI-Powered Slots — Bot flows now support special characters, customizable continuation prompts, and multi-turn test widget conversations
- Virtual Agent Performance Dashboard — Track bot containment rates, transfers, and ROI
- Preferred Agents (Transfer to ACD) — Supports up to 100 preferred agents with scoring
9. Quick Reference Cheat Sheet
| I want to... |
Use this component |
| Play a message to the caller |
Play Audio |
| Let callers press 1 for Sales |
Menu |
| Route to a group of agents |
Transfer to ACD |
| Route to a specific agent |
Transfer to User |
| Route to an outside number |
Transfer to Number |
| Send to voicemail |
Transfer to Voicemail |
| Check if office is open |
Evaluate Schedule / Evaluate Schedule Group |
| Make a True/False decision |
Decision |
| Look up data from an API |
Call Data Action |
| End the call |
Disconnect |
| Reuse logic across the flow |
Reusable Task / Call Task |
Last verified against Genesys Cloud Resource Center — January/February 2026
Genesys - Architect - Call Flow UI Overview
The Architect call flow editor contains multiple UI sections that define how calls are processed, routed, and managed. These sections appear in the left navigation panel, toolbox, and configuration panels within the call flow editor.
Flow Configuration Panel (Left Navigation)
| Section |
Description |
| Starting Task |
Entry point of the flow. The first logic executed when a call arrives — typically used for initial checks such as caller identification, block lists, or routing decisions. |
| Settings |
Defines default behavior for the flow including timeout handling, event handling, and fallback routing logic if unexpected errors occur. |
| Menu Defaults |
Defines standard IVR behavior such as how many times a menu repeats and how long the system waits for caller input before timing out. |
| Supported Languages |
Configures the languages available in the flow. Each language can use pre-recorded prompts or text-to-speech engines. |
| Speech Recognition |
Enables or disables voice recognition so callers can speak commands instead of using DTMF keypresses. |
| Resources |
Displays variables used in the flow including system variables (such as caller ANI) and user-created variables used for routing logic. |
| Prompts |
Lists audio prompts referenced directly in the flow such as greetings, announcements, or menu prompts. |
| Dependencies |
Displays resources used by the flow such as prompts, data tables, or tasks to prevent accidental deletion of required objects. |
| Reusable Menus |
Stores reusable IVR menus that can be called from multiple parts of the flow to simplify management and reduce duplication. |
| Reusable Tasks |
Stores reusable logic blocks used for background processing such as schedule checks or routing decisions. |
The Toolbox contains all actions used to build call flow logic. It is available on the flow's main page and inside the task editor. Categories are collapsible, and a search bar lets you quickly filter and find any action by name. Action availability varies by Genesys Cloud license plan and flow type.
| Category |
Description |
| Audio |
Plays prompts, text-to-speech, or other audio to the caller. Also handles whisper audio to agents, transcription, audio monitoring, and flushing queued audio. |
| Bot |
Integrates conversational bots such as Genesys Dialog Engine Bot Flows, Amazon Lex, Google Dialogflow (ES and CX), Nuance Mix, or external voice bots via Audio Connector. |
| Common |
Executes logic stored in a previously created Common Module flow, allowing shared logic to be reused across multiple flows. |
| Customer Secured Data |
Handles sensitive data within flows using encryption. Includes Get Secured Data, Set Secured Data, Encrypt Data, and Decrypt Data. |
| Data |
Retrieves or manipulates data from external services, APIs, or internal data tables. Includes Call Data Action, Data Table Lookup, Collect Input, Update Data, Set/Get Participant Data, Set UUI Data, Call Decision Table, Get/Set SIP Headers, and Set External Tag. |
| Dial |
Enables Dial by Extension, allowing callers to dial and be transferred to a specific extension directly. |
| Disconnect |
Ends the call or interaction. Used as the terminal action when no further routing is needed. |
| External Contacts |
Retrieves information from the Genesys Cloud External Contacts system. Includes Get External Contact, Get External Organization, and Promote External Contact. |
| Find |
Dynamically locates resources at IVR runtime by name or ID. Includes Find Queue, Find Queue by ID, Find User, Find User by ID, Find Users by ID, Find Group, Find Skill, Find Language Skill, Find Schedule, Find Schedule Group, Find Emergency Group, Find System Prompt, Find User Prompt, and Find Utilization Label. |
| Flow |
Interaction-level actions including Create Callback, Set Screen Pop, Set Wrap-Up Code, Set Language, Set/Clear Post-Flow, Initialize/Set Flow Outcome, Add Flow Milestone, Set/Clear Utilization Label, and Enable Participant Recording. |
| Logical |
Decision-making and schedule-based routing. Includes Decision (if/else), Switch, Evaluate Schedule, and Evaluate Schedule Group. |
| Loop |
Repeats sections of a task sequence. Includes Loop, Next Loop, and Exit Loop. Supports fixed count, collection iteration, and condition-based looping. |
| Menu |
Creates IVR menus where callers choose options via DTMF keypresses or speech recognition. Includes Menu, Jump to Menu, and Previous Menu. |
| Task |
Groups related actions into reusable routines. Includes Task, Call Task, Jump to Reusable Task, and End Task. |
| Transfer |
Routes callers to a destination. Includes Transfer to ACD (queue), Transfer to User, Transfer to Number, Transfer to Group, Transfer to Flow, Transfer to Secure Flow, and Transfer to Voicemail. |
📌 Note: The Communicate category does not exist in inbound call flows. Action availability differs across flow types (inbound, outbound, in-queue, bot, email, message, etc.) and Genesys Cloud license plans.
Audio
| Action |
Description |
| Play Audio |
Plays a prompt or text-to-speech message to the caller. |
| Play Audio on Silence |
Plays a message to completion when silence is detected. |
| Flush Audio |
Clears any queued audio within the call flow. |
| Set Whisper Audio |
Plays a message to the agent before they answer the call to indicate which queue the caller came from. |
| Transcription |
Enables the voice transcription feature for the call flow. |
| Audio Monitoring |
Starts or stops streaming conversation audio to a third-party service for real-time analysis. |
Bot
| Action |
Description |
| Call Bot Flow |
Launches an existing Genesys Dialog Engine Bot Flow within the call flow. |
| Call Lex Bot / Call Lex V2 Bot |
Integrates Amazon Lex (v1 or v2) for self-service and intent processing. |
| Call Dialogflow Bot / Call Dialogflow CX |
Integrates Google Dialogflow (ES or CX) for self-service and intent processing. |
| Call Nuance Bot |
Integrates a Nuance Mix bot into the call flow. |
| Call Audio Connector |
Streams conversation audio to an external voice bot and returns audio back to Genesys Cloud. |
Common
| Action |
Description |
| Call Common Module |
Executes reusable logic stored in a previously created Common Module flow. Allows shared logic to be maintained in one place and referenced across multiple flows. |
Customer Secured Data
| Action |
Description |
| Get Secured Data |
Retrieves a secured data attribute from an interaction participant. |
| Set Secured Data |
Assigns a secured data attribute value to a call participant. |
| Encrypt Data |
Encrypts sensitive data using your organization's encryption key. |
| Decrypt Data |
Decrypts previously encrypted data within a flow. |
Data
| Action |
Description |
| Call Data Action |
Retrieves customer data from a default or custom data actions integration (e.g. Salesforce, external API). |
| Call Decision Table |
Executes a rule-based decision table previously configured by an administrator. |
| Collect Input |
Prompts a caller to enter a string of digits (e.g. account number). |
| Data Table Lookup |
Retrieves a value stored in a Genesys Cloud data table. |
| Get Participant Data |
Retrieves a participant attribute previously set on the interaction. |
| Set Participant Data |
Sets a named attribute value on the call participant — persists across flows and is accessible to agents and integrations. |
| Update Data |
Assigns or modifies flow or task-level variables. |
| Set UUI Data |
Passes User-to-User Information (UUI) data through transfer and disconnect actions. |
| Get SIP Headers / Get Raw SIP Headers |
Retrieves BYOC Cloud SIP headers for use in routing logic. |
| Set External Tag |
Associates the interaction with a record in an external CRM or system of record (SOR). |
Dial
| Action |
Description |
| Dial by Extension |
Allows the caller to dial a specific extension and be transferred directly to it. |
Find
| Action |
Description |
| Find Queue / Find Queue by ID |
Dynamically locates a queue by name or ID at IVR runtime. |
| Find User / Find User by ID / Find Users by ID |
Locates a specific agent or multiple agents at runtime. |
| Find Group |
Retrieves a Genesys Cloud group at runtime. |
| Find Skill |
Finds an ACD skill by name at runtime for use with Transfer to ACD routing. |
| Find Language Skill |
Retrieves a language skill at runtime for use with Transfer to ACD routing. |
| Find Schedule / Find Schedule Group |
Retrieves a schedule or schedule group at runtime for dynamic routing decisions. |
| Find Emergency Group |
Retrieves an emergency group at runtime. |
| Find System Prompt / Find User Prompt |
Dynamically looks up a prompt by name for playback. |
| Find Utilization Label |
Dynamically retrieves a utilization label by name at runtime. |
Flow
| Action |
Description |
| Create Callback |
Offers callers the option to receive a callback instead of waiting in queue. |
| Set Screen Pop |
Selects a predefined script to display to the agent when the interaction arrives. |
| Set Wrap-Up Code |
Automatically assigns a wrap-up code to the interaction. |
| Set Language |
Allows callers to select the language in which they hear prompts. |
| Set Post-Flow / Clear Post-Flow |
Assigns or removes a post-flow action (e.g. voice survey or transfer) that executes after the interaction ends. |
| Initialize Flow Outcome / Set Flow Outcome |
Tracks and sets success or failure outcomes for analytics and reporting. |
| Add Flow Milestone |
Adds a milestone marker to the flow for granular reporting and customer journey tracking. |
| Set Utilization Label / Clear Utilization Label |
Dynamically applies or removes a utilization label on the interaction. |
| Enable Participant Recording |
Gives callers the option to consent to call recording. |
Logical
| Action |
Description |
| Decision |
Routes the flow based on a true/false condition (if/else). |
| Switch |
Routes the flow based on multiple possible case values. |
| Evaluate Schedule |
Routes calls based on whether a schedule is open, closed, or in a holiday state. |
| Evaluate Schedule Group |
Routes calls using a schedule group that combines multiple schedules. |
Loop
| Action |
Description |
| Loop |
Repeats a series of actions before continuing to the next action. Supports fixed count, collection iteration, and condition-based modes. |
| Next Loop |
Skips the remaining actions in the current iteration and moves to the next. |
| Exit Loop |
Exits the loop entirely and continues execution with the next action after the loop. |
| Action |
Description |
| Menu |
Creates an IVR submenu where callers select options by pressing a digit or speaking a valid speech recognition entry. |
| Jump to Menu |
Transfers the caller immediately to a designated menu within the flow. |
| Previous Menu |
Returns the caller to the menu they came from. |
Task
| Action |
Description |
| Task |
Groups related logic steps into a named routine within the flow. |
| Call Task |
Executes another task within the same flow. |
| Jump to Reusable Task |
Executes a previously created reusable task. |
| End Task |
Ends execution of the current task and returns control to the calling action. |
Transfer
| Action |
Description |
| Transfer to ACD |
Sends the interaction to a queue for agent routing. Supports preferred agents, skills-based routing, and pre-transfer audio. |
| Transfer to User |
Sends the call directly to a specific agent or user. |
| Transfer to Number |
Transfers the call to an external phone number. |
| Transfer to Group |
Transfers the call to a Genesys Cloud group. |
| Transfer to Flow |
Transfers the call to another Architect call flow. |
| Transfer to Secure Flow |
Transfers to a secure call flow for handling sensitive data such as payment card information. |
| Transfer to Voicemail |
Sends the caller directly to a voicemail destination. |
Workspace UI Components
| Component |
Description |
| Canvas |
The main visual area where flow components are placed, arranged, and connected to build interaction logic. |
| Connections |
Visual lines representing the execution path between flow components, updated as components are linked. |
| Properties Panel |
Displays configuration options for the currently selected component. |
| Validation |
Checks the flow for configuration errors. Red = must fix before publishing; yellow = warning, publishing still allowed. |
| Debug Tool |
Activates a testable version of the flow reachable via SIP address (YourFlowName-debug@localhost) to hear the flow from the caller's perspective before publishing. English-language flows only. |
📌 Limits reminder: The maximum number of actions Architect runs per flow invocation is 10,000. If exceeded, the flow enters error handling (default: disconnect). Flow authors can configure an alternative path such as Transfer to ACD, Jump to Menu, or Jump to Reusable Task — Architect grants an additional 1,000 actions for error handling. Exceeding that limit results in a silent disconnect.
Last verified against Genesys Cloud Resource Center – March 2026
Prompt Management
Navigation: Admin → Architect → Prompts
Context: Part of Architect administration — managed alongside flows, not under Routing
What Are Prompts?
Prompts are audio or text-to-speech messages played to customers during interactions inside Architect flows. Every piece of audio a caller hears — welcome greetings, menu options, hold messages, closure announcements — is a prompt.
Two Types of Prompts
| Type |
Description |
Editable? |
| System Prompts |
Pre-built by Genesys for generic use (dates, numbers, days, months, standard phrases) |
Cannot be renamed or deleted |
| User Prompts |
Custom prompts created by administrators for org-specific messaging |
Fully configurable |
ℹ️ System prompts are used internally by Architect for things like reading back times, dates, and digits. You do not create or manage them — you only create User Prompts.
Prompt Content Options
Each User Prompt can use one or both content types:
| Option |
Description |
| Text-to-Speech (TTS) |
Type the message text — Genesys synthesizes it using the org's configured TTS engine |
| Uploaded Audio (WAV) |
Upload a professionally recorded audio file |
✅ Best practice: Use TTS for dynamic or frequently changing messages. Use uploaded WAV for polished, permanent messages like main greetings where audio quality matters most.
Prompt Naming Rules
| Rule |
Detail |
| No spaces |
Use underscores instead (e.g., US_Support_WelcomePrompt) |
| No special characters |
Letters, numbers, and underscores only |
| Cannot start with a number |
Must start with a letter |
| Must be unique |
No two prompts can share the same name in the org |
Creating a Prompt
- Admin → Architect → Prompts
- Click Add
- Enter the Prompt Name (follow naming rules above)
- Optionally add a Description
- Click Create Prompt
- In the prompt editor:
- For TTS: type your message text in the Text-to-Speech field
- For audio: click Add Audio and upload a WAV file
- Click Save


Managing Prompts
| Task |
How |
| Edit a prompt |
Admin → Architect → Prompts → click prompt name |
| Update TTS text |
Open prompt → edit text field → Save |
| Replace audio file |
Open prompt → Add Audio → upload new WAV → Save |
| Add a language variant |
Open prompt → add TTS or audio for additional supported language |
Multi-Language Prompts
A single prompt can have content defined for multiple languages. Architect selects the appropriate language variant at runtime based on the flow's language configuration. If a variant for the active language doesn't exist, Architect falls back to the default.
Using Prompts in Architect Flows
Prompts are referenced inside flows using the Play Audio action (or within Menu actions for IVR options). The flow does not embed the audio — it references the prompt by name from the central library.
Result: Updating a prompt in the library automatically updates it everywhere it is used, without republishing flows.
Architect Flow
      ↓
Play Audio action
      ↓
References prompt: US_Support_WelcomePrompt
      ↓
Prompt library serves TTS or WAV
      ↓
Customer hears message
      ↓
Flow continues
Common Prompt Use Cases
| Prompt Type |
Example |
| Welcome Greeting |
"Thank you for calling Customer Support." |
| IVR Menu |
"Press 1 for Sales, 2 for Support, 3 for Billing." |
| Queue Hold Message |
"All agents are currently busy. Your call is important to us." |
| Estimated Wait |
"Your estimated wait time is approximately [X] minutes." |
| Holiday Closure |
"Our offices are closed for [holiday]. We will reopen on [date]." |
| After Hours |
"You have reached us outside our business hours." |
| Maintenance |
"We are currently performing scheduled maintenance." |
Naming Convention
Troubleshooting
| Issue |
Cause |
Fix |
| Prompt not playing in flow |
Prompt not referenced in the Play Audio action |
Open flow → verify the prompt action points to correct prompt |
| Audio playback failure |
Incorrect file format |
Re-upload as a valid WAV file |
| TTS not working |
Text formatting issue (special characters, symbols) |
Review and clean the TTS text content |
| Prompt change not reflected in live calls |
Flow not republished after prompt update |
Prompts update without republish — if issue persists, check the flow's prompt reference is correct |
| Wrong prompt playing |
Incorrect prompt name referenced in flow |
Update the Play Audio action to reference the correct prompt |
ℹ️ Unlike flow changes, prompt content updates (TTS text or audio replacement) take effect without republishing the flow. However, if you rename a prompt or create a new prompt to replace an old one, you must update the flow reference and republish.
Troubleshooting Checklist
| Check |
✓ |
| Prompt created in Architect |
☐ |
| TTS text entered or WAV file uploaded |
☐ |
| Prompt saved |
☐ |
| Play Audio action in flow references correct prompt |
☐ |
| Flow published (if flow changes were made) |
☐ |
| Test call/interaction confirms correct audio |
☐ |
Key Facts for Exam / Interview
| Question |
Answer |
| Where are prompts managed? |
Admin → Architect → Prompts |
| What two content types can a prompt have? |
Text-to-Speech (TTS) and uploaded WAV audio |
| Can system prompts be deleted or renamed? |
No |
| What file format is required for uploaded audio? |
WAV |
| Do prompt updates require republishing the flow? |
No — content updates are live immediately; only flow reference changes require republish |
| Can one prompt serve multiple languages? |
Yes — add language variants within the same prompt |
See Also
- Architect Overview — where prompts are used inside flows
- Call Flow Components & Basics — the Play Audio and Menu actions that reference prompts
- Organization Settings → Global Settings — Default TTS Engine configuration
Queue Configuration Reference
1. What Is a Queue?
A queue is a holding area where interactions (calls, chats, emails, callbacks) wait to be routed to an available agent. Queues are the backbone of ACD (Automatic Call Distribution) routing in Genesys Cloud — every Transfer to ACD action in Architect points to a queue.
📌 Genesys Cloud supports up to 5,000 queues with a maximum of 5,000 members per queue for voice and chat channels.
2. How to Navigate to Queues
Two ways to get there:
- Search bar → type "Queues"
- Admin menu → Contact Center → Queues
⚠️ Permissions required: You must have administrative credentials with the Routing > Queue permission to create or edit queues. Users with only Routing > QueueMember > Manage permission can manage membership only — not queue settings.
3. Creating a New Queue
- Navigate to Admin → Contact Center → Queues
- Click + Create Queue (top right)
- Fill in the Name — must be unique; cannot contain asterisks
- (Optional) Select a Division
- (Optional) Copy settings from an existing queue to replicate its configuration and members
- Click Save
📌 Naming tip: Use a consistent naming convention (e.g., Support_Inbound, Sales_Chat) so queues are easy to identify in Architect flow dropdowns and reports.

4. Queue Configuration Tabs
After saving, the queue opens with several configuration tabs:

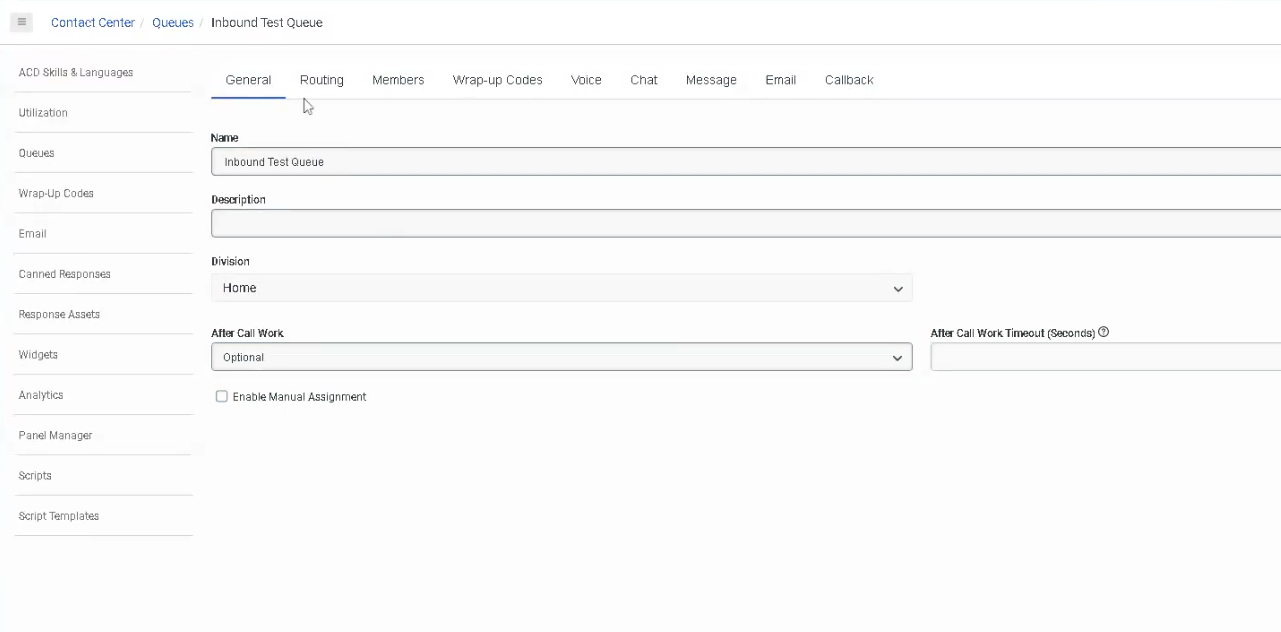
📋 General Tab
| Setting |
Description |
| Name |
Unique identifier — cannot contain asterisks |
| Division |
Organizes the queue within your org's division structure |
| Description |
Optional notes about the queue's purpose |
| After Call Work (ACW) |
Controls agent wrap-up behavior after each interaction |
| Auto Answer |
Automatically answers interactions for agents on this queue (digital channels) |
| Last Agent Routing (LAR) |
Routes interactions to the last agent who handled that customer |
| Manual Assignment |
Allows supervisors/agents to pull interactions from the queue manually |
⏱️ After Call Work (ACW) Modes
The lecture covers this partially — here is the complete list per current documentation:
| ACW Mode |
Description |
| Optional |
Agent can enter ACW manually or skip it entirely |
| Mandatory Discretionary |
ACW is required but agent decides when to end it and return to queue |
| Mandatory Time-boxed |
ACW has a set time limit; agent can end early and return to queue before timer expires |
| Mandatory Time-boxed – No Early Exit |
Agent must wait the full time before returning to queue; cannot exit early |
| Agent Requested |
Agent can request ACW; not automatically triggered |
📌 Maximum ACW timeout: 3,600 seconds (1 hour). If an agent fails to complete ACW within the timeout, Genesys automatically assigns the default wrap-up code ININ-WRAP-UP-TIMEOUT.
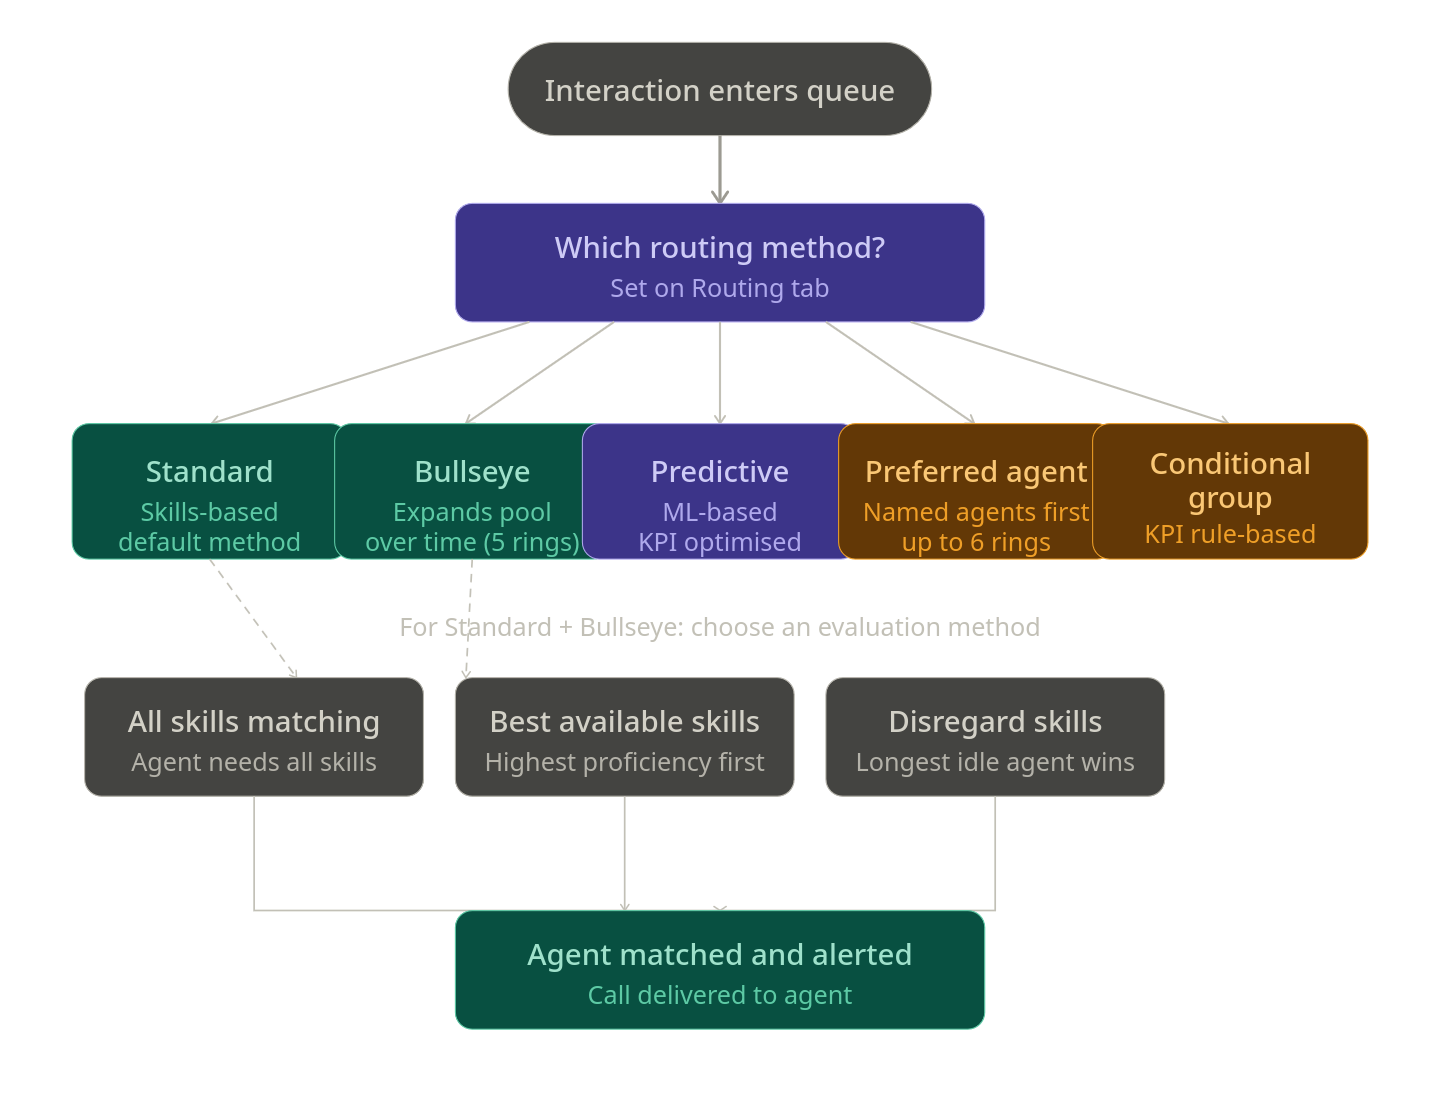
🔀 Routing Tab
The Routing Tab is where you configure how interactions are matched to agents. The lecture mentions this is "based around skills" — here is the full picture:
Routing Methods (5 available)
| Routing Method |
Description |
| Standard |
Default method. Routes based on skills evaluation method you choose. |
| Bullseye |
Skills-based routing with expansion rings — widens the agent pool over time if no match found. Supports up to 5 rings with configurable delays. |
| Predictive |
Uses machine learning to analyze historical data and predict the best agent-interaction match to optimize a chosen KPI. Supports voice, email, and async messages. |
| Preferred Agent |
Routes to specific preferred agents first, then falls back to bullseye rules. Supports up to 6 rings. |
| Conditional Group |
Routes based on real-time KPI conditions (e.g., queue wait time, agents available). Supports up to 5 rules with 10 conditions per rule. |
Evaluation Methods (used with Standard and Bullseye routing)
| Evaluation Method |
Description |
| All Skills Matching |
Agent must have ALL required skills to receive the interaction |
| Best Available Skills |
Routes to the agent with the highest skill proficiency available |
| Disregard Skills / Next Agent |
Ignores skills entirely; routes to the agent idle longest |
Scoring Methods
| Scoring Method |
Description |
| Conversation Score |
Combines arrival time and priority value to rank waiting interactions |
| Priority Score |
Uses only the priority value; time in queue used as tiebreaker |
📌 Best practice: Set the scoring method at queue creation or when the queue has no waiting interactions. Changing it mid-queue can cause unexpected routing order.
👥 Members Tab
- Add individual users or groups to the queue
- Members must be added for the queue to receive and route interactions
- For Bullseye routing, members can be assigned to specific rings
- For Preferred Agent routing, agent score pairs (0–100) define priority
🏷️ Wrap-Up Codes Tab
- Assign specific wrap-up codes agents can select after completing an interaction on this queue
- Wrap-up codes are used for reporting and interaction categorization
- If no code is selected by the agent within ACW timeout,
ININ-WRAP-UP-TIMEOUT is automatically assigned
📌 The lecture notes wrap-up codes are covered in a separate course — but be aware this tab exists and connects directly to reporting.
🔊 Voice Tab (Additional Settings)
Not covered in the lecture — but present in the UI:
| Setting |
Description |
| Alerting Timeout |
How long an agent's phone rings before the interaction is redirected |
| Service Level |
Target % of interactions answered within a defined number of seconds |
| In-Queue Flow |
Assign an Architect in-queue flow (e.g., music on hold, queue position announcements) |
| Whisper Prompt |
Audio played to the agent just before they answer the call |
5. Queue Limits & Permissions Reference
| Item |
Limit / Detail |
| Max queues per org |
5,000 |
| Max members per queue |
5,000 (voice and chat) |
| ACW max timeout |
3,600 seconds |
| Preferred agent rings |
Up to 6 |
| Bullseye rings |
Up to 5 |
| Conditional Group rules |
Up to 5 rules, 10 conditions each |
| Queue name |
Must be unique; no asterisks |
| Required permission (create/edit) |
Routing > Queue > Edit |
| Required permission (members only) |
Routing > QueueMember > Manage |
6. How Queues Connect to Call Flows
Once a queue is created, it's referenced inside Architect flows using the Transfer to ACD action:
Call Flow → Evaluate Schedule → Open → Transfer to ACD → [Select Queue Name]
This is the core connection between Architect and Queues — the queue you create here is what you select in your Transfer to ACD action.
7. Best Practices
| Practice |
Why It Matters |
| Use consistent naming conventions |
Easy to find in Architect dropdowns and reporting |
| Set ACW mode intentionally |
Impacts agent productivity and reporting accuracy |
| Choose routing method at creation |
Changing scoring methods mid-queue can cause unexpected routing |
| Assign an In-Queue flow |
Controls caller hold experience (music, position announcements) |
| Test queue before connecting to live flow |
Validate routing behavior without impacting real callers |
| Don't leave queues without members |
Calls will wait indefinitely with no agent to answer |
8. Quick Reference Cheat Sheet
| I want to... |
Where to configure |
| Create a new queue |
Admin → Contact Center → Queues → + Create |
| Control how long agents do wrap-up |
General tab → After Call Work |
| Change how calls are routed to agents |
Routing tab → Routing Method |
| Add agents to the queue |
Members tab → Add Users/Groups |
| Assign wrap-up codes to the queue |
Wrap-Up Codes tab |
| Set hold music or queue announcements |
Voice tab → In-Queue Flow |
| Play a message to agent before answering |
Voice tab → Whisper Prompt |
| Reference the queue in a call flow |
Architect → Transfer to ACD → select queue |


Inbound Call Flows
Study Notes
| Topic |
Description |
| Inbound Call Flow |
Flow that handles voice calls entering the contact center |
| Trigger |
Activated by call routing configuration |
| Components |
Prompts, menus, queues, transfers |
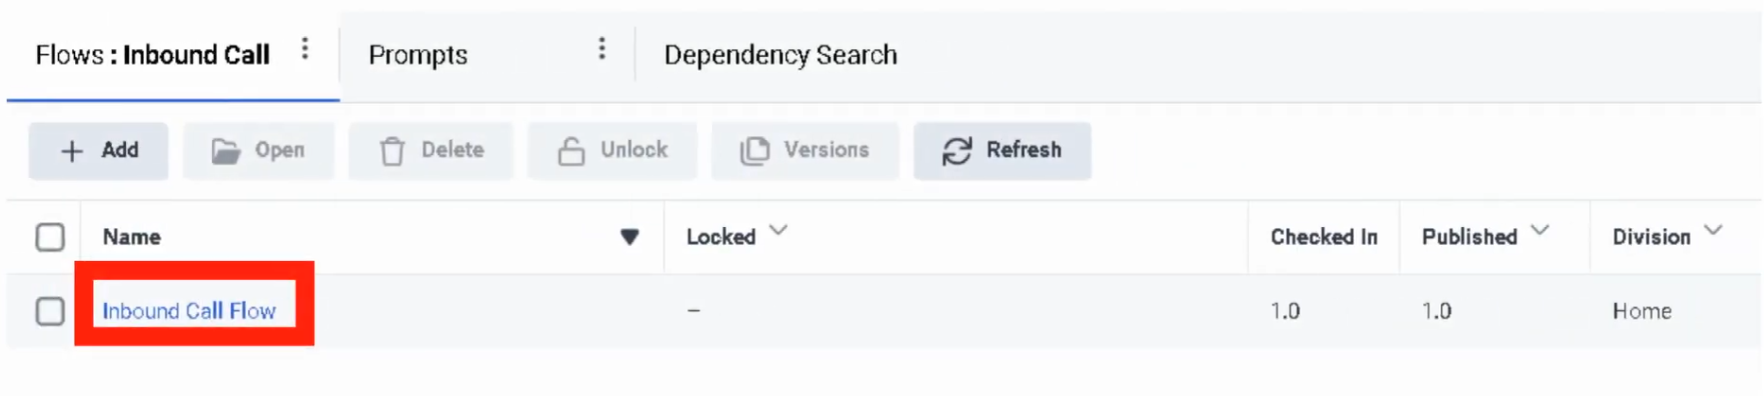
Navigation
Admin → Architect → Flows → Inbound Call Flow
Implementation Guide
- Create new inbound call flow
- Add greeting prompt
- Create IVR menu
- Configure queue transfers
- Publish flow
How to Implement
| Phase |
Description |
| Design |
Build IVR structure |
| Testing |
Simulate inbound calls |
| Deployment |
Assign flow to call route |
Workflow
Customer Call
      ↓
Call Route
      ↓
Inbound Call Flow
      ↓
Menu
      ↓
Queue
Real Flow Scenario
Customer Calls
      ↓
Greeting Prompt
      ↓
Menu Options
      ↓
Support Queue
Architecture Diagram
Customer
  ↓
Carrier
  ↓
Genesys Cloud
  ↓
Call Route
  ↓
Inbound Call Flow
  ↓
Queue / Agent
Usage Scenarios
| Scenario |
Description |
| IVR Navigation |
Route callers to departments |
| Self-Service |
Automated call handling |
| Queue Routing |
Send callers to agents |
Implementation Example
Start
 ↓
Welcome Prompt
 ↓
Main Menu
 ↓
Queue Transfer
Design Example
Start
 ↓
Greeting
 ↓
Menu
 ↓
Department Selection
Best Practices
Naming Convention
<Region>_<Service>_InboundCallFlow
Example:
US_Support_InboundCallFlow
Troubleshooting
| Issue |
Cause |
Fix |
| Call not reaching flow |
Routing misconfigured |
Check call route |
| Menu not working |
Flow logic issue |
Review IVR design |
Interview Cheat Sheet
| Question |
Answer |
| What triggers inbound call flows? |
Call routing configuration |
| Where are flows built? |
Architect |
Key Takeaways
- Inbound call flows control IVR behavior
- Connected to call routing
Inbound Message Flows
Study Notes
| Topic |
Description |
| Inbound Message Flow |
Handles digital messaging interactions |
| Channels |
SMS, Web Messaging, Messaging Apps |
| Trigger |
Activated by message routing |
Navigation
Admin → Architect → Flows → Inbound Message Flow
Implementation Guide
- Create inbound message flow
- Configure greeting message
- Capture user input
- Route to queue or bot
- Publish flow
How to Implement
| Phase |
Description |
| Flow Design |
Build messaging conversation logic |
| Integration |
Connect with message routing |
| Deployment |
Publish flow |
Workflow
Customer Message
      ↓
Message Routing
      ↓
Inbound Message Flow
      ↓
Automation / Agent
Real Flow Scenario
Customer SMS
 ↓
Greeting Message
 ↓
Ask Question
 ↓
Transfer to Queue
Architecture Diagram
Customer
  ↓
Messaging Channel
  ↓
Genesys Cloud
  ↓
Message Routing
  ↓
Inbound Message Flow
  ↓
Agent
Usage Scenarios
| Scenario |
Description |
| SMS Support |
Customers text support |
| Automated Help |
Bots answer questions |
| Appointment Scheduling |
Automated booking |
Implementation Example
Start
 ↓
Greeting Message
 ↓
Capture Input
 ↓
Transfer to Agent
Design Example
Start
 ↓
Greeting
 ↓
Intent Detection
 ↓
Agent Transfer
Best Practices
- Keep conversations simple
- Use automation where possible
- Always allow agent escalation
Naming Convention
<Region>_<Service>_MessageFlow
Example:
US_Support_MessageFlow
Troubleshooting
| Issue |
Cause |
Fix |
| Messages not routed |
Routing misconfigured |
Check message routing |
| Flow not responding |
Flow unpublished |
Publish flow |
Interview Cheat Sheet
| Question |
Answer |
| What handles messaging interactions? |
Inbound message flows |
| What connects messages to flows? |
Message routing |
Key Takeaways
- Inbound message flows manage digital interactions
- Integrated with message routing
Operating Schedules
| Section |
Detail |
| Navigation |
Admin → Routing → Operating Schedules |
| Alt Navigation |
Menu → Orchestration → Routing → Operating Schedules |
| Required Permission |
Routing > Schedule > Add, Edit, View, Delete |
| Module Context |
Part of Routing & Architect in Genesys Cloud |
| Purpose |
Control when routing flows run based on date, time, or event |
✅ Verified against Genesys Cloud Resource Center — March 2026
Overview
Operating schedules determine how Genesys Cloud manages routing for inbound and outbound interactions based on time and events. They are used to support business hours, after-hours support, holidays, recurring events, maintenance windows, and special situations.
Architect uses operating schedules to determine which flow to execute — for example, routing callers to a live queue during open hours and to voicemail during closed hours.
⚠️ Naming note: The official Genesys Cloud term is Operating Schedules (not just "Schedules"). This distinction matters in the UI navigation and exam contexts.
Evaluation Order (Exam Critical)
When Genesys Cloud evaluates a schedule group, it checks conditions in this specific order:
Emergency (only if Emergency routing is activated)
        ↓
Holiday
        ↓
Closed
        ↓
Open
⚠️ Emergency is not part of the base evaluation order. It is a separate override that fires first only when Emergency routing has been actively turned on. The default hierarchy without Emergency active is: Holiday → Closed → Open.
⚠️ Default fallback: If no schedule in the group matches the current date/time, Closed is the default path in Architect's Evaluate Schedule Group action.
Key Concepts
| Topic |
Explanation |
| Operating Schedule |
A time-based object defining when a particular routing condition is active |
| Operating Schedule Group |
Groups multiple schedules into a single routing definition with Open, Closed, and Holiday categories |
| Emergency Group |
A separate object that adds emergency override behavior — activates/deactivates independently |
| Recurrence |
Schedules can be one-time or repeating (daily, weekly, monthly, yearly, or custom iCal rule) |
| All Day |
Runs the schedule for the full duration of the selected date(s) — no start/end time needed |
| Multi-Day Span |
Use the "This occurrence spans multiple days" checkbox to configure a schedule that runs across consecutive days |
| Division |
Controls which administrators can manage the schedule — every schedule must belong to a division (default: Home) |
| Copy Schedule |
Existing schedules can be copied to create modified versions quickly |
| Usage Tracking |
You can view which schedule groups and call flows any schedule is associated with |
Navigation
| Task |
Steps |
| View Operating Schedules |
Admin → Routing → Operating Schedules or Menu → Orchestration → Routing → Operating Schedules |
| Create a Schedule |
Operating Schedules page → Add Schedule |
| View Schedule Groups |
Operating Schedules page → Schedule Groups tab or Menu → Orchestration → Routing → Operating Schedule Groups |
| Copy a Schedule |
Operating Schedules list → More (⋮) → Copy |
| View Schedule Usage |
Operating Schedules list → click schedule name → view associated groups and flows |
| Use in Architect |
Architect → Open Flow → Add Evaluate Schedule Group action |
Configuration Fields
| Field |
Description |
Example |
| Schedule Name |
Unique name identifying the schedule |
US_Support_BusinessHours |
| Division |
Administrative ownership — restricts which admins can manage it |
Home |
| Single Day / Multi-Day |
Single day sets one date; multi-day uses "This occurrence spans multiple days" checkbox |
Multi-day |
| From / To |
Start and end date/time for multi-day schedules |
2026-01-01 08:00 → 2026-12-31 18:00 |
| All Day |
Runs for the full duration of selected date(s) — no time range needed |
Disabled |
| Recurrence |
How often the schedule repeats |
Weekly |
| iCal Rule |
Advanced recurrence rule for custom patterns |
FREQ=WEEKLY;BYDAY=MO,TU,WE,TH,FR |
Creating an Operating Schedule
- Navigate to
Admin → Routing → Operating Schedules or Menu → Orchestration → Routing → Operating Schedules
- Click Add Schedule
- Enter a unique name for the schedule
- Select the Division (default: Home)
- In the "When does the schedule first occur and repeat?" section:
- For a single-day schedule: set the date and time
- For a multi-day schedule: check "This occurrence spans multiple days" → set From and To dates/times
- To run continuously all day, click All Day
- Set recurrence in the "How often does this schedule repeat?" field
- Configure recurrence details (days, end conditions, etc.)
- Click Save
Recurrence Types
| Type |
Description |
Example |
| Does not repeat |
One-time event |
July_4_Closure |
| Daily |
Repeats every day or every N days |
After_Hours_Daily |
| Weekly |
Repeats on selected days each week |
Mon_Fri_BusinessHours |
| Monthly |
Repeats on a specific day each month |
First_Monday_Maintenance |
| Yearly |
Repeats on the same date each year |
Christmas_Holiday |
| Custom (iCal) |
Advanced rule using iCal RRULE syntax |
FREQ=WEEKLY;BYDAY=MO,TU,WE,TH,FR |
Operating Schedule Groups
Schedule groups combine multiple operating schedules into a single routing definition. Each schedule in a group is assigned a type:
| Type |
Purpose |
| Open Hours |
Active during business hours — must have at least one open schedule |
| Closed Hours |
Active during off-hours or non-business periods |
| Holiday |
Active on designated holiday dates |
Schedule groups also have a time zone setting that determines how all schedules in the group are evaluated. This accounts for daylight saving time automatically.
⚠️ A schedule group must contain at least one Open schedule to function correctly.
Architecture: Schedule Group Evaluation
Customer Interaction Arrives
           ↓
Call Route or Architect Flow
           ↓
Evaluate Schedule Group action
           ↓
Emergency active? ──→ Yes ──→ Emergency path
           ↓ No
Holiday match? ────→ Yes ──→ Holiday path
           ↓ No
Closed match? ─────→ Yes ──→ Closed path
           ↓ No
Open ──────────────────────→ Open path
Real Flow Scenarios
Scenario 1 — Business Hours Menu
Caller Enters Flow → Evaluate Schedule Group → Open
→ Play Welcome Prompt → IVR Menu → Route to Queue
Scenario 2 — After-Hours Voicemail
Caller Enters Flow → Evaluate Schedule Group → Closed
→ Play Closed Prompt → Route to Voicemail
Scenario 3 — Holiday Transfer
Caller Enters Flow → Evaluate Schedule Group → Holiday
→ Play Holiday Prompt → Transfer to External Number
Scenario 4 — Emergency Override
Caller Enters Flow → Evaluate Schedule Group → Emergency (activated)
→ Play Emergency Prompt → Disconnect
Schedule Group Design Example
Schedule: US_Support_BusinessHours  (Open, Mon–Fri 08:00–18:00, weekly)
Schedule: US_Support_Christmas      (Holiday, Dec 25, yearly)
Schedule: US_Support_Closed         (Closed, all remaining times)
          ↓
Schedule Group: US_Support_Main_SG  (Time zone: America/New_York)
          ↓
Open      → Business hours IVR and queue
Closed    → Voicemail routing
Holiday   → External after-hours provider
Emergency → Emergency prompt + disconnect (via Emergency Group)
Screenshots


Best Practices
| Practice |
Reason |
| Use the official term "Operating Schedules" |
Matches UI and avoids confusion with WFM scheduling |
| Use clear, descriptive names |
Easier to manage and troubleshoot routing logic |
| Separate business hours and holiday schedules |
Provides flexibility without rebuilding open schedule logic |
| Always use schedule groups for production routing |
Simplifies open/closed/holiday branching in one object |
| Set the correct time zone on the group |
Prevents incorrect routing due to UTC or DST mismatches |
| Test all branches before go-live |
Ensures each path (open/closed/holiday/emergency) routes correctly |
| Review holiday schedules annually |
Keeps routing accurate as holidays change year to year |
| Use the Copy feature for similar schedules |
Speeds up creation without starting from scratch |
| Check schedule usage before deleting |
Avoid breaking flows that reference the schedule |
Naming Convention
| Resource |
Pattern |
Example |
| Business Hours Schedule |
<Region>_<Dept>_BusinessHours |
US_Support_BusinessHours |
| Holiday Schedule |
<Region>_<Dept>_<Holiday> |
US_Support_Christmas |
| Maintenance Schedule |
<Region>_<Dept>_Maintenance |
US_Support_MaintenanceWindow |
| Schedule Group |
<Region>_<Dept>_SG |
US_Support_Main_SG |
Security Considerations
| Control |
Description |
| Division Assignment |
Limits which admins can view, edit, or delete a schedule |
| Permission-based access |
Routing > Schedule > Add, Edit, View, Delete controls all schedule management |
| External transfer verification |
Confirm approved numbers before using them in holiday or emergency branches |
| Test before production |
Misconfigured schedules can silently misroute customers |
Limitations & Constraints
| Constraint |
Description |
| Division required |
Every schedule must belong to a division — cannot be division-less |
| Open schedule required |
A schedule group must have at least one Open Hours schedule |
| Emergency is separate |
Emergency routing uses Emergency Groups, not schedule types — must be separately activated |
| Default fallback is Closed |
If no schedule matches the current time, Architect defaults to the Closed path |
| Time zone on group, not schedule |
Individual schedules don't have time zones — the time zone is set at the schedule group level |
Troubleshooting
| Issue |
Cause |
Resolution |
| Flow always routes Closed |
Time zone mismatch or no active Open schedule |
Verify schedule times and schedule group time zone |
| Holiday path never triggers |
Holiday schedule not assigned to group |
Add holiday schedule to the schedule group |
| Emergency path does not fire |
Emergency group not activated |
Verify emergency group is active and connected to the flow or call route |
| Recurring schedule not firing |
Recurrence settings incorrect |
Review repeating event settings and end conditions |
| External transfer not reached |
Holiday branch misconfigured |
Check Architect holiday branch action and verify external number |
| Schedule group unavailable in Architect |
Permission or division visibility issue |
Confirm Routing > Schedule > View permission and division access |
| Schedule won't delete |
Schedule is in use by a group or call route |
Remove the schedule from all groups and routes first |
Exam Cheat Sheet
| Question |
Answer |
| What is an Operating Schedule? |
A time-based object that controls when routing or flow logic is active |
| What permission is required? |
Routing > Schedule > Add, Edit, View, Delete |
| What are the navigation paths? |
Admin → Routing → Operating Schedules or Menu → Orchestration → Routing → Operating Schedules |
| What is the base evaluation order? |
Holiday → Closed → Open |
| Where does Emergency fit in? |
Evaluated first, but only when Emergency routing is actively turned on |
| What is the default fallback if nothing matches? |
Closed |
| What is a Schedule Group? |
A grouping of Open, Closed, and Holiday schedules with a shared time zone |
| Does a schedule group need an Open schedule? |
Yes — at least one Open schedule is required |
| Where is the time zone set? |
On the Schedule Group, not on individual schedules |
| Can schedules be copied? |
Yes — use More (⋮) → Copy to duplicate and modify |
| What recurrence types are supported? |
Does not repeat, Daily, Weekly, Monthly, Yearly, Custom (iCal) |
| What does "All Day" do? |
Runs the schedule for the entire selected day — no start/end time |
Chapter Placement
❌ Operating Schedules does NOT belong in the Platform Operations chapter.
It belongs in the Routing & Architect chapter — alongside Call Routing, Emergency Groups, Schedule Groups, and Architect flows. Platform Operations covers platform-level administration (OAuth, SSO, Authorized Apps, API Usage). Operating Schedules is a routing configuration topic that directly controls call flow behavior and caller experience.
See Also
- Operating Schedule Groups — combine schedules into open/closed/holiday routing definitions
- Emergency Groups (
Admin → Routing → Emergency Groups) — override routing during critical events
- Call Routing — map call flows to dialed addresses using schedule groups
- Architect → Evaluate Schedule Group — action used in flows to branch by schedule state
- Divisions Overview — understand how division assignment affects schedule visibility
Data Tables
| Section |
Description |
| Feature Area |
Architect / Orchestration Assets |
| Navigation |
Admin → Architect → Data Tables |
| Alt Navigation |
Menu → Orchestration → Orchestration Assets → Data Tables |
| Primary Function |
Store configuration data locally so Architect flows can look it up dynamically during an interaction |
| Typical Use Cases |
CRM-to-queue mapping, account routing, dynamic prompt selection, large lookup sets that exceed switch statement limits |
| Key Dependency |
Architect flows use the Data Table Lookup action to retrieve values at runtime |
Data tables allow you to store data locally so Architect can access it within an interaction. They are particularly useful for data sets larger than what a switch statement can handle, and for combining Genesys Cloud with third-party integrations — for example, mapping an account number returned by a CRM to a Genesys Cloud queue.
Important: Data tables are intended for configuration data only. They must not contain personal information or any data that could identify a natural, living person.
Study Notes
| Topic |
Explanation |
| Data Table |
A structured lookup table stored within Genesys Cloud, accessible by Architect flows |
| Reference Key |
The primary key of the table — uniquely identifies each row. Required. Cannot be changed after a row is created. |
| Reference Key Label |
A descriptive name for the reference key column (e.g., "Account Number"). Cannot include / or \ |
| Custom Fields |
Additional columns beyond the reference key. Up to 50 fields per table. Cannot be deleted after the table is saved. |
| API Field ID |
Auto-populated from the field label — used when loading data via API. Cannot be changed after creation. |
| Data Table Lookup Action |
The Architect action used inside a flow to query a data table by reference key and map results to flow variables |
| Division |
Each data table is assigned to a division for access control |
| Import/Export |
Tables support CSV import (append or replace) and export |
Org Limits (Exam Critical)
| Limit |
Value |
| Maximum data tables per organization |
200 |
| Maximum rows per table |
5,000 |
| Maximum fields per table |
50 |
| Maximum characters in a reference key value |
256 |
| Maximum characters in a table name |
256 |
To request higher limits, contact Genesys Cloud Customer Care.
Permissions
| Action |
Permission Required |
| View data table |
Architect > Datatable > View |
| Add data table |
Architect > Datatable > Add |
| Edit data table |
Architect > Datatable > Edit |
| Delete data table |
Architect > Datatable > Delete |
| View data table row |
Architect > Datatable Row > View |
| Add data table row |
Architect > Datatable Row > Add |
| Edit data table row |
Architect > Datatable Row > Edit |
| Delete data table row |
Architect > Datatable Row > Delete |
| All permissions shortcut |
Architect > Datatable > All + Architect > Datatable Row > All |
Navigation
| Task |
Navigation Path |
| Open Data Tables |
Admin → Architect → Data Tables |
| Alt Navigation |
Menu → Orchestration → Orchestration Assets → Data Tables |
| Create a table |
Click Add |
| Edit a table |
Hover over row → click Edit |
| Delete a table |
Hover over row → click Delete (cannot delete if table is in use by a flow) |
| View table rows |
Click the table name or hover → click View |
| Import data |
Click Manage Imports |
| Export data |
Click Export Data |
Configuration Fields (UI Form Fields)
Data Tables List Page
| UI Field |
Description |
| Name |
Table name — unique, max 256 characters, no duplicates |
| Reference Key Label |
Describes the primary key purpose (e.g., "Account Number") — no / or \ |
| Description |
Optional — helpful context about the table |
| Division |
Division the table belongs to |
| Export Data |
Exports table rows to CSV |
| Manage Imports |
Import rows via CSV (append or replace) |
| Delete |
Delete selected tables (cannot delete a table used in a flow) |
| Refresh |
Reload the table list |
| Add |
Create a new data table |
| View (hover) |
View table rows |
| Edit (hover) |
Edit table structure or rows |
| Delete (hover) |
Delete individual table |
Create Data Table Form
| UI Field |
Description |
Notes |
| Name |
Unique table name |
Max 256 characters; no duplicates |
| Division |
Division assignment |
Required |
| Description |
Optional context |
Free text |
| Reference Key Label |
Name for the primary key column |
Cannot include / or \ |
| Add Field → Boolean |
Checkbox field |
Set "True by default" option |
| Add Field → Integer |
Whole number field |
Set default value |
| Add Field → Decimal |
Decimal number field |
Set default value |
| Add Field → String |
Text field |
Set default text value |
| API Field ID |
Auto-populated from field label |
Read-only — cannot be changed after creation |
| Save |
Save table |
Required before adding rows |
Permanent limitations once saved:
- You cannot delete a custom field after saving the table
- You cannot change the API Field ID of a custom field — only the label can be changed
- You cannot modify the reference key value of an existing row
| UI Field |
Description |
| Reference Key |
Value for the primary key (e.g., the account number) |
| Custom Field values |
One entry per configured custom field |
| Save & Close |
Save row and return to table |
| Save & Create Another |
Save row and immediately add another |
Data Table Lookup Action (in Architect Flows)
| Attribute |
Details |
| Action Name |
Data Table Lookup |
| Purpose |
Query a data table using a reference key value and map results to flow variables |
| Required Permission |
Architect > Data Table > All |
| Input |
Reference Key value (can come from a flow variable, e.g., entered by caller) |
| Output |
Custom field values mapped to flow variables |
| Failure Path |
Flow continues via failure path if key is not found |
Example use in a flow:
Caller enters Account Number
        ↓
Data Table Lookup action
  Input: Account Number (reference key)
  Table: CRM_Queue_Mapping
        ↓
Output: Queue Name → flow variable
        ↓
Transfer to Queue using variable
Import / Export
| Feature |
Description |
| Export |
Downloads all table rows as a CSV file. Exported file retains original API field keys (not display labels). |
| Import |
Upload a CSV to append rows or replace all existing rows |
| Manage Imports |
View import history and any import errors |
When exporting, the CSV retains the original API field keys, not the display labels — relevant if labels were renamed after creation.
Dependencies
| Component |
Purpose |
| Architect Flows |
Consume data tables via the Data Table Lookup action |
| Divisions |
Control which users/flows can access a given table |
| CRM / External Systems |
Common source of data loaded into tables |
| Flow Variables |
Receive output values from Data Table Lookup |
| Component |
Relationship |
| Inbound Call Flows |
Most common flow type using Data Table Lookup |
| Inbound Message Flows |
Can also use Data Table Lookup for digital routing |
| Data Actions |
Alternative for real-time external API lookups (vs. static data in tables) |
| Decision Tables |
Related feature under Rule-Based Decisions — logic-based conditional routing |
| Switch Action |
Alternative for small, static lookup sets directly in the flow |
| Topic |
Description |
| Data Table Lookup Action |
Architect action that queries a data table at runtime |
| Import or Export Data Tables |
Load data via CSV |
| Decision Tables |
Rule-based routing decisions (separate feature under Admin → Rule-Based Decisions) |
| Architect Overview |
Parent feature area |
| Flow Variables |
Store and pass values within a flow |
Implementation Checklist
| Task |
Status |
| Identify what data needs to be looked up in the flow |
☐ |
| Design the table schema (reference key + custom fields) |
☐ |
| Create the data table and define fields |
☐ |
| Populate rows (manually or via CSV import) |
☐ |
| Add the Data Table Lookup action to the flow |
☐ |
| Map output fields to flow variables |
☐ |
| Test the flow with known reference key values |
☐ |
| Handle the failure path (key not found) |
☐ |
Implementation Guide
| Step |
Action |
| Step 1 |
Navigate to Admin → Architect → Data Tables |
| Step 2 |
Click Add |
| Step 3 |
Enter a unique Name, select a Division, add optional Description |
| Step 4 |
Enter a descriptive Reference Key Label |
| Step 5 |
Click Save |
| Step 6 |
Add Custom Fields (Boolean, Integer, Decimal, String) |
| Step 7 |
Save field configuration |
| Step 8 |
Add rows manually or import via Manage Imports (CSV) |
| Step 9 |
In Architect, add a Data Table Lookup action to your flow |
| Step 10 |
Configure the lookup: select table, set reference key input, map outputs to variables |
| Step 11 |
Handle the failure path for keys not found |
Workflow
Admin Creates Data Table
        ↓
Fields Defined (Reference Key + Custom Fields)
        ↓
Rows Populated (Manual or CSV Import)
        ↓
Architect Flow Uses Data Table Lookup Action
        ↓
Caller Input (e.g., Account Number) Passed as Reference Key
        ↓
Matching Row Found → Custom Field Values Returned
        ↓
Values Stored in Flow Variables
        ↓
Flow Uses Variable (e.g., Queue Name) for Routing
Architecture Diagram
External CRM / System
        ↓
CSV Export
        ↓
Data Table (Genesys Cloud)
  Reference Key: Account Number
  Field 1: Queue Name
  Field 2: VIP Flag
  Field 3: Language Preference
        ↓
Architect Flow
  Data Table Lookup Action
        ↓
Flow Variables → Routing Logic
Real Flow Scenarios
Scenario 1 — CRM-to-Queue Mapping
Caller enters Account Number via IVR
        ↓
Data Table Lookup: AccountNumber → DepartmentQueue
        ↓
Matched: "Billing" queue name returned
        ↓
Transfer to Billing Queue
Scenario 2 — VIP Routing
Caller enters Customer ID
        ↓
Data Table Lookup: CustomerID → VIPFlag, PreferredQueue
        ↓
VIPFlag = True → Transfer to Priority Queue
VIPFlag = False → Transfer to Standard Queue
Scenario 3 — Language Preference
Caller enters Account Number
        ↓
Data Table Lookup: AccountNumber → LanguagePreference
        ↓
Play prompt in preferred language
Usage Scenarios
| Scenario |
Description |
| CRM queue mapping |
Map external account IDs to internal queues |
| VIP identification |
Flag high-value customers for priority routing |
| Language preference routing |
Route to language-appropriate queue |
| Dynamic prompt selection |
Retrieve prompt names stored in table |
| Product-based routing |
Look up department by product code |
| Configuration data storage |
Store environment-specific values accessible to flows |
Best Practices
| Practice |
Reason |
| Design your schema carefully before creating the table |
Fields cannot be deleted after saving |
| Use descriptive Reference Key Labels |
Makes the table purpose clear to other admins |
| Do not store personal data |
Violates Genesys data use policy for data tables |
| Use Import/Export for bulk data management |
Faster and more reliable than manual row entry |
| Always handle the Lookup failure path in the flow |
Prevents unhandled routing failures when a key is not found |
| Keep table size within limits |
Max 5,000 rows; contact Customer Care for higher limits |
| Use separate tables per business domain |
Easier to maintain and audit |
| Validate imported CSV against table schema |
API Field IDs in CSV must match table schema |
Naming Convention
| Resource |
Example |
| Data Table |
CRM_AccountQueue_Mapping |
| Data Table |
VIP_Customer_Flags |
| Data Table |
Language_Preference_Lookup |
| Reference Key Label |
Account Number / Customer ID |
Naming pattern:
<Source>_<Purpose>_<Type>
Security Considerations
| Control |
Description |
| Division Assignment |
Controls which flows and users can access the table |
| Role-Based Permissions |
Granular Architect > Datatable permissions per action |
| No PII |
Data tables must not contain personal identifiable information |
| API Field ID immutability |
Prevents accidental schema changes after deployment |
Limitations / Constraints
| Constraint |
Value / Description |
| Max tables per org |
200 (can request increase via Customer Care) |
| Max rows per table |
5,000 (can request increase) |
| Max fields per table |
50 |
| Max reference key length |
256 characters |
| Max table name length |
256 characters |
| Cannot delete custom fields |
Once saved, fields are permanent — create a new table if needed |
| Cannot change API Field ID |
Only display labels can be changed after creation |
| Cannot change reference key value |
Row reference key values are immutable once created |
| Cannot delete a table in use |
Must remove flow references first |
| Reference key label restrictions |
Cannot contain / or \ |
Troubleshooting
| Issue |
Cause |
Resolution |
| Lookup returns no match |
Reference key value not in table |
Verify data is loaded; check for whitespace or case mismatch |
| Cannot delete table |
Table is referenced in one or more flows |
Remove Data Table Lookup references in flows first |
| Cannot delete a field |
Fields are permanent after saving |
Create a new table with the correct schema |
| Import fails |
CSV column keys don't match API Field IDs |
Export the table first to get the correct column headers |
| API Field ID unexpected |
Label renamed after creation |
API Field ID is fixed at creation; only label changed |
| Flow variable empty after lookup |
Failure path taken — key not found |
Check row exists; add default handling in failure path |
Interview Cheat Sheet
| Question |
Answer |
| What is a data table in Genesys Cloud? |
A locally stored lookup table that Architect flows can query during an interaction |
| What is the purpose of the Reference Key? |
It is the primary key that uniquely identifies each row — used as the lookup input |
| What are the org limits? |
200 tables / 5,000 rows per table / 50 fields per table |
| What can you NOT do after saving a data table? |
Delete custom fields or change API Field IDs |
| What can you NOT do to a row's reference key? |
Modify it — reference key values are immutable once created |
| What Architect action reads from a data table? |
Data Table Lookup |
| Can data tables store personal information? |
No — configuration data only |
| What navigation opens Data Tables? |
Admin → Architect → Data Tables or Menu → Orchestration → Orchestration Assets → Data Tables |
| How do you load data in bulk? |
CSV import via Manage Imports |
| Can you delete a table being used by a flow? |
No — must remove flow references first |
Key Takeaways
| Topic |
Summary |
| Data Tables |
Local configuration data storage for Architect flows |
| Reference Key |
Primary, immutable key for each row — required |
| Field Types |
Boolean, Integer, Decimal, String — permanent after save |
| Limits |
200 tables / 5,000 rows / 50 fields |
| Data Table Lookup Action |
Retrieves values from a table at runtime using a reference key |
| No PII |
Personal data must never be stored in data tables |
| Import/Export |
CSV-based bulk data management |
| Failure Path |
Always handle the case where a key is not found |
Bot Flows
| Section |
Description |
| Feature Area |
Architect / AI & Bots |
| Navigation |
Admin → Architect → select flow type from the flow list |
| Primary Function |
Build native AI-powered bots that automate customer conversations before routing to a live agent |
| Flow Types |
Dialog Engine Bot Flow (voice + digital) · Digital Bot Flow (digital only) |
Genesys Cloud offers two native bot flow types built directly inside Architect. Both use Natural Language Understanding (NLU) to interpret customer input and guide conversations. The key distinction is the channel scope and PCI compliance status.
Study Notes
| Topic |
Explanation |
| Dialog Engine Bot Flow |
Native bot for voice, chat, and message channels. PCI DSS-compliant — can be used in secure call flows |
| Digital Bot Flow |
Native bot for digital/messaging channels only (chat, messaging). Not PCI DSS-compliant — cannot be used in secure call flows |
| Intent |
A customer goal or request the bot is trained to recognize (e.g., "Check Balance", "Cancel Order") |
| Utterance |
A sample phrase the customer might say to express an intent — used to train the NLU model |
| Slot |
A piece of information the bot needs to extract from the conversation (e.g., account number, date) |
| Slot Type |
Defines the format/type of a slot: built-in (e.g., date, number), custom list, regex, dynamic list, or AI-powered |
| Confirmation |
A step where the bot confirms captured slot values with the customer before proceeding |
| Learning |
The bot reviews unrecognized utterances and suggests additions to improve NLU over time |
| Intent Health |
Dashboard that shows how well intents are performing and highlights training gaps |
| Optimization Dashboard |
Per-flow dashboard showing total interactions, average duration, average turns, and end states |
| NLU |
Natural Language Understanding — the AI model that maps customer input to intents and slots |
| Call Bot Flow action |
Architect action used in an Inbound Call, Chat, or Message Flow to invoke a Dialog Engine Bot Flow |
| Call Digital Bot Flow action |
Architect action used in a Message Flow to invoke a Digital Bot Flow |
| Virtual Agent |
Advanced AI bot powered by Genesys AI — generates intents and utterances from descriptions |
| Intent Miner |
Analyzes transcripts/recordings to discover real customer intents that can be imported into a bot |
| Knowledge Integration |
Bots can query a Knowledge Base to answer customer questions automatically |
| Rich Media (Digital) |
Digital Bot Flows support quick replies, cards, and carousels for structured customer choices |
Bot Flow Type Comparison (Exam Critical)
| Attribute |
Dialog Engine Bot Flow |
Digital Bot Flow |
| Channels |
Voice, Chat, Message |
Digital (Chat, Message) only |
| PCI DSS Compliant |
Yes — can be used in secure call flows |
No — must not be used in secure call flows |
| Used In (Architect) |
Inbound Call, Chat, or Message flows via Call Bot Flow action |
Message flows via Call Digital Bot Flow action |
| Pricing — Voice |
Per minute (15-second increments) |
N/A |
| Pricing — Digital |
Per session |
Per session |
| Rich Media |
Quick replies, cards, carousels (on messaging) |
Quick replies, cards, carousels |
| Knowledge Base |
Yes |
Yes |
| Virtual Agent |
Yes |
Yes |
| Intent Miner |
Yes |
Yes |
| DTMF Input |
Yes (voice) |
N/A |
Permissions
| Permission |
Purpose |
Architect > UI > View |
Access Architect |
Architect > Flow > Add |
Create bot flows |
Architect > Flow > Edit |
Edit bot flows |
Architect > Flow > Delete |
Delete bot flows |
Language Understanding > All |
Required for NLU/intent management in bot flows |
For Virtual Agent specifically: Architect > virtualAgentFlow > Edit
Navigation
| Task |
Path |
| Open Architect |
Admin → Architect (opens in separate window) |
| Create a Dialog Engine Bot Flow |
Architect → flow type list → select Bot Flow → Add |
| Create a Digital Bot Flow |
Architect → flow type list → select Digital Bot Flow → Add |
| View Optimization Dashboard |
Architect → [selected Bot or Digital Bot Flow] → Insights & Optimizations → Optimization Dashboard |
| View Intent Health |
Architect → [selected flow] → NLU menu → Intent Health |
Key Concepts in Detail
Intents
An intent represents a specific customer goal. Each intent is trained with a set of utterances that the NLU model learns to recognize.
| Attribute |
Detail |
| Definition |
A categorized customer goal the bot recognizes |
| Training input |
Utterances (sample phrases) |
| Best practice |
Provide a diverse set of utterances per intent |
| Intent Health |
Tool to identify weak or conflicting intents |
Slots
Slots are the specific data points the bot collects during a conversation.
| Slot Type |
Description |
| Built-in |
Pre-built types: date, time, number, currency, etc. |
| Custom List |
Fixed list of values (e.g., product names) |
| Custom Dynamic List |
List fetched at runtime via a data action |
| Custom Regex |
Pattern-matched input (e.g., account number format) |
| AI-Powered |
Uses Genesys AI to extract free-form values — recommended over free-form text slots |
| Timeslot |
For appointment scheduling (e.g., available time picker) |
AI-Powered slots are recommended by Genesys. Free-form slot capture should be used carefully — see Virtual Agent slot authoring recommendations.
Utterances
Sample phrases used to train the bot's NLU model. More diverse, realistic utterances improve recognition accuracy.
Confirmations
Optional step that reads back captured slot values and asks the customer to confirm before the bot proceeds.
Learning
Reviews utterances the bot did not recognize and suggests adding them to improve the model over time.
Optimization Dashboard Metrics
| Metric |
Description |
| Total Bot Interactions |
Total number of customers who interacted with the bot |
| Average Duration |
Average length of time customers spent in the bot |
| Average Turns |
Average number of steps a customer went through |
| Contained |
Interactions fully resolved within the bot (no agent handoff) |
| Transferred |
Interactions handed off to ACD |
| Agent Escalation |
Customer explicitly requested a human agent |
| Abandoned |
Customer disconnected before completing or transferring |
| Recognition Failure |
Bot could not match customer input to a known intent |
| Error |
System/expression errors during the interaction |
Data retention: Utterance history and the Bot Conversation Library are available for the last 10 days.
| Type |
Description |
| Quick Replies |
Pre-defined response buttons the customer taps to reply — structured, fast responses |
| Cards |
Bot message with image, title, body text, and action buttons |
| Carousels |
Multiple cards displayed in a scrollable horizontal layout |
| List Pickers |
Structured lists for guided selection (e.g., appointment time slots, Apple Messages for Business) |
Architect Actions (Used in Parent Flows)
| Action |
Used In |
Purpose |
| Call Bot Flow |
Inbound Call / Chat / Message flows |
Invokes a Dialog Engine Bot Flow |
| Call Digital Bot Flow |
Message flows |
Invokes a Digital Bot Flow |
| Call Dialog Engine Bot |
Voice / Chat / Message flows |
Legacy action for Dialog Engine bots (in-flow reference) |
How Bot Flows Integrate with Inbound Flows
Inbound Call / Message Flow
        ↓
Call Bot Flow action (or Call Digital Bot Flow)
        ↓
Bot Flow Runs (NLU processes customer input)
        ↓
Bot resolves intent → Collects slots → Confirms
        ↓
Exit Reason: Contained / Transfer to ACD / Agent Escalation
        ↓
Parent flow continues based on exit reason
Third-Party Bot Options (For Reference)
If a native Genesys bot is not used, the following third-party options are available:
| Integration |
Channel |
| Amazon Lex V2 |
Voice (Inbound Call flows) |
| Google Dialogflow CX |
Voice / Message flows |
| Google Dialogflow ES |
Voice / Message flows |
| Nuance Mix Bot |
Voice flows |
| Genesys Bot Connector |
Message flows (up to 5 third-party bots) |
| Genesys Digital Bot Connector |
Message flows (up to 5 third-party bots) |
Third-party bots are configured under Admin → Integrations.
PCI DSS Compliance Note (Exam Critical)
| Flow Type |
PCI Compliant |
Can Use in Secure Call Flow |
| Dialog Engine Bot Flow |
Yes |
Yes |
| Digital Bot Flow |
No |
No — must not be used in Architect secure call flows |
Pricing Overview
| Channel |
Dialog Engine Bot Flow |
Digital Bot Flow |
| Voice |
Charged per minute, billed in 15-second increments |
N/A |
| Digital (chat/messaging) |
Charged per session |
Charged per session |
Contact your Customer Success Manager or Genesys Sales for volume discounts.
Best Practices
| Practice |
Reason |
| Use AI-Powered slot types where possible |
More flexible than free-form; Genesys-recommended |
| Provide varied, realistic utterances per intent |
Improves NLU accuracy and reduces recognition failures |
| Use Intent Health regularly |
Identifies weak intents before they impact customers |
| Handle all exit reasons in the parent flow |
Ensures graceful routing regardless of bot outcome |
| Use Dialog Engine Bot Flow for voice/PCI contexts |
Only compliant option for secure call flows |
| Use Intent Miner on existing transcripts |
Discovers real customer intents faster than manual authoring |
| Monitor the Optimization Dashboard |
Track contained vs. transferred rates to measure bot effectiveness |
Key Takeaways
| Topic |
Summary |
| Two native bot types |
Dialog Engine Bot Flow (voice + digital, PCI-compliant) · Digital Bot Flow (digital only, not PCI-compliant) |
| Built in Architect |
Both types are authored directly in Architect — no separate tool needed |
| Core NLU concepts |
Intents → trained with utterances; Slots → extract data; Confirmations → verify data |
| Parent flow connection |
Use Call Bot Flow or Call Digital Bot Flow action in parent Inbound flows |
| Optimization Dashboard |
Tracks interactions, duration, turns, and exit states including contained vs. transferred |
| PCI distinction |
Dialog Engine = PCI DSS compliant; Digital Bot = not compliant |
| Pricing |
Voice: per minute (15s increments); Digital: per session |
| AI enhancement |
Virtual Agent, Intent Miner, Knowledge Base, and AI-Powered Slots available in both |
Common Module Flows & Outbound Call Flows
Two additional Architect flow types that complete the flow coverage for Chapter 5.
Common Module Flows
| Section |
Description |
| Feature Area |
Architect / Flows |
| Flow Type |
Common Module |
| Navigation |
Admin → Architect → Flows → Common Module |
| Primary Function |
Build reusable logic once and call it from multiple flows — reduces duplication across flow types |
A common module flow is a reusable container of Architect logic. Instead of rebuilding the same authentication check, language selection, or routing block in every flow, you build it once as a common module and call it from any compatible flow using the Call Common Module action.
Study Notes
| Topic |
Explanation |
| Common Module |
A flow that contains reusable logic callable from other Architect flows |
| Call Common Module action |
The action used within a parent flow to invoke a common module — available in all flow types |
| Compatible Flow Types |
Defined when creating the common module — determines which flow types can call it |
| Snapshot behavior |
When a consuming flow publishes, Architect snapshots the current version of the common module into that flow |
| Update behavior |
Changes to a common module do not automatically propagate — consuming flows must be republished to pick up changes |
| Older version usage |
If you want a consuming flow to stay on an older version, publish the consuming flow before updating the common module |
| Size limit |
Common module flows have a lower size limit than other flow types |
| Input variables |
Optional — pass values into the common module from the calling flow |
| Output variables |
Returned from the common module back to the calling flow (visible in the right panel) |
| Dependency tracking |
Use dependency tracking to view common module version numbers in use |
Compatible Flow Types
When creating a common module, you select which flow types it's compatible with. The available actions inside the common module depend on these selections — flow-specific actions are not shared.
| Flow Type Category |
Examples |
| Voice |
Inbound Call, Outbound Call, In-Queue Call, Secure Call |
| Digital |
Inbound Message, Inbound Email, Inbound Chat |
| Back-office / Automation |
Workflow, Workitem |
| Bot |
Bot Flow, Digital Bot Flow |
You can add or remove compatible flow types after creation under Settings → Common Module Settings.
Common Module vs Reusable Task (within a flow)
| Attribute |
Common Module |
Reusable Task (in-flow) |
| Scope |
Callable from multiple flows |
Only within a single flow |
| Where defined |
Separate Common Module flow |
Within the flow itself |
| Callable from |
Any compatible flow type via Call Common Module action |
Only the parent flow |
| Versioning |
Snapshot taken at publish time |
Part of the parent flow's version |
Call Common Module Action
| Attribute |
Detail |
| Available in |
All flow types |
| Configuration |
Name the action · Select common module flow · Select version (Published or Debug) |
| Input variables |
Map values from the calling flow into the common module |
| Output variables |
Appear in the calling flow's right panel after the action |
| Version note |
Always uses the most recently published version unless you explicitly select an older published version |
Size Limit
Common module flows have a lower size limit than other Architect flow types. Monitor the flow size indicator under Insights & Optimizations → Flow Size (available at 4 levels: Low / Medium / High / Full).
Use Cases
| Use Case |
Example |
| Authentication block |
Verify account number → look up in data table → set customer tier variable |
| Language selection menu |
Play language options → capture choice → set language variable |
| Business hours check |
Evaluate schedule → return open/closed flag |
| Emergency routing check |
Check emergency group status → return emergency flag |
| Standard queue transfer |
Unified transfer logic used across multiple flows |
Key Takeaways — Common Modules
| Topic |
Summary |
| Purpose |
Reusable logic across multiple flows — reduces duplication |
| Call action |
Call Common Module — available in all flow types |
| Snapshot on publish |
Consuming flow snapshots the common module at publish time |
| Must republish to update |
Changes don't auto-propagate — consuming flow must be republished |
| Lower size limit |
Common modules have stricter size constraints than other flows |
| Compatible flow types |
Defined at creation — determines available actions |
Outbound Call Flows
| Section |
Description |
| Feature Area |
Architect / Flows |
| Flow Type |
Outbound Call |
| Navigation |
Admin → Architect → Flows → Outbound Calls |
| Primary Function |
Process outbound calls placed by dialing campaigns — handles live answers and voicemails for agentless outbound |
| Key Dependency |
Requires a Contact List and a default Wrap-Up Code before the flow can be created |
Outbound flows process calls that are made without agents — specifically those made by Outbound Dialing Campaigns. The campaign's Call Analysis Response determines which outbound flow handles a live answer versus a voicemail, so the IVR can behave differently depending on what answered the call.
Study Notes
| Topic |
Explanation |
| Outbound Flow |
An Architect flow that handles calls placed by an outbound campaign — no agent connected |
| Contact List |
Required — must be associated when creating the outbound flow; provides the call.contact variable and its properties |
| Default Wrap-Up Code |
Required — must be selected at creation; used to tag the interaction if no other wrap-up is set during the flow |
call.contact variable |
Automatically available in outbound flows — contains properties from the associated contact list (name, phone, custom fields) |
| Call Analysis Response |
Configured in Outbound Dialing — determines which outbound flow receives a live answer vs a voicemail |
| Agentless use case |
The flow handles the entire interaction with no agent handoff — plays a message, collects data, or transfers |
| Flow author vs admin |
Flow authors design the routing logic; outbound admins configure which flow runs for a given campaign |
Outbound Flow vs Inbound Flow — Key Differences
| Attribute |
Inbound Call Flow |
Outbound Call Flow |
| Initiator |
Inbound customer call |
Outbound campaign dials the contact |
| Agent involvement |
Routes to agent |
No agent — fully automated unless transferred |
| Contact List required |
No |
Yes — required at creation |
| Wrap-Up Code required |
No |
Yes — required at creation |
call.contact variable |
Not available |
Automatically available |
| Assigned via |
Call Routing config |
Outbound → Call Analysis Responses |
Creation Requirements
Before creating an outbound flow, the following must exist in the org:
| Prerequisite |
Why |
| At least one Contact List |
Required field at flow creation |
| At least one Wrap-Up Code |
Required default selection at flow creation |
Navigation
| Task |
Path |
| Create Outbound Flow |
Admin → Architect → Flows → Outbound Calls → Add |
| Configure outbound settings within the flow |
Settings → Outbound (within the flow's configuration page) |
| Assign flow to a campaign |
Admin → Outbound → Campaign Management → Call Analysis Response |
Configuration Fields (Create Flow Dialog)
| Field |
Description |
Required |
| Name |
Unique name for the flow (max 200 characters) |
Yes |
| Description |
Optional context |
No |
| Default Language |
Language for TTS in the flow |
Yes |
| Division |
Division assignment |
Yes |
| Contact List |
The contact list associated with this flow |
Yes |
| Default Wrap-Up Code |
Wrap-up code applied if no other code is set |
Yes |
Some Architect Toolbox actions are not available in Outbound Call flows (not displayed in the toolbox). Outbound flows share most features with inbound flows but have certain omissions related to inbound-specific functions (e.g., queue wait, in-queue handling).
Call Analysis Response — Connection to Outbound Flows
The Call Analysis Response (configured in Outbound Dialing) is what connects a campaign to specific outbound flows:
| Call Analysis Result |
Action |
| Live Voice Answer |
Route to the live answer outbound flow |
| Answering Machine / Voicemail |
Route to the voicemail outbound flow |
| Busy / No Answer |
Configure retry behavior |
This means an organization will typically have separate outbound flows for live answers and voicemails within the same campaign.
Key Takeaways — Outbound Call Flows
| Topic |
Summary |
| Purpose |
Handle agentless outbound campaign calls (live answer + voicemail) |
| Required at creation |
Contact List + Default Wrap-Up Code |
| call.contact variable |
Auto-available — contains contact list field values |
| Assigned to campaign |
Via Outbound → Call Analysis Response |
| Flow author role |
Designs the logic; does not specify which campaign uses the flow |
| Outbound admin role |
Configures which flow the campaign uses via Call Analysis Response |
| Differs from inbound |
No inbound queue routing; contact list required; call.contact available |
Inbound Email Flows & Inbound Chat Flows
These are two distinct Architect flow types, each handling a specific digital channel. Both share structural similarities with Inbound Message flows but have channel-specific behaviors and limitations.
Inbound Email Flows
| Section |
Description |
| Feature Area |
Architect / Flows |
| Flow Type |
Inbound Email |
| Navigation (Architect) |
Admin → Architect → Flows → Inbound Email |
| Navigation (Connect to domain) |
Admin → Contact Center → Email → [domain] → Route Settings → select flow |
| Primary Function |
Route incoming ACD emails to the correct queue based on sender, subject, keywords, or scheduling logic |
What Inbound Email Flows Do
Inbound email flows allow administrators to route and deliver incoming email messages to the right queue based on customer identity and intent. The flow is assigned to an email domain in the Email routing settings and runs when a new inbound email arrives.
Email Flow Characteristics
| Attribute |
Value / Description |
| Does NOT have failure/success paths |
Unlike call flows — errors are handled by configuring an action's path (e.g., Disconnect, Transfer to Queue) |
| No language settings |
Inbound email flows do not support language configuration |
| No in-queue handling |
Cannot trigger an in-queue flow from within the email flow itself |
| No audio controls |
No DTMF, no text-to-speech |
| Maximum wait time |
72 hours |
| In-queue flow limit |
30 in-queue flows per email interaction (prevents looping when target queue = current queue) |
| In-queue flow initial period |
60 seconds (recurring states run every 5 minutes + 5 second added wait) |
| Auto-generated email handling |
Configurable — default is Disconnect; can be set to "Process as normal" |
Auto-Generated Email Detection
Genesys Cloud automatically identifies auto-generated emails by confirming all three of these headers:
Default behavior: auto-generated emails are disconnected. Setting location: Architect → Flows → Settings → Inbound Email.
Common Routing Logic in Email Flows
| Routing Scenario |
Architect Technique |
| Route by keyword in subject line |
Contains() function in a Decision action |
| Route by sender's email domain |
EmailAddressDomainPart() function in a Decision action |
| Route by case ID in body |
Contains() on the body text |
| Route by schedule (business hours) |
Evaluate Schedule or Evaluate Schedule Group action |
| Auto-reply after hours |
Send Auto Reply action |
| Route internal vs external senders |
EmailAddressDomainPart() — send internal employees to employee queue, everyone else to standard queue |
Permissions
| Permission |
Purpose |
Architect > Flow > Add |
Create email flows |
Architect > Flow > Edit |
Edit email flows |
Architect > Flow > View |
View email flows |
Architect > Flow > Delete |
Delete email flows |
How Email Flows Connect to Email Domains
- Create and publish the Inbound Email flow in Architect
- Navigate to
Admin → Contact Center → Email
- Select the email domain and configure routing settings
- Assign the published Inbound Email flow
Inbound Chat Flows
| Section |
Description |
| Feature Area |
Architect / Flows |
| Flow Type |
Inbound Chat |
| Navigation (Architect) |
Admin → Architect → Flows → Inbound Chat |
| Primary Function |
Route ACD web chat interactions to the correct queue; optionally invoke bot flows before agent handoff |
| Channel |
Web chat (via Web Chat widget / Web Messenger — deprecated web chat; Inbound Chat flows are for legacy Web Chat) |
What Inbound Chat Flows Do
Inbound Chat flows handle chat interactions arriving via Genesys web chat widgets. They route chats to agents, invoke bots, and perform logic based on available agent capacity, schedules, or customer data. This flow type is distinct from Inbound Message flows, which handle ACD messaging channels (SMS, social, messaging apps, Web Messenger).
Chat Flow Characteristics
| Attribute |
Value / Description |
| Failure/success paths |
No — same as email; errors handled via action-level path configuration |
| In-queue handling |
No in-queue flow within chat flows |
| Audio controls |
No — no DTMF, no TTS |
| Language setting |
Yes — chat flows do support a default language setting |
| Error event transfer queue |
Configurable at flow creation — optional queue to transfer the flow to if Architect detects an error |
| Maximum wait time |
72 hours |
| Bot integration |
Can invoke a Dialog Engine Bot Flow or Digital Bot Flow via Call Bot Flow / Call Digital Bot Flow action |
Permissions
| Permission |
Purpose |
Architect > Flow > Add |
Create chat flows |
Architect > Flow > Edit |
Edit chat flows |
Architect > Flow > View |
View chat flows |
Architect > Flow > Delete |
Delete chat flows |
Comparison: Email vs Chat vs Message Flows
| Attribute |
Inbound Email |
Inbound Chat |
Inbound Message |
| Channel |
Email (ACD) |
Web Chat (legacy) |
ACD Messaging (SMS, social, Web Messenger) |
| Failure/success paths |
No |
No |
No |
| Language setting |
No |
Yes |
No |
| In-queue handling |
No |
No |
No |
| Audio / DTMF / TTS |
No |
No |
No |
| Maximum wait time |
72 hours |
72 hours |
72 hours |
| In-queue flow limit |
30 per interaction |
N/A |
30 per interaction |
| Bot integration |
No (email-specific) |
Yes |
Yes |
| Auto-generated handling |
Yes (configurable) |
No |
No |
Shared Architect Flow Notes for Digital Flows
| Rule |
Applies To |
| No failure or success paths |
Email, Chat, Message |
| In-queue flow limit of 30 |
Email and Message |
| Cannot loop transfer to same queue |
Email and Message |
| 72-hour max wait time |
Email, Chat, Message |
| All require publishing before use |
All flow types |
| Assigned at channel config level |
Email → Email domain settings; Chat → Web Chat widget; Message → Messaging config |
Key Takeaways
| Topic |
Summary |
| Inbound Email flow |
Routes ACD emails; no audio, no failure paths, no language; max 72hr wait; auto-generated email detection |
| Auto-generated detection |
Three headers: Auto-Submitted ≠ "no", Precedence = "bulk", X-Autoreply = "yes" |
| Email routing techniques |
Contains(), EmailAddressDomainPart(), Evaluate Schedule, Send Auto Reply |
| In-queue flow limit |
30 per email/message interaction |
| Inbound Chat flow |
Routes legacy web chat; similar to email but does support language setting |
| Chat vs Message |
Inbound Chat = legacy Web Chat widget; Inbound Message = ACD messaging channels (SMS, social, Web Messenger) |
| Both lack in-queue handling |
Neither email nor chat flows trigger in-queue flows internally |
Secure Call Flows
| Section |
Description |
| Feature Area |
Architect / Flows |
| Flow Type |
Secure Call Flow |
| Navigation |
Admin → Architect → Flows → Secure Call |
| Primary Function |
Temporarily mask audio and prevent recording/agent access to sensitive customer data (PCI payments, PII collection) |
| Compliance |
PCI DSS compliant |
Secure call flows protect sensitive customer data by masking audio paths and preventing system recording during specific portions of an interaction. The most common use case is collecting credit card or bank account information for payment processing without exposing that data to agents or recording systems.
Study Notes
| Topic |
Explanation |
| Secure Flow |
A flow type in Architect that masks audio and data captured during an interaction to meet PCI/PII compliance requirements |
| Secure IVR |
Bundles multiple tools — secure flows, secure variables, and secure actions — into a complete PCI-safe data collection approach |
| Secure Action |
Any action in Architect marked as "secure" — triggers the flow to operate in secure mode |
| Secure Variable |
A variable whose content is flagged as secure — also triggers secure mode when consumed |
| Key Icon |
Visual indicator in Architect showing that an action or action beneath it is either secure or consuming secure data |
| PCI DSS |
Payment Card Industry Data Security Standard — secure call flows help organizations comply with this standard for phone-based payments |
| Protocol Capture risk |
Enabling trunk diagnostics/protocol capture logs all data, including data entered in secure flows — sensitive data is not encrypted. Avoid enabling when using secure flows |
| PCI DSS setting |
If enabled in org settings, Genesys Cloud automatically disables Media Capture and Protocol Capture settings |
Two Secure Flow Scenarios
| Scenario |
Description |
| Agent-referred secure session |
Agent is on an active call with the customer → agent initiates the transfer to a secure flow → flow collects sensitive data → flow returns caller to the agent via Return to Agent action |
| IVR-only secure session |
No live agent involved — caller interacts entirely with the automated flow — sensitive data collected and processed — flow ends with Disconnect action |
Key Actions in Secure Flows
| Action |
Purpose |
| Transfer to Secure Flow |
Used in an Inbound, Outbound, or In-Queue flow to transfer the caller into a secure flow |
| Return to Agent |
Terminating action in a secure flow — reconnects caller to the agent after the secure session ends; passes stored variable values (e.g., confirmation number) back to agent's script |
| Disconnect |
Terminating action for IVR-only secure sessions with no agent |
| Extract Secure Data |
Retrieves secure variable values within a secure flow |
| Call Secure Data |
Used to pass secure data between flow components |
The Transfer to Secure Flow action is available in Inbound, Outbound, and In-Queue flows.
For transfer actions within a secure flow: Genesys Cloud uses blind transfers (not consult). The defined failure path is overridden and the call is disconnected if the transfer fails.
Return to Agent Action — Key Details
| Attribute |
Detail |
| Type |
Terminating action — ends the secure flow |
| Where used |
Secure flows (agent-referred scenario) |
| What it does |
Reconnects caller to the original agent; sends stored variable values to agent's script |
| If agent left before caller returns |
Call is disconnected |
| Cannot transfer to new destination |
Return to Agent does not support transferring to a different agent or number |
| Monitoring restriction |
If a supervisor is actively monitoring the interaction, the agent cannot initiate the Transfer to Secure Flow; monitoring must be ended first |
Analytics Impact
Secure flows affect the following agent metrics:
| Metric Affected |
Description |
| Time in IVR |
Time spent in the secure flow counts against IVR time |
| Average Time in IVR |
Affected by secure flow duration |
| Agent Handle Time |
Impacted because the agent is technically handling the interaction during the secure session |
| Average Agent Handle Time |
Affected |
| Agent Talk Time |
Affected |
Bot Integration with Secure Flows
If a bot session is initiated from a secure call flow, the bot inherits the secure characteristics of the secure call flow. This prevents logging and recording of data at the bot level, maintaining PCI/PII compliance.
Note: Dialog Engine Bot Flows are PCI DSS compliant and can be used in secure call flows. Digital Bot Flows are not PCI DSS compliant and must not be used in secure call flows.
Protocol Capture Warning (Exam Critical)
| Situation |
Risk |
| Protocol captures enabled for trunk diagnostics |
System does not encrypt data — all data including secure flow inputs is logged |
| PCI DSS setting enabled in org |
Genesys Cloud automatically disables Media Capture and Protocol Capture settings |
| Best practice |
Never enable protocol captures while using secure call flows in production |
Permissions
| Permission |
Purpose |
Architect > Flow > Add |
Create secure flows |
Architect > Flow > Edit |
Edit secure flows |
Architect > Flow > View |
View secure flows |
Architect > Flow > Delete |
Delete secure flows |
Workflow — Agent-Referred Secure Session
Agent on call with customer
        ↓
Agent initiates transfer (Transfer to Secure Flow action in inbound/in-queue flow)
  Note: If supervisor is monitoring, transfer cannot be initiated until monitoring ends
        ↓
Secure Flow begins — audio masked — recording paused
  Agent can no longer hear customer input
        ↓
Customer enters sensitive data (e.g., credit card number) via DTMF
        ↓
Secure Flow processes payment or stores confirmation number in secure variable
        ↓
Return to Agent action executes
  Confirmation number passed to agent's script
        ↓
Customer reconnected to agent
Workflow — IVR-Only Secure Session
Customer calls in — routed directly to Secure Flow
        ↓
No agent involved
        ↓
Secure Flow processes sensitive data (e.g., account number, payment)
        ↓
Disconnect action terminates interaction
Key Takeaways
| Topic |
Summary |
| Purpose |
Mask audio and prevent recording during sensitive data collection |
| PCI DSS compliant |
Yes — designed for PCI compliance |
| Triggering condition |
Any secure action or secure variable consumed in a flow activates secure mode |
| Two scenarios |
Agent-referred (returns to agent after) · IVR-only (ends with Disconnect) |
| Transfer to Secure Flow |
Available in Inbound, Outbound, and In-Queue flows |
| Return to Agent |
Terminating action — passes data back to agent; call disconnects if agent left |
| Protocol Capture risk |
Never enable protocol capture when using secure flows; PCI DSS setting disables it automatically |
| Bot support |
Dialog Engine Bot Flows only (PCI-compliant); Digital Bot Flows must NOT be used |
| Analytics impact |
Secure flow time counts against IVR metrics and agent handle time |
| Key icon |
Visual indicator in Architect showing secure action/variable in use |
Virtual Agent Flows (Agentic)
Study Notes
| Topic |
Description |
| Virtual Agent Flows |
AI-powered autonomous agent workflows for handling customer interactions |
| Also Known As |
Agentic Flows, AI Agent Automation, Autonomous Agents |
| Purpose |
Automate routine interactions without human agent intervention |
| Activation |
Requires Premium edition and Genesys Cloud CX module |
| Benefit |
24/7 availability, reduced operational costs, faster resolution for routine issues |
Navigation
Admin → Architect → Flows → Virtual Agent Flows
OR
Admin → Contact Center → Automation → Virtual Agent Configuration
Virtual Agent Flows Overview
Virtual Agent Flows are AI-powered autonomous agents that handle customer interactions without human agent involvement. They use natural language processing, machine learning, and conversation design to understand customer intent and resolve issues independently or escalate when necessary.
Key Capabilities
- Natural language understanding - Comprehends customer intent without rigid menu systems
- Conversational AI - Engages in natural dialogue with customers
- Intent recognition - Identifies customer goals and required actions
- Multi-turn conversations - Maintains context across conversation turns
- Seamless escalation - Routes to human agents when needed
- Learning capability - Improves responses based on interactions
- Omnichannel support - Operates across voice, chat, email, messaging
- Integration with systems - Accesses backend systems for real-time data
How It Works
- Customer initiates contact (voice, chat, email, etc.)
- Virtual agent receives interaction
- NLP analyzes customer intent
- Agent determines if it can handle the request
- Agent engages in conversation to gather information
- Agent performs action or retrieves information
- Agent provides resolution or escalates to human
- System learns from interaction for improvement
Edition & Module Requirements
| Requirement |
Details |
| Minimum Edition |
Premium Edition required |
| Module |
Genesys Cloud CX Automation or Virtual Agent add-on |
| License Type |
Virtual agent license (separate from agent seats) |
| Setup |
Configuration via Architect flows |
| Integration |
Backend system APIs for transactions |
Study Notes - Virtual Agent Capabilities
| Capability |
Description |
Use Case |
| Self-Service Resolution |
Handle routine requests independently |
Password resets, account balance checks |
| Information Retrieval |
Access and provide customer data |
Account status, order tracking |
| Transaction Processing |
Execute system actions safely |
Payment processing, appointment booking |
| Sentiment Analysis |
Monitor customer emotion during interaction |
De-escalate, escalate when frustrated |
| Context Preservation |
Maintain conversation history |
Multi-turn dialogues, follow-ups |
| Proactive Outreach |
Initiate contacts with customers |
Payment reminders, service updates |
| Knowledge Integration |
Access knowledge base articles |
Answer FAQs, provide guidance |
| Escalation Logic |
Intelligent routing to human agents |
Complex issues, preference-based |
| Multi-language Support |
Communicate in multiple languages |
Global customer base support |
| Compliance Monitoring |
Ensure interactions meet regulations |
Legal requirements, disclosures |
Implementation Guide
Step 1: Assessment & Strategy
- Identify suitable use cases (routine interactions)
- Map customer journeys to automate
- Determine escalation scenarios
- Audit backend system integrations needed
- Estimate volume and ROI
- Plan change management approach
Step 2: Virtual Agent Design
- Navigate to Admin → Architect → Flows
- Create new Virtual Agent Flow
- Define entry points (voice, chat, email)
- Design conversation scenarios
- Configure intent recognition
- Set up context variables
- Define escalation paths
Step 3: Conversation Design
- Create dialogue trees for common scenarios
- Write natural conversation language
- Define follow-up questions for clarity
- Build error handling for misunderstandings
- Create fallback responses
- Add personality/brand voice guidelines
- Test conversation flows
Step 4: System Integration
- Connect to knowledge base
- Integrate with CRM/customer systems
- Set up payment processing (if needed)
- Configure appointment systems
- Enable account system access
- Set up notification systems
- Test all integrations
Step 5: Testing & Validation
- Conduct conversation scenario testing
- Test integration endpoints
- Validate escalation triggers
- Test error handling
- Performance and load testing
- Security validation
- Compliance review
Step 6: Deployment & Monitoring
- Deploy to production queues
- Monitor interaction success rates
- Track escalation patterns
- Gather customer feedback
- Optimize based on metrics
- Refine conversations
- Continuous improvement
How to Implement
| Phase |
Description |
Timeline |
| Planning |
Identify use cases and design approach |
Week 1-2 |
| Design |
Create conversation flows and intents |
Week 2-4 |
| Development |
Build flows and integrations |
Week 4-6 |
| Testing |
Validate all scenarios and systems |
Week 6-7 |
| Pilot |
Deploy to subset of traffic |
Week 7-8 |
| Rollout |
Full deployment to production |
Week 8-9 |
| Optimization |
Monitor and improve performance |
Ongoing |
Virtual Agent Flow Architecture
Customer Contact
    ↓
Virtual Agent Entry Point
├── Voice (IVR-to-Agent transition)
├── Chat Bot Interface
├── Email Automation
└── Messaging Platform
    ↓
NLP & Intent Recognition Engine
├── Language Understanding
├── Entity Extraction
├── Intent Classification
└── Confidence Scoring
    ↓
Conversation Management
├── Context Preservation
├── State Management
├── History Tracking
└── Multi-turn Handling
    ↓
Action Determination
├── Self-Service Resolution Check
├── Required Information Gathering
├── System Access Requirement
└── Escalation Threshold Assessment
    ↓
Execution Path
├── Self-Service Path
│   ├── Database Query
│   ├── Transaction Processing
│   └── Information Retrieval
├── Guided Path
│   ├── Ask Clarifying Questions
│   ├── Provide Information
│   └── Collect Input
└── Escalation Path
    ├── Human Agent Queue
    ├── Context Transfer
    └── Warm Handoff
    ↓
Response Generation
├── Natural Language Generation
├── Personality/Brand Voice
└── Accessibility Compliance
    ↓
Customer Receives Response
    ↓
Interaction Logged & Analyzed
Common Virtual Agent Use Cases
Use Case 1: Self-Service Password Reset
Customer: "I forgot my password"
    ↓
Virtual Agent:
├── Understands: Password reset request
├── Verification: "Let me verify your identity
│   with security questions"
├── Questions: "What's your account email?
│   What was your first pet's name?"
├── Action: Reset password, send new one
└── Confirmation: "Your password has been reset.
    Check your email. Need anything else?"
    ↓
Resolution Rate: 95%+ (self-service)
Use Case 2: Order Status Inquiry
Customer: "Where's my order?"
    ↓
Virtual Agent:
├── Retrieves: Customer account
├── Questions: "What's your order number?"
├── Lookup: Accesses order system
├── Tracking: "Your order is out for delivery
    today. You can track it here: [link]"
└── Offer: "Can I help with anything else?"
    ↓
Resolution Rate: 90%+ (self-service)
Use Case 3: Appointment Scheduling
Customer: "I need to schedule a service call"
    ↓
Virtual Agent:
├── Understands: Appointment request
├── Gathers: "What service do you need?
    What days work for you?"
├── Checks: Availability in scheduling system
├── Confirms: "Got you down for March 15
    at 10 AM. You'll get a reminder."
└── Summary: Sends appointment confirmation
    ↓
Resolution Rate: 85%+ (self-service)
Use Case 4: Payment Processing
Customer: "I want to pay my bill"
    ↓
Virtual Agent:
├── Verification: Confirms identity
├── Info: "Your balance is $150.00.
    How much would you like to pay?"
├── Collection: Securely gathers payment info
├── Processing: Processes payment
├── Confirmation: "Payment of $100 processed.
    New balance: $50. Receipt sent."
    ↓
Resolution Rate: 92%+ (self-service)
Use Case 5: Escalation to Human Agent
Customer: "This is too complicated"
    ↓
Virtual Agent:
├── Sentiment: Detects frustration
├── Assessment: Issue beyond agent capability
├── Escalation: "I understand this is complex.
    Let me connect you with a specialist
    who can help better."
├── Transfer: Warm handoff with context
└── Human Agent Receives: Full interaction history
    ↓
Human Agent: "Hi Sarah, I see you were
    working on a billing dispute. Let me
    take it from here..."
Virtual Agent Conversation Flow Design
Simple Conversation Example
INTENT: Account Balance Check

Virtual Agent: "Hi! What can I help with?"
User: "I need my account balance"
Virtual Agent: [Detects intent]
    "I can help with that. Let me verify
    who you are. What's your account email?"
User: "john.smith@email.com"
Virtual Agent: [Verifies identity]
    "Thanks. What's your account PIN?"
User: "5432"
Virtual Agent: [Confirms identity]
    "Perfect. Your current balance is $2,150.
    Would you like to make a payment?"
User: "No, that's all I needed"
Virtual Agent: "Great! Is there anything
    else I can help with today?"
User: "No thanks"
Virtual Agent: "Thanks for contacting us.
    Have a great day!"
[Interaction Complete - Self-Service Resolution]
Complex Conversation with Escalation
INTENT: Billing Dispute

Virtual Agent: "Hi! What's going on today?"
User: "I was charged twice for the same order"
Virtual Agent: [Detects: Billing dispute]
    "I'm sorry that happened. I can help
    investigate. What's your order number?"
User: "ORD-123456"
Virtual Agent: [Looks up order]
    "I see the issue. You're right - there
    are two charges. Let me credit one back."
    [Processes refund]
    "The refund of $99.99 has been processed.
    You should see it in 2-3 business days."
User: "But I need it today - I'm short on funds"
Virtual Agent: [Sentiment: Frustrated]
    "I understand this is urgent. While I
    can't speed up the refund, I can connect
    you with our billing specialist who might
    have other options. One moment..."
    [Initiates escalation]
Virtual Agent: "Sarah from billing is ready
    to help. I'm connecting you now..."
    ↓
[Warm Handoff to Human Agent]
Human Agent: "Hi, I see the double charge
    issue. Let's explore what we can do..."
Multi-Channel Virtual Agent Flows
Voice Channel (IVR-like)
Customer Calls
    ↓
Virtual Agent Answers (Voice Synthesized)
    ↓
Conversation via Speech Recognition/TTS
├── "Welcome. Say what you need help with."
├── Customer speaks: "I want my balance"
├── Agent understands: Account inquiry
└── Agent responds with balance information
    ↓
[Natural voice conversation, not menu-based]
Chat Channel
Customer Opens Chat
    ↓
Virtual Agent Responds (Text-based)
    ↓
Conversation via Text
├── "Hi there! How can I help?"
├── Customer: "Where's my order?"
├── Agent: [Provides tracking info with links]
└── Conversation continues naturally
Email Channel
Customer Sends Email
    ↓
Virtual Agent Processes (Async)
    ↓
Email Response Generated
├── Understands customer question
├── Retrieves relevant information
├── Drafts personalized response
└── Sends reply with solution/escalation
Messaging Apps (SMS, WhatsApp)
Customer Sends SMS/WhatsApp
    ↓
Virtual Agent Receives
    ↓
Concise Text-based Conversation
├── "Hi! What do you need?"
├── Customer: "Bill amount?"
├── Agent: "Your bill is $150"
└── Natural conversational flow
Escalation Scenarios & Logic
Escalation Decision Tree:

Virtual Agent Receives Request
    ↓
Can handle self-service?
├─ YES: Process request
│   └─ Return result to customer
│       ├─ Success → End interaction
│       └─ Failure → Escalate
│
└─ NO: Determine escalation type
    ├─ Capability-based
    │  └─ "I'm not able to handle that.
    │     Let me connect you with someone
    │     who can help."
    │
    ├─ Complexity-based
    │  └─ "This needs expert analysis.
    │     Connecting you with a specialist..."
    │
    ├─ Sentiment-based
    │  └─ Customer frustrated
    │     "I understand your frustration.
    │     Let me get you a specialist..."
    │
    ├─ Preference-based
    │  └─ Customer requests human
    │     "Of course, I'll connect you
    │     with an agent right now."
    │
    └─ Business-based
       └─ High-value customer
          "This deserves personalized
          attention. One moment..."
            ↓
    Queue to Appropriate Agent Group
            ↓
    Warm Handoff with Full Context
            ↓
    Human Agent Assists Customer
Virtual Agent Performance Metrics
Interaction Success
| Metric |
Target |
Purpose |
| Self-Service Resolution Rate |
>75% |
Measure autonomous handling |
| Successful Escalations |
>95% |
Ensure proper handoffs |
| Escalation Rate |
<25% |
Control human agent workload |
| First-Contact Resolution |
>80% |
Avoid repeat contacts |
| Customer Satisfaction |
>80% |
Measure customer experience |
Operational Efficiency
| Metric |
Target |
Purpose |
| Automated Interactions |
>60% of volume |
Measure automation impact |
| Avg Interaction Time |
Baseline -30% |
Track efficiency gains |
| Cost Per Interaction |
-40-60% vs agent |
Measure ROI |
| 24/7 Availability |
100% |
Measure uptime |
| Peak Hour Handling |
100% capacity |
Measure scalability |
Quality Metrics
| Metric |
Target |
Purpose |
| Intent Recognition Accuracy |
>90% |
Verify understanding |
| Conversation Completion |
>85% |
Measure flow success |
| Compliance Adherence |
100% |
Ensure regulatory met |
| Sentiment Stability |
No escalation due to tone |
Measure conversational quality |
| Knowledge Article Accuracy |
100% |
Ensure correct information |
Real Flow Scenario: 24/7 Self-Service
Scenario: Customer calls at 2 AM with password reset

Timeline:
2:00 AM - Customer Calls
    ↓
Virtual Agent Answers (No wait!)
    "Welcome to ABC Company. I'm your
    virtual assistant. How can I help?"

Customer: "I can't log in"
    ↓
Virtual Agent - Intent Recognition
    Identified: "Password Reset Request"
    Confidence: 98%
    ↓
Virtual Agent - Verification
    "I can help you reset your password.
    Let me verify your identity first.
    What email is on your account?"

Customer: "john@email.com"
    ↓
Virtual Agent - System Access
    [Queries customer database]
    [Retrieves security questions]
    ↓
Virtual Agent - Authentication
    "What's your mother's maiden name?"

Customer: "Smith"
    ↓
Virtual Agent - Verification Complete
    [Identity confirmed]
    [Generates temporary password]
    [Sends via SMS]
    ↓
Virtual Agent - Confirmation
    "Perfect! I've sent a temporary
    password to your phone. Use that to
    log in, then set a new password.
    Need anything else?"

Customer: "No, thanks"
    ↓
Virtual Agent - Closing
    "Great! You're all set. Have a
    good night!"
    ↓
2:03 AM - Issue Resolved
Resolution: Self-service (Zero human involvement)
Cost: ~$0.15 per interaction
Customer Satisfaction: Immediate resolution
Best Practices
Conversation Design
- Natural language - Avoid robotic responses, use conversational tone
- Context awareness - Remember previous statements in multi-turn dialogue
- Graceful degradation - Handle misunderstandings without frustration
- Clear escalation - Explain why escalating to human when needed
- Personality - Match brand voice (professional, friendly, etc.)
- Conciseness - Keep responses brief and to the point
Intent Recognition
- Comprehensive training - Train model with many user utterance variations
- Entity extraction - Accurately identify account numbers, dates, etc.
- Confidence thresholds - Only process high-confidence intents
- Fallback handling - Ask clarifying questions for low confidence
- Regular updates - Continuously improve model with real interactions
- Error capture - Log misunderstandings for model improvement
Escalation Strategy
- Clear criteria - Define when escalation is triggered
- Warm handoffs - Provide full context to human agent
- Preference respect - Allow customer to request human anytime
- Sentiment triggers - Escalate frustrated customers automatically
- Complexity assessment - Escalate issues beyond agent capability
- Smooth transition - Make escalation seamless and professional
System Integration
- Secure access - Validate all backend system connections
- Transaction safety - Implement verification for financial transactions
- Data protection - Encrypt sensitive customer information
- Audit trails - Log all agent actions for compliance
- Error handling - Gracefully handle system unavailability
- Real-time sync - Keep agent data current with systems
Continuous Improvement
- Monitor metrics - Track resolution rates and satisfaction daily
- Gather feedback - Survey customers about virtual agent experience
- Analyze conversations - Review failed interactions for improvement
- Update conversations - Refine dialogue based on real interactions
- A/B testing - Test different conversation approaches
- Quarterly reviews - Assess overall performance and ROI
Common Implementation Scenarios
Scenario 1: Small Business (Simple Use Case)
Configuration:
├── Single virtual agent
├── 2-3 use cases (balance, order status, hours)
├── Basic escalation to agent queue
└── Email & chat channels

Setup Time: 4-6 weeks
Expected Automation: 60-70% of routine inquiries
ROI Timeline: 3-4 months
Cost Savings: $2,000-5,000/month
Scenario 2: Enterprise (Multi-Use Case)
Configuration:
├── Multiple specialized virtual agents
├── 10+ use cases (billing, support, sales, etc.)
├── Intelligent routing based on intent
├── All channels (voice, chat, email, messaging)
├── Advanced escalation logic
└── Integration with CRM, billing, ticketing systems

Setup Time: 12-16 weeks
Expected Automation: 50-70% of volume
ROI Timeline: 2-3 months
Cost Savings: $50,000-100,000+/month
Scenario 3: 24/7 Global Support
Configuration:
├── Multi-language virtual agents (5+ languages)
├── Timezone-aware routing
├── Global escalation queues
├── Multiple backend system integrations
├── Compliance per region

Setup Time: 16-20 weeks
Expected Automation: 40-60% of global volume
ROI Timeline: 4-6 months
Cost Savings: $100,000-250,000+/month
Troubleshooting Guide
| Issue |
Cause |
Resolution |
| Low resolution rate |
Poor intent recognition |
Improve NLP training with more examples |
| High escalation rate |
Agent not handling enough cases |
Expand conversation design and capabilities |
| Customer frustration |
Misunderstood requests |
Add better error handling and fallbacks |
| Slow response time |
System latency |
Optimize integrations and database queries |
| Integration failures |
Backend system down |
Implement fallback flows and escalation |
| Incorrect information |
Stale data in systems |
Ensure real-time system synchronization |
| Compliance issues |
Missing required language |
Add required disclosures and messaging |
| Security concerns |
Data exposed |
Review access controls and encryption |
| Poor escalation |
Missing context |
Ensure full interaction history transfer |
| Low adoption |
Customers prefer agents |
Improve virtual agent experience and marketing |
Virtual Agent vs. Traditional IVR
| Feature |
Virtual Agent |
Traditional IVR |
| User Experience |
Natural conversation |
Menu-driven |
| Understanding |
NLP-based intent |
Keyword matching |
| Conversation Type |
Multi-turn dialogue |
Sequential selections |
| Error Handling |
Contextual recovery |
Repeat menu |
| Personalization |
Personalized responses |
Generic options |
| Flexibility |
Handles variations |
Follows fixed paths |
| Resolution Rate |
70-80%+ |
40-60% |
| Learning |
Improves with data |
Static |
| Cost |
Medium-High |
Low |
| Customer Satisfaction |
High |
Medium |
| Setup Time |
8-16 weeks |
2-4 weeks |
Interview Cheat Sheet
| Question |
Answer |
| What are virtual agent flows? |
AI-powered autonomous agents that handle customer interactions without humans |
| What are they also called? |
Agentic flows, autonomous agents, AI automation |
| What edition is required? |
Premium edition with Genesys Cloud CX Automation module |
| What technology do they use? |
Natural language processing, machine learning, conversation management |
| What channels do they support? |
Voice, chat, email, SMS, WhatsApp, messaging apps |
| What can they handle? |
Routine requests: password resets, order tracking, payments, scheduling |
| When do they escalate? |
Complex issues, customer preference, sentiment triggers, capability limits |
| What's the expected automation rate? |
50-70% of routine interactions |
| What's the ROI timeline? |
2-4 months to see significant cost savings |
| What's most important for success? |
Quality conversation design and NLP training |
| How do they improve over time? |
Machine learning from interactions, feedback, and updates |
| What about security? |
Secure authentication, encrypted data, audit trails |
| Can customers always reach humans? |
Yes, escalation available anytime on demand |
| What's the biggest benefit? |
24/7 availability at 60-80% cost reduction |
| What's the biggest challenge? |
Complex conversation design and integration setup |
Key Takeaways
- Autonomous Operation - Virtual agents handle interactions without human involvement
- AI-Powered - Uses NLP and machine learning for natural conversations
- Cost Reduction - 60-80% lower cost than human agents for routine interactions
- 24/7 Availability - Provide support outside business hours automatically
- Omnichannel - Work across voice, chat, email, and messaging channels
- Intelligent Escalation - Routes to humans when needed seamlessly
- Continuous Learning - Improves recommendations and handling over time
- Significant Automation - Can handle 50-70% of routine inquiries
- Customer Preference - Allows escalation to human anytime
- Quick ROI - 2-4 months to see measurable cost and efficiency improvements
Migration Path from Traditional IVR
Phase 1: Planning (Weeks 1-2)
├── Audit current IVR flows
├── Identify suitable use cases
├── Design new virtual agent conversations
├── Plan escalation logic
└── Estimate volume and ROI
Phase 2: Development (Weeks 3-6)
├── Build virtual agent flows
├── Create conversation scenarios
├── Configure NLP and intents
├── Integrate backend systems
└── Set up escalation routing
Phase 3: Testing (Weeks 6-8)
├── Conduct conversation testing
├── Validate integrations
├── Test escalation paths
├── Performance load testing
└── Security validation
Phase 4: Pilot (Weeks 8-10)
├── Deploy to test traffic
├── Monitor success rates
├── Gather customer feedback
├── Collect metric baseline
└── Optimize based on learnings
Phase 5: Rollout (Weeks 10-12)
├── Redirect production traffic
├── Disable old IVR
├── Monitor closely
├── Provide agent support
└── Scale up gradually
Phase 6: Optimization (Ongoing)
├── Monitor performance daily
├── Improve conversation design
├── Update intents based on data
├── Gather ongoing feedback
└── Continuous improvement
Advanced: Custom Agent Configurations
Multi-Agent Orchestration
Contact Arrives
    ↓
Main Virtual Agent
├── Understands intent
├── Routes to specialized agent
│   ├── Billing Agent
│   ├── Support Agent
│   ├── Sales Agent
│   └── Technical Agent
├── Specialized agent handles interaction
└── Escalates if needed
Hybrid Agent Approach
Virtual Agent + Human
├── Virtual agent starts interaction
├── Gathers information
├── Handles simple part
├── Transfers to human for complex part
└── Virtual agent confirms resolution
Proactive Agent
System Trigger
├── "Bill due in 3 days"
├── Virtual agent proactively contacts customer
├── "Your payment is due March 15. Pay now?"
├── Processes payment if requested
└── Sends confirmation
Additional Resources
Official Documentation Links
- Genesys Cloud Virtual Agent Guide: https://help.genesys.com/genesyscloud/current/en-us/VirtualAgent.html
- Architect Flows: https://help.genesys.com/genesyscloud/current/en-us/ArchitectFlows.html
- NLP & Intent Configuration: https://help.genesys.com/genesyscloud/current/en-us/NLPConfiguration.html
- Genesys Sales: sales@genesys.com
- Genesys Support: https://support.genesys.com
- Community Forums: https://community.genesys.com
Document Version Info
Last Updated: March 2026
Source: Genesys PureCloud Official Documentation
Version: 1.0