2.- Organization Settings
- Global Settings
- Onboarding & Access
- Security & Compliance
- Status & Presence Management
- Technical & Routing Behaviours
Global Settings
Global Settings control the foundational behavior of your Genesys Cloud organization — how the platform identifies users, what language and region it operates in, and where internal issues are reported. These settings are configured under Admin → Account Settings → Organization Settings → Settings.
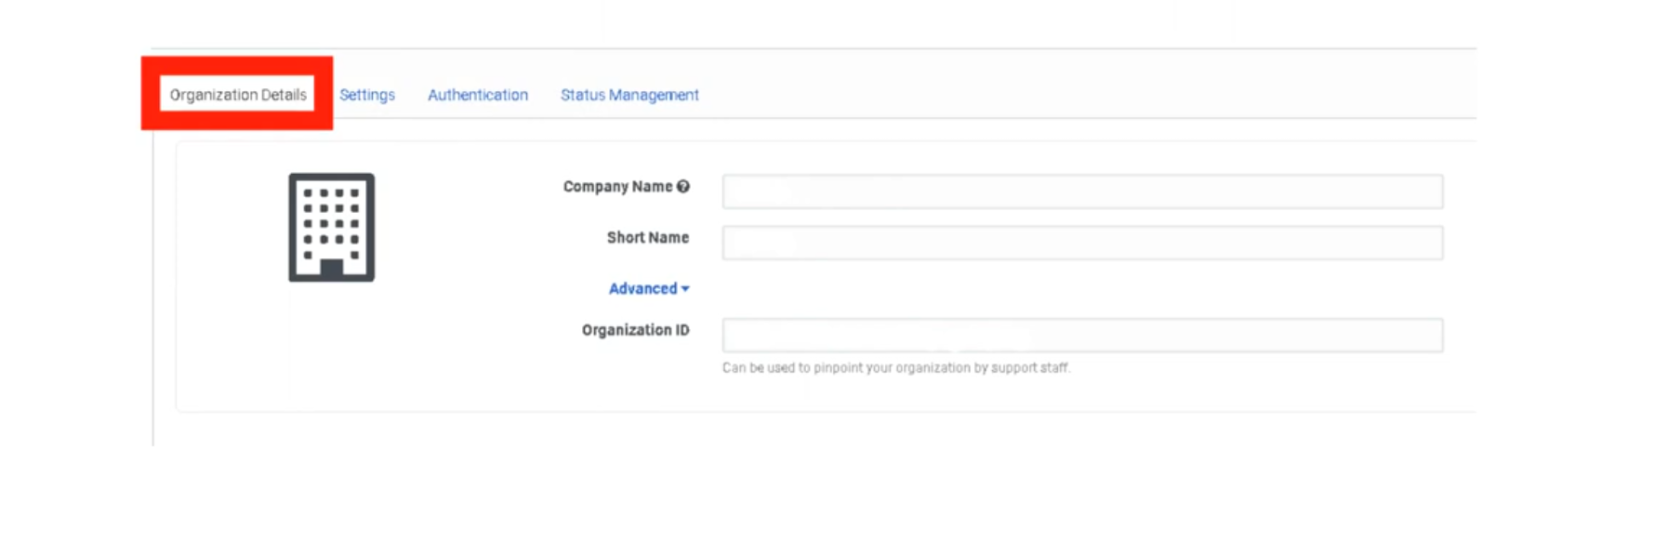
Organization Details
These fields identify your specific Genesys Cloud instance. Most are view-only after provisioning. Administration
| Setting | Description | Editable? |
|---|---|---|
| Organization Name | The display name of your org shown across the platform. | ✅ Yes |
| Organization ID | A unique, system-generated identifier for your cloud instance. Used in API calls and support tickets. | ❌ No |
| Short Name | A URL-safe identifier used in your Genesys Cloud login URL (e.g. yourcompany.mypurecloud.com). |
❌ No |
| Default Site | The telephony site assigned as the default for new users. | ✅ Yes |
📌 Note: If you are unsure of your Organization Short Name, navigate to Admin → Account Settings → Organization Settings. You will need it when configuring BYOC trunk integrations and SSO providers.
Geolocation Detection
| Setting | Description |
|---|---|
| Geolocation Detection | When enabled, Genesys Cloud automatically detects and displays user physical locations on the directory and presence map. Can be toggled off for privacy or compliance reasons. |
Default: On. Toggle off under Admin → Account Settings → Organization Settings → Settings → Turn off location detection.
Default Language & Country Code
These settings establish the regional baseline for the entire organization. They affect system-generated emails and phone number formatting across the platform.
| Setting | Description | Impact |
|---|---|---|
| Default Language | Sets the language used for system-generated emails such as user invitations and password reset messages. | System emails, platform UI default for new users |
| Default Country Code | Sets the default international dialing prefix for phone number formatting (e.g., +1 for United States, +52 for Mexico). | Phone number display, E.164 formatting, DID assignment |
📌 Important: The Default Country Code does not restrict which countries agents can dial. It only determines how phone numbers without an explicit country prefix are interpreted and formatted.
Issue Submission Destination
| Setting | Description |
|---|---|
| Issue Submission Destination | Defines where feedback and issue reports submitted by users through the in-app Help → Report a Problem feature are sent. Can be directed to an internal email address or ticketing system instead of Genesys Support. |
Useful for organizations that want to triage user-reported issues internally before escalating to Genesys Care.
Invite Links
| Setting | Description |
|---|---|
| Invite Link Configuration | Controls how new user invitation emails are generated and whether invitation links expire. Administrators can configure link behavior when onboarding users manually or via CSV import. |
Free Seating
| Setting | Description |
|---|---|
| Free Seating | When enabled, agents are not assigned a fixed physical phone. Instead, they log in and the system dynamically assigns them to whatever phone they are using. Reduces the need to pre-assign individual phone profiles to every user. |
📌 Note: Free Seating must be enabled at the org level before it can be applied to individual users. Requires compatible phone base settings.
Voicemail Settings
These settings apply to all users in the organization unless overridden at the user level.
| Setting | Description | Default |
|---|---|---|
| Voicemail PIN | Requires users to set and enter a PIN to access their voicemail. Can be disabled org-wide if your security policy does not require it. | On |
| Voicemail Timeout | Number of seconds a call rings before being forwarded to voicemail. | Configurable |
| Maximum Voicemail Length | Sets the maximum duration (in seconds) of a voicemail message a caller can leave. | Configurable |
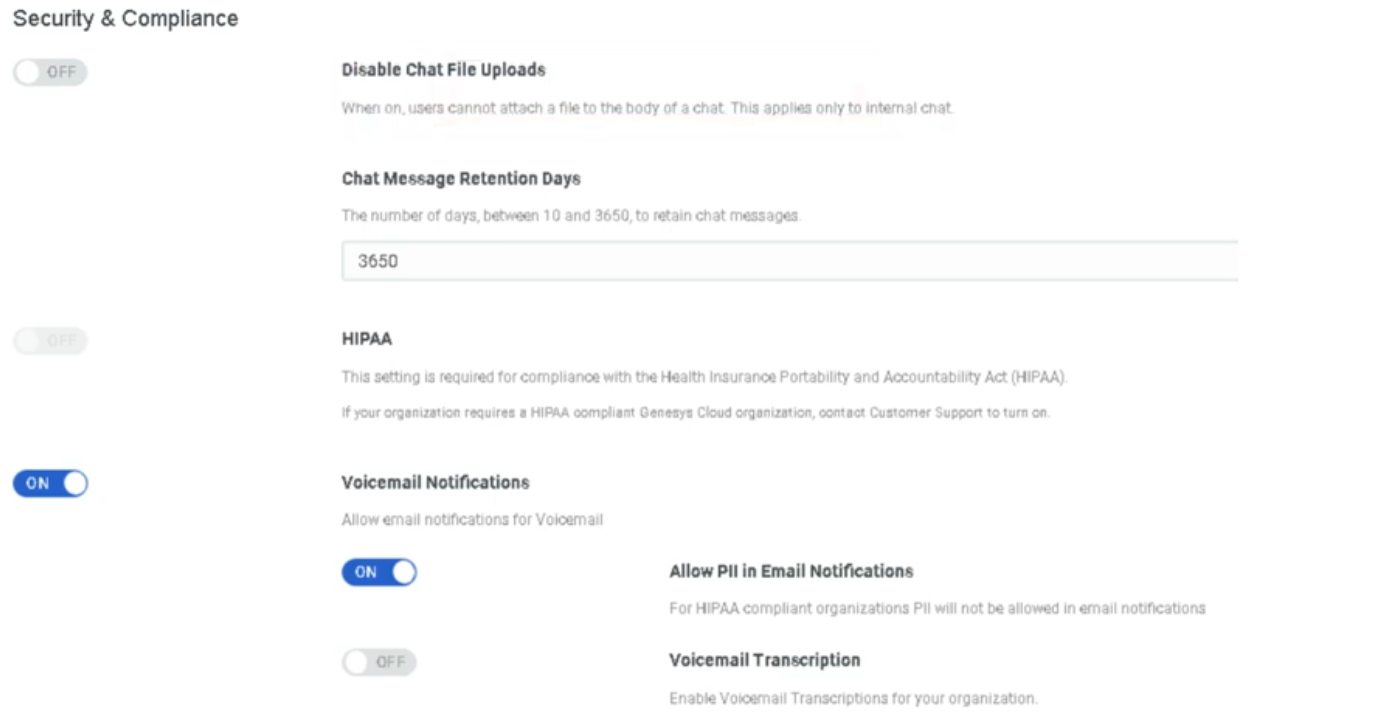
| Voicemail Transcription | When enabled, Genesys Cloud transcribes voicemail audio to text and includes it in email notifications. | Off |
| Voicemail Notifications | Sends an email notification to the user when a new voicemail is received. | Configurable |
| Allow PII in Voicemail Email Notifications | When enabled, the voicemail email notification includes the caller's phone number and name. Disable for environments with strict PII handling requirements. | Off |
Default Text-to-Speech (TTS) Engine
| Setting | Description |
|---|---|
| Default TTS Engine | Sets the organization-wide TTS engine used in Architect flows when no specific engine is defined at the flow level. Options include Genesys TTS, Google TTS, and Microsoft Azure TTS (the latter two require AppFoundry integration). |
📌 Note (March 2026): Genesys plans to end native Enhanced TTS support for select Google and Microsoft voices on August 5, 2026. After that date, those voices require a third-party TTS integration via AppFoundry under the BYOT-A billing model. Plan accordingly if your flows use Google Standard or Microsoft voices.
Summary — What Lives Here vs. Other Pages
| Setting Area | This Page | Other Page |
|---|---|---|
| Org ID, name, short name | ✅ | — |
| Geolocation | ✅ | — |
| Default language / country code | ✅ | — |
| Invite links / free seating | ✅ | → Onboarding & Access |
| Voicemail settings | ✅ | → Onboarding & Access (detail) |
| Default TTS engine | ✅ | → Architect & Call Flows (usage) |
| Security & compliance | — | → Security & Compliance |
| Password policy / SSO / MFA | — | → Security & Compliance |
| Secondary statuses | — | → Status & Presence Management |
| Routing behaviors | — | → Technical Routing Behaviours |
| Role backfill / division-aware roles | — | → Security & Compliance |
| Execution data retention | — | → Technical Routing Behaviours |

Last verified against Genesys Cloud Resource Center – March 2026
Onboarding & Access
These settings control how new users are introduced to the platform, what email domains are permitted to join the organization, and how sessions are managed for security and compliance. Configured under Admin → Account Settings → Organization Settings → Settings → Onboarding People and Telephony Settings.
Navigation Path
| Step | Path |
|---|---|
| 1 | Click Admin |
| 2 | Under Account Settings, click Organization Settings |
| 3 | Click the Settings tab |
| 4 | Locate the Onboarding People and Telephony Settings section |
📌 Authentication settings (Password Policy, SSO, MFA) are on the Authentication tab, not the Settings tab. See the Security & Compliance page.
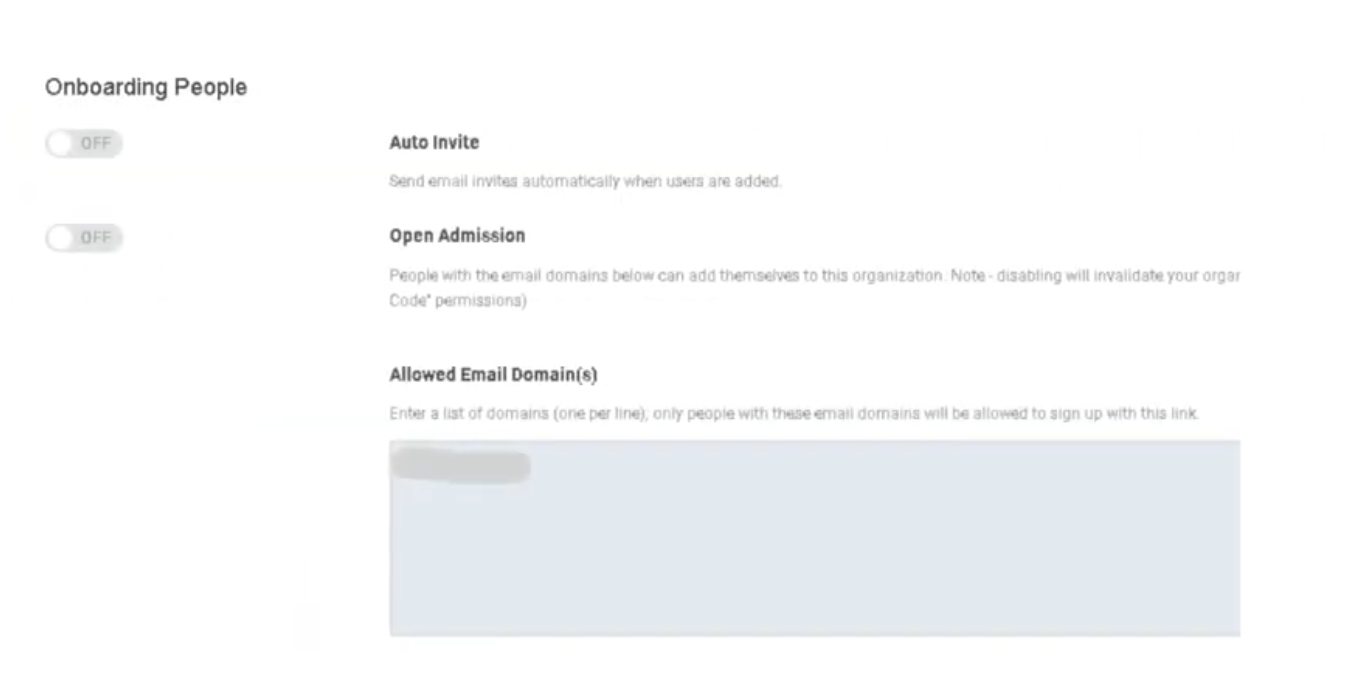
1. Invitation Settings
Auto Invite (Automatically Send Welcome Email)
| State | Behavior |
|---|---|
| Enabled | When a new user is created (manually or via bulk import), Genesys Cloud immediately sends a Welcome email containing a link to set their password. |
| Disabled | Users are created silently with no email sent. Admins must manually trigger invitations later from the People list. |
When to disable Auto Invite:
Useful when pre-loading a large batch of users (e.g., 100 agents before a go-live) and you don't want them logging in until a specific training date. Create all users, then bulk-send invitations when ready.
⚠️ Do not send manual email invitations to users who already received an automatic invite — they will receive duplicate emails.
Invitation Link Expiration
| Item | Detail |
|---|---|
| Expiry period | 30 days from the date the invitation is sent |
| What happens after expiry | The password-set link in the email becomes invalid |
| How to recover | Admin must go to Admin → People & Permissions → People, find the user, and click Resend Invite |
| Status check | Use the Welcome Sent column on the Manage People page to verify whether an invite has been sent to a user |
⚠️ Note: The invitation link expires after 30 days, not 48 hours.
Open Admission (Self-Service Invite Link)
| Setting | Description |
|---|---|
| Open Admission / Invite Link | Generates a shareable link that allows people to add themselves to the organization. Anyone with the link can create an account (subject to Allowed Domains restrictions). |
| Disable to invalidate | Toggling this off immediately invalidates any previously shared link. Useful for closing off self-registration after an onboarding event. |
📌 Post the invite link on an internal SharePoint or intranet during structured onboarding, then disable it once all expected users have joined.
2. Allowed Email Domains
| Setting | Description |
|---|---|
| Allowed Email Domain(s) | A whitelist of email domains permitted to create accounts in the organization. Only users with a matching domain can be added or self-register. |
Example:
| Configured Domain | Result |
|---|---|
@telecom-corp.com |
✅ Users with @telecom-corp.com can be added |
@gmail.com |
❌ Blocked — cannot create an account |
@outlook.com |
❌ Blocked — cannot create an account |
⚠️ Important distinction: This setting controls who can join the org. It is not the same as the Contact Center Email Domain Allowlist, which controls outbound email routing. These are two different settings in two different locations.
3. Free Seating
| Setting | Description |
|---|---|
| Free Seating | When enabled, a station (WebRTC or physical phone) is released once an agent goes offline, making it available for the next user who logs in to that workstation. |
📌 Free Seating must be enabled here at the org level and configured on compatible phone base settings before it applies to individual users. See Technical & Routing Behaviours for how this interacts with station assignment logic.
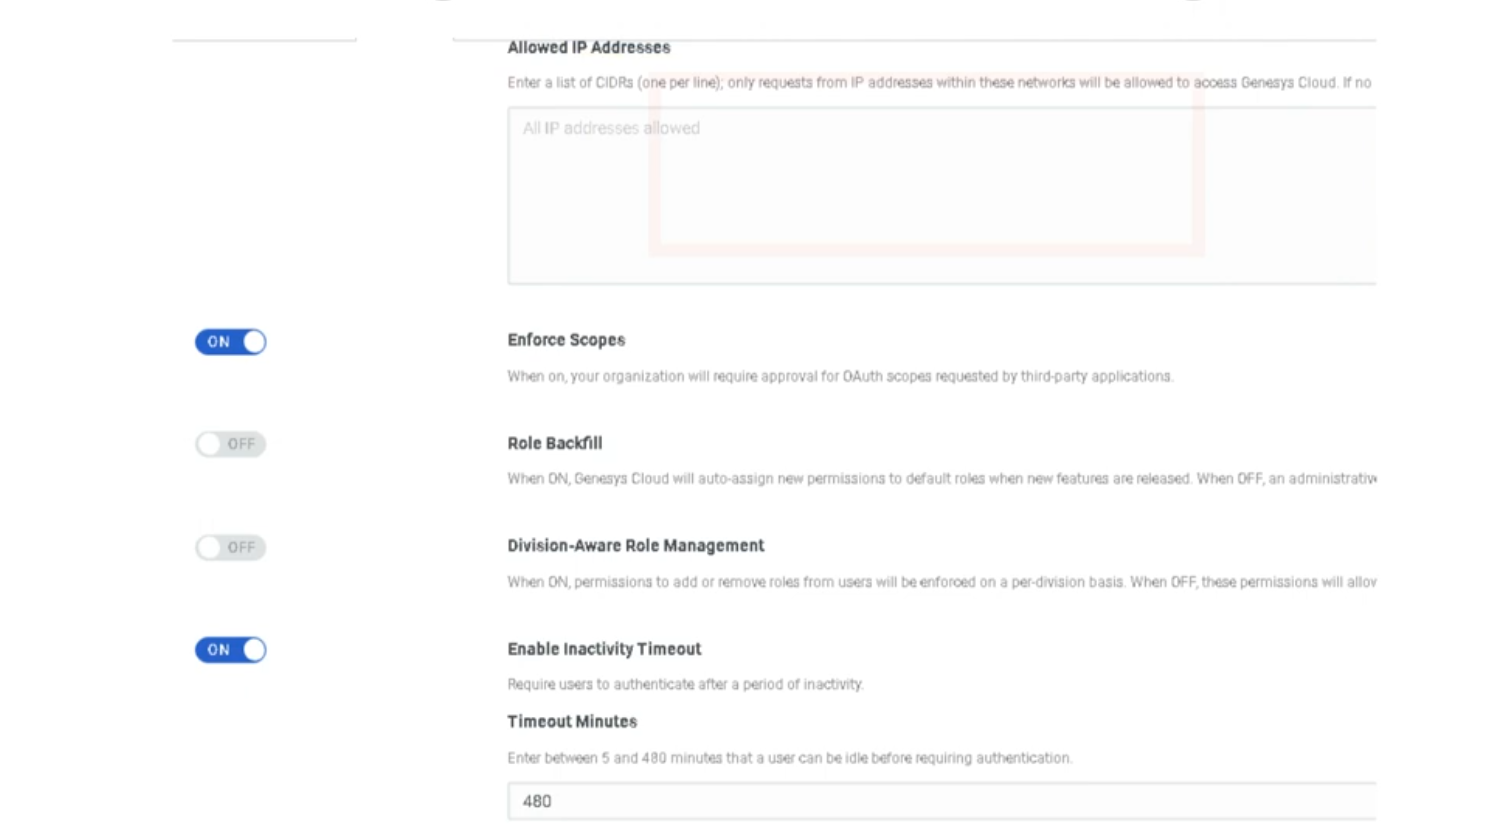
4. Inactivity Timeout
| Setting | Description |
|---|---|
| Inactivity Timeout | Automatically logs a user out of Genesys Cloud after a set period of idle time with no user input detected. |
Configuration range:
| Limit | Value |
|---|---|
| Minimum | 5 minutes |
| Maximum | 8 hours |
| HIPAA orgs | Mandatory maximum of 15 minutes — enforced even if the toggle is off |
Behavior notes:
| Scenario | Behavior |
|---|---|
| User is actively clicking/typing | Timer resets — no logout |
| Browser tab is open but no interaction | Timer counts down |
| Mobile app users | Not recommended — mobile apps handle session state differently and unexpected logouts may occur |
| Specific API calls | Certain API calls can be excluded from resetting the timer (configured separately) |
📌 License management tip: If agents leave browsers open overnight, an open session may still consume a license seat depending on your billing model. Inactivity Timeout closes those sessions automatically.
Onboarding Checklist
| Step | Setting | Recommended Action |
|---|---|---|
| 1 | Allowed Email Domains | Set to your corporate domain(s) before any users are added |
| 2 | Auto Invite | Decide enabled vs. disabled based on your go-live timeline |
| 3 | Open Admission Link | Enable during structured onboarding, disable afterward |
| 4 | Inactivity Timeout | Align with corporate security policy (typically 30–60 min); mandatory 15 min for HIPAA |
| 5 | Free Seating | Enable if shift workers share workstations |
| 6 | SSO / MFA | See Security & Compliance page |
Last verified against Genesys Cloud Resource Center – March 2026
Security & Compliance
These settings govern how Genesys Cloud protects sensitive data, enforces compliance with regulatory standards, and controls access and authentication across the organization. Configured under Admin → Account Settings → Organization Settings → Settings → Security & Compliance and the Authentication tab.
Navigation Path
| Step | Path |
|---|---|
| 1 | Click Admin |
| 2 | Under Account Settings, click Organization Settings |
| 3 | Click the Settings tab → Security & Compliance section |
| 4 | For authentication settings → click the Authentication tab |
1. Regulatory Compliance Modes
These modes are not self-service toggles — they must be enabled by contacting Genesys Cloud Customer Care. Once enabled, they impose specific platform behaviors and restrictions.
HIPAA Compliance
| Item | Detail |
|---|---|
| What it does | Secures Protected Health Information (PHI) handled in the contact center. Imposes specific restrictions on data handling, recording, and storage. |
| Inactivity timeout impact | HIPAA organizations have a mandatory 15-minute maximum inactivity timeout, even if the inactivity timeout is toggled off. |
| How to enable | You must first obtain a Business Associate Agreement (BAA) from Genesys. Contact dataprivacy@genesys.com. Once you have a BAA, contact Genesys Cloud Customer Care to enable HIPAA mode. |
| Regions | Americas (HIPAA, HITRUST) |
PCI DSS Compliance
| Item | Detail |
|---|---|
| What it does | Enables PCI DSS-compliant handling of payment card data. Disables DTMF logging and media capture by the Edge to prevent cardholder data from being recorded. |
| Compliance level | Genesys Cloud is a Level 1 PCI DSS Service Provider assessed under PCI DSS version 4.0.1. |
| How to enable | Contact Genesys Cloud Customer Care. PCI DSS cannot be self-enabled. |
| Important | Only Genesys Cloud features noted in the Report on Compliance as PCI-certified can be used to process, transmit, or store credit card information. |
PCI DSS deployment options:
| Model | PCI Compliant? |
|---|---|
| Genesys Cloud Voice | ✅ Yes |
| BYOC Cloud | ✅ Yes |
| BYOC Premises | ✅ Yes |
PCI DSS transaction handling options:
| Method | Description |
|---|---|
| Secure Pause | Agent manually initiates a pause in recording before collecting card data. Only Secure Pause and Secure Call Flows are validated as Level 1 PCI DSS compliant by an external Qualified Security Assessor. |
| Secure Call Flow | Architect flow transfers the call to a secure flow for card data collection, keeping the agent out of scope. |
⚠️ Genesys recommends Secure Pause or Secure Call Flows as the first line of defense for PCI DSS. Automatic redaction (below) is best-effort only and is not a substitute for PCI DSS compliance.
2. Data Redaction
Sensitive Data Redaction
| Setting | Description |
|---|---|
| Sensitive Data Redaction for Payment Cards | Automatically redacts PCI entities (credit card numbers, CVVs) from recordings and voice transcriptions on a best-effort basis. |
| Sensitive Data Redaction for Personal Information | Automatically redacts personal information entities (SSNs, dates of birth, etc.) from recordings and voice transcriptions on a best-effort basis. |
Key limitations:
| Item | Detail |
|---|---|
| Availability | Only functions if Speech or Text Analytics is enabled for the interaction |
| Best-effort | Not a guaranteed redaction — not a substitute for Secure Pause or Secure Call Flows for PCI compliance |
| Override | Users with the Recording > Recording > ViewSensitiveData permission can still access the original unredacted recording |
Admin → Account Settings → Organization Settings → Settings → Security & Compliance → Sensitive Data Redaction
3. Access & Authentication Controls
IP Address Allowlist
| Setting | Description |
|---|---|
| IP Address Allowlist | Restricts Genesys Cloud access to specific IP addresses or CIDR ranges. Useful for enforcing that agents can only log in from corporate networks or VPNs. |
⚠️ Caution: Before adding IP restrictions, ensure your own admin IP address is included. Locking yourself out requires contacting Genesys Care.
Division-Aware Role Management
| Setting | Description |
|---|---|
| Division-Aware Role Management | When enabled, role assignments are scoped to specific divisions. A user assigned the Supervisor role in the Monterrey division can only supervise agents and resources in that division. |
📌 This is a significant architectural decision. Once enabled, all role assignments must be made with a division context. Coordinate with your access control design before enabling.
Automatic Role Permission Backfill
| Setting | Description |
|---|---|
| Automatically backfill roles with new permissions | When enabled, Genesys Cloud automatically adds new feature permissions to existing roles as new features are released. When disabled, administrators must manually review and assign new permissions as new features roll out. |
Recommendation:
| Organization Type | Recommended Setting |
|---|---|
| Small org, wants to stay current automatically | Enabled |
| Regulated org with strict change control | Disabled — review and approve permissions manually |
OAuth Scope Enforcement
| Setting | Description |
|---|---|
| Enable OAuth Scope Enforcement | Restricts what API integrations can access based on the OAuth scopes explicitly granted to them. Prevents integrations from accessing resources beyond their declared scope. |
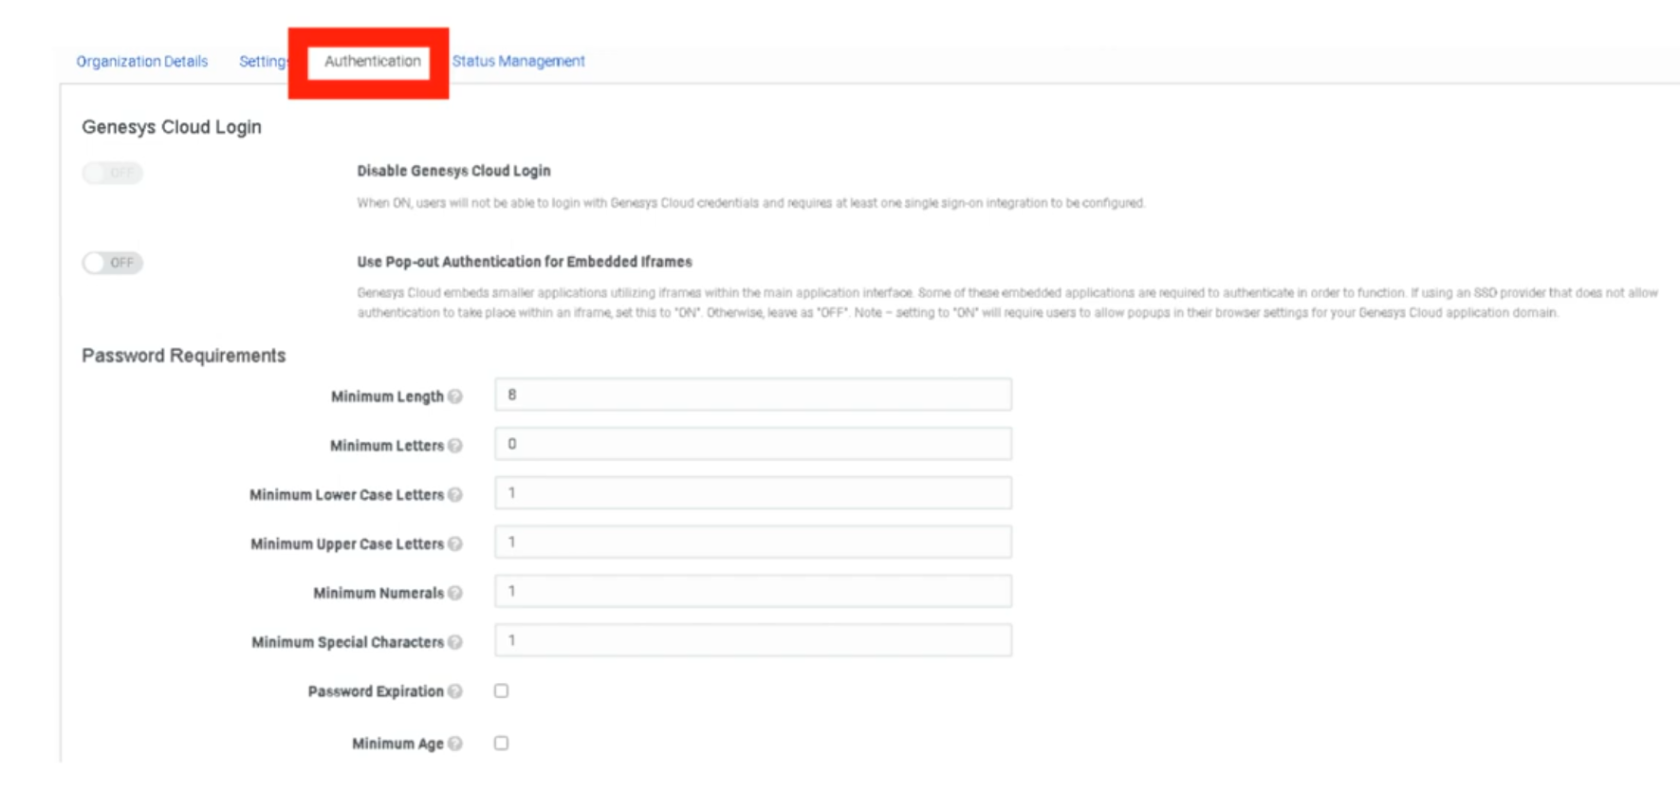
4. Authentication Settings
Configured under the Authentication tab of Organization Settings, not the Settings tab.
Password Policy
| Setting | Description |
|---|---|
| Minimum Length | Minimum number of characters required |
| Uppercase Required | Forces at least one uppercase letter |
| Numbers Required | Forces at least one numeric character |
| Special Characters Required | Forces at least one special character |
| Password History | Prevents reuse of previous passwords |
Single Sign-On (SSO)
| Setting | Description |
|---|---|
| SSO Integration | Configure Genesys Cloud to authenticate through an external identity provider such as Azure AD, Okta, or Ping Identity. |
| SSO Only Mode | Forces all users to authenticate exclusively through SSO. Disables native Genesys username/password login entirely. |
📌 Always test SSO with a non-admin account before enabling SSO Only mode. If SSO is misconfigured and SSO Only is enabled, admin accounts may be locked out.
Multi-Factor Authentication (MFA)
| Setting | Description |
|---|---|
| MFA | Requires a second verification factor (e.g., authenticator app, SMS code) at login in addition to the password. |
⚠️ Mandate (March 2026): Genesys has mandated MFA for all administrator accounts with elevated permissions that do not authenticate through SSO. SSO accounts are exempt as SSO providers already enforce MFA. Pure username/password admin logins without MFA are no longer permitted as of this date.
Inactivity Timeout (cross-reference)
Inactivity Timeout is located in the Security & Compliance section of the Settings tab but is documented on the Onboarding & Access page since it also applies to general session management.
| Key detail | Value |
|---|---|
| Range | 5 minutes – 8 hours |
| HIPAA orgs | Mandatory 15-minute maximum |
5. Embedding & Anti-Clickjacking
| Setting | Description |
|---|---|
| Manage Genesys Cloud Embedding | Prevents external websites from embedding your Genesys Cloud instance in an iframe. Combats clickjacking attacks where a malicious site overlays your org's UI to capture credentials or actions. |
⚠️ Warning: Enabling this feature will break any Genesys Cloud integrations, apps, or embeddable framework implementations whose domain is not listed in the Allowed Embeddable Domains list. Read the Genesys embedding documentation and configure allowed domains before enabling this setting.
6. Supported Compliance Standards Reference
| Standard | Region | How to Enable |
|---|---|---|
| HIPAA | Americas | Contact Genesys Care + BAA required |
| HITRUST | Americas | Contact Genesys Care |
| PCI DSS | Global | Contact Genesys Care |
| GDPR | EMEA / Global | No configuration needed — applies to all AWS regions |
| HDS | France | Contact Genesys Care |
| FedRAMP (Moderate) | US Government | Contact Genesys Care |
| SOC 1 & SOC 2 Type 2 | Global | Attestation available under NDA |
| ISO 27001 / 27017 / 27018 | Global | Certifications maintained by Genesys |
| CCPA | California / Americas | No configuration needed |
| LGPD | Brazil | No configuration needed |
| IRAP | Australia | Contact Genesys Care |

Last verified against Genesys Cloud Resource Center – March 2026
Status & Presence Management
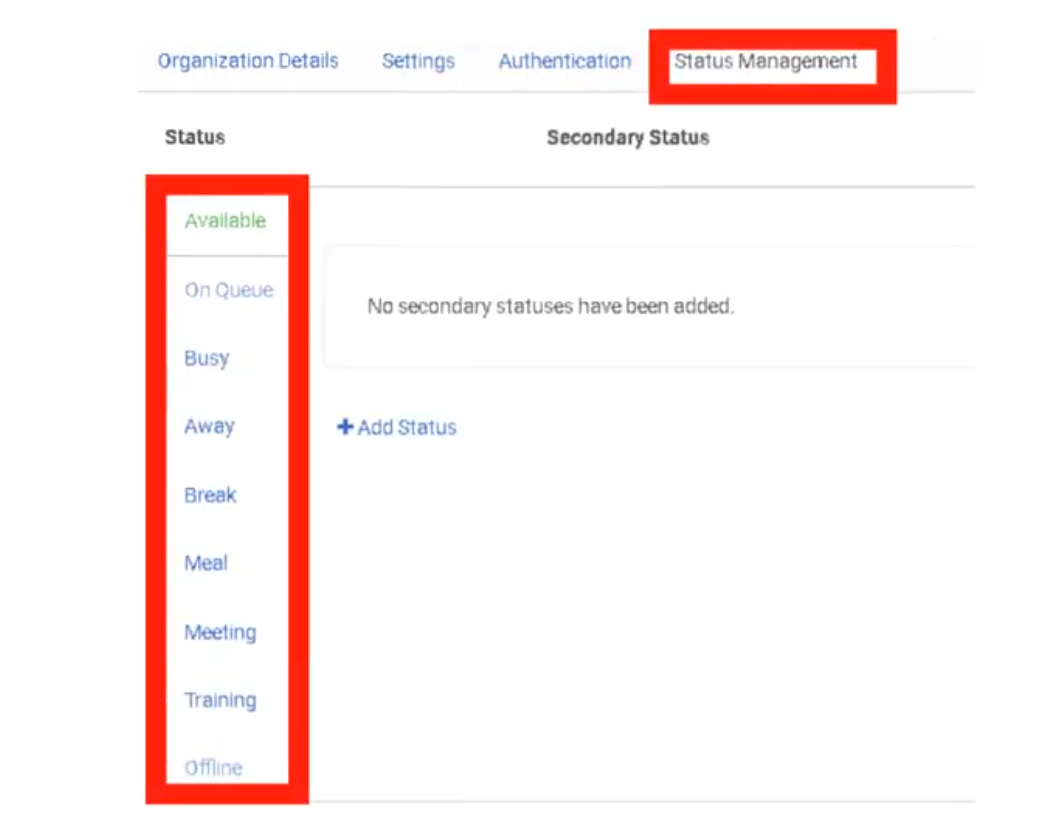
Status and Presence are the "line state" indicators that tell the ACD engine whether an agent is available to receive an interaction. While primary statuses are system-defined and cannot be deleted, administrators have significant control over secondary statuses for granular workforce tracking and reporting. Configured under Admin → Account Settings → Organization Settings → Status Management.
Navigation Path
| Step | Path |
|---|---|
| 1 | Click Admin |
| 2 | Under Account Settings, click Organization Settings |
| 3 | Click the Status Management tab |
Required permission: Presence Definition > Edit
1. Status Hierarchy: Primary vs. Secondary
Genesys Cloud uses a two-level hierarchy for presence management.
Primary Statuses (System-Defined)
Primary statuses are hard-coded by Genesys Cloud and cannot be created, renamed, or deleted. They define the base routing behavior of the agent.
| Primary Status | ACD Behavior | Calls Accepted? |
|---|---|---|
| On Queue | Agent is active and available to receive ACD interactions | ✅ Yes |
| Available | Agent is logged in but not On Queue | ❌ No (non-ACD only) |
| Busy | Agent is occupied | ❌ No |
| Away | Agent is temporarily unavailable | ❌ No |
| Break | Agent is on a break | ❌ No |
| Meal | Agent is at lunch/meal | ❌ No |
| Meeting | Agent is in a meeting | ❌ No |
| Training | Agent is in training | ❌ No |
| Idle | Agent is logged in but idle | ❌ No |
| Offline | Agent is logged out | ❌ No |
Secondary Statuses (Admin-Defined)
Secondary statuses provide the "why" behind a primary status. They are created and managed by administrators and provide context for workforce reporting and management.
| Item | Detail |
|---|---|
| Maximum active secondary statuses | Up to 30 per primary status |
| Deactivated statuses | Do not count toward the 30-status limit. Can be reactivated later. |
| Required permission | Presence Definition > Edit + Admin role |
Examples:
| Primary Status | Secondary Status Examples |
|---|---|
| Away | Away – Lunch, Away – Break, Away – Team Meeting, Away – Training |
| Busy | Busy – Administration, Busy – After Call Work, Busy – Documentation |
| On Queue | On Queue – Inbound, On Queue – Outbound |
2. Configuration & Limits
| Limit | Value |
|---|---|
| Active secondary statuses per primary | 30 |
| Deactivated statuses | Unlimited (do not count toward limit) |
| Divisions per secondary status | One or more — can be restricted to specific divisions |
Status management actions available:
| Action | Description |
|---|---|
| Add | Create a new secondary status for a primary status |
| Deactivate | Remove a status from agent view without deleting it permanently |
| Reactivate | Restore a previously deactivated status |
| Translate | Add localized labels for multi-language organizations |
| Assign to Division | Restrict visibility of a status to specific divisions |
3. Division Assignment (Contextual Presence)
Secondary statuses can be scoped to specific divisions, so agents only see the status options relevant to their team.
| Without Division Assignment | With Division Assignment |
|---|---|
| All 30 statuses visible to all agents org-wide | Each division sees only its relevant statuses |
| Agents may be overwhelmed by irrelevant options | Cleaner UI, less agent confusion |
| Reporting is org-wide only | Reporting can be filtered by division-specific statuses |
Example use case:
| Division | Custom Statuses |
|---|---|
| Telecommunications | Away – SBC Maintenance, Away – Network Incident |
| Sales | Away – Prospect Call, Away – Demo |
| HR | Away – Interview, Away – Onboarding Session |
| All divisions | Away – Lunch, Away – Break (shared) |
4. Translations for Global Teams
For organizations with agents across multiple countries, secondary status labels can be translated into different languages. Each translation maps to the same underlying status for reporting purposes.
| Language | Status Label | Maps To |
|---|---|---|
| English | Away – Lunch | Away |
| Spanish (Mexico) | Ausente – Comida | Away |
| Polish | Nieobecny – Obiad | Away |
📌 Translations ensure that agents see status labels in their native language while supervisors and analytics always report against the same underlying primary/secondary status regardless of the language displayed to the agent.
5. Reporting & Workforce Management
Presence data is one of the primary inputs to Workforce Management (WFM) and real-time supervision.
Real-Time Views
Supervisors can monitor agent status in the Agent Activity view and Queue Activity view:
| View | What You Can See |
|---|---|
| Agent Activity | Current status, time in status, queue assignment, recent interactions |
| Queue Activity | Agents on queue, agents available, agents in each secondary status |
Historical Reporting
| Report Use | Description |
|---|---|
| Status Duration | Track exact time spent in each primary and secondary status per agent |
| Adherence Tracking | Compare scheduled status (from WFM) against actual status in real time |
| Team Trends | Identify if a team is spending excessive time in non-productive statuses (e.g., Busy – Administration) |
| Secondary Status Breakdown | Drill into Away – Lunch vs. Away – Meeting distributions across shifts |
6. Presence Restore on Reconnect
| Setting | Description |
|---|---|
| Restore previous presence for agents who disconnect and reconnect | When enabled, if an agent loses their connection and reconnects, Genesys Cloud automatically restores their presence to the status they had before disconnecting instead of defaulting to Offline or Away. |
📌 Prevents agents from inadvertently going offline in reporting due to brief connectivity drops, which would otherwise affect adherence scores and queue staffing.
Summary Reference
| Feature | Location | Key Limit |
|---|---|---|
| Secondary status creation | Admin → Organization Settings → Status Management | 30 active per primary |
| Division assignment | Status Management → Edit status | Per status |
| Translations | Status Management → Edit status → Translations | Per status per language |
| Deactivation / Reactivation | Status Management → Edit status | Deactivated don't count toward 30 |
| Presence restore | Organization Settings → Settings → Contact Center | Toggle on/off |
Last verified against Genesys Cloud Resource Center – March 2026
Technical & Routing Behaviours
These settings control low-level ACD engine behavior — how agent stations are managed, how skills travel with interactions during transfers, how agents are scored in queue, and global media defaults. Configured under Admin → Account Settings → Organization Settings → Settings → Contact Center Settings.
Navigation Path
| Step | Path |
|---|---|
| 1 | Click Admin |
| 2 | Under Account Settings, click Organization Settings |
| 3 | Click the Settings tab |
| 4 | Locate the Contact Center Settings section |
1. Station & Presence Behavior
Free Seating
| Setting | Description |
|---|---|
| Free Seating | When enabled, a station (WebRTC or physical phone) is released once an agent goes offline, making it available for the next user who logs in. When disabled, stations remain assigned to specific users and are not shared. |
Use cases:
| Scenario | Recommended Setting |
|---|---|
| 24/7 contact center with shift rotations sharing physical workstations | Enabled |
| Dedicated desks — one agent per station permanently | Disabled |
| Hot-desking environments or work-from-home with shared profiles | Enabled |
📌 Note: Free Seating must also be enabled at the org level before it can be applied to individual user profiles. Requires compatible phone base settings. See Onboarding & Access page for the user-level configuration.
ACD Routing Score Reset
| Setting | Description |
|---|---|
| Reset routing score after presence change | When enabled, an agent's idle time counter resets to zero whenever they change their presence status (e.g., Available → Away → Available). This sends them to the back of the queue priority order. When disabled, agents retain their accumulated idle time through status changes. |
How routing score works:
Genesys Cloud uses idle time to determine which agent receives the next interaction. The agent with the longest idle time (most idle) is prioritized.
| Configuration | Behavior |
|---|---|
| Reset enabled | Agent goes Available → Away → Available = starts at zero idle time, goes to back of the line |
| Reset disabled | Agent retains accumulated idle time through the status change, keeps their queue position |
📌 Telecom note: This is the Genesys equivalent of an Avaya "Most Idle Agent" reset. Use Reset for strict fairness enforcement; disable it to avoid penalizing agents for brief unavoidable status changes (e.g., system-triggered Away).
2. Routing & Transfer Logic
Skill Stripping on Blind Transfers
| Setting | Description |
|---|---|
| Strip skills from voice interactions on blind transfers by agents | When enabled, all ACD skill requirements attached to an interaction are removed when an agent performs a blind transfer to a queue. The interaction arrives at the target queue with no skill requirements, making it eligible for any available agent in that queue. |
Default behavior (skill stripping OFF):
When an agent transfers an ACD call to a queue, Genesys Cloud remembers both the priority and the skills-based information applied to the original call. This means the call will only route to agents in the new queue who also have the required skills.
With skill stripping ON:
All skill requirements are stripped at the moment of blind transfer. The interaction is treated as a fresh, unskilled interaction in the target queue.
| Scenario | Recommended Setting |
|---|---|
| Transfer to a specialized queue where agents may not share the original skills | Enabled — prevents calls getting stuck waiting for a skill no one has |
| Transfer within the same skill group where agents share skills | Disabled — preserves routing context |
⚠️ Important: To apply the Strip Skills on Blind Transfer setting, the agent must select the queue from the suggestions list during the blind transfer. The skill stripping does not apply if the agent manually types a queue name.
📌 Note: Consult transfers always discard skills regardless of this setting.
Preserve Routing Data for Callbacks and Voicemails
| Setting | Description |
|---|---|
| Preserve routing data from calls for callbacks and voicemails | When enabled, the skill and priority data from the original call is preserved when the interaction becomes a callback or voicemail. Ensures the callback or voicemail is routed back to an agent with the same skills that handled the original call. |
Routing Score (Conversation Score vs. Priority Score)
This is configured per queue, not at the org level, but understanding the two models is essential for org-wide routing strategy.
| Score Type | Formula | Best For |
|---|---|---|
| Conversation Score (default) | Arrival time + priority value. One priority point = 60,000 ms (1 minute) of simulated earlier arrival. | Standard fairness — balances wait time with priority. |
| Priority Score | Uses only the absolute priority value assigned in Architect. Time in queue is a tiebreaker only. | VIP lines — high-priority callers jump to the front regardless of how long others have waited. |
📌 Best practice: Set the scoring method at queue creation or when the queue has no waiting interactions. If you change the scoring method midway while the queue has interactions waiting, the waiting interactions may be assigned in an unexpected order. The new scoring method takes effect only after interactions that arrived before the change are routed.
3. Media & Timer Defaults
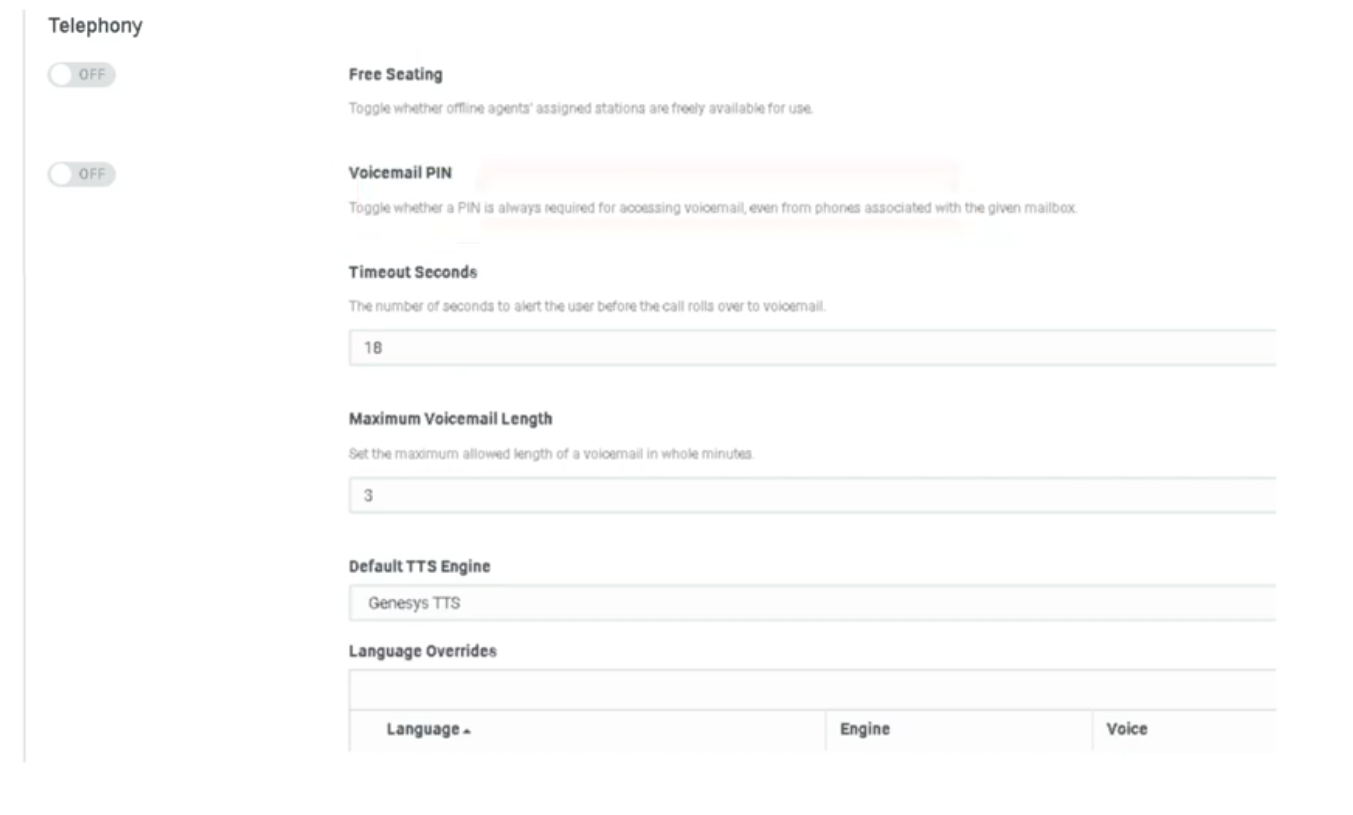
Voicemail Defaults
| Setting | Default | Description |
|---|---|---|
| Alert Time (Ring Timeout) | 18 seconds | How long the phone rings before the call is forwarded to voicemail. Equivalent to a "ring-no-answer" coverage path in traditional telephony. Configurable per org. |
| Maximum Voicemail Length | 3 minutes (180 seconds) | Maximum duration of a voicemail message a caller can leave. Caps file size for storage and prevents accidental extended recordings. |
| Voicemail PIN | On | Requires users to enter a PIN to retrieve voicemail. Can be disabled org-wide. |
| Voicemail Transcription | Off | Transcribes voicemail audio to text and includes it in email notifications. Requires Speech & Text Analytics. |
📌 See the Global Settings page for the full voicemail settings table including notifications and PII handling.
Default Text-to-Speech (TTS) Engine
| Setting | Description |
|---|---|
| Default TTS Engine | Sets the org-wide voice engine used in Architect flows when no specific engine is defined at the flow level. Affects every flow action that uses Play Audio with TTS or dynamic data playback. |
Available options:
| Engine | Notes |
|---|---|
| Genesys TTS (native) | Built-in, no additional configuration required |
| Google Cloud TTS | Requires AppFoundry integration |
| Microsoft Azure TTS | Requires AppFoundry integration |
| Amazon Polly | Requires AppFoundry integration |
⚠️ Deprecation notice (August 2026): Genesys will end native Enhanced TTS support for select Google and Microsoft voices on August 5, 2026. After that date, those voices require a third-party TTS AppFoundry integration under the BYOT-A billing model. Plan ahead if your Architect flows use Google Standard or Microsoft voices.
📌 Telecom note: Changing the default TTS engine affects every Architect flow that uses dynamic audio or text-to-speech blocks and has not explicitly specified an engine. Test in a non-production flow first.
4. Additional Contact Center Settings
| Setting | Description |
|---|---|
| Turn off file uploading in chats | Disables file attachment capability in Genesys Collaborate (internal chat). Useful for data loss prevention (DLP) compliance. |
| Route email to multiple destinations | Allows inbound email interactions to be sent to more than one queue or destination simultaneously. |
| Enable communication level After Call Work (ACW) | Enables ACW to be tracked and enforced at the individual communication level rather than the interaction level. |
| Enable agents to specify queue for scheduled callbacks | Allows agents to select which queue a scheduled callback is placed in, rather than defaulting to the originating queue. |
| Set maximum interaction data retention time | Controls how long interaction data is retained in Genesys Cloud before automatic deletion. Relevant for compliance and storage management. |
| Manage historical execution data | Configures which Architect flow execution data types are stored and for how long. Used for Replay Mode and flow troubleshooting. |
Telecom Engineer Summary
| Setting | What It Prevents |
|---|---|
| Skill Stripping | Calls stuck in new queues waiting for skills that agents there don't have |
| ACD Routing Reset | Agents gaming status changes to stay at the front of the queue |
| Conversation vs. Priority Score | Unexpected routing order when queue scoring changes mid-operation |
| Voicemail Alert Time | Callers waiting too long before hitting voicemail coverage |
| Free Seating | Unused station licenses being held by offline agents |
Last verified against Genesys Cloud Resource Center – March 2026