# AZ-104 - Learning Azure Cloud Administrator
# AZ-104 Resources
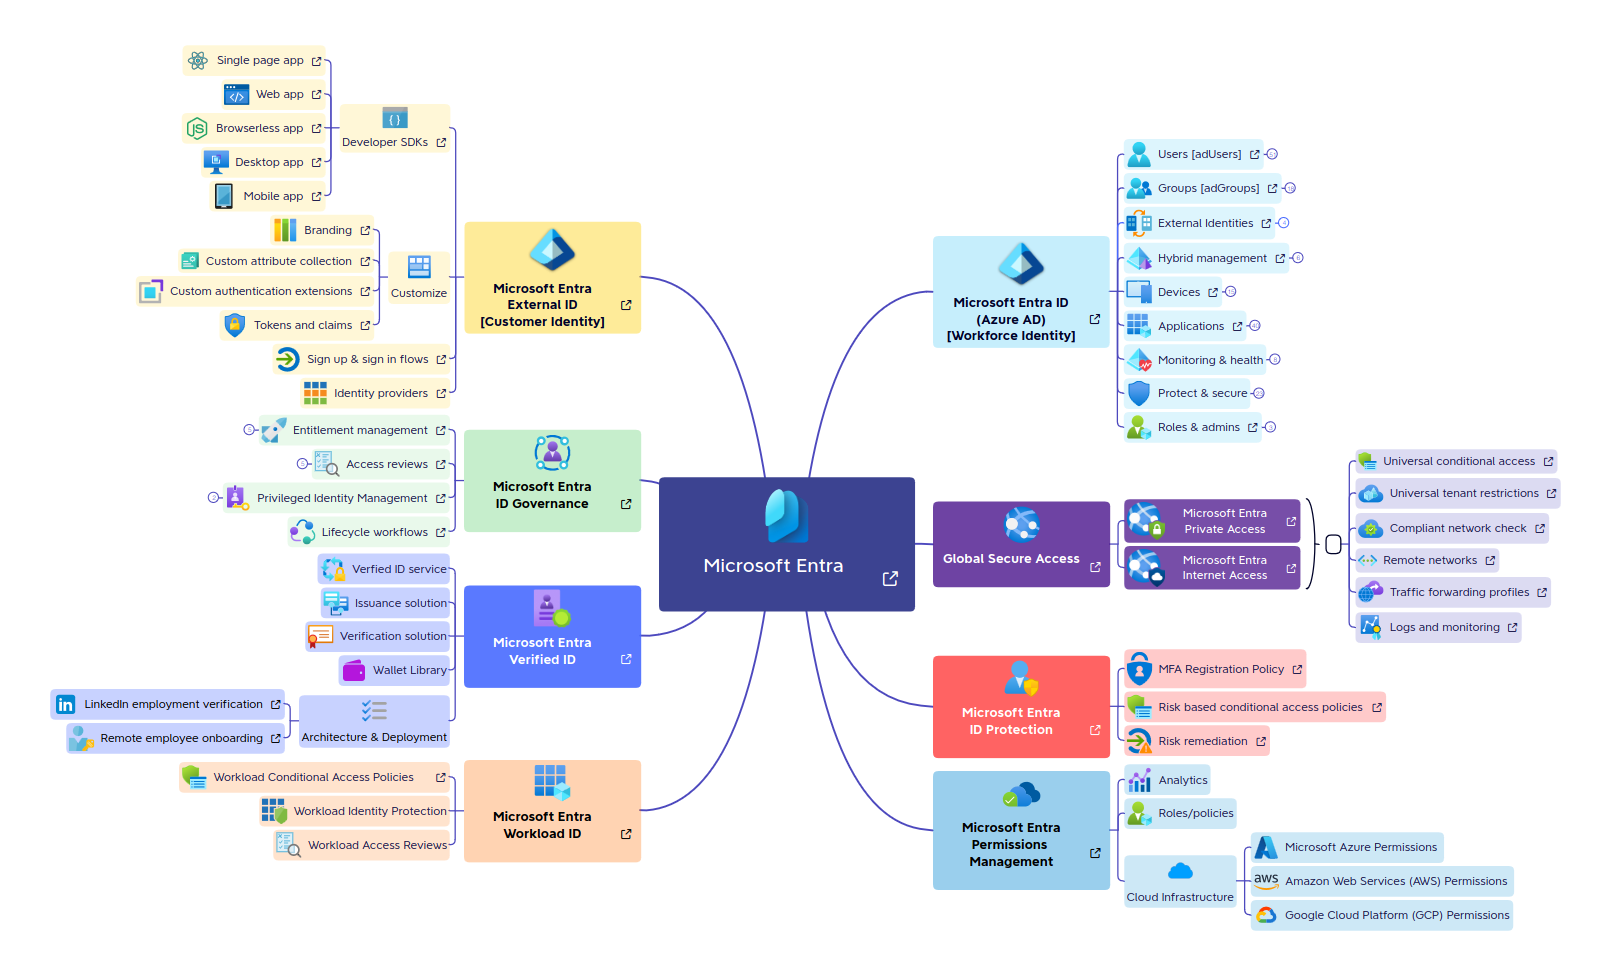
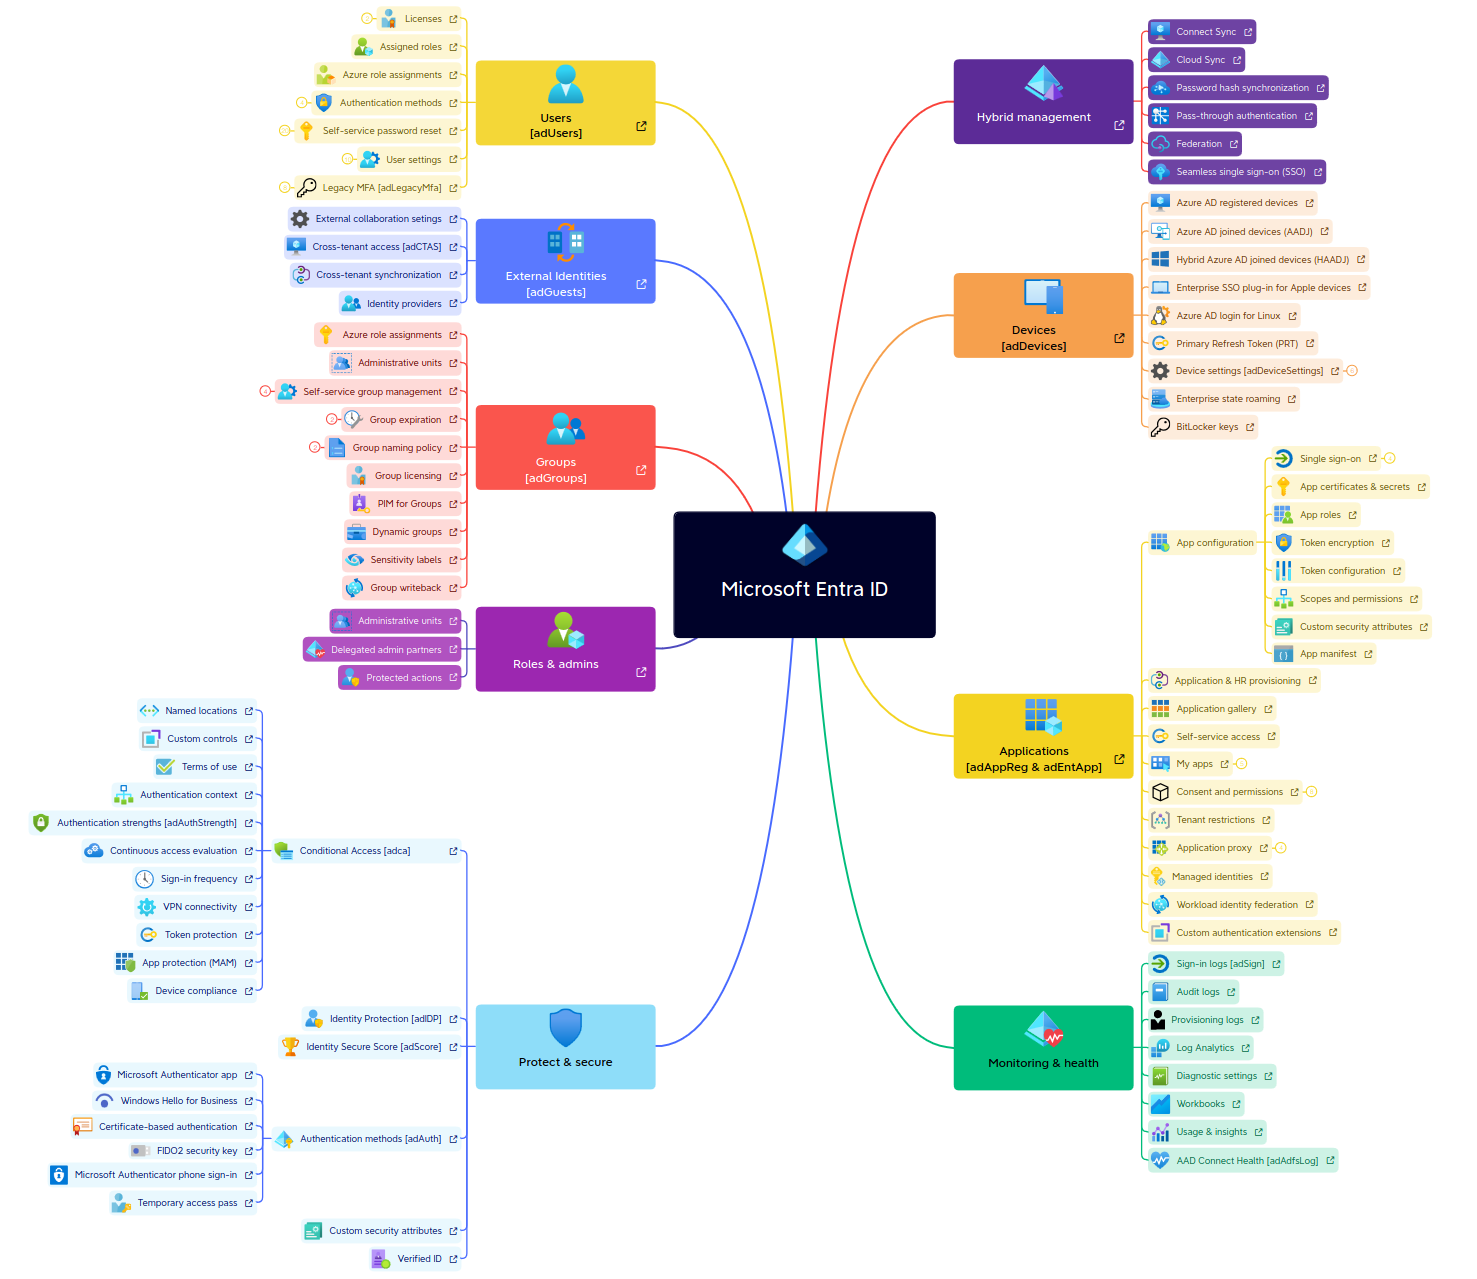
# Azure Entra ID Mindmap
# Azure Youtube Videos
Exam Cram by John Savills
Study List
# 1.- AZ-104 Azure Administration
# AZ-104 - Administration - Azure Resource Manager
#### **[What is Azure Resource Manager?](https://learn.microsoft.com/en-us/azure/azure-resource-manager/management/overview)**
####
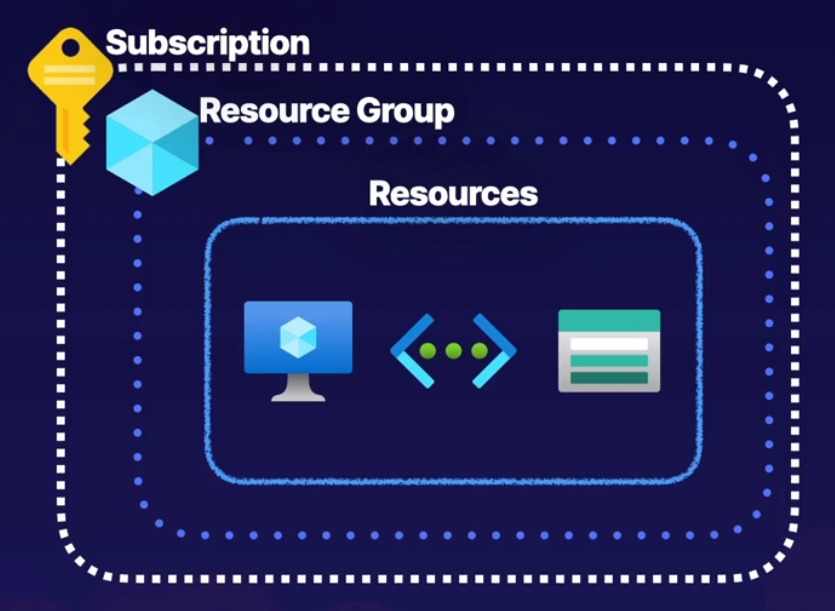
#### **Azure Clouds made of?**
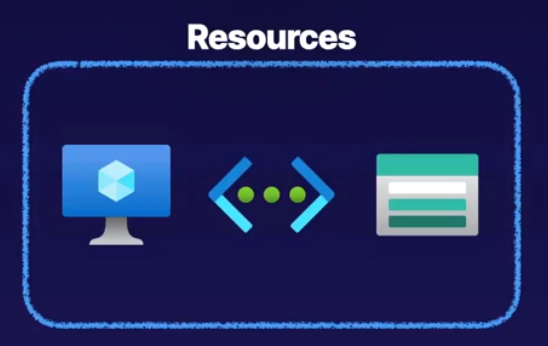
##### Resources:
- Entity managed by azure
- Virtual Machines
- Storage accounts and virtual networks
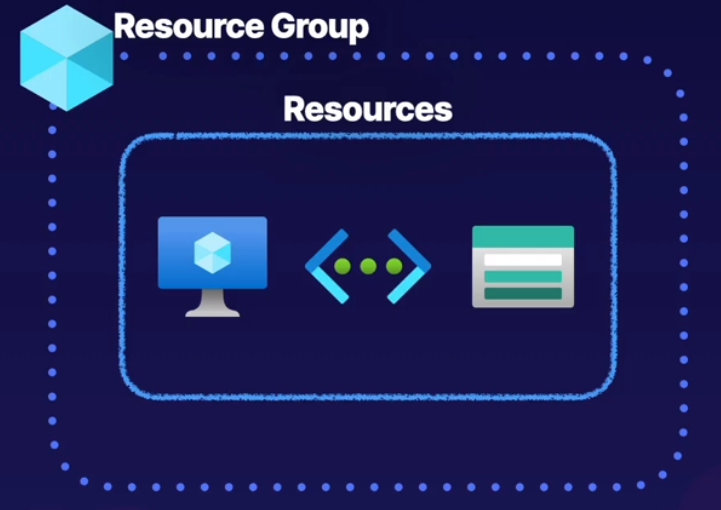
##### Resources groups:
- Logical container for grouping resources
- Group resources based on lifecycle and security
- Associated with an azure subscription
##### Azure Subscription:
- Logical construct that groups together resource groups and associated resources
- Billing unit for the azure cloud cost
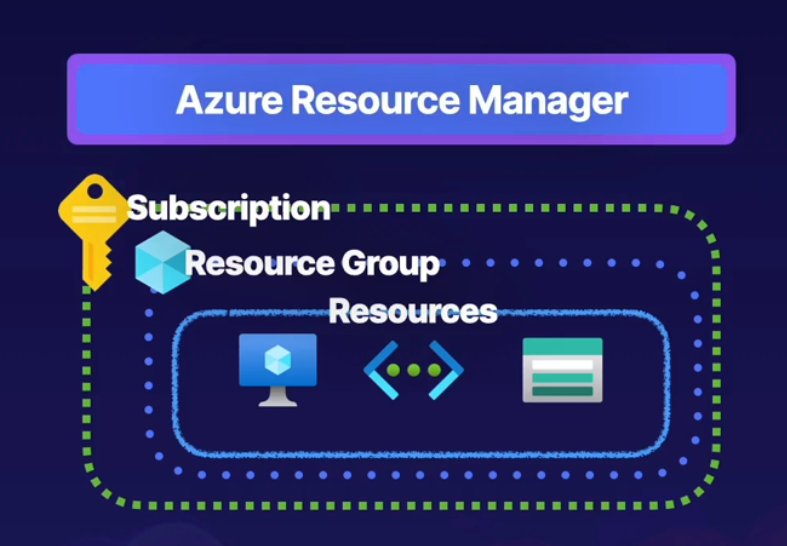
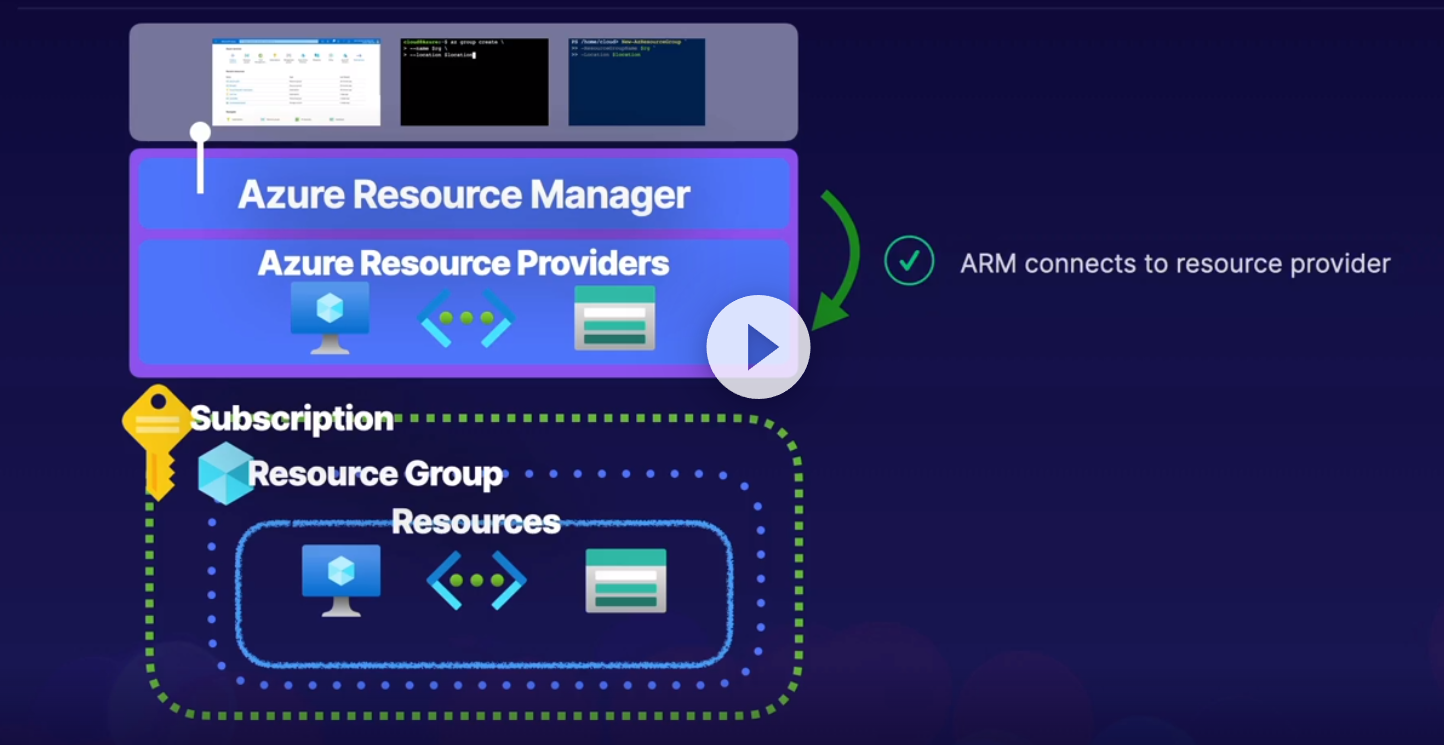
##### Azure Resource Manager - ARM
- is the orchestration layer for managing the azure cloud
- Uses REST API endpoints
- ARM connects to resource provider (Powershell, CLI, Azure Portal)
- Resource provider completes the request
- It uses Azure Identity Manager
Resources are Azure Managed Entities like virtual Machines, Storage accounts and Virtual Networks
Resources are contained in resource groups
Resource groups are contained in subscriptions
You can use REST API endpoint to manage Azure through Azure Resource Manager
Azure Resource Manager is a Management Service
Each Resource has a resource provider
# AZ-104 - Administration - Azure Portal and Cloud Shell Basics
##### [Microsoft Azure portal ](https://azure.microsoft.com/en-us/get-started/azure-portal/)
##### [What is Azure Cloud Shell?](https://learn.microsoft.com/en-us/azure/cloud-shell/overview)
##### Describing Azure Portal, Components of Azure portal, Using the azure portal
##### Azure portal:
- Web-based portal for the azure cloud
- Crate and manage azure resources
- Uses cloud shell
- Manage Billing
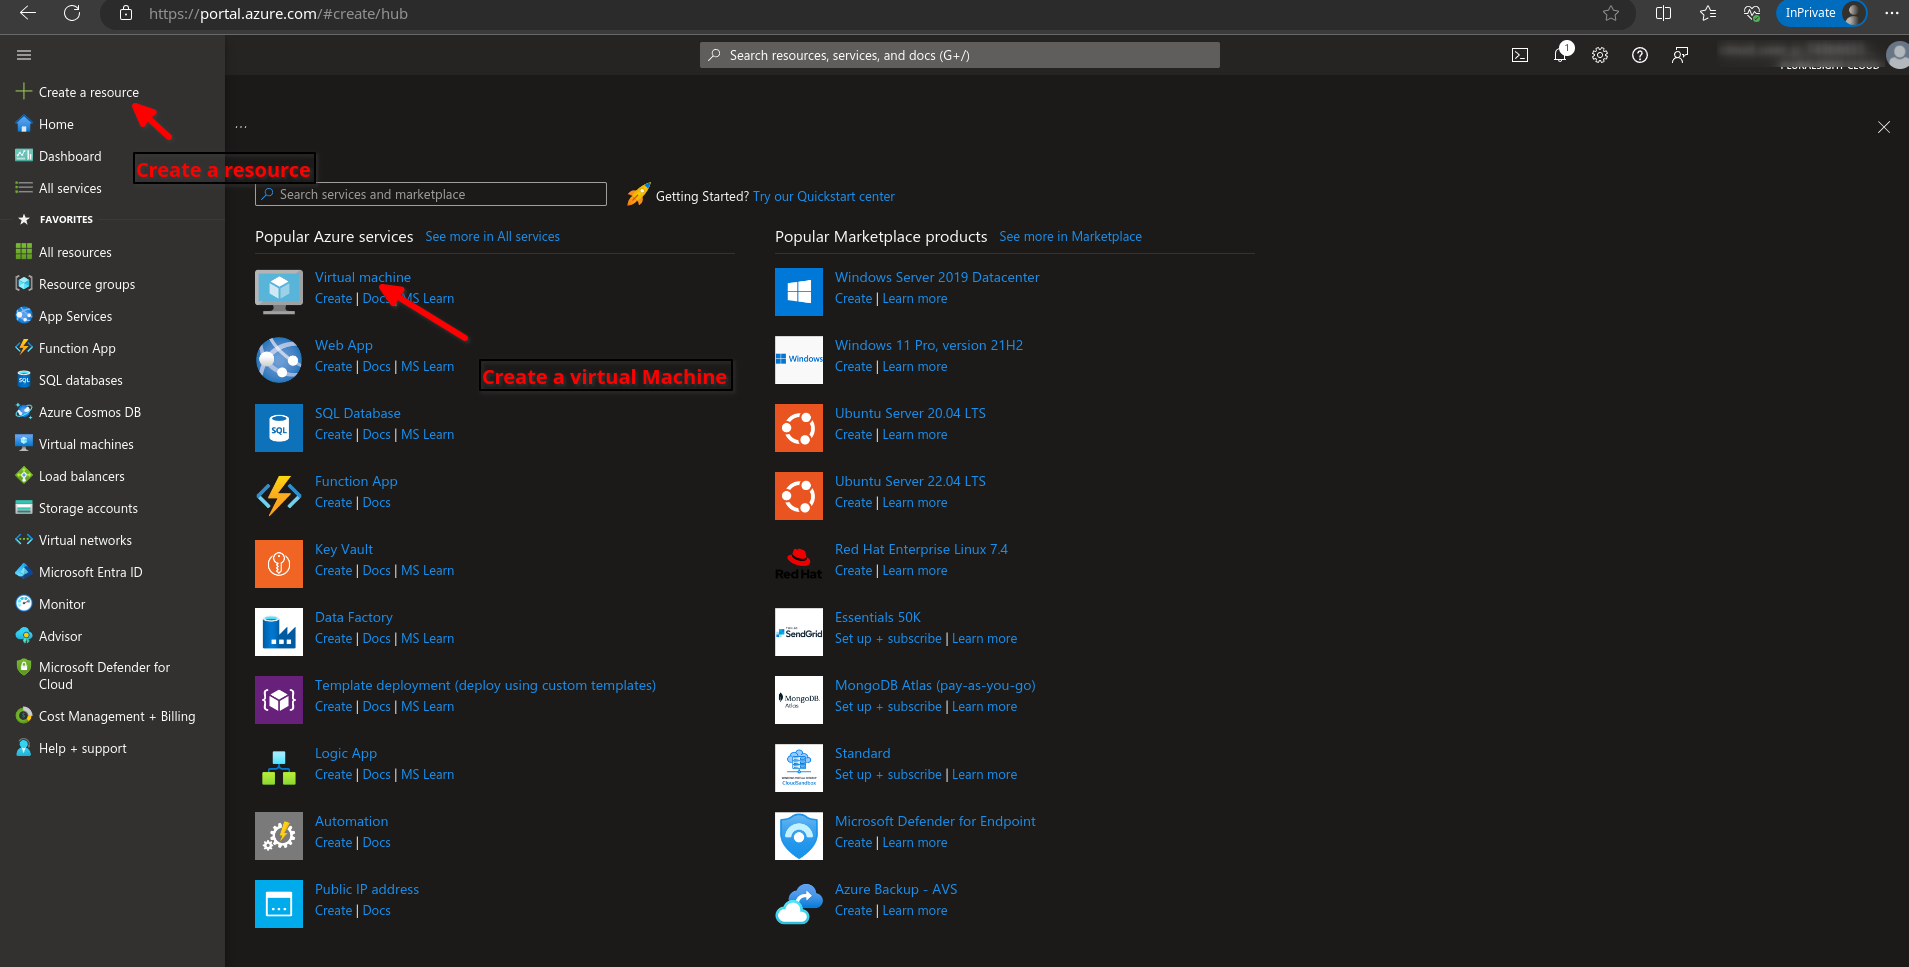
Access [https://portal.azure.com](https://portal.azure.com)
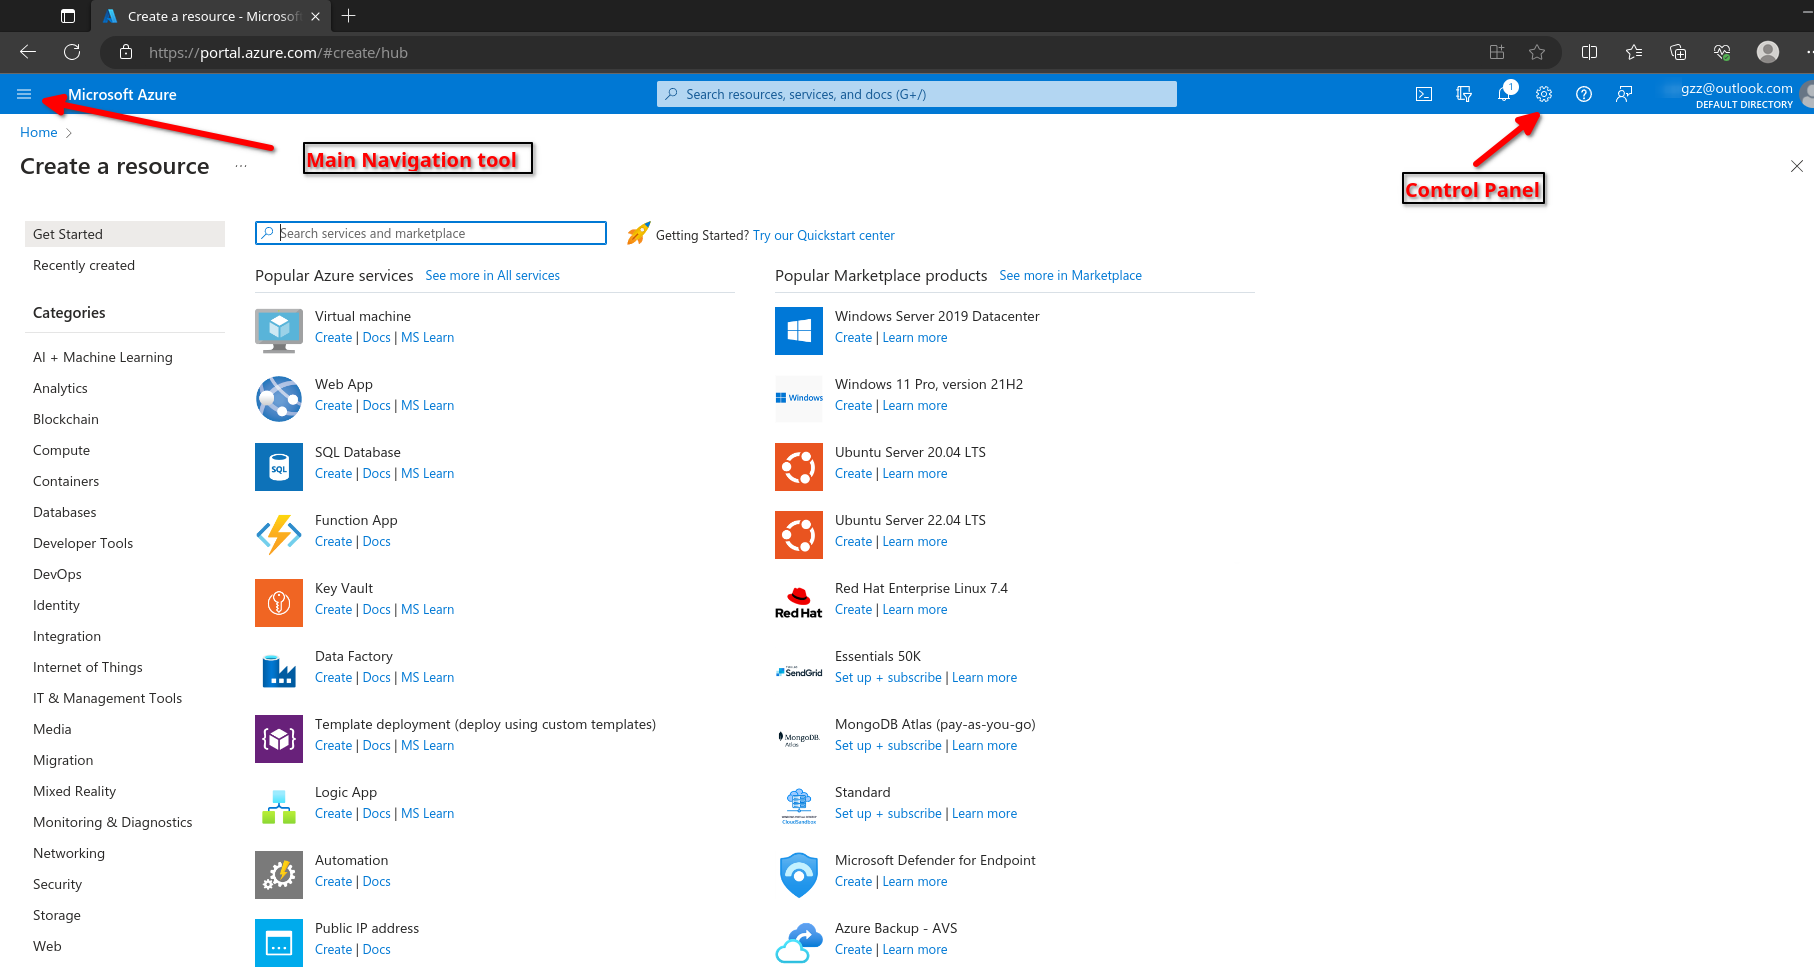
Here you can navigate to create resources such as virtual machines
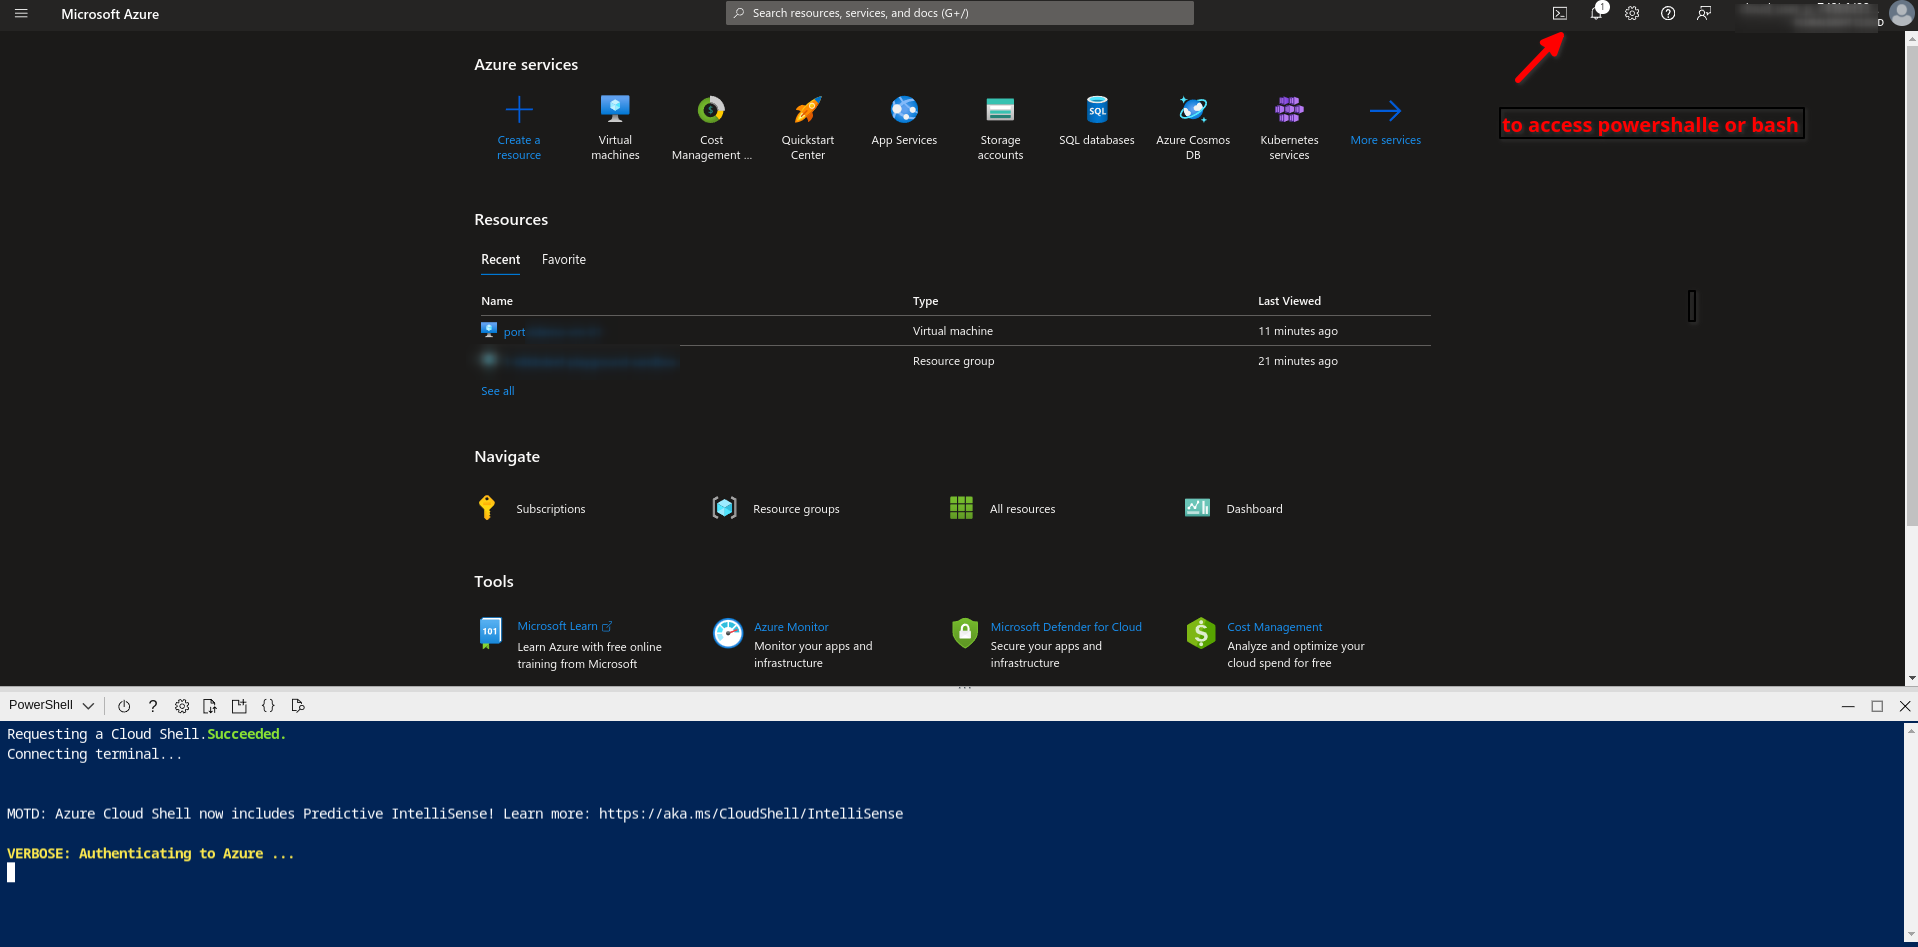
To access your preferences such as themes, etc go to the settings page
[](https://wiki.tinod.net/uploads/images/gallery/2024-02/K69lx98E7IdMsT3l-image.png)
Here you can navigate and access the powershell or bash
[](https://wiki.tinod.net/uploads/images/gallery/2024-02/OYdwJq2MSsEqnOOD-image.png)
# AZ-104 - Administration - Azure CLI and Powershell
##### [Install PowerShell on Windows, Linux, and macOS](https://learn.microsoft.com/en-us/powershell/scripting/install/installing-powershell?view=powershell-7.4&viewFallbackFrom=powershell-7.1)
##### [How to install the Azure CLI](https://learn.microsoft.com/en-us/cli/azure/install-azure-cli)
[Commands](https://github.com/BrentenDovey-ACG/AZ-104_Azure_Administrator/blob/95a62b8af178794ca2c6ebf8a19f33740a61f4e8/S02_Basic_Prerequisites_of_Azure_Administration/L03_Using_Azure_CLI_and_PowerShell/commands.txt)
##### What is the Azure CLI
- Its a command-line utility for managing azure resources
- Crate and manage resources without logging to the azure portal
- Create scripts to automate tasks
##### What is Azure PowerShell
- Its a set of cmdlets for managing Azure resources
- Create and manage resource s without logging into the azure portal
- Create scripts to automate tasks.
##### Cloud Shell
First we need to create a Cloud Shell
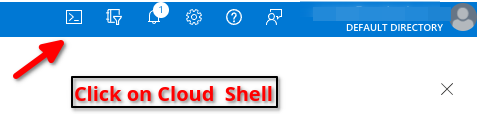
Select Bash or Powershell

Go to Advanced settings
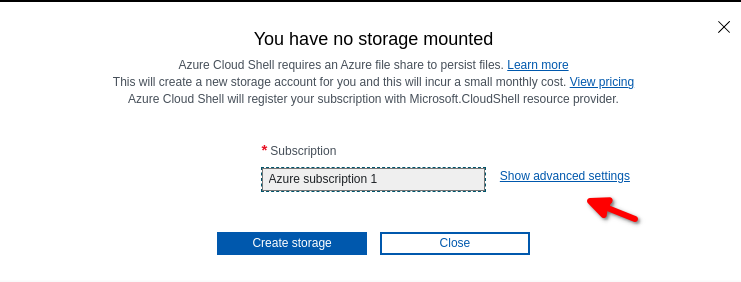
Select a random storage account name and a file share name then click on create storage
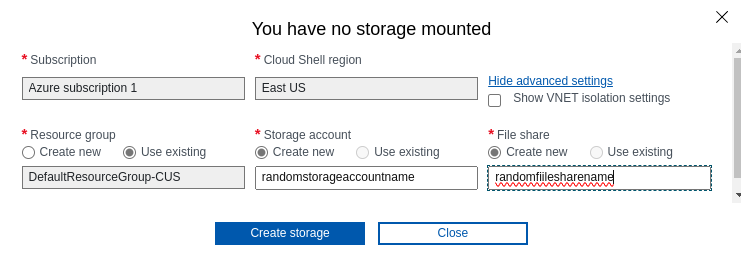
if you get this error its more likely your storage account name its already in use, use alphanumeric

Done, you can switch between Powershell and Bash using the drop down menu on the left

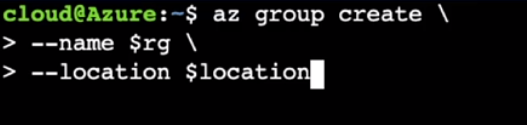
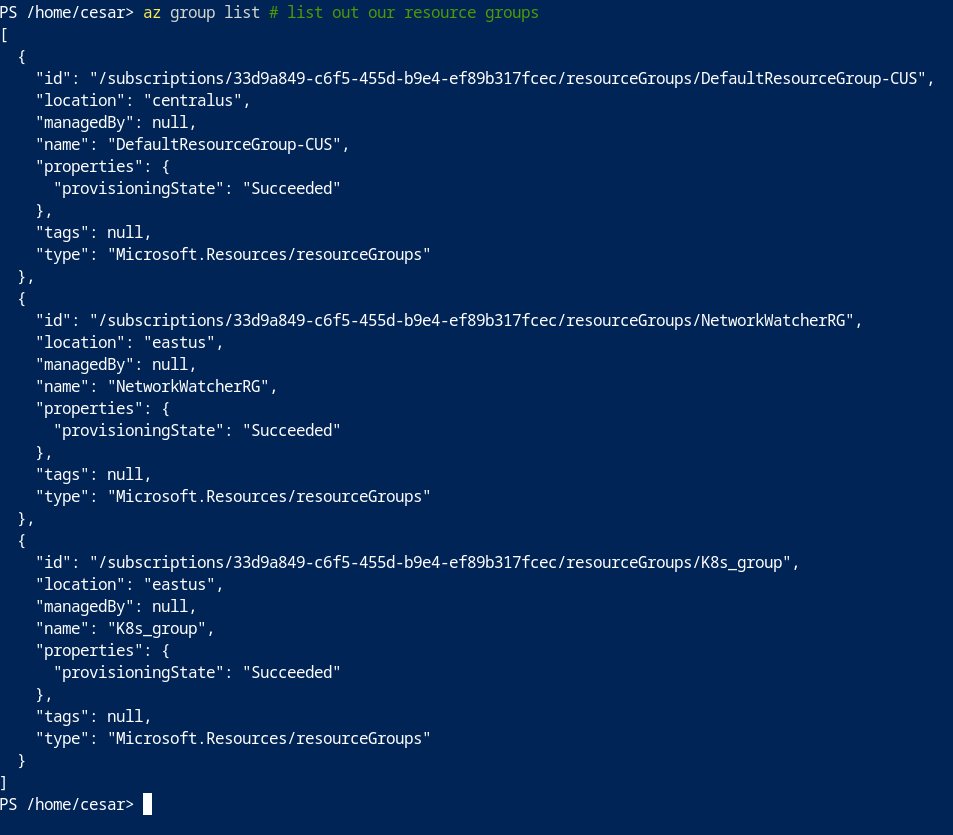
Here we can run AZ CLI commands
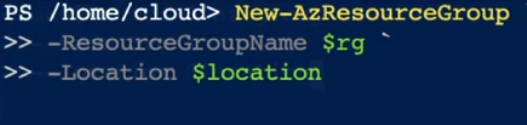
And here is using the powershell
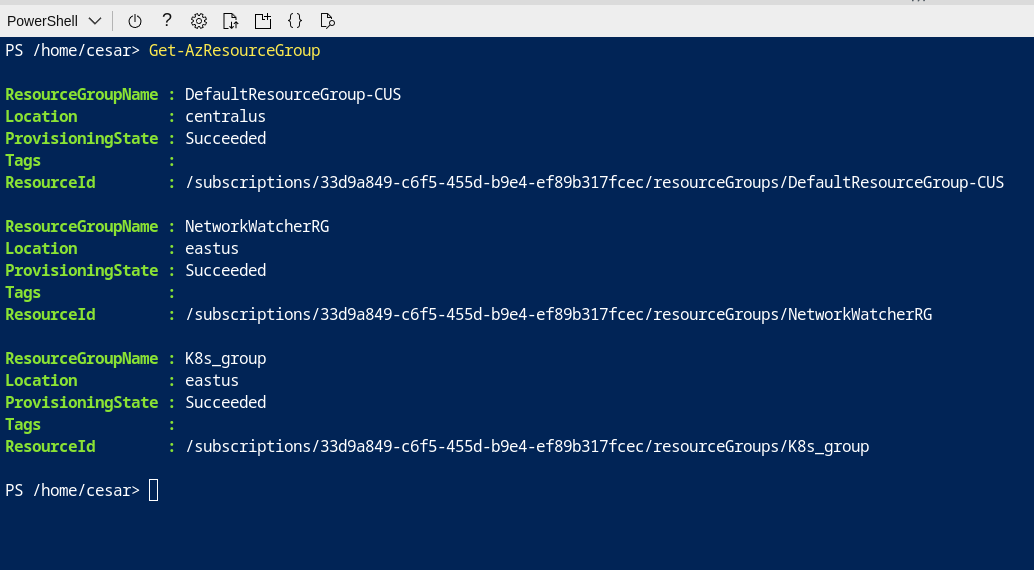
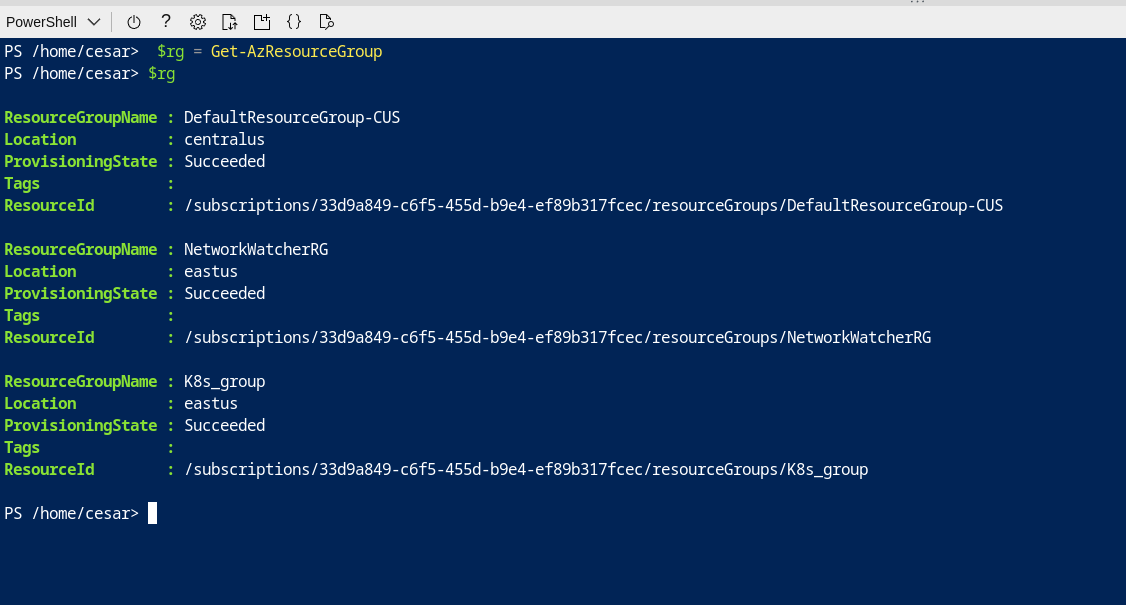
We can save objects to variables
To create a virtual machine from Azure CLI

```powershell
PS /home/cesar> get-cloudDrive
FileShareName : random1fileshare
FileSharePath : //random1storage4.file.core.windows.net/random1fileshare
MountPoint : /home/cesar/clouddrive
Name : random1storage4
ResourceGroupName : DefaultResourceGroup-CUS
StorageAccountName : random1storage4
SubscriptionId : 33d9a849-c6f5-455d-b9e4-ef89b317fcec
PS /home/cesar> get-azresource | format-Table
Name ResourceGroupName ResourceType Location
---- ----------------- ------------ --------
DefaultWorkspace-33d9a849-c6f5-455d-b9e4-ef89b317fcec-CUS DefaultResourceGroup-CUS Microsoft.OperationalInsights/workspaces centralus
random1storage4 DefaultResourceGroup-CUS Microsoft.Storage/storageAccounts eastus
NetworkWatcher_eastus NetworkWatcherRG Microsoft.Network/networkWatchers eastus
PS /home/cesar>
```
# AZ-104 - Administration - Azure ARM Templates
[Deploy Azure infrastructure by using JSON ARM templates](https://learn.microsoft.com/en-us/training/modules/create-azure-resource-manager-template-vs-code/)
ARM templates are azure resource manager templates we create JSON files and provides
- IaC (Infrastructure as code)
- Deploy environments quickly
- Repeatable deployments
##### ARM Template
Skeleton arm template
```json
{
"$schema" : "https://schema.management.azure.com"
,
"contentVersion":
"`1.0.0.0",
"parameters": {},
"variables": {},
"resourceS": {},
"outputs": {}
}
```
**Parameters and variables**: components are used to pass information to the template.
**Resources**: Define resources to use in the template
**Outputs:** Component is used to return output from the execution of the template
Example of a template:
azuredeploy.json template
```json
{
"$schema": "https://schema.management.azure.com/schemas/2019-04-01/deploymentTemplate.json#",
"contentVersion": "1.0.0.0",
"parameters": {
"adminUsername": {
"type": "string",
"metadata": {
"description": "Username for the Virtual Machine."
}
},
"adminPassword": {
"type": "secureString",
"minLength": 12,
"metadata": {
"description": "Password for the Virtual Machine."
}
},
"dnsLabelPrefix": {
"type": "string",
"defaultValue": "[toLower(format('{0}-{1}', parameters('vmName'), uniqueString(resourceGroup().id, parameters('vmName'))))]",
"metadata": {
"description": "Unique DNS Name for the Public IP used to access the Virtual Machine."
}
},
"publicIpName": {
"type": "string",
"defaultValue": "myPublicIP",
"metadata": {
"description": "Name for the Public IP used to access the Virtual Machine."
}
},
"publicIPAllocationMethod": {
"type": "string",
"defaultValue": "Dynamic",
"allowedValues": [
"Dynamic",
"Static"
],
"metadata": {
"description": "Allocation method for the Public IP used to access the Virtual Machine."
}
},
"publicIpSku": {
"type": "string",
"defaultValue": "Basic",
"allowedValues": [
"Basic",
"Standard"
],
"metadata": {
"description": "SKU for the Public IP used to access the Virtual Machine."
}
},
"OSVersion": {
"type": "string",
"defaultValue": "2022-datacenter-azure-edition-core",
"allowedValues": [
"2008-R2-SP1",
"2008-R2-SP1-smalldisk",
"2012-Datacenter",
"2012-datacenter-gensecond",
"2012-Datacenter-smalldisk",
"2012-datacenter-smalldisk-g2",
"2012-Datacenter-zhcn",
"2012-datacenter-zhcn-g2",
"2012-R2-Datacenter",
"2012-r2-datacenter-gensecond",
"2012-R2-Datacenter-smalldisk",
"2012-r2-datacenter-smalldisk-g2",
"2012-R2-Datacenter-zhcn",
"2012-r2-datacenter-zhcn-g2",
"2016-Datacenter",
"2016-datacenter-gensecond",
"2016-datacenter-gs",
"2016-Datacenter-Server-Core",
"2016-datacenter-server-core-g2",
"2016-Datacenter-Server-Core-smalldisk",
"2016-datacenter-server-core-smalldisk-g2",
"2016-Datacenter-smalldisk",
"2016-datacenter-smalldisk-g2",
"2016-Datacenter-with-Containers",
"2016-datacenter-with-containers-g2",
"2016-datacenter-with-containers-gs",
"2016-Datacenter-zhcn",
"2016-datacenter-zhcn-g2",
"2019-Datacenter",
"2019-Datacenter-Core",
"2019-datacenter-core-g2",
"2019-Datacenter-Core-smalldisk",
"2019-datacenter-core-smalldisk-g2",
"2019-Datacenter-Core-with-Containers",
"2019-datacenter-core-with-containers-g2",
"2019-Datacenter-Core-with-Containers-smalldisk",
"2019-datacenter-core-with-containers-smalldisk-g2",
"2019-datacenter-gensecond",
"2019-datacenter-gs",
"2019-Datacenter-smalldisk",
"2019-datacenter-smalldisk-g2",
"2019-Datacenter-with-Containers",
"2019-datacenter-with-containers-g2",
"2019-datacenter-with-containers-gs",
"2019-Datacenter-with-Containers-smalldisk",
"2019-datacenter-with-containers-smalldisk-g2",
"2019-Datacenter-zhcn",
"2019-datacenter-zhcn-g2",
"2022-datacenter",
"2022-datacenter-azure-edition",
"2022-datacenter-azure-edition-core",
"2022-datacenter-azure-edition-core-smalldisk",
"2022-datacenter-azure-edition-smalldisk",
"2022-datacenter-core",
"2022-datacenter-core-g2",
"2022-datacenter-core-smalldisk",
"2022-datacenter-core-smalldisk-g2",
"2022-datacenter-g2",
"2022-datacenter-smalldisk",
"2022-datacenter-smalldisk-g2"
],
"metadata": {
"description": "The Windows version for the VM. This will pick a fully patched image of this given Windows version."
}
},
"vmSize": {
"type": "string",
"defaultValue": "Standard_B2s",
"metadata": {
"description": "Size of the virtual machine."
}
},
"location": {
"type": "string",
"defaultValue": "[resourceGroup().location]",
"metadata": {
"description": "Location for all resources."
}
},
"vmName": {
"type": "string",
"defaultValue": "vm-demo-002",
"metadata": {
"description": "Name of the virtual machine."
}
}
},
"variables": {
"storageAccountName": "[format('bootdiags{0}', uniqueString(resourceGroup().id))]",
"nicName": "myVMNic",
"addressPrefix": "10.0.0.0/16",
"subnetName": "Subnet",
"subnetPrefix": "10.0.0.0/24",
"virtualNetworkName": "MyVNET",
"networkSecurityGroupName": "default-NSG"
},
"resources": [
{
"type": "Microsoft.Storage/storageAccounts",
"apiVersion": "2021-04-01",
"name": "[variables('storageAccountName')]",
"location": "[parameters('location')]",
"sku": {
"name": "Standard_LRS"
},
"kind": "Storage"
},
{
"type": "Microsoft.Network/publicIPAddresses",
"apiVersion": "2021-02-01",
"name": "[parameters('publicIpName')]",
"location": "[parameters('location')]",
"sku": {
"name": "[parameters('publicIpSku')]"
},
"properties": {
"publicIPAllocationMethod": "[parameters('publicIPAllocationMethod')]",
"dnsSettings": {
"domainNameLabel": "[parameters('dnsLabelPrefix')]"
}
}
},
{
"type": "Microsoft.Network/networkSecurityGroups",
"apiVersion": "2021-02-01",
"name": "[variables('networkSecurityGroupName')]",
"location": "[parameters('location')]",
"properties": {
"securityRules": [
{
"name": "default-allow-3389",
"properties": {
"priority": 1000,
"access": "Allow",
"direction": "Inbound",
"destinationPortRange": "3389",
"protocol": "Tcp",
"sourcePortRange": "*",
"sourceAddressPrefix": "*",
"destinationAddressPrefix": "*"
}
}
]
}
},
{
"type": "Microsoft.Network/virtualNetworks",
"apiVersion": "2021-02-01",
"name": "[variables('virtualNetworkName')]",
"location": "[parameters('location')]",
"properties": {
"addressSpace": {
"addressPrefixes": [
"[variables('addressPrefix')]"
]
},
"subnets": [
{
"name": "[variables('subnetName')]",
"properties": {
"addressPrefix": "[variables('subnetPrefix')]",
"networkSecurityGroup": {
"id": "[resourceId('Microsoft.Network/networkSecurityGroups', variables('networkSecurityGroupName'))]"
}
}
}
]
},
"dependsOn": [
"[resourceId('Microsoft.Network/networkSecurityGroups', variables('networkSecurityGroupName'))]"
]
},
{
"type": "Microsoft.Network/networkInterfaces",
"apiVersion": "2021-02-01",
"name": "[variables('nicName')]",
"location": "[parameters('location')]",
"properties": {
"ipConfigurations": [
{
"name": "ipconfig1",
"properties": {
"privateIPAllocationMethod": "Dynamic",
"publicIPAddress": {
"id": "[resourceId('Microsoft.Network/publicIPAddresses', parameters('publicIpName'))]"
},
"subnet": {
"id": "[resourceId('Microsoft.Network/virtualNetworks/subnets', variables('virtualNetworkName'), variables('subnetName'))]"
}
}
}
]
},
"dependsOn": [
"[resourceId('Microsoft.Network/publicIPAddresses', parameters('publicIpName'))]",
"[resourceId('Microsoft.Network/virtualNetworks', variables('virtualNetworkName'))]"
]
},
{
"type": "Microsoft.Compute/virtualMachines",
"apiVersion": "2021-03-01",
"name": "[parameters('vmName')]",
"location": "[parameters('location')]",
"properties": {
"hardwareProfile": {
"vmSize": "[parameters('vmSize')]"
},
"osProfile": {
"computerName": "[parameters('vmName')]",
"adminUsername": "[parameters('adminUsername')]",
"adminPassword": "[parameters('adminPassword')]"
},
"storageProfile": {
"imageReference": {
"publisher": "MicrosoftWindowsServer",
"offer": "WindowsServer",
"sku": "[parameters('OSVersion')]",
"version": "latest"
},
"osDisk": {
"createOption": "FromImage",
"managedDisk": {
"storageAccountType": "StandardSSD_LRS"
}
},
"dataDisks": [
{
"diskSizeGB": 1023,
"lun": 0,
"createOption": "Empty"
}
]
},
"networkProfile": {
"networkInterfaces": [
{
"id": "[resourceId('Microsoft.Network/networkInterfaces', variables('nicName'))]"
}
]
},
"diagnosticsProfile": {
"bootDiagnostics": {
"enabled": true,
"storageUri": "[reference(resourceId('Microsoft.Storage/storageAccounts', variables('storageAccountName'))).primaryEndpoints.blob]"
}
}
},
"dependsOn": [
"[resourceId('Microsoft.Network/networkInterfaces', variables('nicName'))]",
"[resourceId('Microsoft.Storage/storageAccounts', variables('storageAccountName'))]"
]
}
],
"outputs": {
"hostname": {
"type": "string",
"value": "[reference(resourceId('Microsoft.Network/publicIPAddresses', parameters('publicIpName'))).dnsSettings.fqdn]"
}
}
}
```
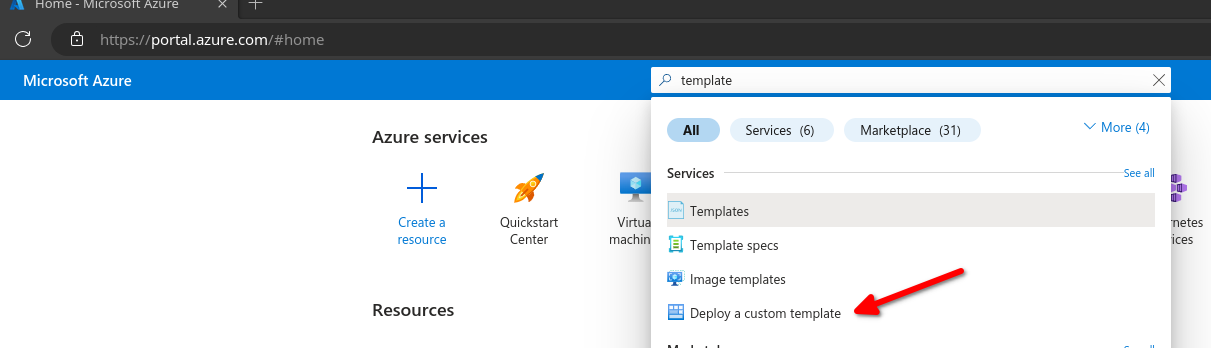
Go to Deploy a custom template
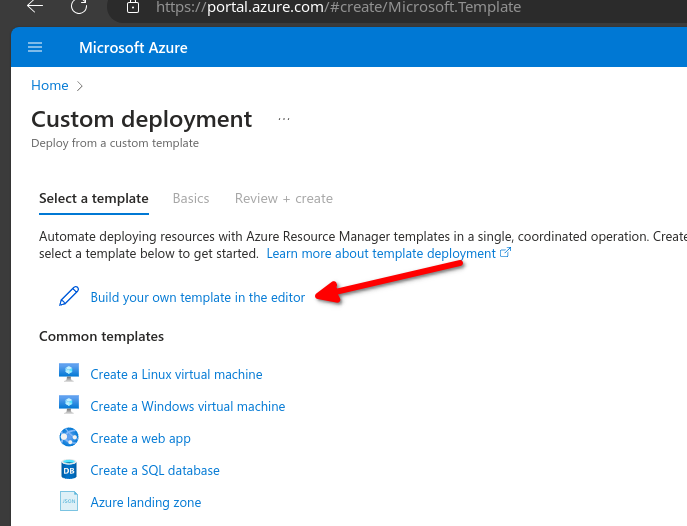
Build your own template in the editor
Copy and paste the azuredeploy.json and save
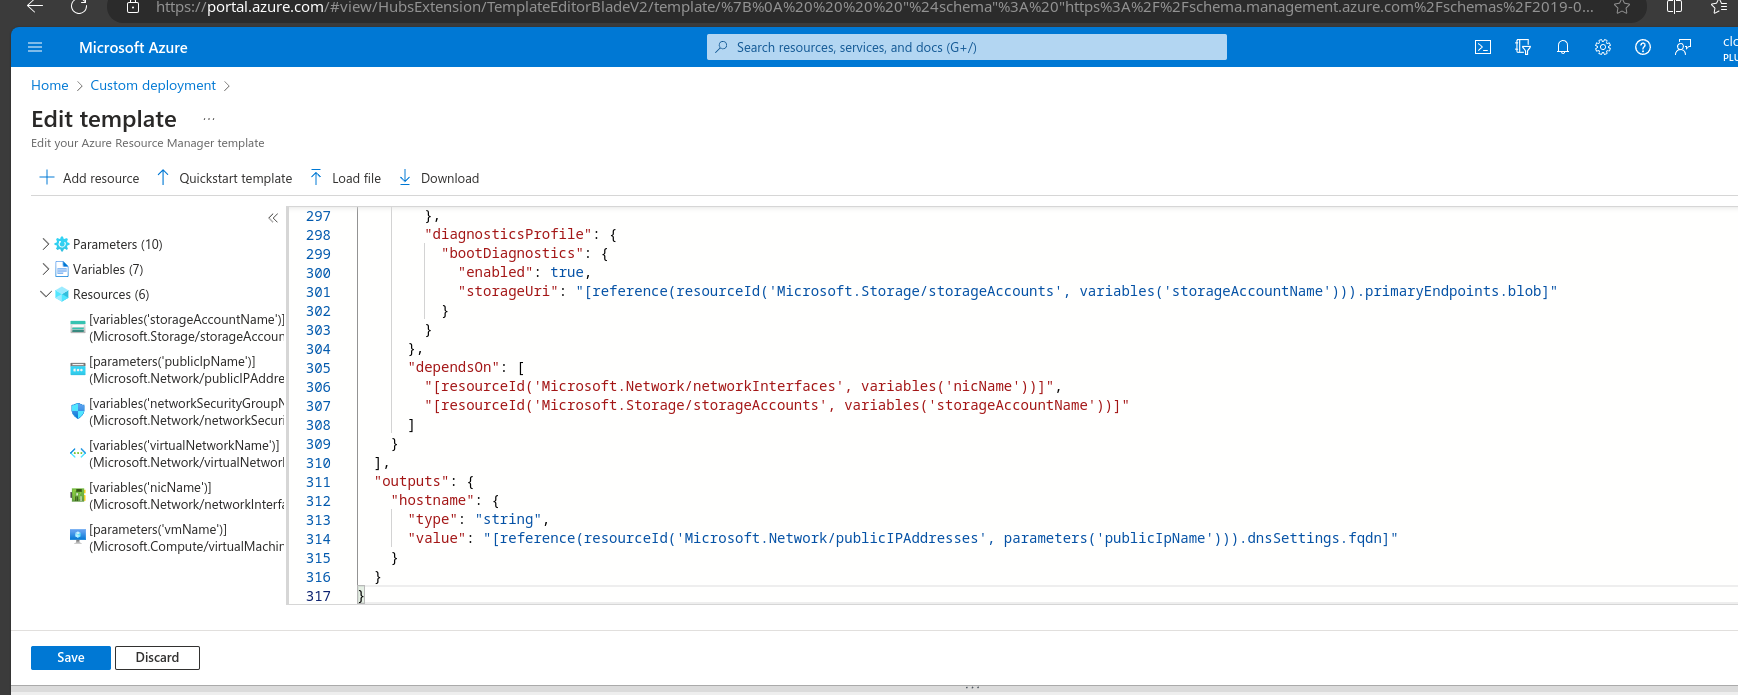
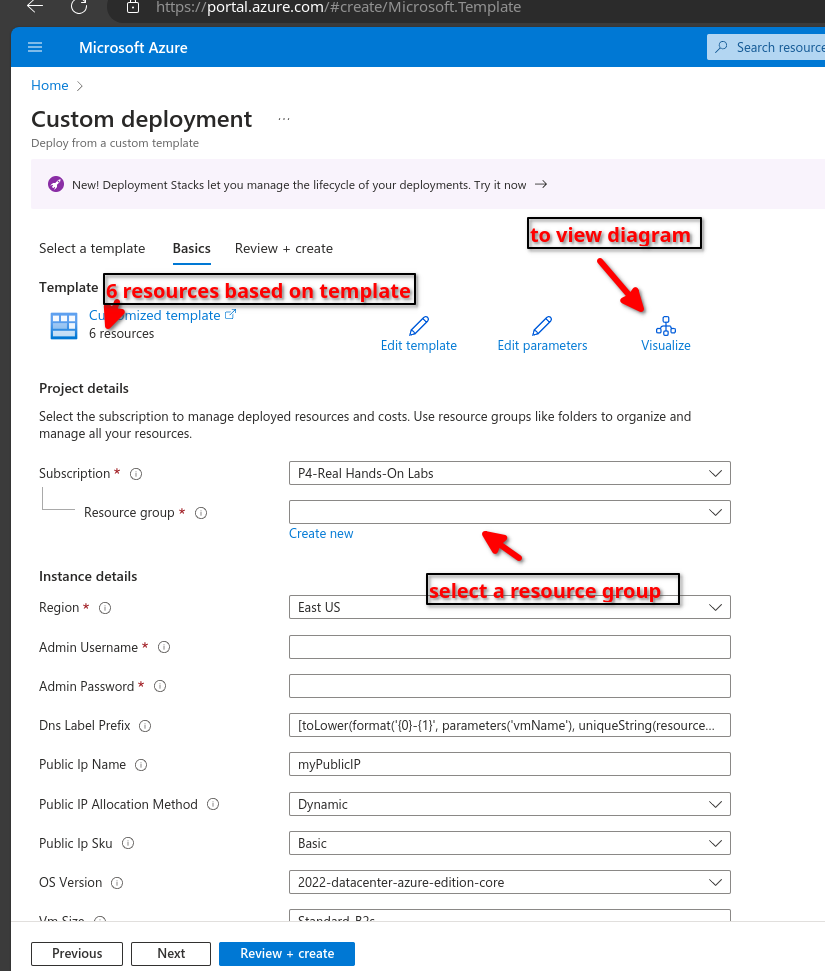
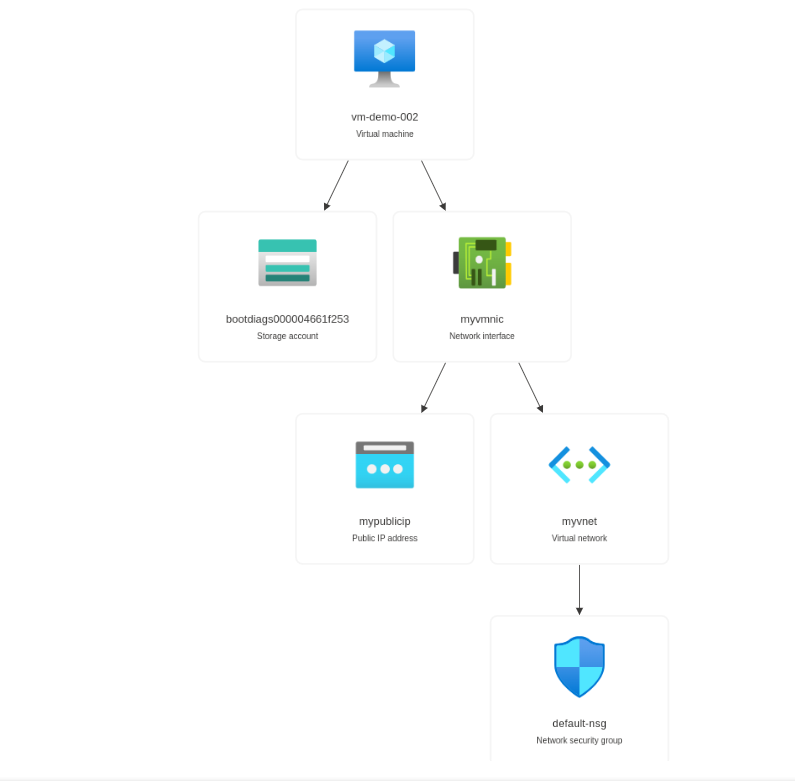
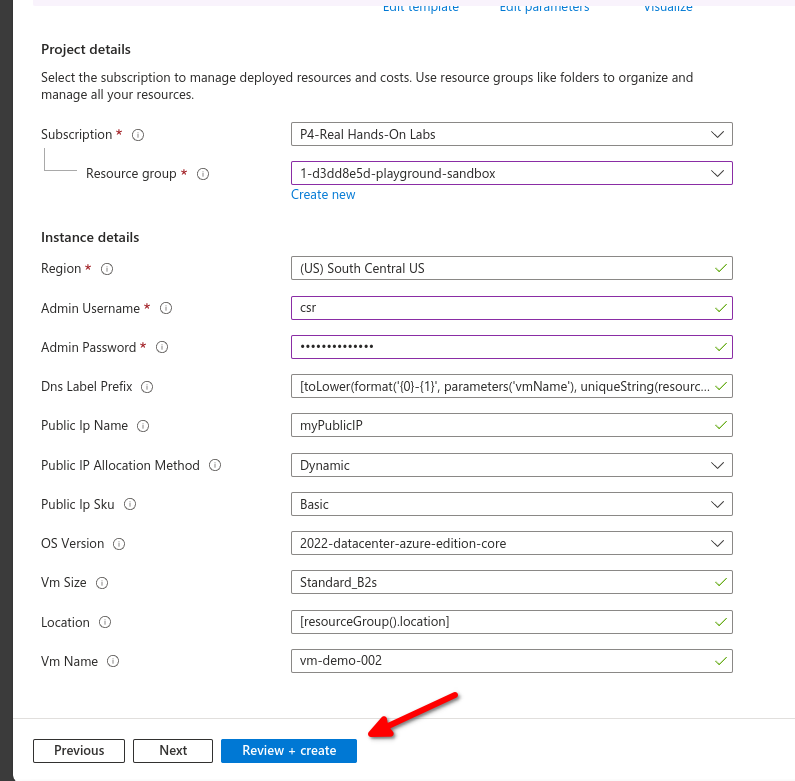
Fill out all parameters then review and create
[](https://wiki.tinod.net/uploads/images/gallery/2024-02/mkceHHdWiPV3TxkZ-image.png)
Deployment in progress
[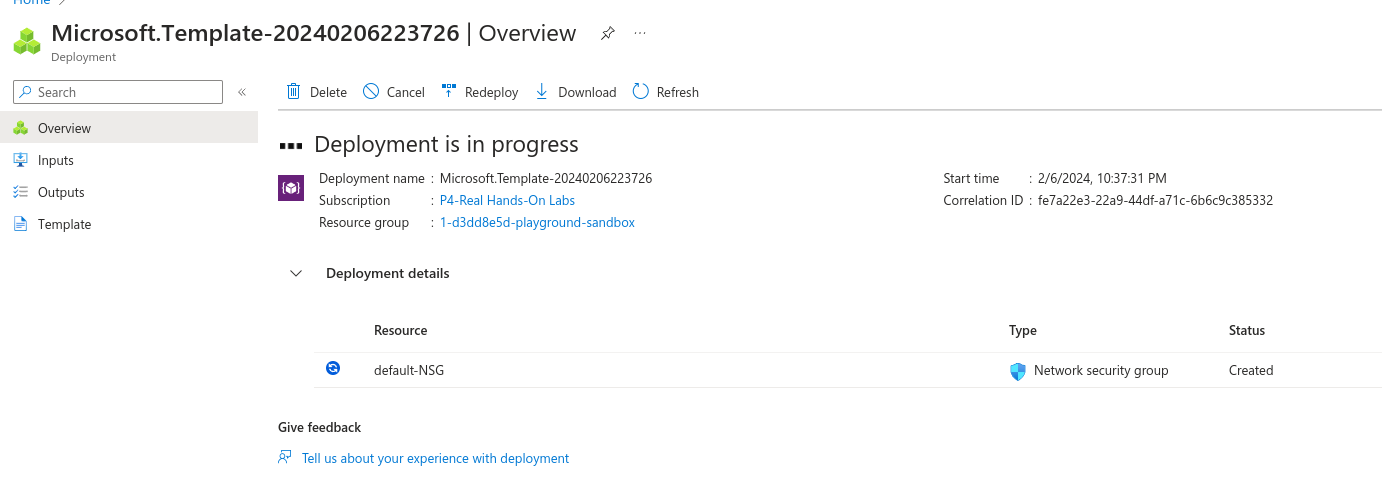](https://wiki.tinod.net/uploads/images/gallery/2024-02/yRSqDa3EbM1Ucexb-image.png)
# 2.- AZ-104 Governance and Compliance
# AZ-104 - Governance and Compliance - Managing Subscriptions
##### [Organize and manage multiple Azure subscriptions](https://learn.microsoft.com/en-us/azure/cloud-adoption-framework/ready/azure-best-practices/organize-subscriptions "Organize and manage multiple Azure subscriptions")
##### What are subscriptions
- Billing unit that aggregates all costs of underlying resources
- Contain resource groups and their associated resources
- Scoping level for governance and security
- Can be associated with only a single organization (Azure AD Tenant) at a time
Examples:
you can define multiple subscriptions per department to identify costs
#### Subscription naming conventions
##### - Prod/Dev/Staging
Subscriptions are named based on whether they are production, development or staging environments.
##### - Department/Teams
Subscriptions are named based on the department or team the subscription is intended for so that billing can then be easily associated with a given business unit.
##### - Region
Subscription are name based on the region of the business that uses the subscription.
# AZ-104 - Governance and Compliance - Using management groups
#### [What are Azure management groups?](https://learn.microsoft.com/en-us/azure/governance/management-groups/overview)
#### Management groups
- Define management groups
- Understanding hierarchy
- Scoping
##### Managing subscriptions
Organize and manage subscriptions by logically grouping them into management groups
- Organizational hierarchy
- Provides another scope for enforcing governance and compliance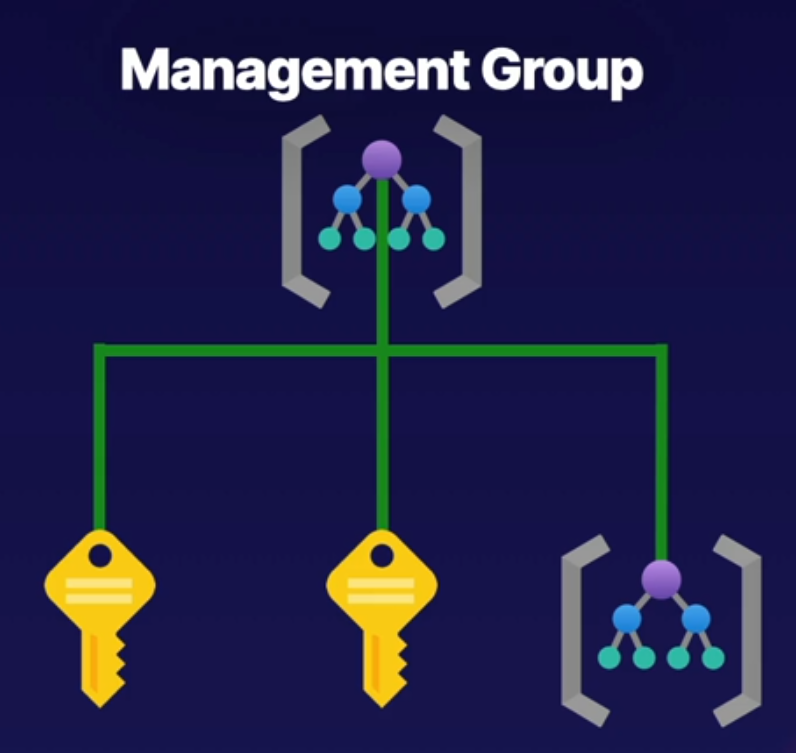
Parent-child relationships
- Root management group is the top level
- Management groups and subscriptions can have a single parent
- Supports six levels of hierarchy
Compliance Support
- Azure Policies
- Azure role-based access control (RBAC)
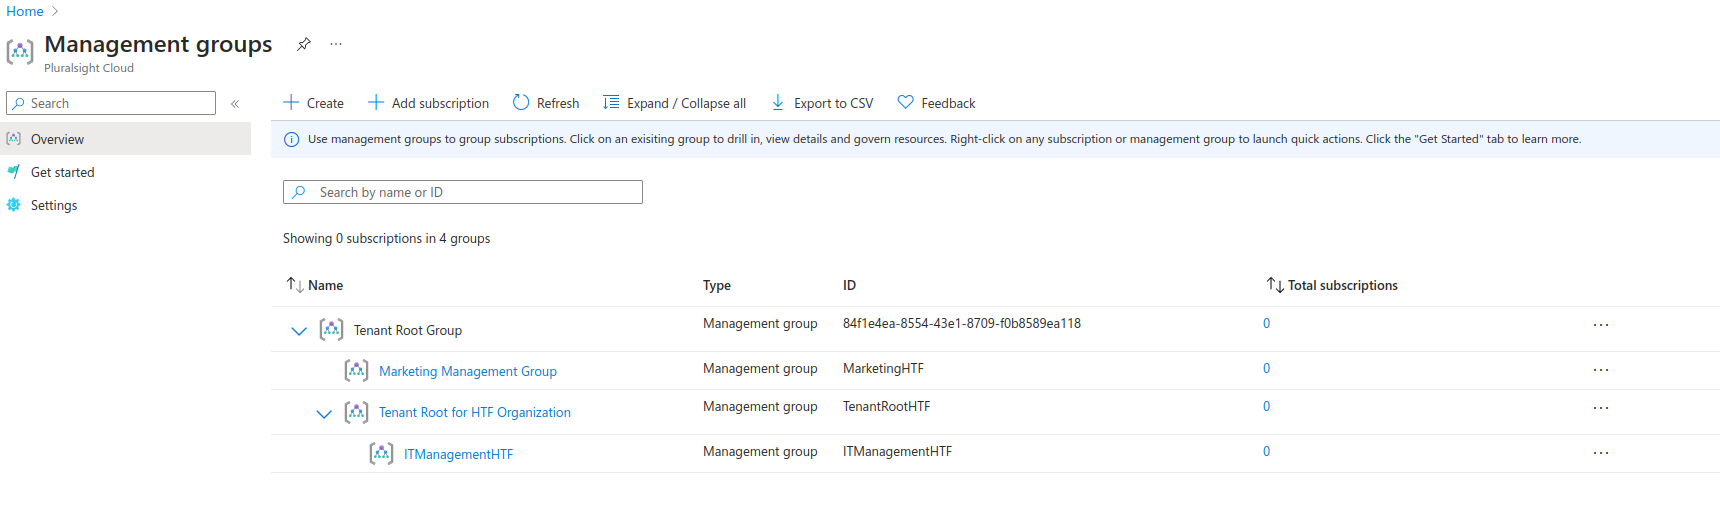
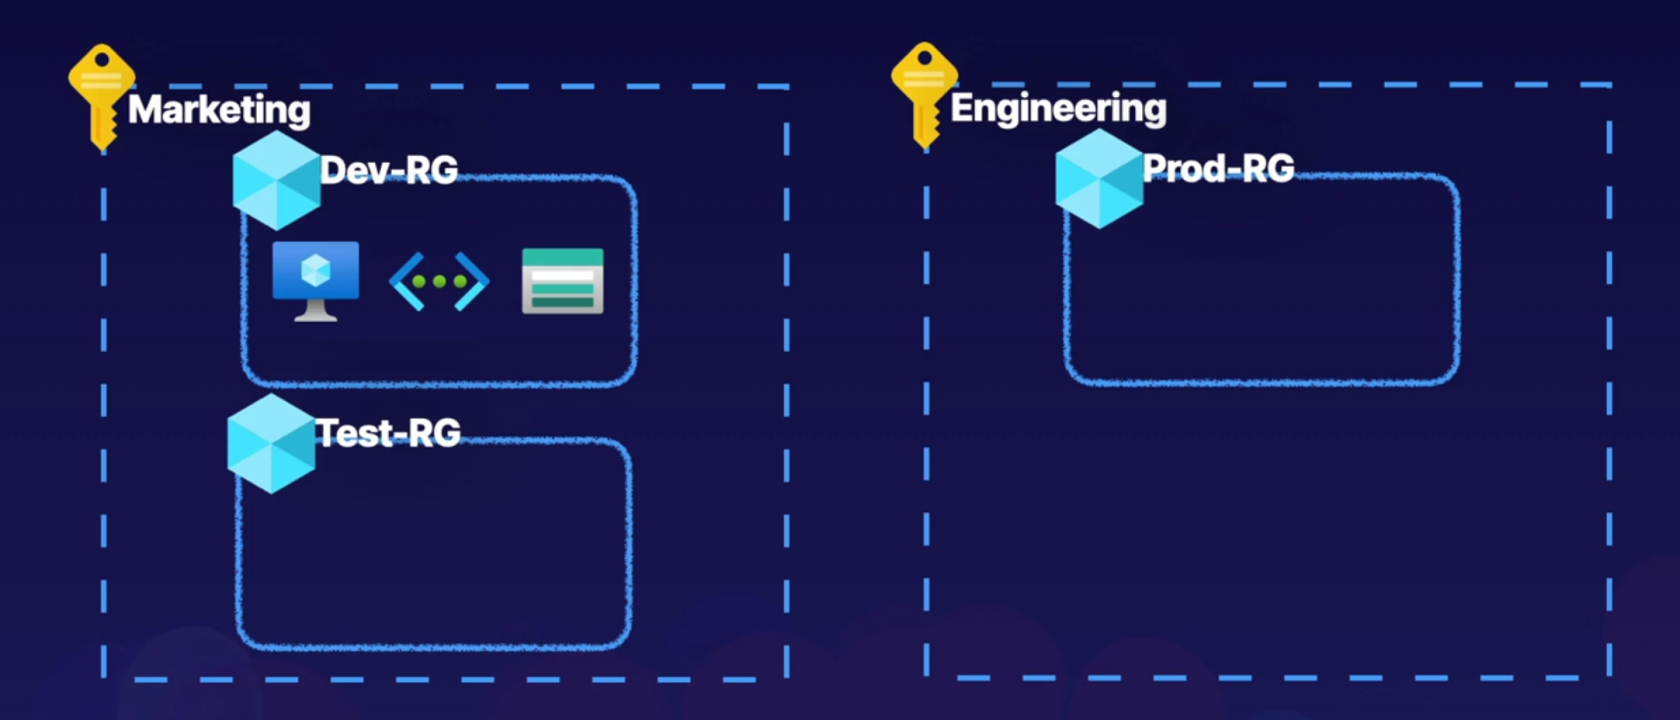
Next diagram shows how to represent an organizational hierarchy by having a Root management group, under root we have a subscription for EA, a Marketing management group and an IT management group.
The Marketing group also have 2 child subscriptions under the marketing management group and IT has another management group as a child management group.
This helps identify the hierarchy levels for our organization
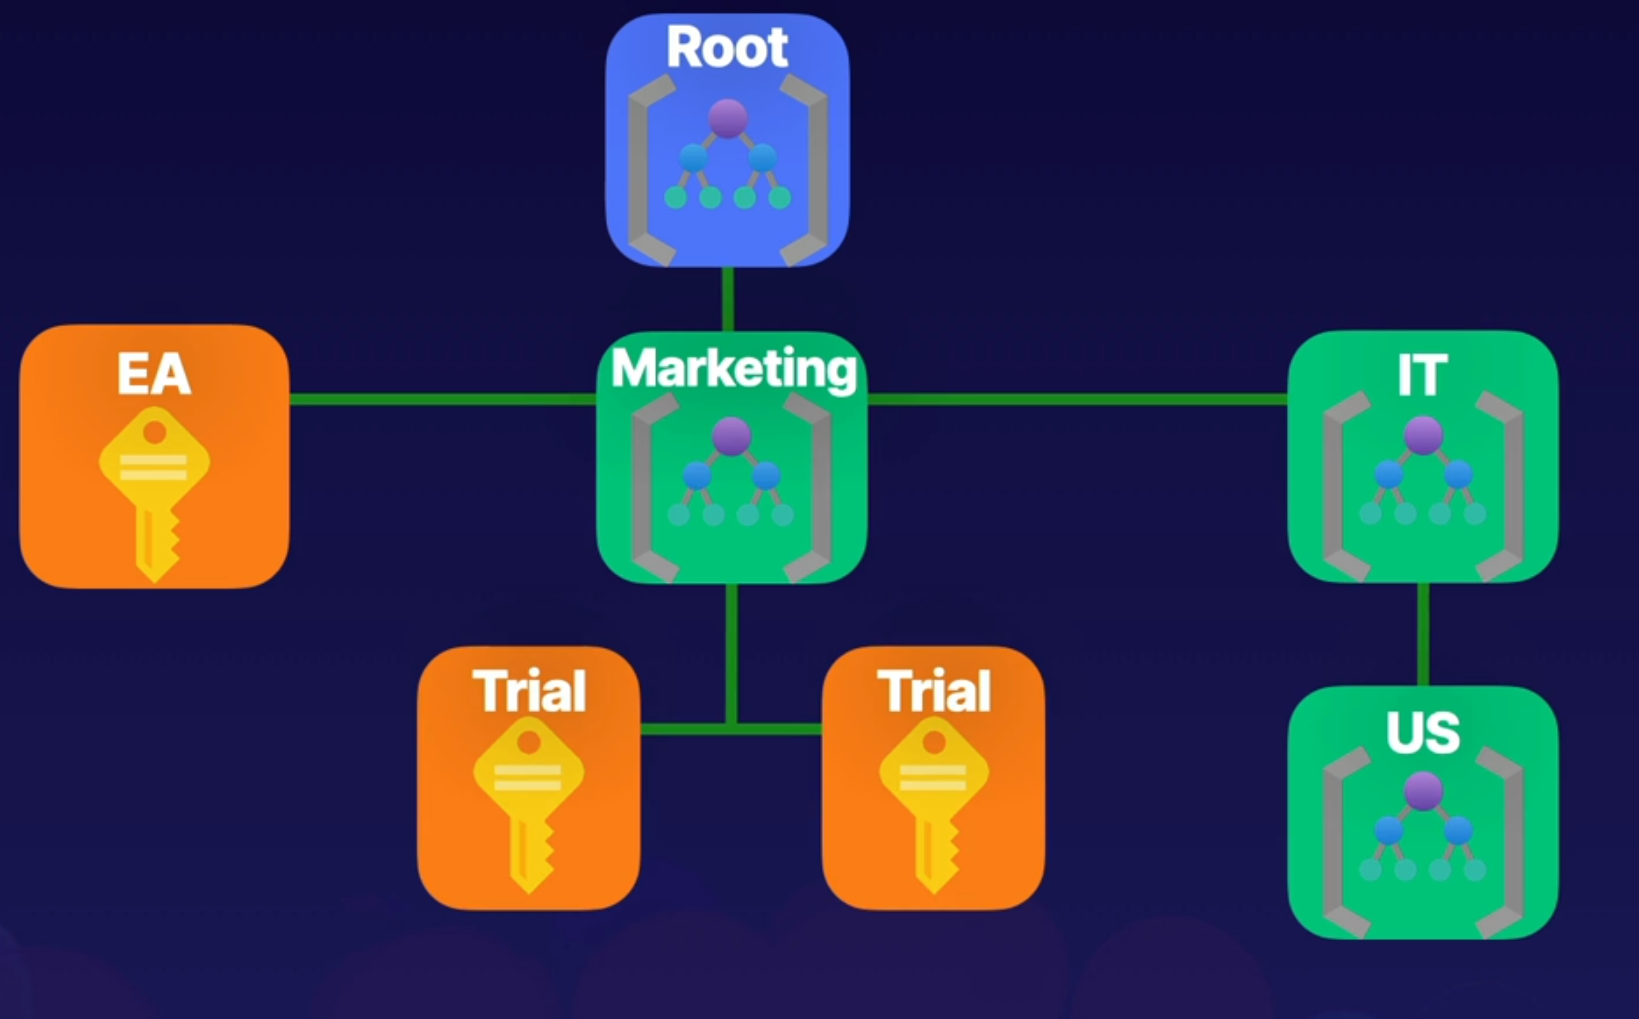
All resources, permissions, etc will flow down in the hierarchy, for example if you give access to the root management group it will have access to IT, Marketing, etc it flow down in the hierarchy.
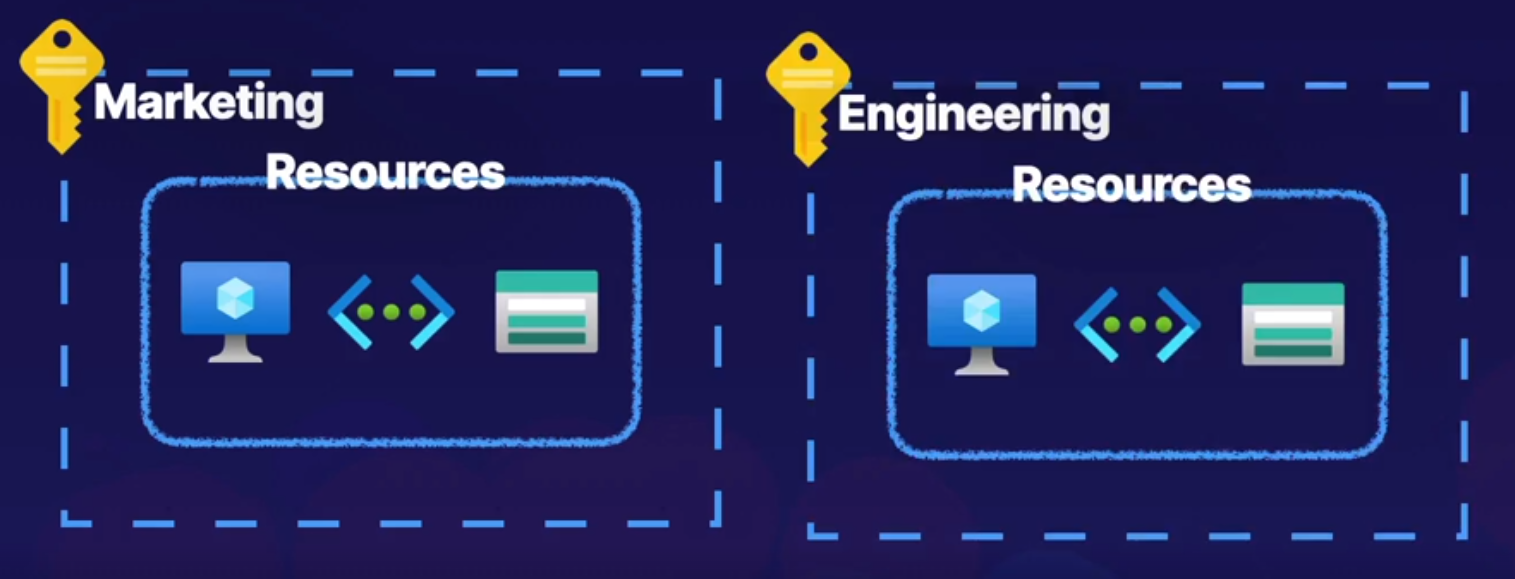
Illustration below shows 2 management groups under the main root Tenant group, we can access and add subscriptions or management groups inside an existing management group.
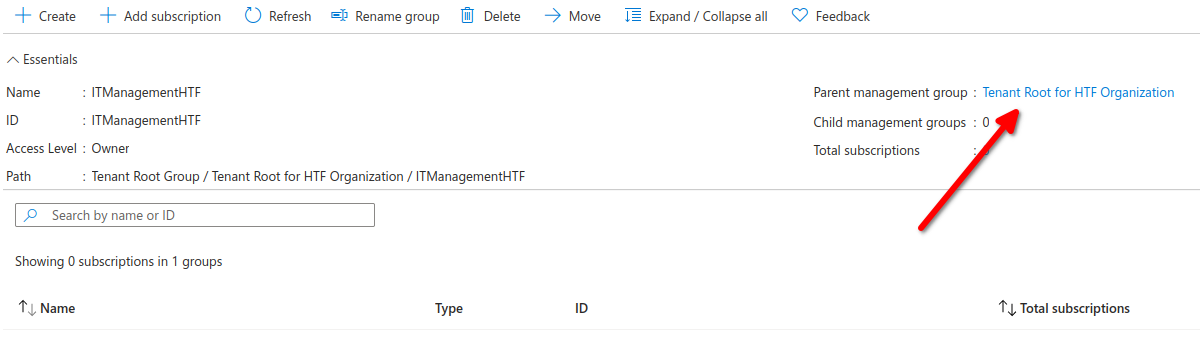
Here we can see the Parent management group for IManagementHTF its Tenant Root for HTF Organization since we created this management group inside our root
Root management group is not given by default
Root Management group cannot be moved or deleted
Azure RBAC is supported for management groups
Global Administrators must be elevated to User Access Administrator of root group
# AZ-104 - Governance and Compliance - Understanding Azure Policy
#### **[Control and organize Azure resources with Azure Resource Manager](https://learn.microsoft.com/en-us/training/modules/control-and-organize-with-azure-resource-manager/)**
#### **Understanding Azure Policy**
- Define Azure Policy
- Components of a Policy
- Policy Examples
Enforce Compliance and enable auditing
Organization need to implement enterprise-level governance and compliance capabilities.
##### Prohibit resources
- control costs
- Restrict service access
##### Allowed Locations
- Geographical compliance
##### Policy DefinitionDefines the evaluation criteria for compliance, and defines the actions that take place. Either audit or deny should be something outside of compliance.
##### Policy AssignmentThe scope at which we will assign our policy. The scope could be a management group, subscription, resource group, or resource.
##### Initiative Definition A collection of policies that are tailored to achieving a singular high-level goal together (e.g., ensuring that VMs meet standards).
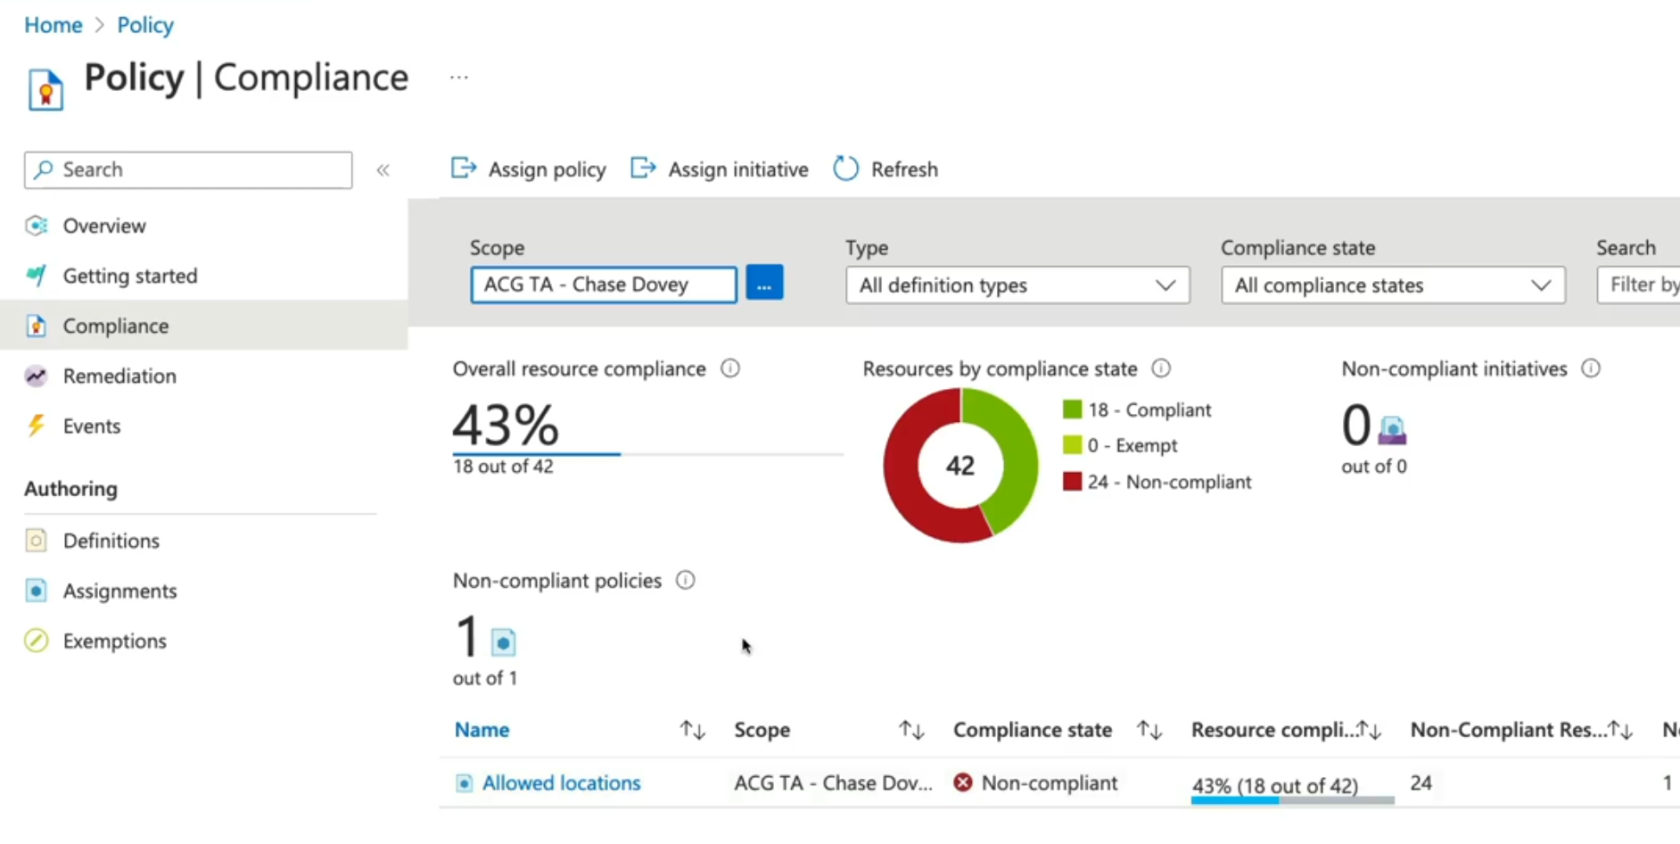
Policy Definition
Evaluate if a VM is being created with our tag Project:az104. if the VM is missing the tag, then deny creation of the resource.
Policy assignment
Assign the policy at the scope of the resource where the VMs will be created
[](https://wiki.tinod.net/uploads/images/gallery/2024-02/SAoyLC7QAEOA7iRZ-image.png)
# AZ-104 - Governance and Compliance - Tagging Resources
#### **[Control and organize Azure resources with Azure Resource Manager](https://learn.microsoft.com/en-us/training/modules/control-and-organize-with-azure-resource-manager/)**
#### **Tags**
What are tags: its a form of Name:Value
- Dept:Marketing - For example if create tag Dept:Marketing and tag all resources from Marketing this will help identify and provide billing to this resources to the Marketing department.
- Env:Prod - Identify wheather an environment is in production or dev
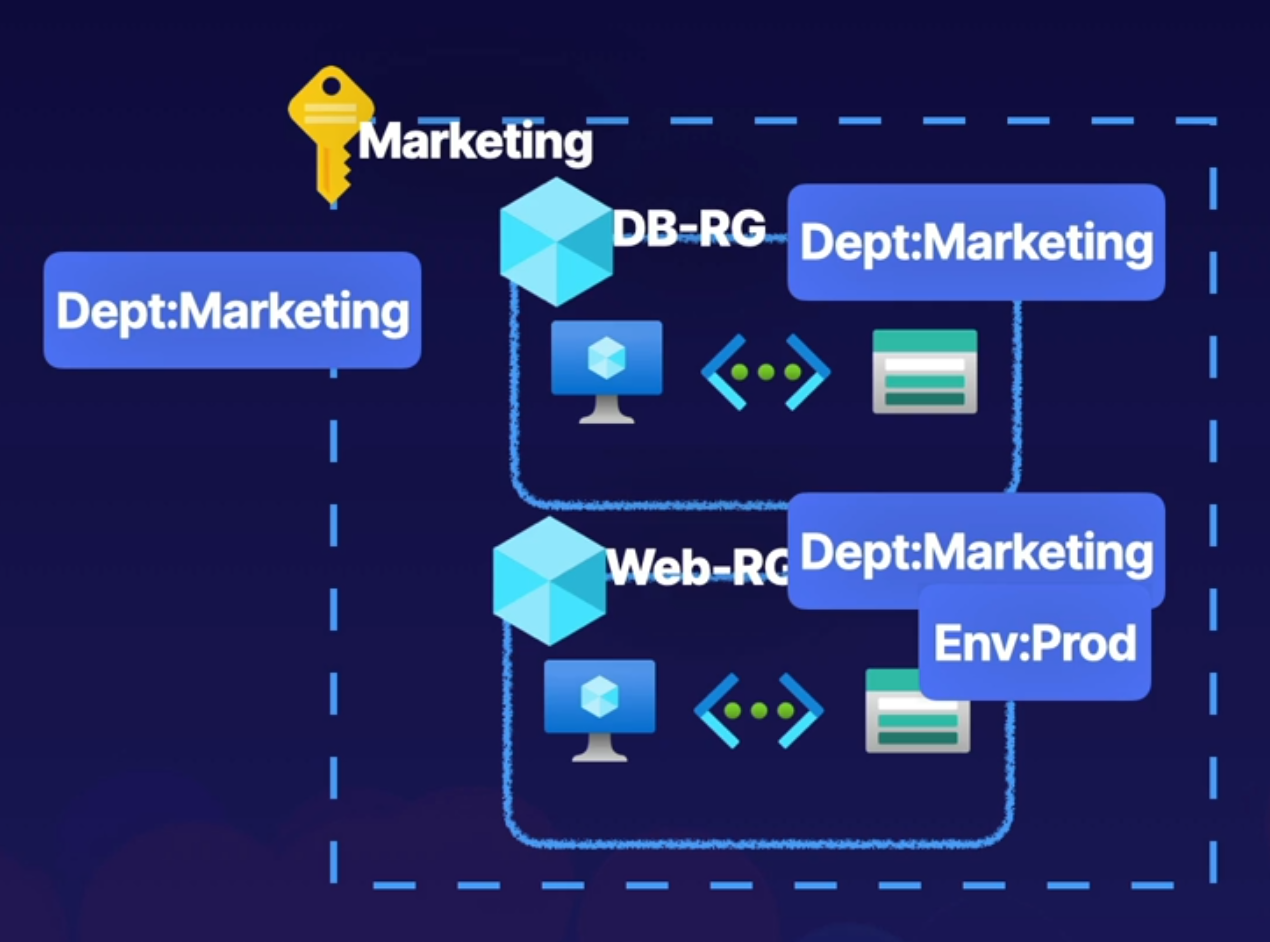
- Name can be 512 characters, and value can be 256 characters.
- Storage accounts can have a name with only 128 characters.
- Tags are not inherited.
- A resource can have 50 tags max.
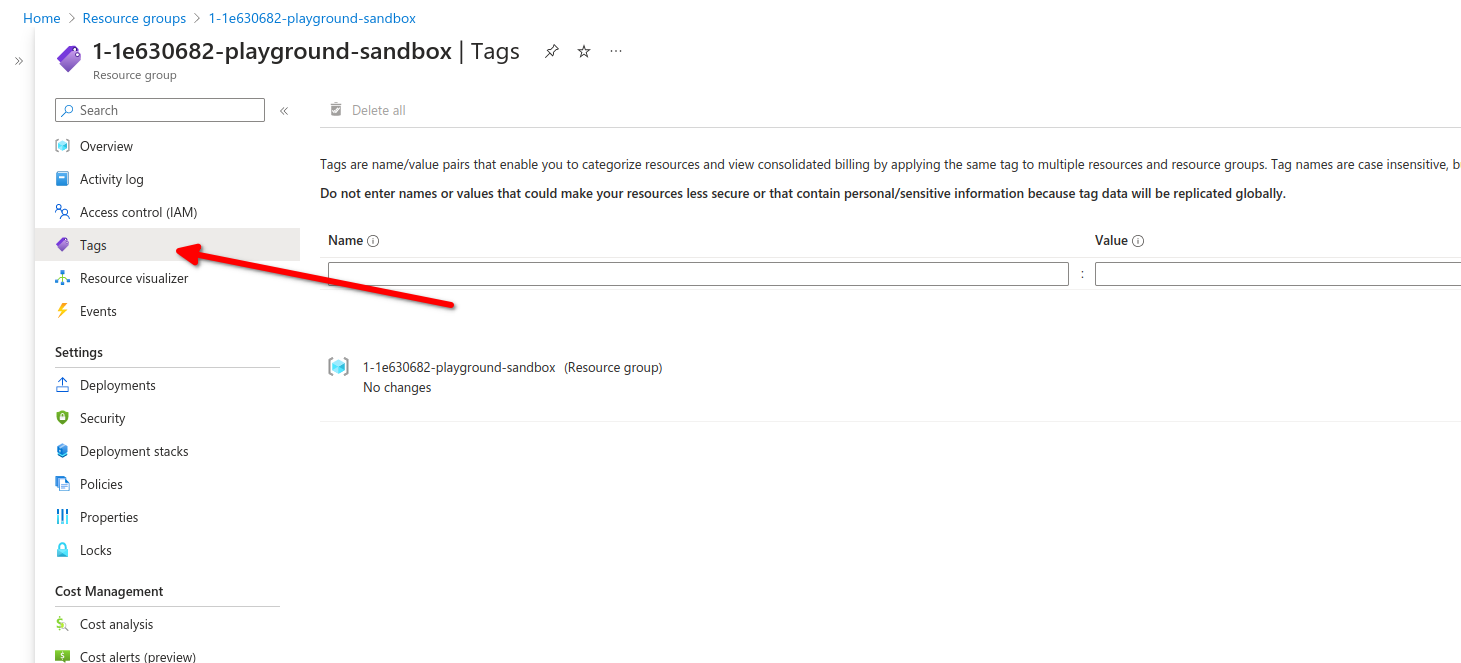
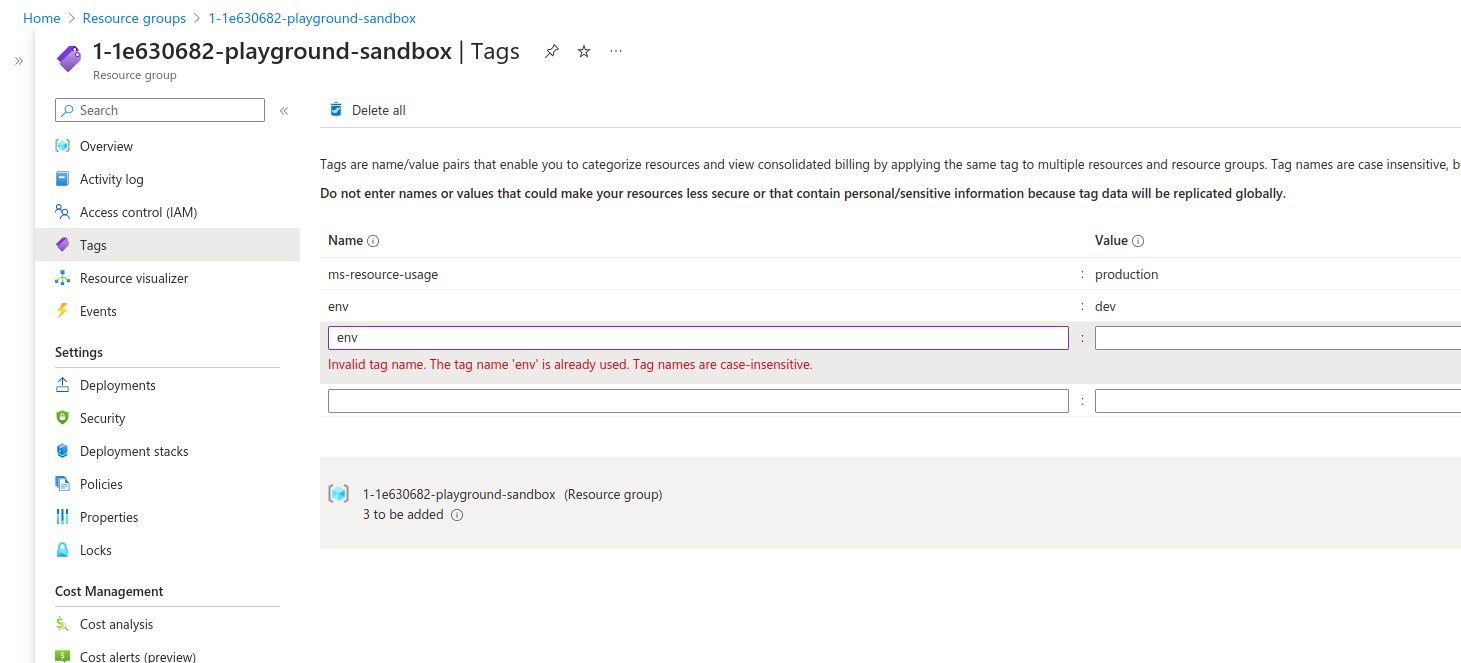
Here we can create tags, tags are not allowed to have the same name
Lets test with the following ARM template.
(refer to [Arm Template here to investigate how to deploy an ARM template](https://wiki.tinod.net/books/az-104-learning-azure-cloud-administrator/page/az-104-administration-azure-arm-templates))
Arm template for TAG test
```
{
"$schema": "https://schema.management.azure.com/schemas/2019-04-01/deploymentTemplate.json#",
"contentVersion": "1.0.0.0",
"parameters": {
"storageAccountName": {
"type": "string",
"metadata": {
"description": "Name of storage account"
}
},
"adminUsername": {
"type": "string",
"metadata": {
"description": "Admin username"
}
},
"adminPassword": {
"type": "securestring",
"metadata": {
"description": "Admin password"
}
},
"dnsNameforLBIP": {
"type": "string",
"metadata": {
"description": "DNS for Load Balancer IP"
}
},
"vmNamePrefix": {
"type": "string",
"defaultValue": "myVM",
"metadata": {
"description": "Prefix to use for VM names"
}
},
"imagePublisher": {
"type": "string",
"defaultValue": "MicrosoftWindowsServer",
"metadata": {
"description": "Image Publisher"
}
},
"imageOffer": {
"type": "string",
"defaultValue": "WindowsServer",
"metadata": {
"description": "Image Offer"
}
},
"imageSKU": {
"type": "string",
"defaultValue": "2019-Datacenter",
"metadata": {
"description": "Image SKU"
}
},
"lbName": {
"type": "string",
"defaultValue": "myLB",
"metadata": {
"description": "Load Balancer name"
}
},
"nicNamePrefix": {
"type": "string",
"defaultValue": "nic",
"metadata": {
"description": "Network Interface name prefix"
}
},
"publicIPAddressName": {
"type": "string",
"defaultValue": "myPublicIP",
"metadata": {
"description": "Public IP Name"
}
},
"vnetName": {
"type": "string",
"defaultValue": "myVNET",
"metadata": {
"description": "VNET name"
}
},
"vmSize": {
"type": "string",
"defaultValue": "Standard_D2s_v3",
"metadata": {
"description": "Size of the VM"
}
},
"location": {
"type": "string",
"defaultValue": "[resourceGroup().location]",
"metadata": {
"description": "Location for all resources"
}
}
},
"variables": {
"storageAccountType": "Standard_LRS",
"availabilitySetName": "myAvSet",
"addressPrefix": "10.0.0.0/16",
"subnetName": "Subnet-1",
"subnetPrefix": "10.0.0.0/24",
"publicIPAddressType": "Dynamic",
"subnetRef": "[resourceId('Microsoft.Network/virtualNetworks/subnets', parameters('vnetName'), variables ('subnetName'))]",
"publicIPAddressID": "[resourceId('Microsoft.Network/publicIPAddresses',parameters('publicIPAddressName'))]",
"numberOfInstances": 2
},
"resources": [
{
"type": "Microsoft.Storage/storageAccounts",
"name": "[parameters('storageAccountName')]",
"apiVersion": "2019-06-01",
"location": "[parameters('location')]",
"sku": {
"name": "[variables('storageAccountType')]"
},
"kind": "StorageV2"
},
{
"type": "Microsoft.Compute/availabilitySets",
"name": "[variables('availabilitySetName')]",
"apiVersion": "2019-12-01",
"location": "[parameters('location')]",
"properties": {
"platformFaultDomainCount": 2,
"platformUpdateDomainCount": 5
},
"sku": {
"name": "Aligned"
}
},
{
"apiVersion": "2020-05-01",
"type": "Microsoft.Network/publicIPAddresses",
"name": "[parameters('publicIPAddressName')]",
"location": "[parameters('location')]",
"properties": {
"publicIPAllocationMethod": "[variables('publicIPAddressType')]",
"dnsSettings": {
"domainNameLabel": "[parameters('dnsNameforLBIP')]"
}
}
},
{
"apiVersion": "2020-05-01",
"type": "Microsoft.Network/virtualNetworks",
"name": "[parameters('vnetName')]",
"location": "[parameters('location')]",
"properties": {
"addressSpace": {
"addressPrefixes": [
"[variables('addressPrefix')]"
]
},
"subnets": [
{
"name": "[variables('subnetName')]",
"properties": {
"addressPrefix": "[variables('subnetPrefix')]"
}
}
]
}
},
{
"apiVersion": "2020-05-01",
"type": "Microsoft.Network/networkInterfaces",
"name": "[concat(parameters('nicNamePrefix'), copyindex())]",
"location": "[parameters('location')]",
"copy": {
"name": "nicLoop",
"count": "[variables('numberOfInstances')]"
},
"dependsOn": [
"[resourceId('Microsoft.Network/virtualNetworks/', parameters('vnetName'))]",
"[resourceId('Microsoft.Network/loadBalancers/', parameters('lbName'))]"
],
"properties": {
"ipConfigurations": [
{
"name": "ipconfig1",
"properties": {
"privateIPAllocationMethod": "Dynamic",
"subnet": {
"id": "[variables('subnetRef')]"
},
"loadBalancerBackendAddressPools": [
{
"id": "[resourceId('Microsoft.Network/loadBalancers/backendAddressPools', parameters('lbName'), 'BackendPool1')]"
}
],
"loadBalancerInboundNatRules": [
{
"id": "[resourceId('Microsoft.Network/loadBalancers/inboundNatRules', parameters('lbName'), concat('RDP-VM', copyindex()))]"
}
]
}
}
]
}
},
{
"apiVersion": "2020-05-01",
"name": "[parameters('lbName')]",
"type": "Microsoft.Network/loadBalancers",
"location": "[parameters('location')]",
"dependsOn": [
"[resourceId('Microsoft.Network/publicIPAddresses/', parameters('publicIPAddressName'))]"
],
"properties": {
"frontendIPConfigurations": [
{
"name": "LoadBalancerFrontEnd",
"properties": {
"publicIPAddress": {
"id": "[variables('publicIPAddressID')]"
}
}
}
],
"backendAddressPools": [
{
"name": "BackendPool1"
}
],
"inboundNatRules": [
{
"name": "RDP-VM0",
"properties": {
"frontendIPConfiguration": {
"id": "[resourceId('Microsoft.Network/loadBalancers/frontendIPConfigurations', parameters('lbName'), 'LoadBalancerFrontEnd')]"
},
"protocol": "Tcp",
"frontendPort": 50001,
"backendPort": 3389,
"enableFloatingIP": false
}
},
{
"name": "RDP-VM1",
"properties": {
"frontendIPConfiguration": {
"id": "[resourceId('Microsoft.Network/loadBalancers/frontendIPConfigurations', parameters('lbName'), 'LoadBalancerFrontEnd')]"
},
"protocol": "Tcp",
"frontendPort": 50002,
"backendPort": 3389,
"enableFloatingIP": false
}
}
],
"loadBalancingRules": [
{
"name": "LBRule",
"properties": {
"frontendIPConfiguration": {
"id": "[resourceId('Microsoft.Network/loadBalancers/frontendIPConfigurations', parameters('lbName'), 'LoadBalancerFrontEnd')]"
},
"backendAddressPool": {
"id": "[resourceId('Microsoft.Network/loadBalancers/backendAddressPools', parameters('lbName'), 'BackendPool1')]"
},
"protocol": "Tcp",
"frontendPort": 80,
"backendPort": 80,
"enableFloatingIP": false,
"idleTimeoutInMinutes": 5,
"probe": {
"id": "[resourceId('Microsoft.Network/loadBalancers/probes', parameters('lbName'), 'tcpProbe')]"
}
}
}
],
"probes": [
{
"name": "tcpProbe",
"properties": {
"protocol": "Tcp",
"port": 80,
"intervalInSeconds": 5,
"numberOfProbes": 2
}
}
]
}
},
{
"apiVersion": "2019-12-01",
"type": "Microsoft.Compute/virtualMachines",
"name": "[concat(parameters('vmNamePrefix'), copyindex())]",
"copy": {
"name": "virtualMachineLoop",
"count": "[variables('numberOfInstances')]"
},
"location": "[parameters('location')]",
"dependsOn": [
"[resourceId('Microsoft.Storage/storageAccounts/', parameters('storageAccountName'))]",
"[resourceId('Microsoft.Network/networkInterfaces/', concat(parameters('nicNamePrefix'), copyindex()))]",
"[resourceId('Microsoft.Compute/availabilitySets/', variables('availabilitySetName'))]"
],
"properties": {
"availabilitySet": {
"id": "[resourceId('Microsoft.Compute/availabilitySets',variables('availabilitySetName'))]"
},
"hardwareProfile": {
"vmSize": "[parameters('vmSize')]"
},
"osProfile": {
"computerName": "[concat(parameters('vmNamePrefix'), copyIndex())]",
"adminUsername": "[parameters('adminUsername')]",
"adminPassword": "[parameters('adminPassword')]"
},
"storageProfile": {
"imageReference": {
"publisher": "[parameters('imagePublisher')]",
"offer": "[parameters('imageOffer')]",
"sku": "[parameters('imageSKU')]",
"version": "latest"
},
"osDisk": {
"createOption": "FromImage"
}
},
"networkProfile": {
"networkInterfaces": [
{
"id": "[resourceId('Microsoft.Network/networkInterfaces',concat(parameters('nicNamePrefix'),copyindex()))]"
}
]
},
"diagnosticsProfile": {
"bootDiagnostics": {
"enabled": true,
"storageUri": "[reference(parameters('storageAccountName'), '2019-06-01').primaryEndpoints.blob]"
}
}
}
}
]
}
```
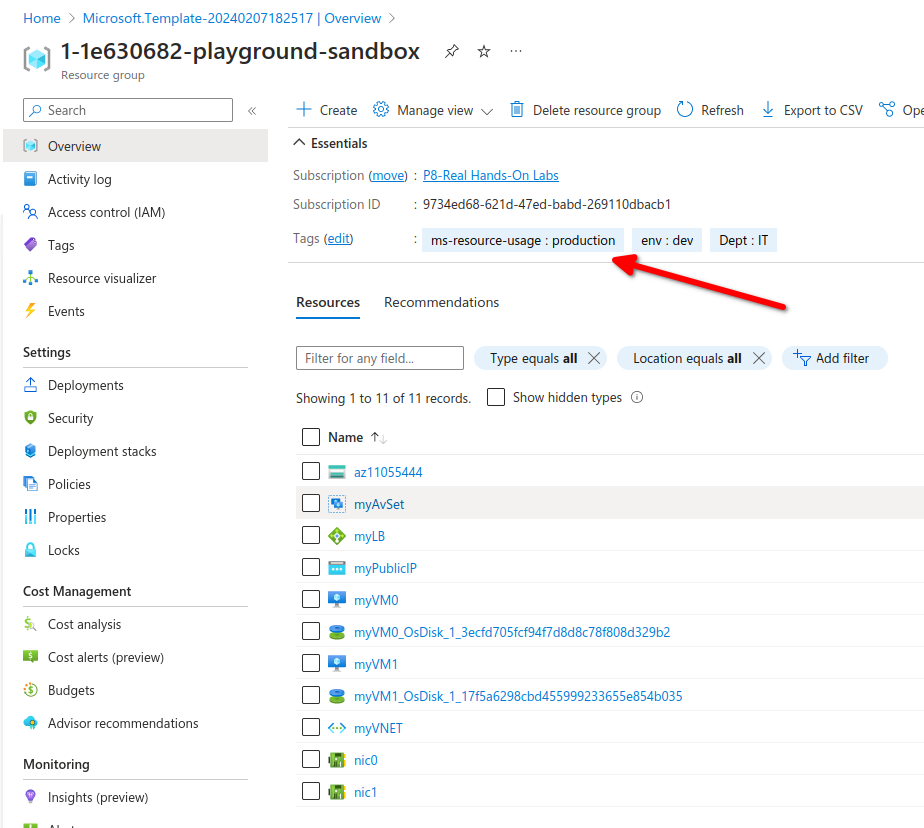
After deploying our VMs using the ARM template, we can see that the resource group show the tags we previously assign.
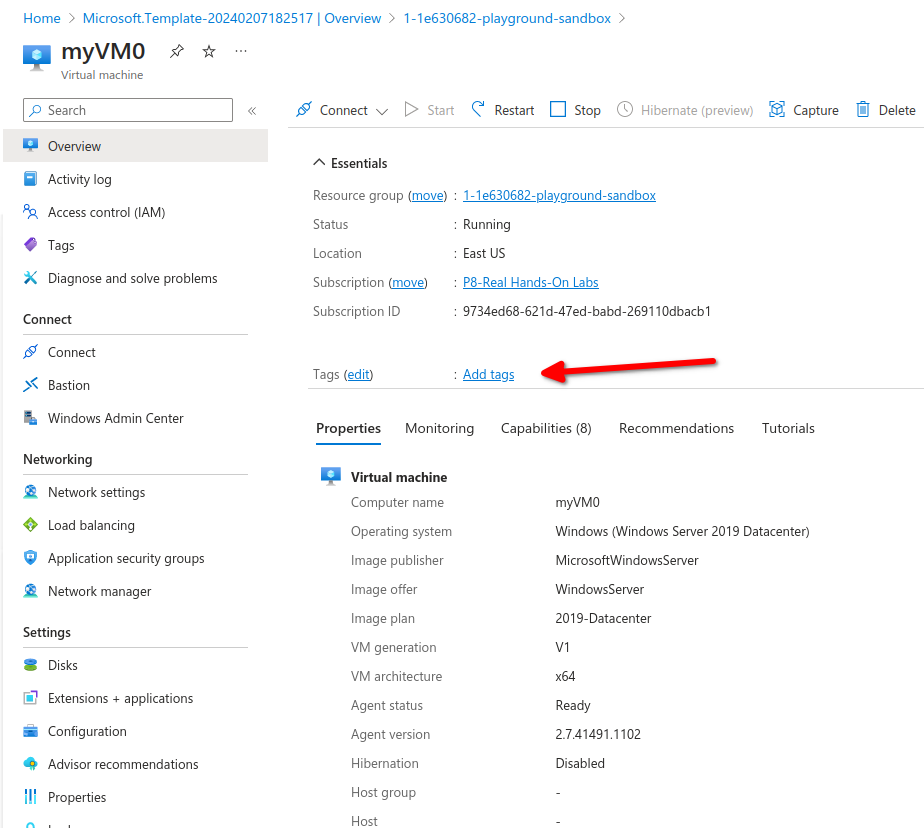
If we go to our virtual machine we notice tags are not inherited from the resource group
Manage resources via tags, For example shutting down all VM's with a specific tag or developers can only update VMs with a specific tag.
Tags are not inheritance from the higher scope like a resource group, Each resource group must be tagged iinidependently. You can use Azure policy to enforce tagging.
# AZ-104 - Governance and Compliance - LAB Add Remove Tags
# Add, Remove and Update Tags for Resources in Azure
## Introduction
In the scenario for this hands-on lab, the finance department has reached out to you. They are requesting additional taxonomy information on a recent Azure bill, including who created the resources, which department budget should be used for the resources, and if the resources are necessary for running business critical systems.
If there are any non-essential business systems, they ask that you signify that in some way.
- Add Tags to resource group
- Modify tags for VM and Mark for Deletion
- Modify tags for Virtual Network
Launch a powershell instance inside azure portal
##### **Add Tags to the resource group**
**Run az group list and copy the name (395-5d062b4a-add-remove-and-update-tags-for-resou)**
```powershell
PS /home/cloud> az group list
[
{
"id": "/subscriptions/9734ed68-621d-47ed-babd-269110dbacb1/resourceGroups/395-5d062b4a-add-remove-and-update-tags-for-resou",
"location": "westus",
"managedBy": null,
"name": "395-5d062b4a-add-remove-and-update-tags-for-resou",
"properties": {
"provisioningState": "Succeeded"
},
"tags": null,
"type": "Microsoft.Resources/resourceGroups"
}
]
```
##### **Update the user group tags:**
**- az group update --resource-group "<RESOURCE\_GROUP\_NAME>" --tags "Environment=Production" "Dept=IT" "CreatedBy=<YourName>"**
```powershell
PS /home/cloud> az group update --resource-group "395-5d062b4a-add-remove-and-update-tags-for-resou" --tags "Environment=Production" "Dept=IT" "CreatedBy=Cesar"
{
"id": "/subscriptions/9734ed68-621d-47ed-babd-269110dbacb1/resourceGroups/395-5d062b4a-add-remove-and-update-tags-for-resou",
"location": "westus",
"managedBy": null,
"name": "395-5d062b4a-add-remove-and-update-tags-for-resou",
"properties": {
"provisioningState": "Succeeded"
},
"tags": {
"CreatedBy": "Cesar",
"Dept": "IT",
"Environment": "Production"
},
"type": "Microsoft.Resources/resourceGroups"
}
PS /home/cloud>
```
##### **Remove Tags for VM and Mark for Deletion**
1. In the Cloud Shell, list the existing virtual machines: ```powershell
PS /home/cloud> az vm list --query '[].{name:name, resourceGroup:resourceGroup, tags:tags}' -o json
[
{
"name": "webvm1",
"resourceGroup": "395-5D062B4A-ADD-REMOVE-AND-UPDATE-TAGS-FOR-RESOU",
"tags": {
"defaultExperience": "Yes"
}
}
]
PS /home/cloud>
```
2. Remove the existing tags from the VM: ```powershell
PS /home/cloud> az vm update -g "395-5d062b4a-add-remove-and-update-tags-for-resou" -n webvm1 --remove tags.defaultExperience
{
"additionalCapabilities": null,
"applicationProfile": null,
"availabilitySet": null,
"billingProfile": null,
"capacityReservation": null,
"diagnosticsProfile": {
"bootDiagnostics": {
"enabled": true,
"storageUri": "https://azurelalabi4q7bqaknwjqy.blob.core.windows.net/"
}
},
"etag": null,
"evictionPolicy": null,
"extendedLocation": null,
"extensionsTimeBudget": null,
"hardwareProfile": {
"vmSize": "Standard_B1ms",
"vmSizeProperties": null
},
"host": null,
"hostGroup": null,
"id": "/subscriptions/9734ed68-621d-47ed-babd-269110dbacb1/resourceGroups/395-5d062b4a-add-remove-and-update-tags-for-resou/providers/Microsoft.Compute/virtualMachines/webvm1",
"identity": null,
"instanceView": null,
"licenseType": null,
"location": "westus",
"managedBy": null,
"name": "webvm1",
"networkProfile": {
"networkApiVersion": null,
"networkInterfaceConfigurations": null,
"networkInterfaces": [
{
"deleteOption": null,
"id": "/subscriptions/9734ed68-621d-47ed-babd-269110dbacb1/resourceGroups/395-5d062b4a-add-remove-and-update-tags-for-resou/providers/Microsoft.Network/networkInterfaces/webvm1-nic1",
"primary": null,
"resourceGroup": "395-5d062b4a-add-remove-and-update-tags-for-resou"
}
]
},
"osProfile": {
"adminPassword": null,
"adminUsername": "cloud_user",
"allowExtensionOperations": null,
"computerName": "webvm1",
"customData": null,
"linuxConfiguration": null,
"requireGuestProvisionSignal": null,
"secrets": [],
"windowsConfiguration": {
"additionalUnattendContent": null,
"enableAutomaticUpdates": true,
"enableVmAgentPlatformUpdates": false,
"patchSettings": {
"assessmentMode": "ImageDefault",
"automaticByPlatformSettings": null,
"enableHotpatching": null,
"patchMode": "AutomaticByOS"
},
"provisionVmAgent": true,
"timeZone": null,
"winRm": null
}
},
"plan": null,
"platformFaultDomain": null,
"priority": null,
"provisioningState": "Succeeded",
"proximityPlacementGroup": null,
"resourceGroup": "395-5d062b4a-add-remove-and-update-tags-for-resou",
"resources": null,
"scheduledEventsProfile": null,
"securityProfile": null,
"storageProfile": {
"dataDisks": [],
"diskControllerType": null,
"imageReference": {
"communityGalleryImageId": null,
"exactVersion": "14393.6709.240206",
"id": null,
"offer": "WindowsServer",
"publisher": "MicrosoftWindowsServer",
"sharedGalleryImageId": null,
"sku": "2016-Datacenter",
"version": "latest"
},
"osDisk": {
"caching": "ReadWrite",
"createOption": "FromImage",
"deleteOption": "Detach",
"diffDiskSettings": null,
"diskSizeGb": 127,
"encryptionSettings": null,
"image": null,
"managedDisk": {
"diskEncryptionSet": null,
"id": "/subscriptions/9734ed68-621d-47ed-babd-269110dbacb1/resourceGroups/395-5d062b4a-add-remove-and-update-tags-for-resou/providers/Microsoft.Compute/disks/webvm1_disk1_8db0168337f74a62a7160d01554e753f",
"resourceGroup": "395-5d062b4a-add-remove-and-update-tags-for-resou",
"securityProfile": null,
"storageAccountType": "Premium_LRS"
},
"name": "webvm1_disk1_8db0168337f74a62a7160d01554e753f",
"osType": "Windows",
"vhd": null,
"writeAcceleratorEnabled": null
}
},
"tags": {},
"timeCreated": "2024-02-13T20:59:23.426680+00:00",
"type": "Microsoft.Compute/virtualMachines",
"userData": null,
"virtualMachineScaleSet": null,
"vmId": "2292ae3f-ab87-42a0-b3ac-58ec941a77bc",
"zones": null
}
PS /home/cloud>
```
3. Mark the VM for deletion ```powershell
PS /home/cloud> az vm update -g "395-5d062b4a-add-remove-and-update-tags-for-resou" -n webvm1 --set tags.MarkForDeletion=Yes
{
"additionalCapabilities": null,
"applicationProfile": null,
"availabilitySet": null,
"billingProfile": null,
"capacityReservation": null,
"diagnosticsProfile": {
"bootDiagnostics": {
"enabled": true,
"storageUri": "https://azurelalabi4q7bqaknwjqy.blob.core.windows.net/"
}
},
"etag": null,
"evictionPolicy": null,
"extendedLocation": null,
"extensionsTimeBudget": null,
"hardwareProfile": {
"vmSize": "Standard_B1ms",
"vmSizeProperties": null
},
"host": null,
"hostGroup": null,
"id": "/subscriptions/9734ed68-621d-47ed-babd-269110dbacb1/resourceGroups/395-5d062b4a-add-remove-and-update-tags-for-resou/providers/Microsoft.Compute/virtualMachines/webvm1",
"identity": null,
"instanceView": null,
"licenseType": null,
"location": "westus",
"managedBy": null,
"name": "webvm1",
"networkProfile": {
"networkApiVersion": null,
"networkInterfaceConfigurations": null,
"networkInterfaces": [
{
"deleteOption": null,
"id": "/subscriptions/9734ed68-621d-47ed-babd-269110dbacb1/resourceGroups/395-5d062b4a-add-remove-and-update-tags-for-resou/providers/Microsoft.Network/networkInterfaces/webvm1-nic1",
"primary": null,
"resourceGroup": "395-5d062b4a-add-remove-and-update-tags-for-resou"
}
]
},
"osProfile": {
"adminPassword": null,
"adminUsername": "cloud_user",
"allowExtensionOperations": null,
"computerName": "webvm1",
"customData": null,
"linuxConfiguration": null,
"requireGuestProvisionSignal": null,
"secrets": [],
"windowsConfiguration": {
"additionalUnattendContent": null,
"enableAutomaticUpdates": true,
"enableVmAgentPlatformUpdates": false,
"patchSettings": {
"assessmentMode": "ImageDefault",
"automaticByPlatformSettings": null,
"enableHotpatching": null,
"patchMode": "AutomaticByOS"
},
"provisionVmAgent": true,
"timeZone": null,
"winRm": null
}
},
"plan": null,
"platformFaultDomain": null,
"priority": null,
"provisioningState": "Succeeded",
"proximityPlacementGroup": null,
"resourceGroup": "395-5d062b4a-add-remove-and-update-tags-for-resou",
"resources": null,
"scheduledEventsProfile": null,
"securityProfile": null,
"storageProfile": {
"dataDisks": [],
"diskControllerType": null,
"imageReference": {
"communityGalleryImageId": null,
"exactVersion": "14393.6709.240206",
"id": null,
"offer": "WindowsServer",
"publisher": "MicrosoftWindowsServer",
"sharedGalleryImageId": null,
"sku": "2016-Datacenter",
"version": "latest"
},
"osDisk": {
"caching": "ReadWrite",
"createOption": "FromImage",
"deleteOption": "Detach",
"diffDiskSettings": null,
"diskSizeGb": 127,
"encryptionSettings": null,
"image": null,
"managedDisk": {
"diskEncryptionSet": null,
"id": "/subscriptions/9734ed68-621d-47ed-babd-269110dbacb1/resourceGroups/395-5d062b4a-add-remove-and-update-tags-for-resou/providers/Microsoft.Compute/disks/webvm1_disk1_8db0168337f74a62a7160d01554e753f",
"resourceGroup": "395-5d062b4a-add-remove-and-update-tags-for-resou",
"securityProfile": null,
"storageAccountType": "Premium_LRS"
},
"name": "webvm1_disk1_8db0168337f74a62a7160d01554e753f",
"osType": "Windows",
"vhd": null,
"writeAcceleratorEnabled": null
}
},
"tags": {
"MarkForDeletion": "Yes"
},
"timeCreated": "2024-02-13T20:59:23.426680+00:00",
"type": "Microsoft.Compute/virtualMachines",
"userData": null,
"virtualMachineScaleSet": null,
"vmId": "2292ae3f-ab87-42a0-b3ac-58ec941a77bc",
"zones": null
}
PS /home/cloud>
```
##### **Change the Tags for the Virtual Network**
In the cloud shell list the virtual networks
```powershell
PS /home/cloud> az network vnet list --query '[].{name:name, resourceGroup:resourceGroup, tags:tags}' -o json
[
{
"name": "vnet1",
"resourceGroup": "395-5d062b4a-add-remove-and-update-tags-for-resou",
"tags": {
"Application": "MyApp",
"Created By": "MyName",
"Department": "MyDepartment"
}
}
]
```
Overwrite the existing tags:
```powershell
PS /home/cloud> az resource tag --tags "Dept=IT" "Environment=Production" "CreatedBy=Cesar" --resource-group "395-5d062b4a-add-remove-and-update-tags-for-resou" -n "vnet1" --resource-type "Microsoft.Network/virtualNetworks"
{
"etag": "W/\"c51873be-773d-4b96-ab24-fa37389401fe\"",
"extendedLocation": null,
"id": "/subscriptions/9734ed68-621d-47ed-babd-269110dbacb1/resourceGroups/395-5d062b4a-add-remove-and-update-tags-for-resou/providers/Microsoft.Network/virtualNetworks/vnet1",
"identity": null,
"kind": null,
"location": "westus",
"managedBy": null,
"name": "vnet1",
"plan": null,
"properties": {
"addressSpace": {
"addressPrefixes": [
"10.1.0.0/16"
]
},
"enableDdosProtection": false,
"provisioningState": "Succeeded",
"resourceGuid": "48583c22-680d-4ddf-97d8-1e25046de802",
"subnets": [
{
"etag": "W/\"c51873be-773d-4b96-ab24-fa37389401fe\"",
"id": "/subscriptions/9734ed68-621d-47ed-babd-269110dbacb1/resourceGroups/395-5d062b4a-add-remove-and-update-tags-for-resou/providers/Microsoft.Network/virtualNetworks/vnet1/subnets/subnet1",
"name": "subnet1",
"properties": {
"addressPrefix": "10.1.1.0/24",
"delegations": [],
"ipConfigurations": [
{
"id": "/subscriptions/9734ed68-621d-47ed-babd-269110dbacb1/resourceGroups/395-5D062B4A-ADD-REMOVE-AND-UPDATE-TAGS-FOR-RESOU/providers/Microsoft.Network/networkInterfaces/WEBVM1-NIC1/ipConfigurations/IPCONFIG1",
"resourceGroup": "395-5D062B4A-ADD-REMOVE-AND-UPDATE-TAGS-FOR-RESOU"
}
],
"networkSecurityGroup": {
"id": "/subscriptions/9734ed68-621d-47ed-babd-269110dbacb1/resourceGroups/395-5d062b4a-add-remove-and-update-tags-for-resou/providers/Microsoft.Network/networkSecurityGroups/shared-nsg",
"resourceGroup": "395-5d062b4a-add-remove-and-update-tags-for-resou"
},
"privateEndpointNetworkPolicies": "Disabled",
"privateLinkServiceNetworkPolicies": "Enabled",
"provisioningState": "Succeeded"
},
"resourceGroup": "395-5d062b4a-add-remove-and-update-tags-for-resou",
"type": "Microsoft.Network/virtualNetworks/subnets"
}
],
"virtualNetworkPeerings": []
},
"resourceGroup": "395-5d062b4a-add-remove-and-update-tags-for-resou",
"sku": null,
"tags": {
"CreatedBy": "MyName",
"Dept": "IT",
"Environment": "Production"
},
"type": "Microsoft.Network/virtualNetworks"
}
PS /home/cloud>
```
# AZ-104 - Governance and Compliance - Locking and Moving Resources
[Control and organize Azure resources with Azure Resource Manager](https://learn.microsoft.com/en-us/training/modules/control-and-organize-with-azure-resource-manager/)
[Move Azure resources to another resource group](https://learn.microsoft.com/en-us/training/modules/move-azure-resources-another-resource-group/ "Move Azure resources to another resource group")
#####
#####
##### **What are Locks**
- Locks allow you to override permissions to resources.
- You can lock subscriptions, resources groups or resources.
- Lock Restrictions apply to all users and roles.
##### Lock types
- Read-only allows authorized users to read a resource, but they cannot delete or update the resource.
- Cannot-delete allows authorized users to read and modify a resource, but they cannot delete the resource.
- Locks are inherited from the parent scope.
Moving resources is the process of actually moving resources that are contained in a specific place in Azure
Navigate in azure portal to your resource group and add a lock
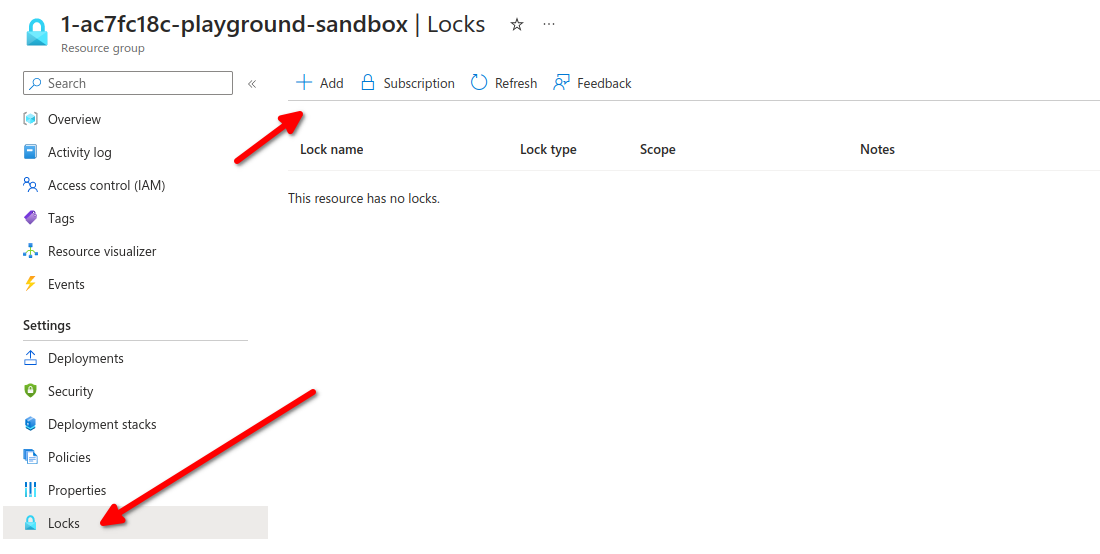
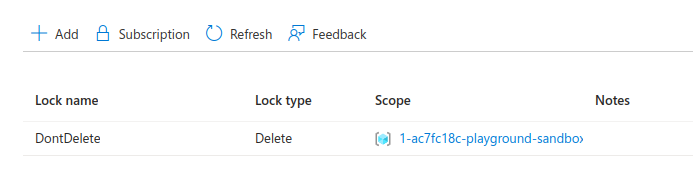
Add Lock to DontDelete or whatever random name, assign to Delete, from this page you can edit or delete the lock.
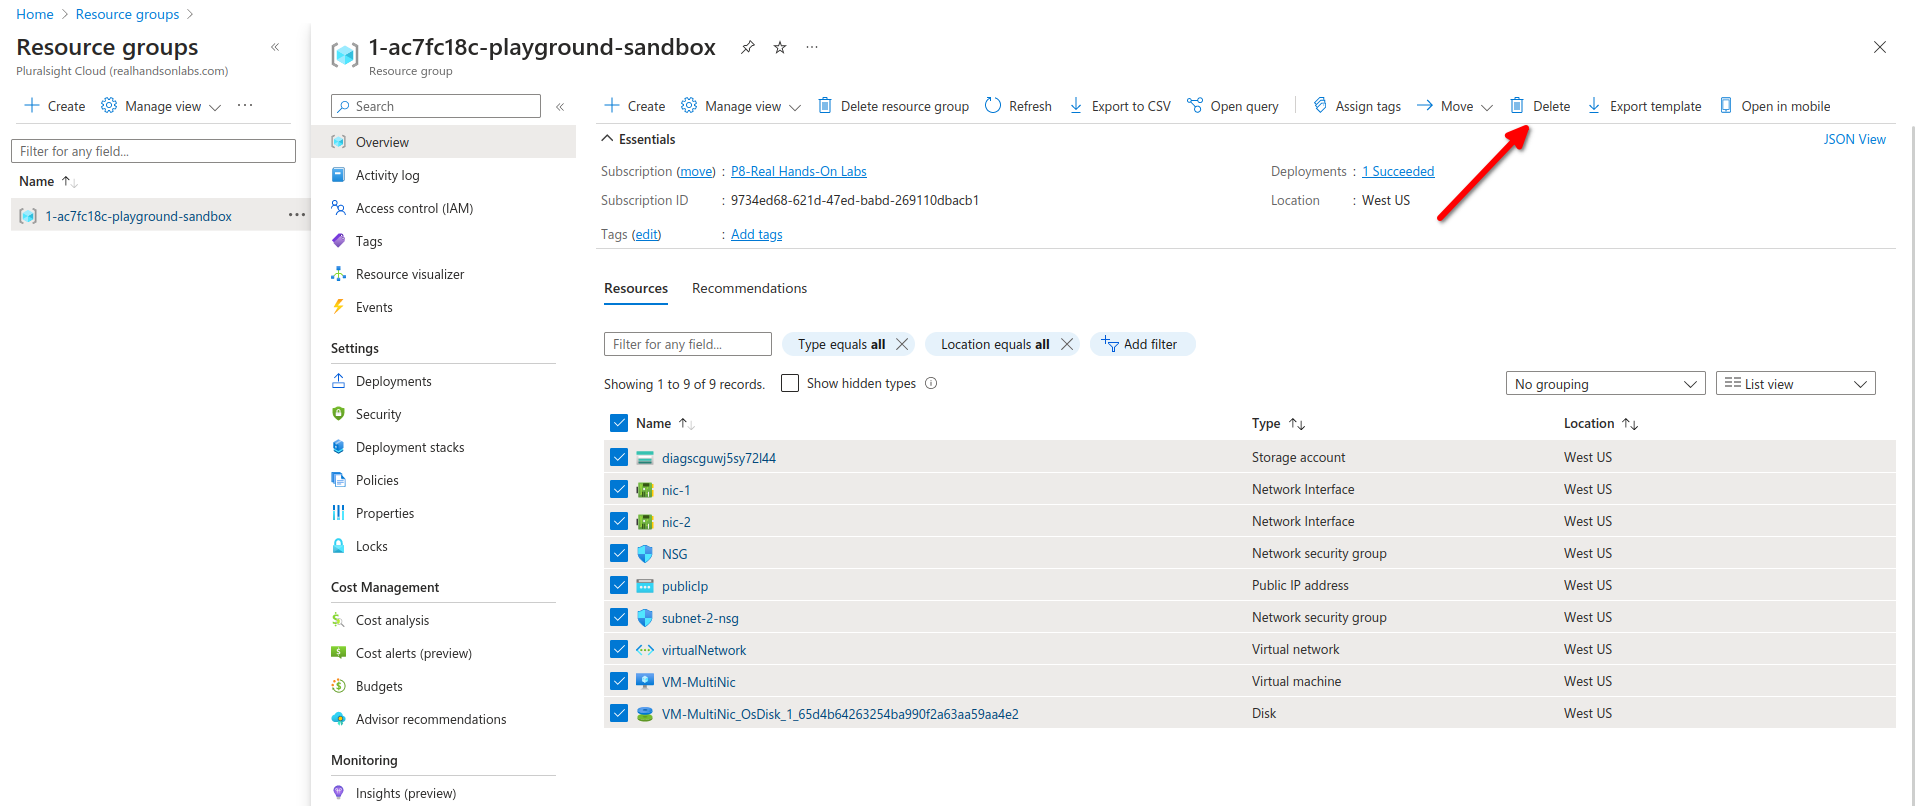
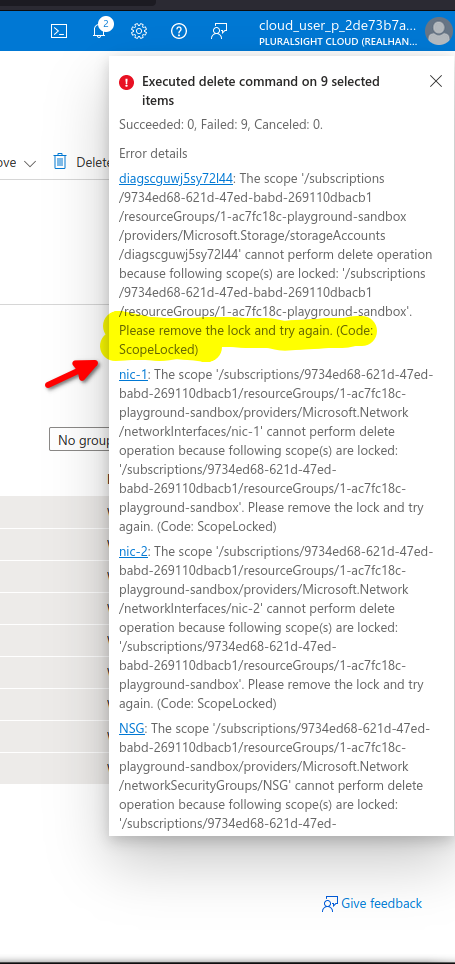
Now with a lock let's select all resources and ht delete
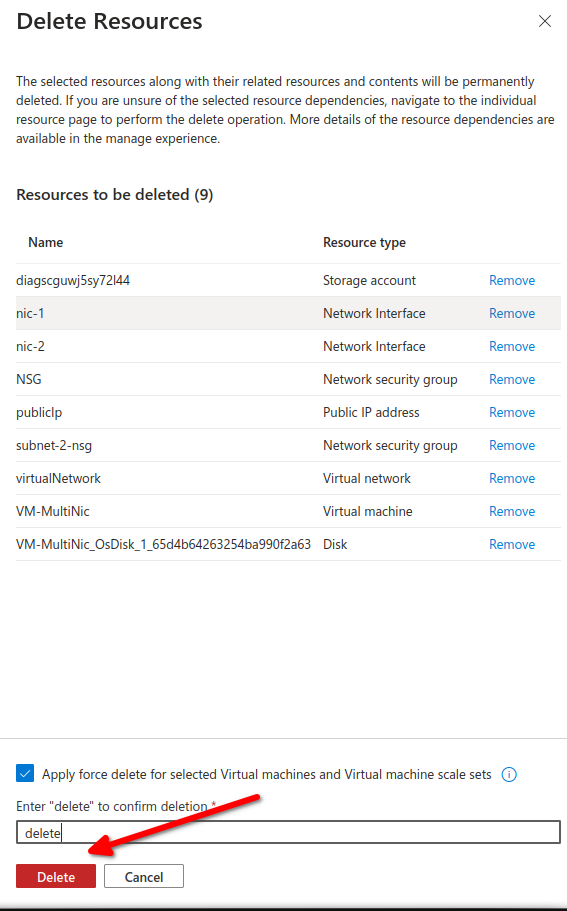
We are unable to delete because of the lock delete rule
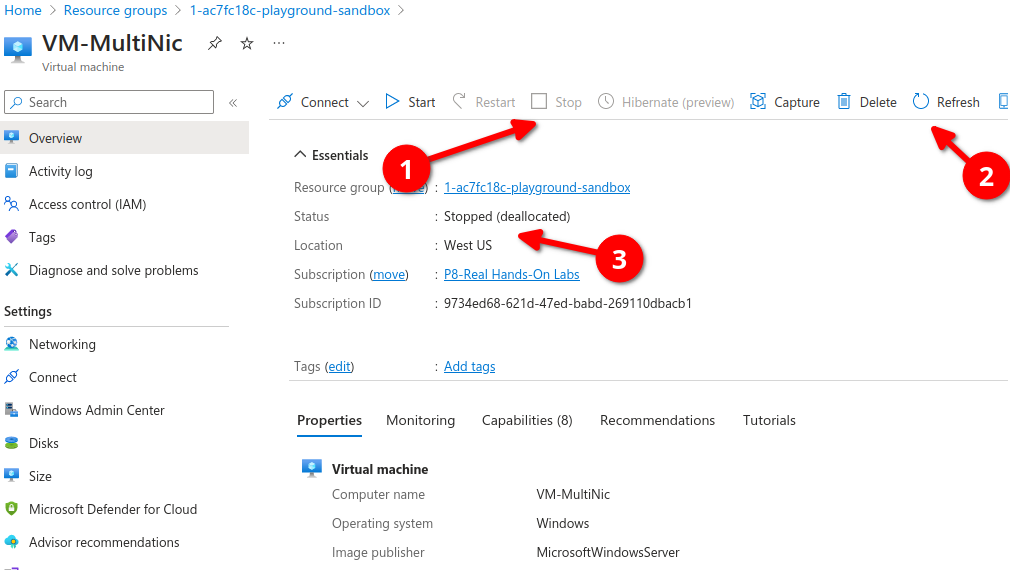
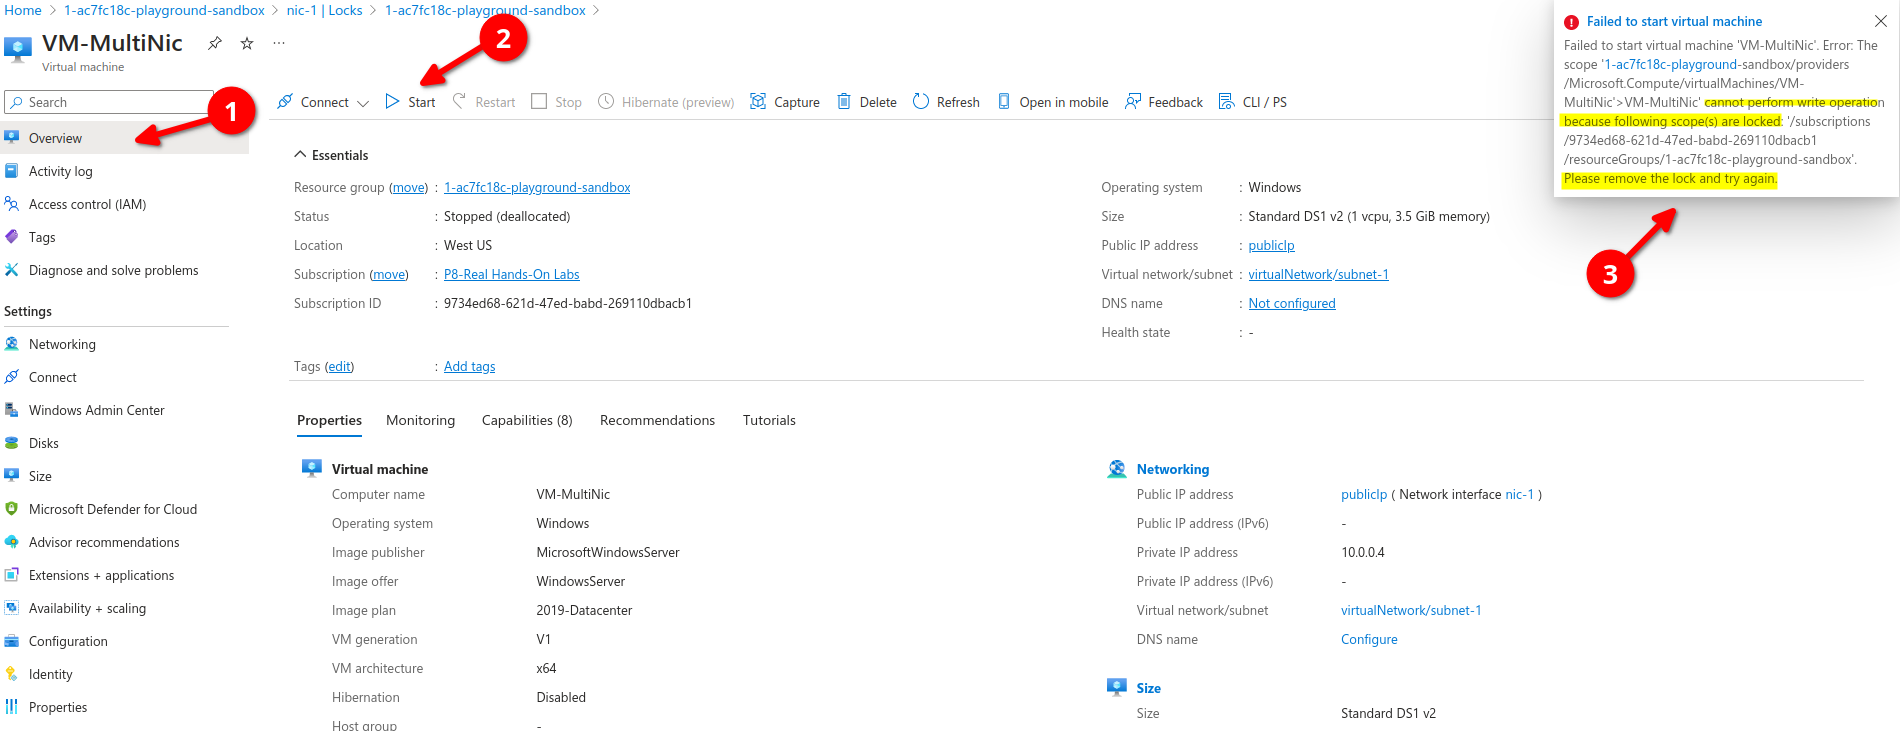
Now lets go to a specific resource inside our resource group, let's go to our VM
first we need to stop the resource then hit refresh, wait for the status to stopped.
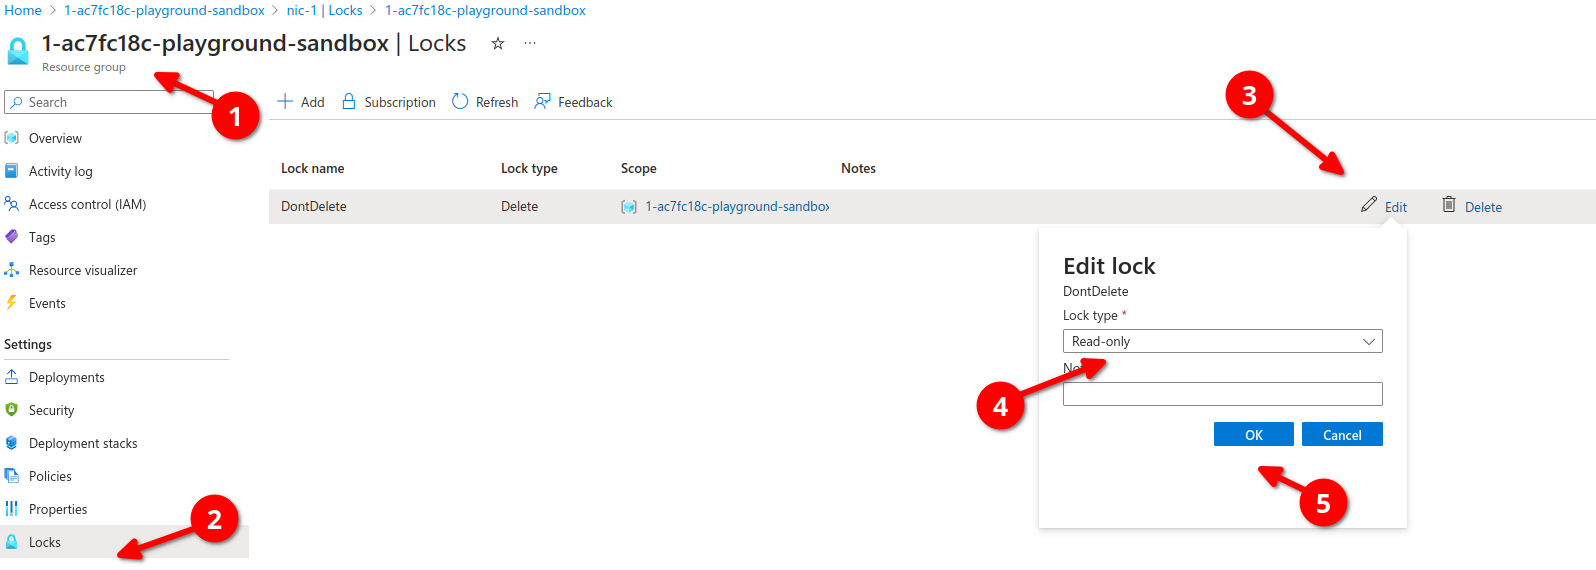
Let's go back to modify our resource group lock from Delete to Read Only
we go to our resource group, select lock (hit refresh if not shown) then edit, we will modify lock type from Delete to Read-only and hit ok
We will refresh and make sure its now read-only
[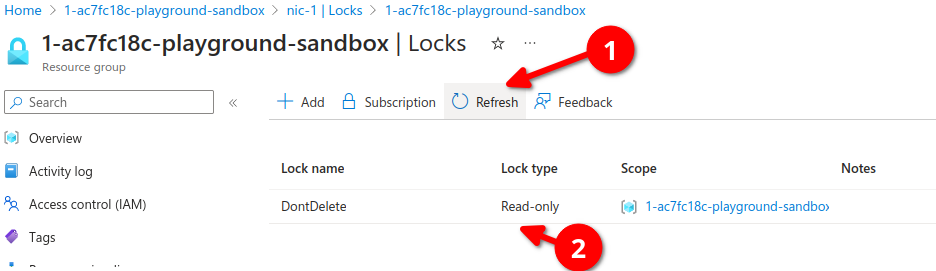](https://wiki.tinod.net/uploads/images/gallery/2024-02/1CLsz6K5Jj6gHma4-image.png)
let's go back to our resources overview, open the VM again and let's Start our VM, we get a warning message, cannot perform write operation, please remove read-only lock
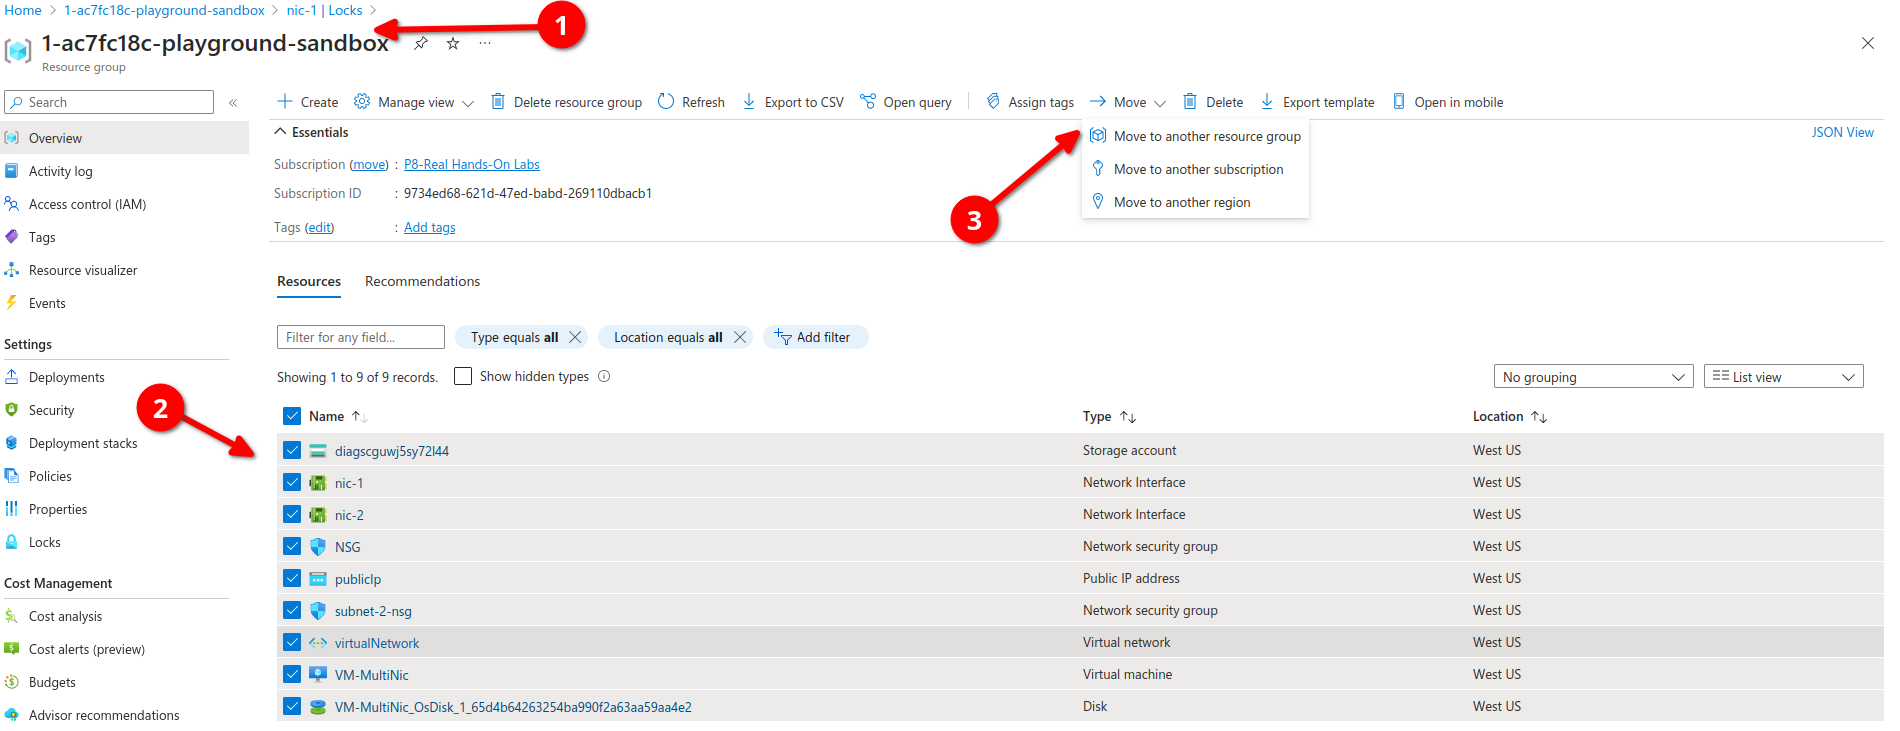
Now if we go back to our resources group we can select all our resources, from here we can click on Move, here you can move resources too another resource group, to another subscription or to another region.
# AZ-104 - Governance and Compliance - Managing Azure Costs
[Introduction to analyzing costs and creating budgets with Microsoft Cost Management](https://learn.microsoft.com/en-us/training/modules/analyze-costs-create-budgets-azure-cost-management/)
[Describe cost management in Azure](https://learn.microsoft.com/en-us/training/modules/describe-cost-management-azure/)
##### **Different components on Azure cost model**
- **Subscription type**: Free, Pay as you go, Enterprise agreement, and Cloud Solution Provider (CSP).
- **Resource type:** For example, storage account blob storage vs Table Storage.
- **Usage Meters**: Utilities like overall CPU time, ingress/egress network traffic and disk size.
- **Resource Usage:** The cost of actually using a resource.
- **Location:** The cost for various services vary across geographical regions.
**Best Practices**
Select the appropriate resource for the use case.
Understand needs (sizing).
De-allocate resources when not needed.
Use cloud capabilities where possible(e.g., scalability, elasticity).
Plan your cost prior to purchase.
**Cost Tools**
Pricing Calculator.
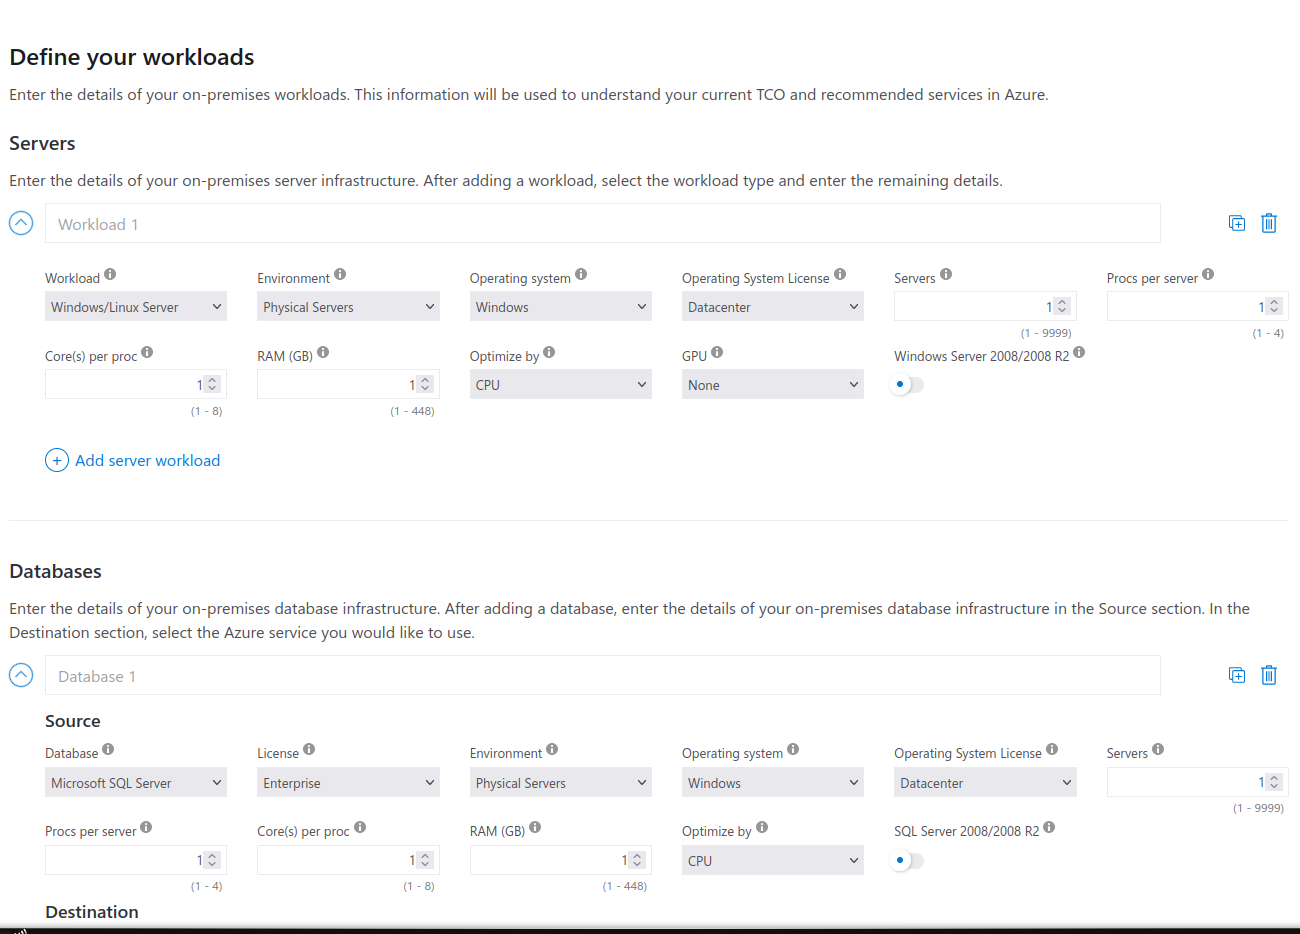
Total cost of Ownership (TCO) calculator.
Microsoft Cost Management (Analyze costs and create Budgets)
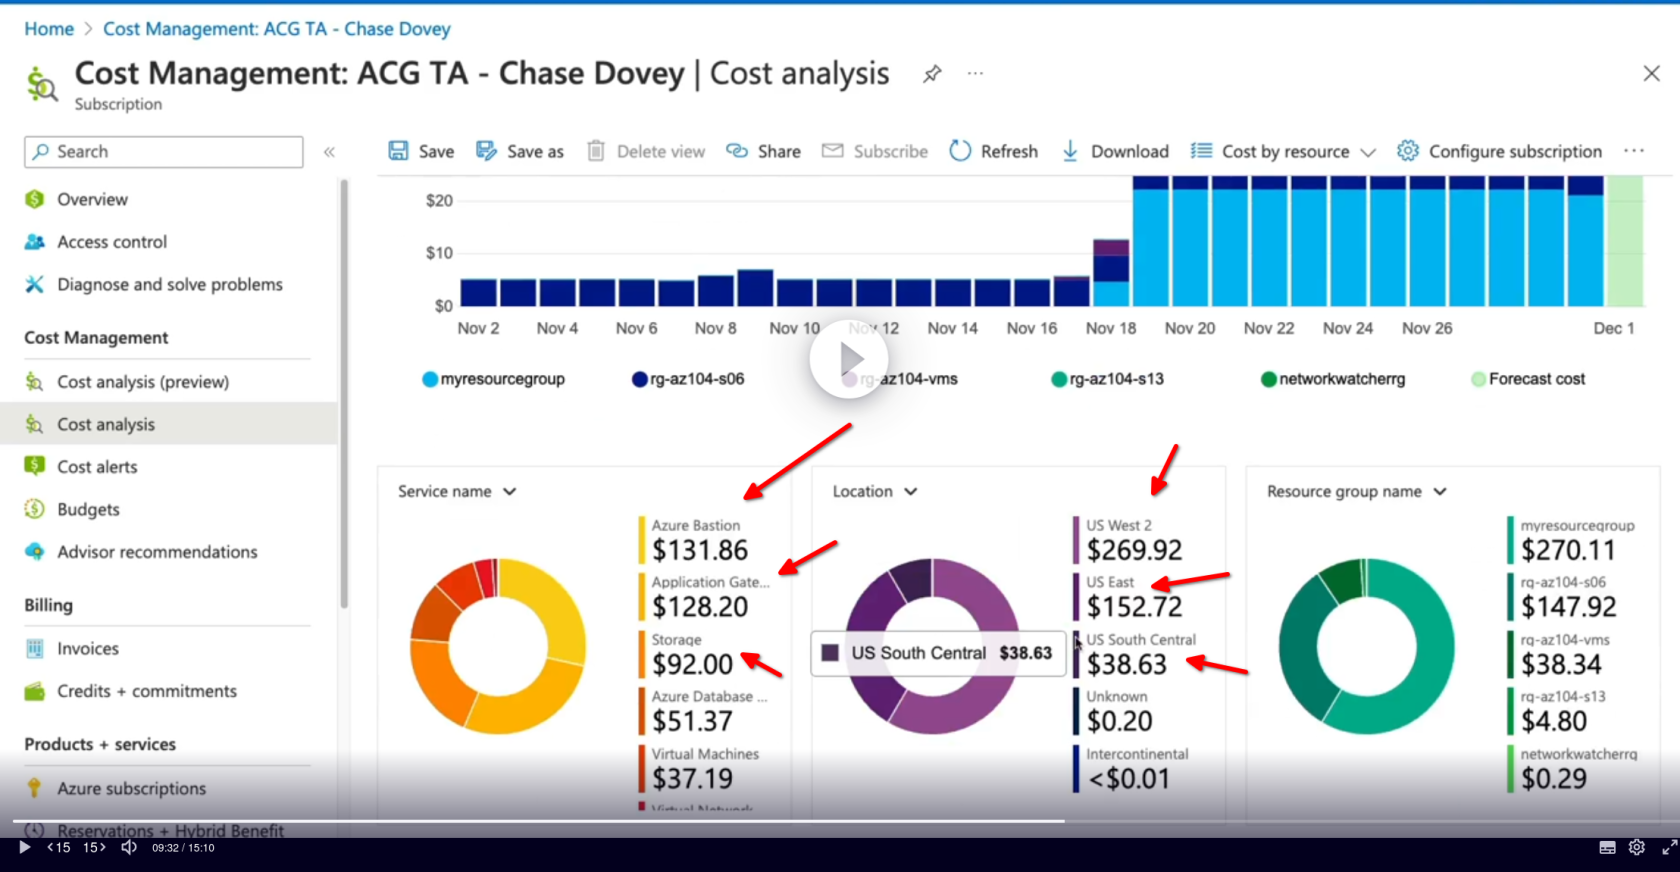
Inside Azure Portal search for cost management then go to cost analysis
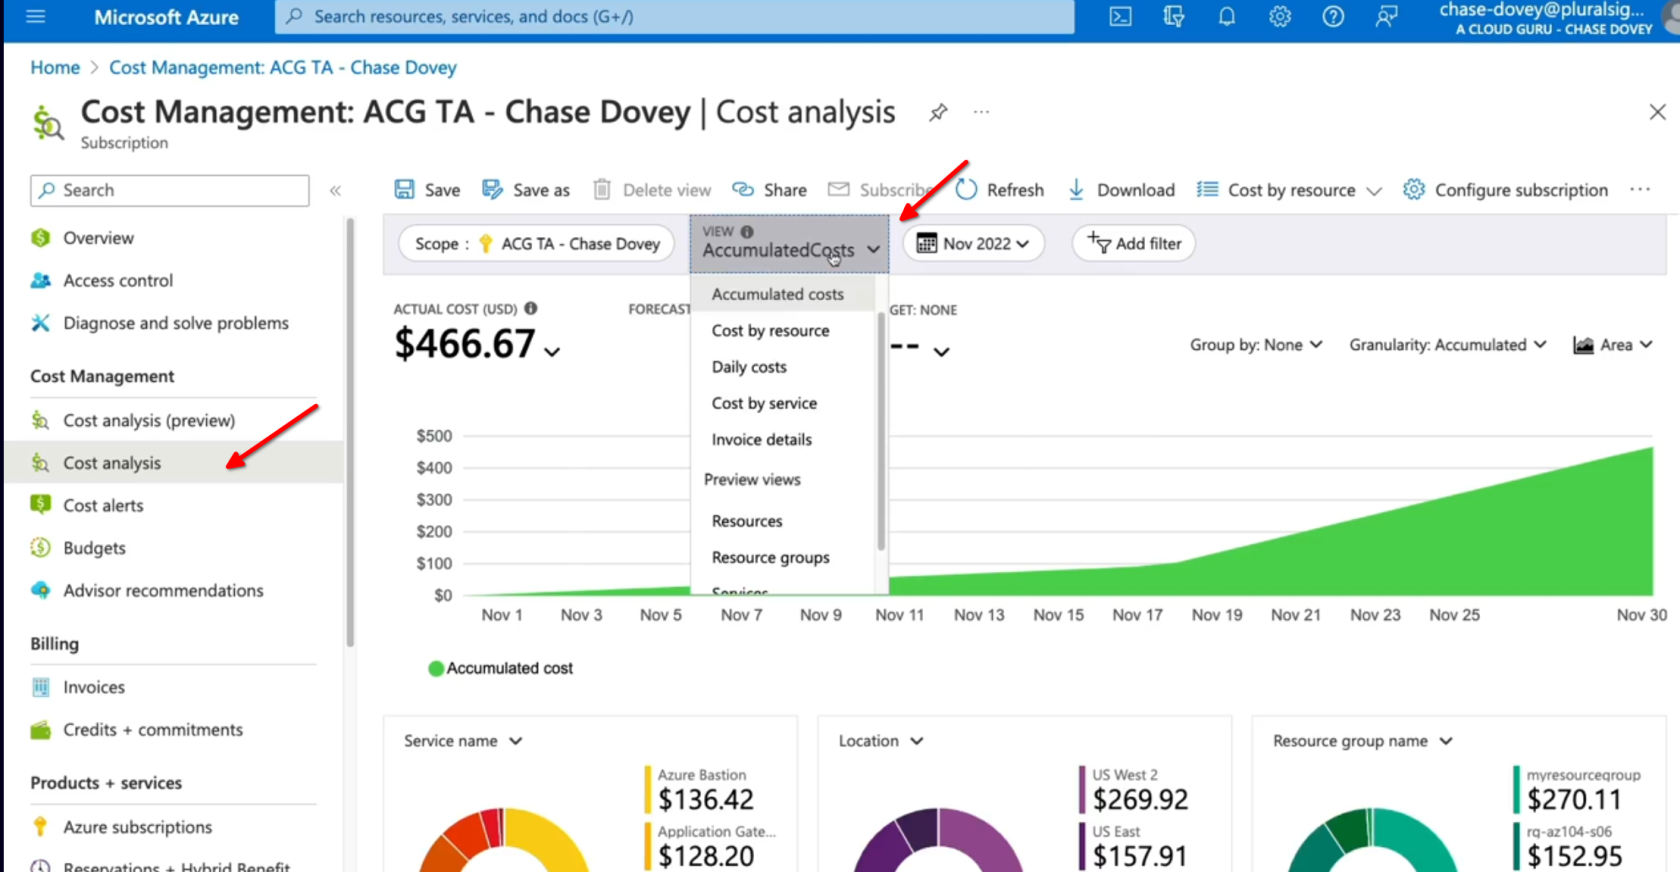
We can identify different costs per service, resource groups, locations, etc
##### **Using the pricing calculator****[Pricing Calculator](https://azure.microsoft.com/en-in/pricing/calculator/)**
##### **Using the TCO Calculator** **[TCO Calculator](https://azure.microsoft.com/en-us/pricing/tco/calculator/)**
# AZ-104 - Governance and Compliance - Building a cloud governance strategy wth Azure tooling
[Building Cloud Governance](https://learn.microsoft.com/en-us/training/paths/describe-azure-management-governance/)
**Define Governance**
- Rules
- Policies
- Compliance standards
- Control over resources
- Enforce rules, policies, and standard
Planing a Cloud Strategy
- Define: Define cloud governance needs of he organization.
- Plan: Plan which tools will be used to implement governance.
- Ready: understand how those tools will be used to implement governance.
- Adopt: Implement governance for the organization using a cloud strategy.
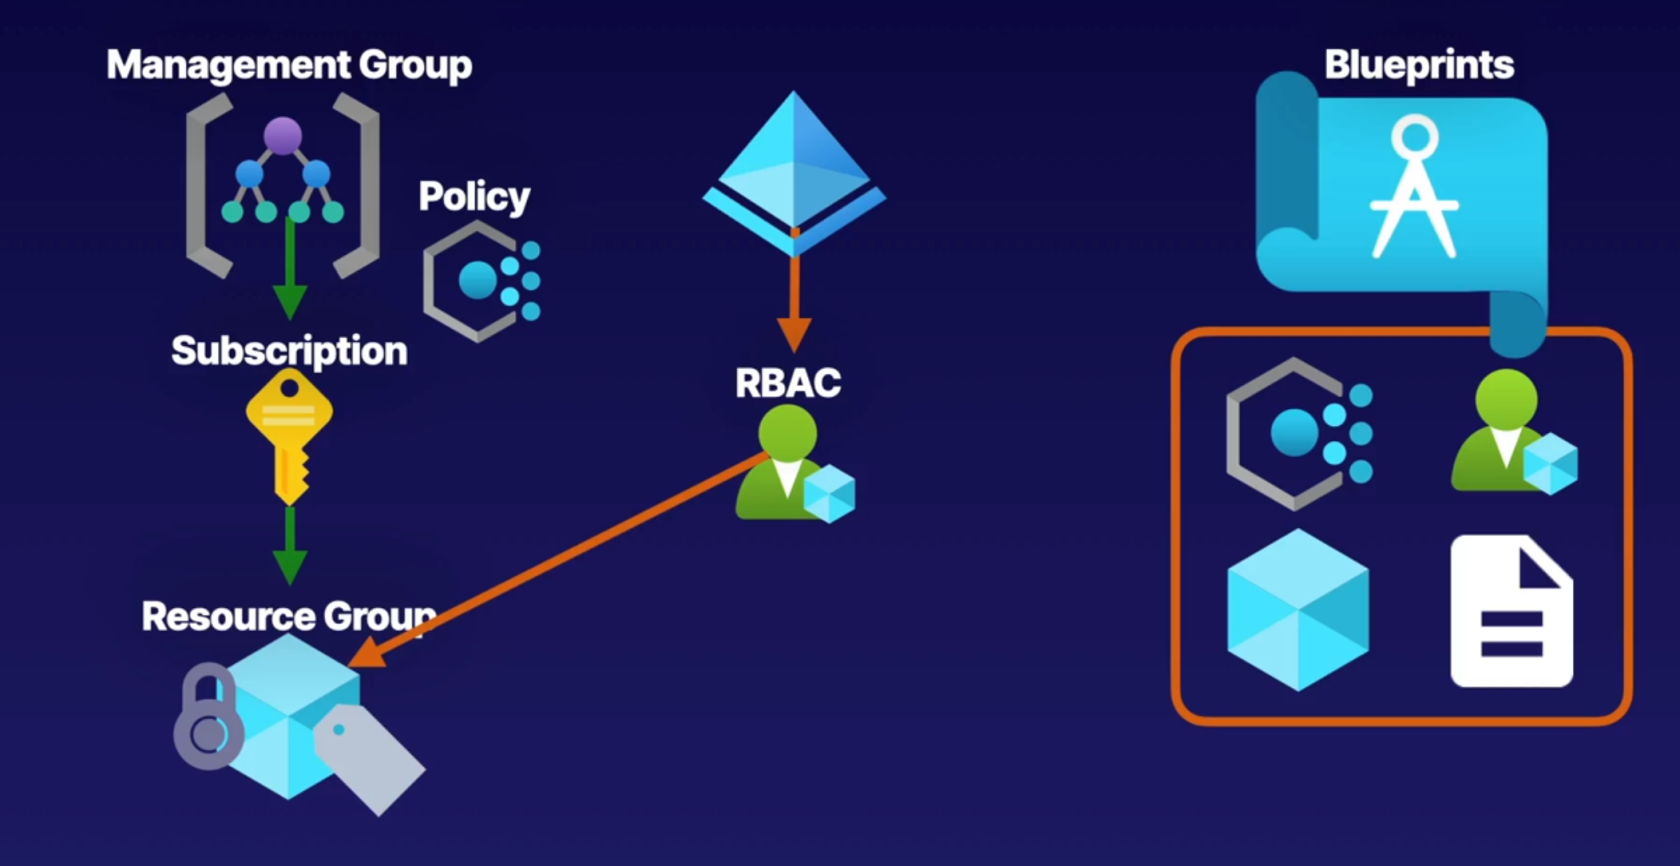
Governance Services
- Management groups and subscriptions: Organize subscriptions into hierarchical structures.
- Azure RBAC: Provide resources at varying scopes.
- Policies: Implement policies to enforce standards.
- Locks and Tagging: Lock resources to prevent deletion and tag resources to categorize.
Recommended to investigate more about Azure Blueprints to better understand rules and policies.
[Azure Blueprints](https://learn.microsoft.com/en-us/azure/governance/blueprints/overview)
# 3.- AZ-104 Azure Identity
# AZ-104 Azure Identity - Conceptualizing Entra ID (Azure Active Directory)
[What is Microsoft Entra ID](https://learn.microsoft.com/en-us/entra/fundamentals/whatis)
- Identity and Access Management (IAM) Basics
- What is Azure AD (Entra ID)?
- Azure AD Tenant ARchitecture
- Azure AD Features
- Active Directory vs Azure AD (Entra ID)
##### **Identity and Access Management (IAM) Basic**
- IAM: A global cloud-based identity service for azure that provides an identity repository
- Principal: An unauthenticated entity that will seek to authenticate as an identity.
- Identity: An Identity profile that is authenticated against using credentials
- Authorization: Actions that are permitted/prohibited for an identity to perform
- Create Identity Resources - Create users and groups
- Manage Identity Security - Enable multi-factor authentication (MFA) control resources access and provide policy based controls
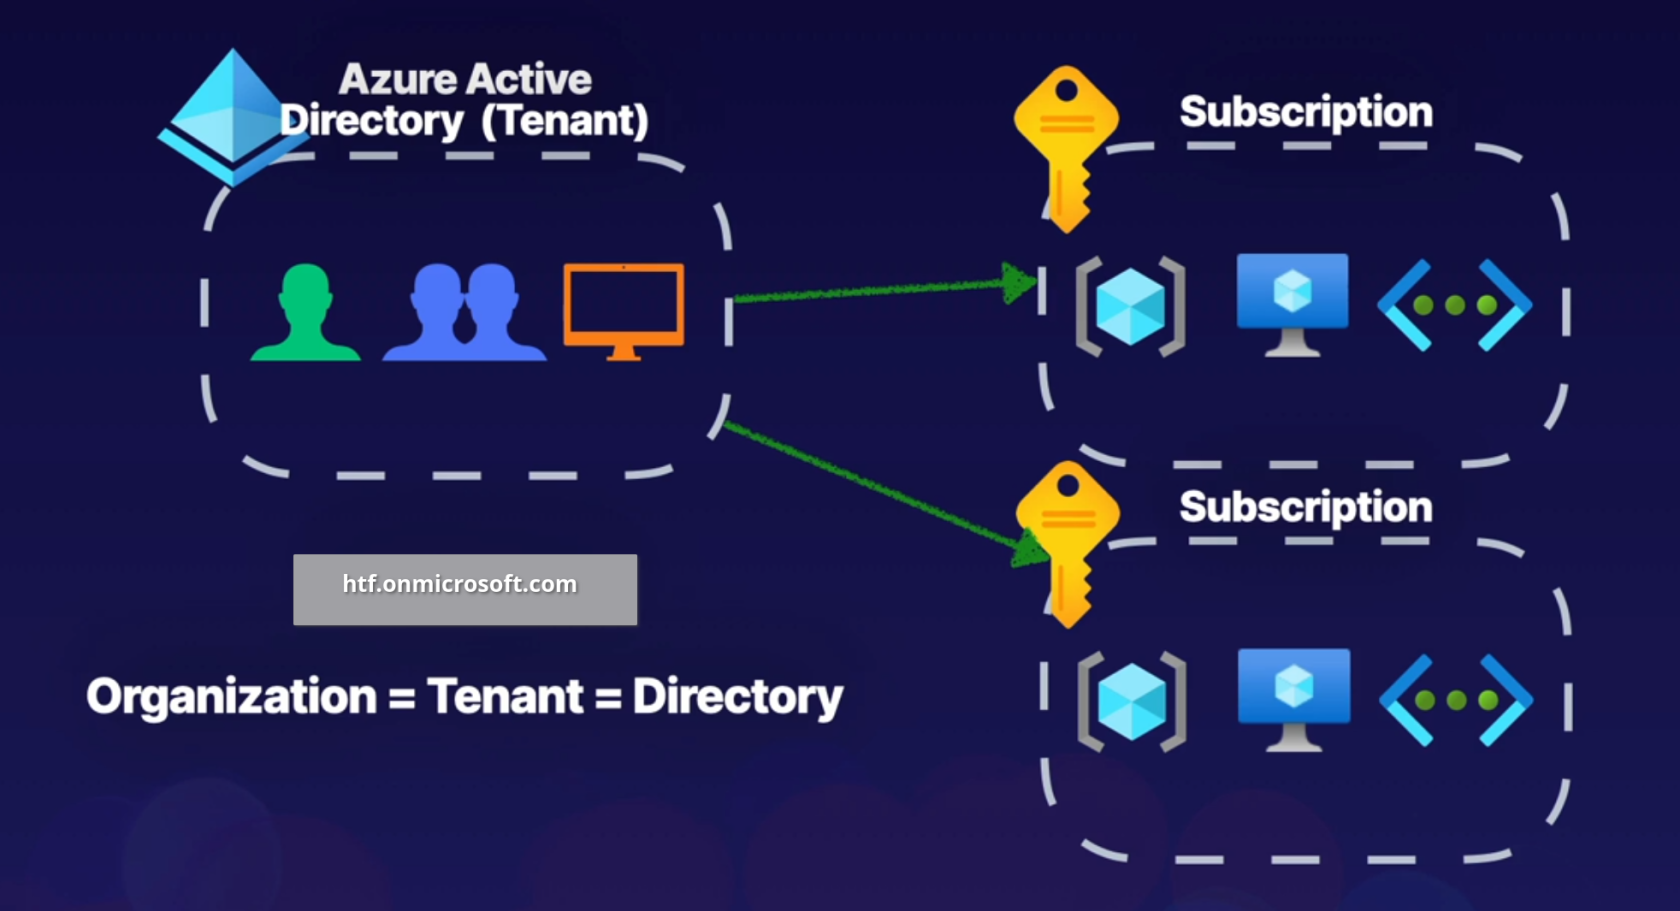
##### **Azure AD Tenant Architecture**
When crating a tenant it will automatically assign a domain for us, for example htf.onmicrosoft.com, you can also register a custom domain name.
A tenant can be associated to multiple subscriptions but a subscription can only be associated to one tenant.
##### **Azure AD Features**
- IAM Platform - for azure cloud based resources.
- Identity security - additional security with MFA and Privileged Identity Management (PIM).
- Collaboration and Development - Azure AD B2B collaboration and Azure AD B2C to support development.
- Monitoring - Audit logs, security monitoring, identity protection and risk management.
- Identity Integration - Hybrid identity and single sign-on (SSO) using Azure AD connect and Azure AD Domain Services.
- Enterprise Access - Additional security for applications and devices both on-premises and in the cloud
**Active Directory**
**Entra ID**
Organizational units (OUs)
Administrative units
Group Policy Objects (GPOs)
SAML, WS-Federation, OAuth
Kerberos, LDAP, NTLM
Flat Directory Structure
Hierarchical
Cloud-based solution
On-Premises
Global
As part of Hybrid solution we can use Entra Connect to manage on prem infrastructure.
# AZ-104 Azure Identity - Managing Tenants
##### [Set up a tenant](https://learn.microsoft.com/en-us/entra/identity-platform/quickstart-create-new-tenant)
##### **Managing Tenants**
**Designing Tenants:**
Planning out the design of our tenant will support easy adoption
- Build Secure Foundations: Setup best practices (e.g., SSPR (Self Service Password Reset), MFA, backup global admin, and privileged users), for specific tasks.
- Populate Identity Resources: Add users, create groups, add devices, and setup hybrid identity
- Manage Applications: Identify apps to be used form the app gallery, and register apps from on-premises
- Monitor and automate: Monitor administrators perform access reviews, and automate user life-cycles.
##### **Creating a Tenant**
Logon to azure portal and go to Entra ID (formerly known as Active Directory) then go to Manage Tenants
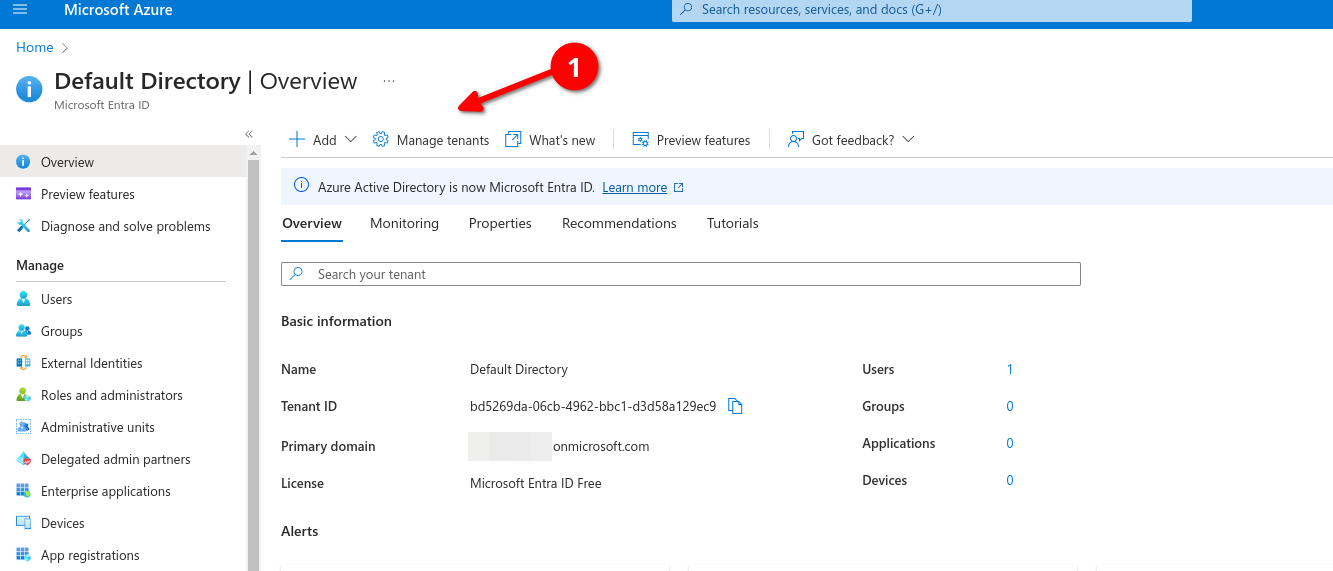

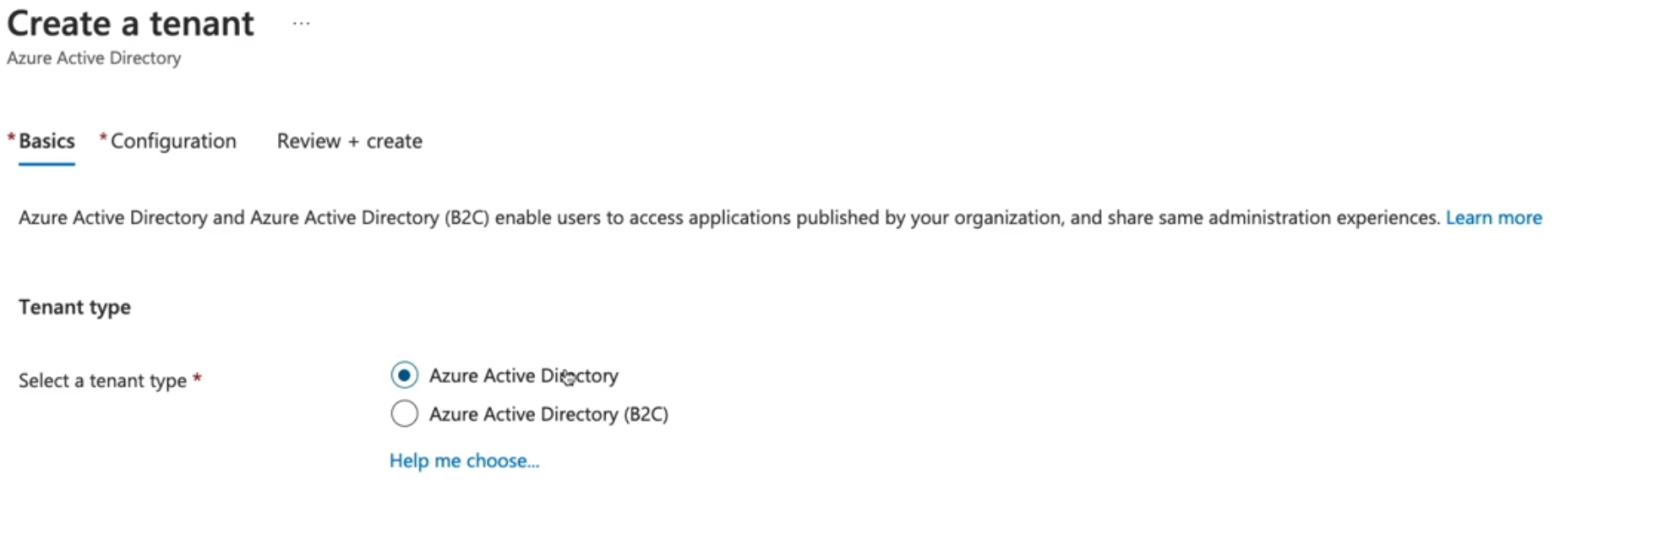
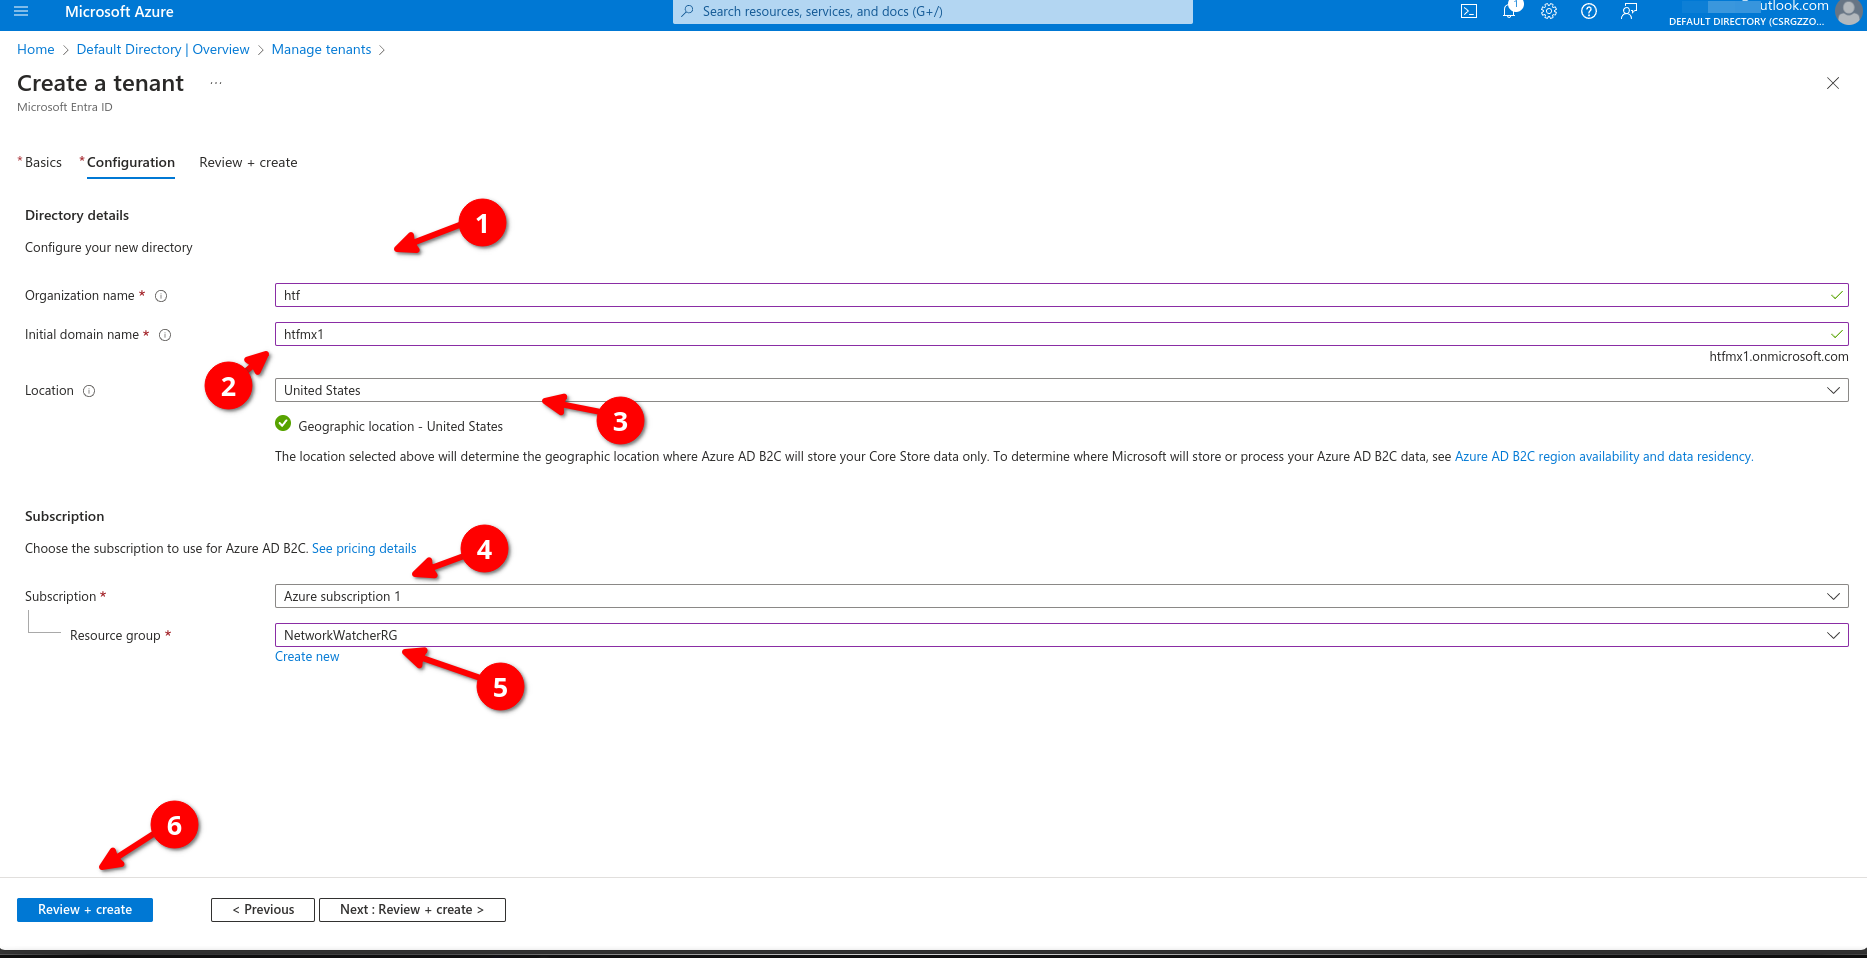
Add organization name, Make sure initial domain its unique, select location, assign your tenant to a subscription, add a resource group then review+create
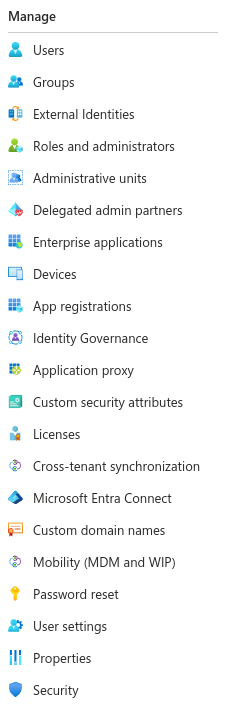
Now we can go back to manage our tenant, remember this will be different from the main tenant.

We can use the left panel to manage our tenant access, licensing, external devices, enterprise applications, etc.
# AZ-104 Azure Identity - Creating and Managing Users
[Creating Azure Users](https://learn.microsoft.com/en-us/training/modules/create-users-and-groups-in-azure-active-directory/)
[Manage Azure Users](https://learn.microsoft.com/en-us/training/modules/manage-users-and-groups-in-aad/)
[Azure AD to Entra ID](https://learn.microsoft.com/en-us/entra/fundamentals/new-name)
- Describing Users
- Type of Users
- Creating a User
- Managing User Propertiies
- Bulk Adding Users
- Inviting Guests
##### **Entra ID**
Describing Members
- Administrative users: Global admins, Billing Administrators, User Administrators.
- Members: Employees such as a support engineer to manage virtual machines, organization data engineering team with access to specific services.
- Guest users: Users invited from a different Microsoft Entra ID Tenant, etc.
> All users are part of Azure AD Tenant and are all just identity objects with certain properties, each member will have a set of default permissions and all these members are all identity objects with JSON properties we can modify these properties such as job title, given name or user's location.
- Administrators: users whit administrator role assigned
- Members: Regular user that are native to Azure AD
- Guest: External users that tare invited to the azure AD Tenant
##### **Creating a user in Entra ID**
Different methods of creating users
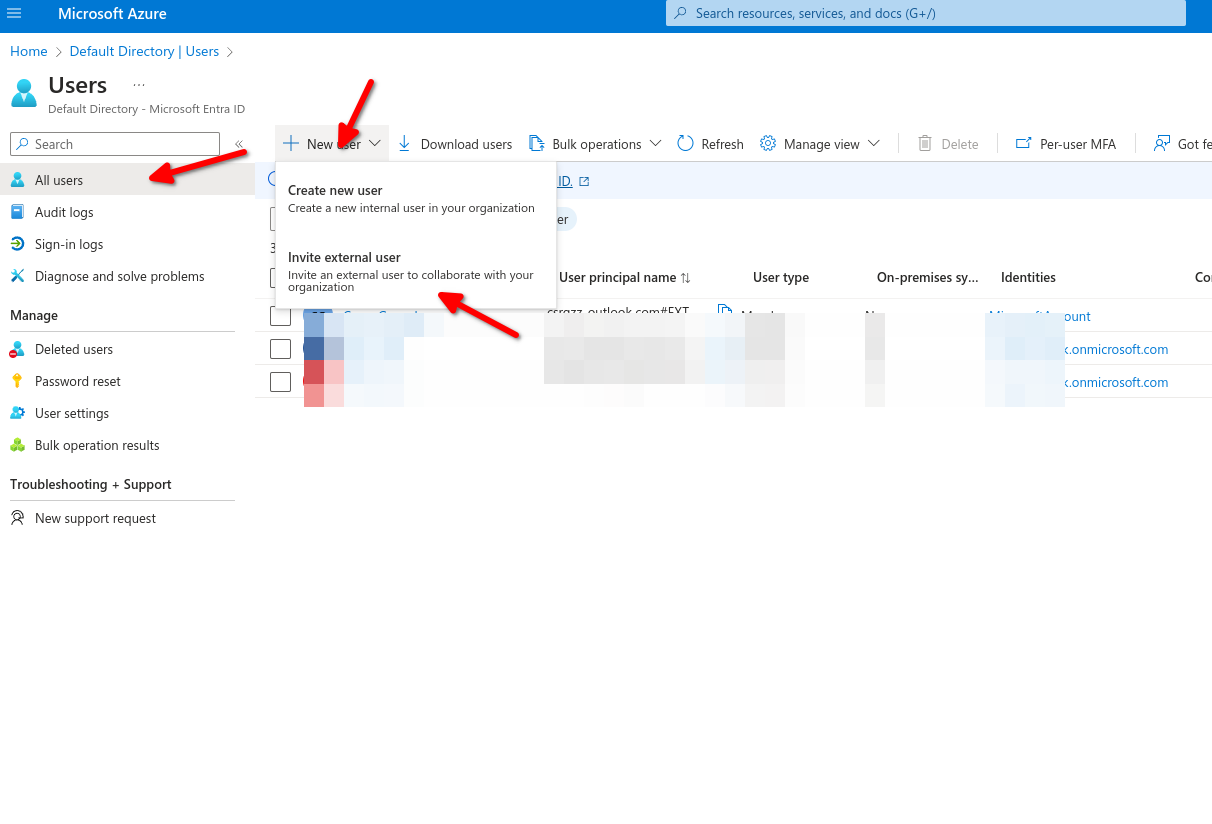
- Auzure Portal: Navigate to Azure Entra ID select Users, new user
- Azure CLI: az ad user create
- Powershell: New-AzureADUser
Exercise:
1. Create/add a User - create a member account inside off Entra ID
2. Update user properties - Update the properties to show this user is part of the HR department
3. Bulk add users - Using a csv file, bulk add users to azure AD
4. Invite a Guest account - Invite an External guest to Azure AD
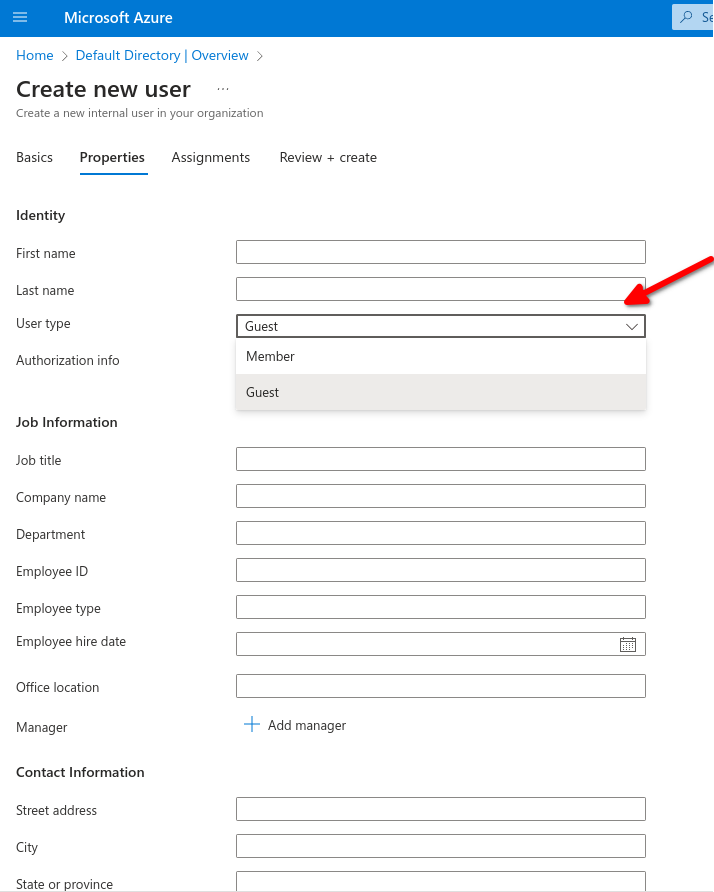
Navigate to Entra ID and select users, add, create new user

Navigate to Properties to fill out personal user information such as first, last name, etc, here you can specify if its a member or a Guest.
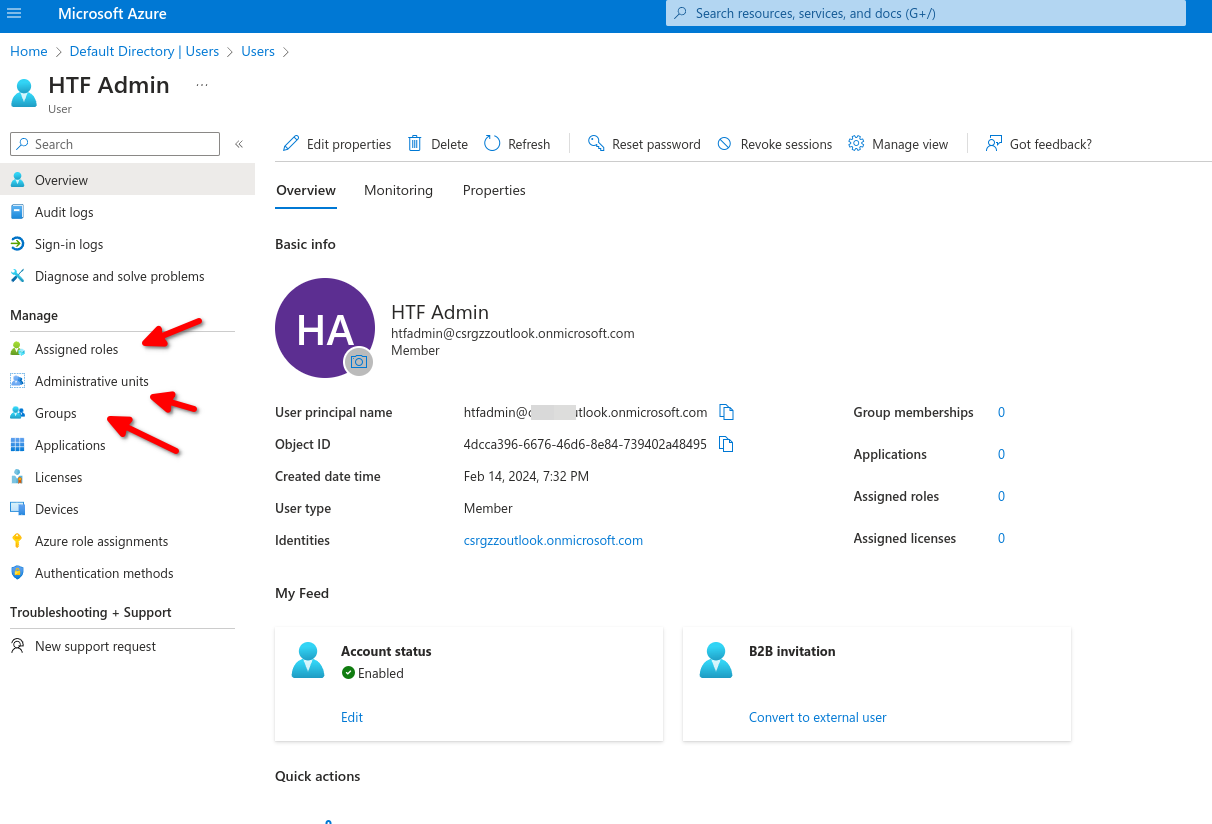
After creating our user we can go back to list all user and select our new user, here we can edit properties, manage assigned roles, admin units, groups etc.
Inviting a Guest Account
[](https://wiki.tinod.net/uploads/images/gallery/2024-02/OS31SfUGwJx3TETk-image.png)
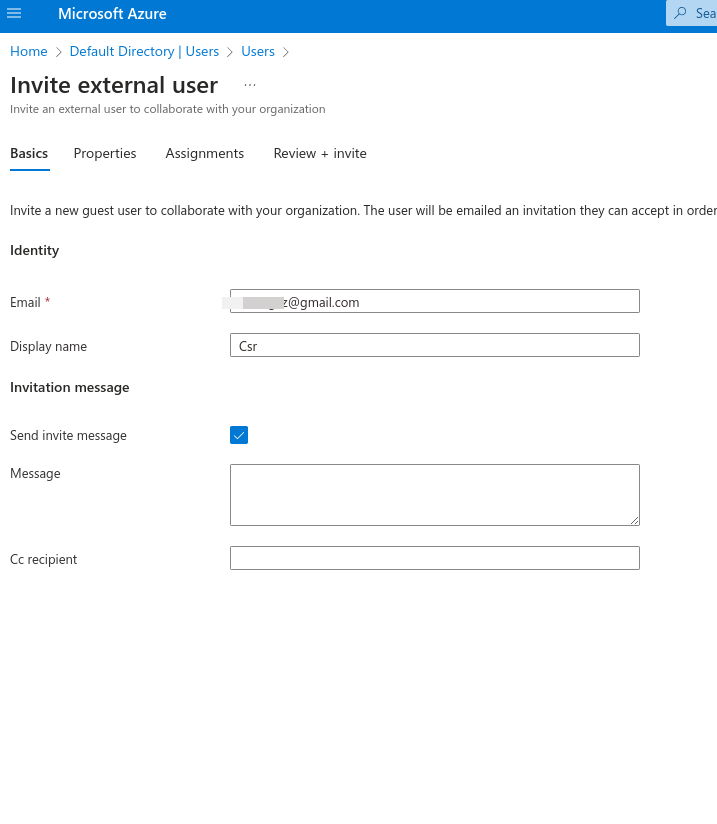
An Invitation will be sent to access your Organization
Type of users - Administrators Members and Guest Accounts.
Role Assignment - Determines permissions and access.
Object Ownership - App, Devices, groups and resources that are owned.
# AZ-104 Azure Identity - LAB Create and Manage Microsoft Entra ID Users in the Portal
**[Crate Azure users and groups in Entra ID](https://learn.microsoft.com/en-us/training/modules/create-users-and-groups-in-azure-active-directory/)**
**Scenario**
To help you walk through the lab, consider the following scenario:
You work as a senior systems administrator, and the management of Microsoft Entra ID is one of your many responsibilities. As a senior team member, it's also important that you share your knowledge with other colleagues. Your manager has recently asked you to provide a **walk through** of basic user management tasks for a group of new Helpdesk team members.
Using an empty demonstration Microsoft Entra ID tenant you have configured, you are going to demonstrate the following:
- Creating a new user.
- Modifying existing user accounts.
- Revoking access for users.
- Deleting user accounts.
---
**Lab Setup**
The objectives for this hands-on lab can be completed using the Azure portal. Specifically, all tasks will be performed using the **Microsoft Entra ID** service pages.
Solution
### Create Microsoft Entra ID User Accounts
1. In the Azure portal, click the hamburger icon at the top-left of the screen to open the menu.
2. From the menu, select **Microsoft Entra ID**.
3. From the menu on the left, select **Users**.
4. From the menu at the top, click **New user**, and then select **Create new user**.
5. In the **User principal name** field, enter a username for the first new user account. Leave the domain name as is.
6. In the **Display name** field, enter a first name and last name for the first new user account.
7. Click **Next: Properties**.
8. Scroll through and view some of the properties you can configure for a new user account. For the purposes of this hands-on lab, you do not need to configure any other properties for the new user account.
> **Note:** Attempting to assign a role to your user may break your hands-on lab.
9. Click **Review + Create**.
10. Then, click **Create**.
11. Repeat steps **4** through **10** to create your second new user account.
12. From the menu at the top, click **Refresh** and verify that both user accounts you just created now appear in the **All users** list in your Microsoft Entra ID service.
> **Note**: You may need to refresh the page a few times for the list to be updated.
### Modify a Microsoft Entra ID User Account
1. From the **All users** list, select one of the users you just created to open their profile.
2. View some of the options and settings that you can modify for a user account using the menu at the left.
3. If necessary, select **Overview** in the menu to return to the user's profile.
4. From the menu at the top, click **Edit properties**.
5. Modify some of the settings for the user, such as entering their **First name** and **Last name** or updating the information for their **Job title**.
6. Click **Save**.
7. From the menu at the top, click **Reset password**.
8. In the **Reset password** pane that displays on the right, click the **Reset password** button.
> **Note:** This will generate a temporary password that must be changed on the next sign in. You would need to take note of the temporary password that is displayed and provide it to the user.
9. Click the **X** to close the **Reset password** pane.
### Revoke Access to a Microsoft Entra ID User Account
1. From the menu at the top, click **Revoke sessions**.
> **Note**: This will log the user out of any active sessions that they are currently logged into.
2. In the **Do you want to revoke all sessions for the user?** prompt, click **Yes**.
### Delete a Microsoft Entra ID User Account
1. From the **All users** list, check the checkbox next to one of the users you created.
2. From the menu at the top, click **Delete**.
3. In the **Delete the selected users?** prompt, click **OK**.
4. From the menu at the top, click **Refresh** and verify that the user account has been removed from the accounts in the **All users** list.
> **Note**: You may need to refresh the page a few times for the list to be updated.
5. From the menu on the left, select **Deleted users**. The user account you just deleted should appear in the list of deleted accounts.
> **Note**: You may need to refresh the page a few times before the user you deleted appears in the list.
6. Check the checkbox for the user account and note that you could choose the **Restore users** or **Delete permanently** options from the menu at the top if you needed to take further action on the account.
> **Note**: Users that have been deleted remain in the **Deleted users** list for 30 days.
# AZ-104 Azure Identity - LAB Perform Bulk Microsof Entra ID Operations in the Portal
**Scenario**
To help you walk through the lab, consider the following scenario:
You work as a systems administrator for an organization that has a lot of seasonal projects. As a result, it's very common for you to have to create and delete a large volume of users every few months throughout the year, as well as manage relevant security groups.
You have some spare time now before the project season begins, and you would like to investigate the use of bulk operations to help minimize your workload during these seasonal high peaks.
To get started, you would like to practice the following operations within your empty demo Microsoft Entra ID tenant:
1. Creating and deleting users in bulk
2. Managing group membership in bulk
---
**Lab Setup**
The objectives for this hands-on lab can be completed using the Azure portal. Specifically, all tasks will be performed using the *Microsoft Entra ID* service pages.
Solution
### Bulk Create Users
#### Download and Edit the Template Used to Bulk Create Users
1. In the Azure portal, click the hamburger icon at the top-left of the screen to open the menu.
2. From the menu, select **Microsoft Entra ID**.
3. From the menu on the left, select **Users**.
4. From the menu at the top, click the **Bulk operations** drop-down.
5. Click **Bulk create**.
6. In the *Bulk create user* pane that displays on the right, click the **Download** button to download the latest CSV template.
7. Navigate to and open the CSV template file that was downloaded.
8. View the fields included in the template. Take note of any required fields and the total number of fields, as you will need to include some sort of information for each field.
> **Note:** The template provided from Microsoft may be updated over time, and the fields included in the template (both required and optional) are subject to change. For that reason, we cannot provide you with a list of fields and the information to include or a mocked up file to be uploaded.
9. Enter information for the three new users you want to add, including data for — at minimum — each of the required fields.
- The required fields likely include the user's name that is aligned with their *Name* and a username (in the form of an email address) that is aligned with their *User Principal Name* in AD.
- To obtain the proper domain for the *User Principal Name* field, navigate back to the Azure portal and click on a user in the *All users* list; where their *User Principal Name* is listed, copy the domain following the `@` symbol (including the `@` symbol), and paste it into the template for each user you create.
- The remaining fields will need to be accounted for in the template with a comma.
- Do not include spaces between the commas and the field data. Spaces between them will cause the upload and bulk creation process to fail.
- For example, at the time this lab was made, an entry in the template included the following fields:
`[First Name] [Last Name],[username]@[userPrincipalName],[password],No,,,,,,,,,,,,,`
`Amos Smith,amos@radlabs4p.onmicrosoft.com,password123!,No,,,,,,,,,,,,,`
10. Once you have entered the users to be added, save your changes to the file.
#### Upload Your Edited File and Execute the Bulk Create User Process
1. Back in the Azure portal, in the *Bulk create user* pane on the right, click the folder icon next to the *Upload your csv file* field.
> **Note:** If you navigated away from the page to copy the domain name for the users while editing the template, you may need to navigate back to the *All users* page and then click **Bulk operations > Bulk create** to open the pane again.
2. Navigate to the location of your edited template file and select it.
3. If there are any issues with the data in the file, you will receive a notification of the errors in the *Bulk create user* pane. If any exist, fix the errors, save the file, and upload it again.
> **Note:** You may have to repeat this process until your file has no errors.
4. When your file has uploaded successfully, click the **Submit** button.
> **Note:** It may take some time to create your users.
5. You will receive a status notification about the creation process in the *Bulk create user* pane.
> **Note:** If there are any issues during the creation process, you can click **Bulk operation results** in the menu on the left, click on your file in the list, and view the errors it encountered.
6. From the menu at the top, click **Refresh** and verify that the new users now appear in the list of *All users*.
### Bulk Delete Users
#### Download and Edit the Template Used to Bulk Delete Users
1. From the menu at the top, click the **Bulk operations** drop-down.
2. Click **Bulk delete**.
3. In the *Bulk delete user* pane that displays on the right, click the **Download** button to download the latest CSV template.
4. Navigate to and open the CSV template file that was downloaded.
5. View the fields included in the template. Take note of any required fields and the total number of fields, as you will need to include some sort of information for each field.
6. Enter information for the user you want to delete, including data for the required field.
- The required fields likely include the username that is aligned with their *User Principal Name* in AD.
- For example, at the time this lab was made, an entry in the template included the following fields:
`[username]@[userPrincipalName]`
`amos@radlabs4p.onmicrosoft.com`
7. Once you have entered the user to be deleted, save your changes to the file.
#### Upload Your Edited File and Execute the Bulk Delete User Process
1. Back in the Azure portal, in the *Bulk delete user* pane on the right, click the folder icon next to the *Upload your csv file* field.
> **Note:** If you navigated away from the page to copy the *User Principal Name* for the user while editing the template, you may need to navigate back to the *All users* page and then click **Bulk operations > Bulk delete** to open the pane again.
2. Navigate to the location of your edited template file and select it.
3. If there are any issues with the data in the file, you will receive a notification of the errors in the *Bulk delete user* pane. If any exist, fix the errors, save the file, and upload it again.
4. Once your file has uploaded successfully, type `Yes` in the *Are you sure you want to perform the delete operation?* field.
5. Click the **Submit** button.
6. You will receive a status notification about the deletion process in the *Bulk delete user* pane.
> **Note:** If there are any issues during the deletion process, you can click **Bulk operation results** in the menu on the left, click on your file in the list, and view the errors it encountered.
7. From the menu at the top, click **Refresh** and verify that the user has been removed from the list of *All users*.
### Bulk Add Group Members
#### Create the Group
1. Using the breadcrumb trail at the top, navigate back to the Microsoft Entra ID tenant.
2. From the menu on the left, select **Groups**.
3. From the menu at the top, click **New group**.
4. From the *Group type* drop-down, select **Security**.
5. In the *Group name* field, enter a name for the group.
6. Leave everything else as is, and click **Create**.
#### Download and Edit the Template Used to Bulk Import Members
1. In the list of groups in the *All groups* view, click on the name of the Security group you created.
2. From the menu on the left, select **Members**.
3. From the menu at the top, click the **Bulk operations** drop-down.
4. Click **Import members**.
5. In the *Bulk import group* pane that displays on the right, click the **Download** button to download the latest CSV template.
6. Navigate to and open the CSV template file that was downloaded.
7. View the fields included in the template. Take note of any required fields and the total number of fields, as you will need to include some sort of information for each field.
8. Enter information for the users you want to add to the group, including data for the required field.
- The required fields likely include the user's *Object ID* **or** the username that is aligned with their *User Principal Name* in AD.
- For example, at the time this lab was made, an entry in the template included the following fields:
`[username]@[userPrincipalName]`
`amos@radlabs4p.onmicrosoft.com`
or
`[memberObjectID]`
`dec3f879-9439-4978-94be-17f17cefc0aa`
> **Note:** You can quickly find this information for each user within the *All users* view in the portal. Modify the view by clicking on **Manage view** in the top menu and then select **Edit columns**. Select only the *User principal name* and *Object ID* options (*Object ID* may need to be added), and click **OK**. Now, the *User Principal Name* and *Object ID* are displayed for each user, which you can then copy and paste into your CSV file.
9. Once you have entered the users to be added to the group, save your changes to the file.
#### Upload Your Edited File and Execute the Bulk Import Group Process
1. Back in the Azure portal, in the *Bulk import group* pane on the right, click the folder icon next to the *Upload your csv file* field.
> **Note:** If you navigated away from the page to copy the *User Principal Name* or *Object ID* for the users while editing the template, you may need to navigate back to the *All groups* page, then click **Members** in the menu on the left, and then click **Bulk operations > Import members** to open the pane again.
2. Navigate to the location of your edited template file and select it.
3. If there are any issues with the data in the file, you will receive a notification of the errors in the *Bulk import group* pane. If any exist, fix the errors, save the file, and upload it again.
4. When your file has uploaded successfully, click the **Submit** button.
5. You will receive a status notification about the import process in the *Bulk import group* pane.
> **Note:** If there are any issues during the import process, you can click **Bulk operation results** in the menu on the left, click on your file in the list, and view the errors it encountered.
6. From the menu at the top, click **Refresh** and verify that the users now appear in the list of *Members*.
# AZ-104 Azure Identity - Creating and Managing Groups
- [ ] [Manage user and groups](https://learn.microsoft.com/en-us/training/modules/manage-users-and-groups-in-aad/)
- [ ] [Create users and groups](https://learn.microsoft.com/en-us/training/modules/create-users-and-groups-in-azure-active-directory/)
- Describing groups
- Practical Use
- Creating a group
- Managing group membership
**Azure Management groups:** Create a hierarchy of Azure management groups tailored to your organization to efficiently manage your subscriptions and resources.
- Owners and Members: An owner of the group or a member of the group.
- Type of group: A security group or a Microsoft 365 group.
- Membership Type: Assigned, dynamic user or dynamic device.
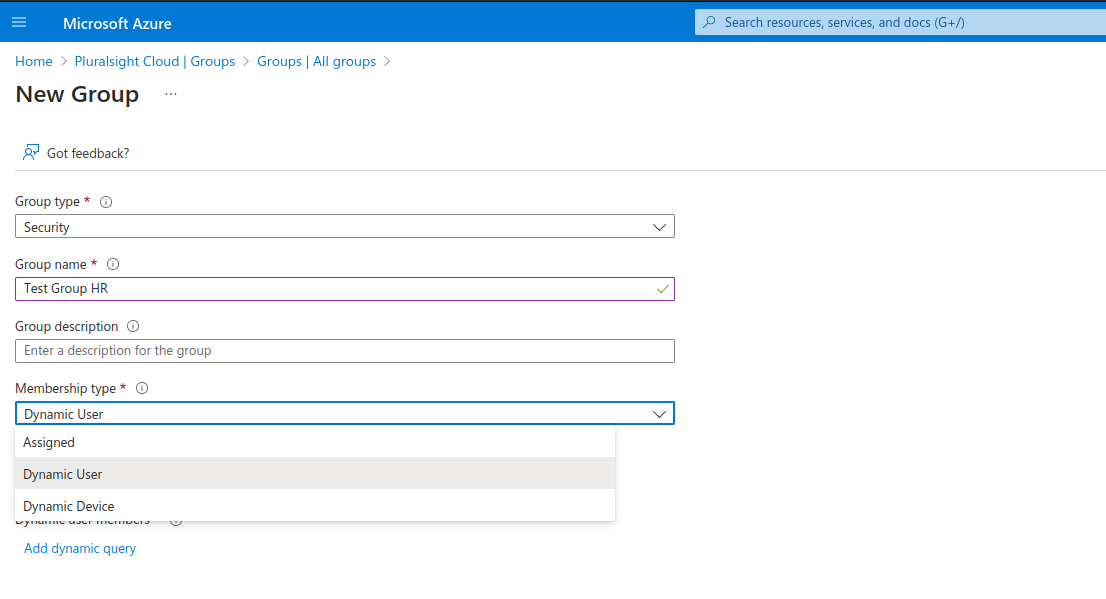
To create a new group we can navigate to Entra ID then groups then add group
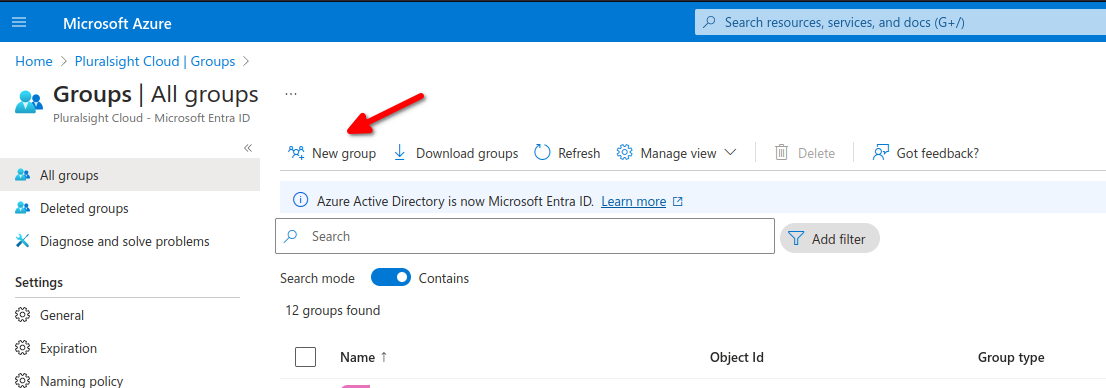
We have different membership types
- Assigned: Manually or in bulk add users
- Dynamic user: Add variables per fields such as department for example to add all users from X department
- Dynamic Device: This apply to specific hardware devices.
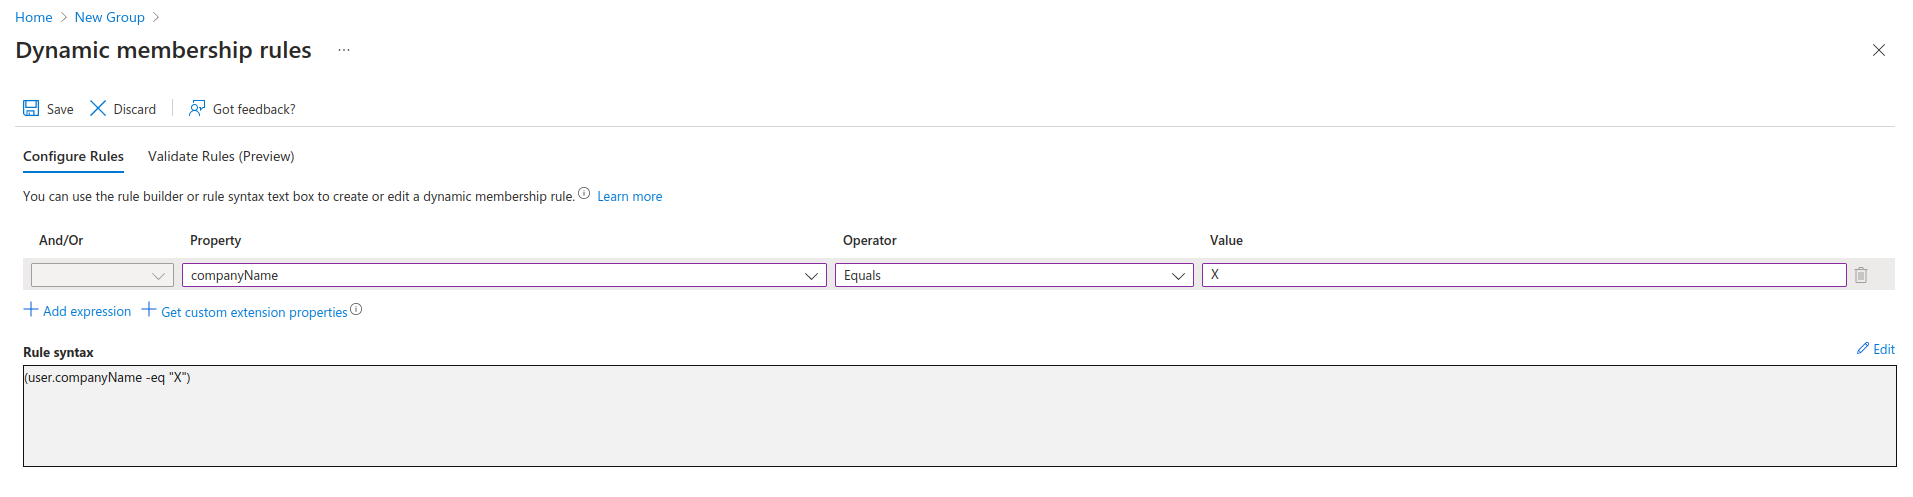
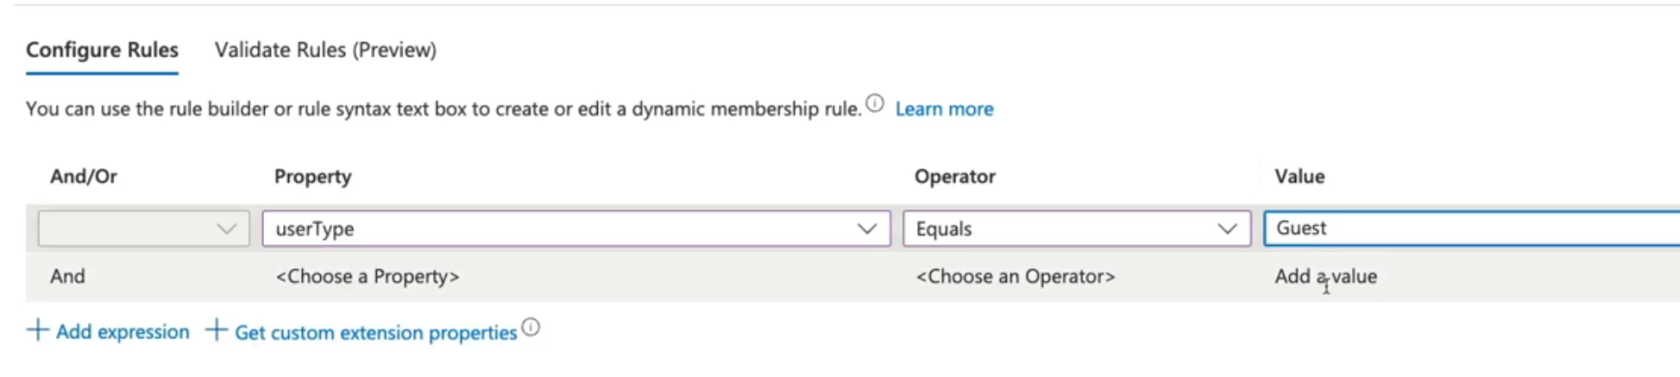
We need to click on Add Dynamic Query to add our rules for dynamic users in this case.
Here we added a Rule Syntax to add all members of Company-name X to our group, there are multiple properties and operators we can use.
Now we need to add users then validate and see if they belong to group HR
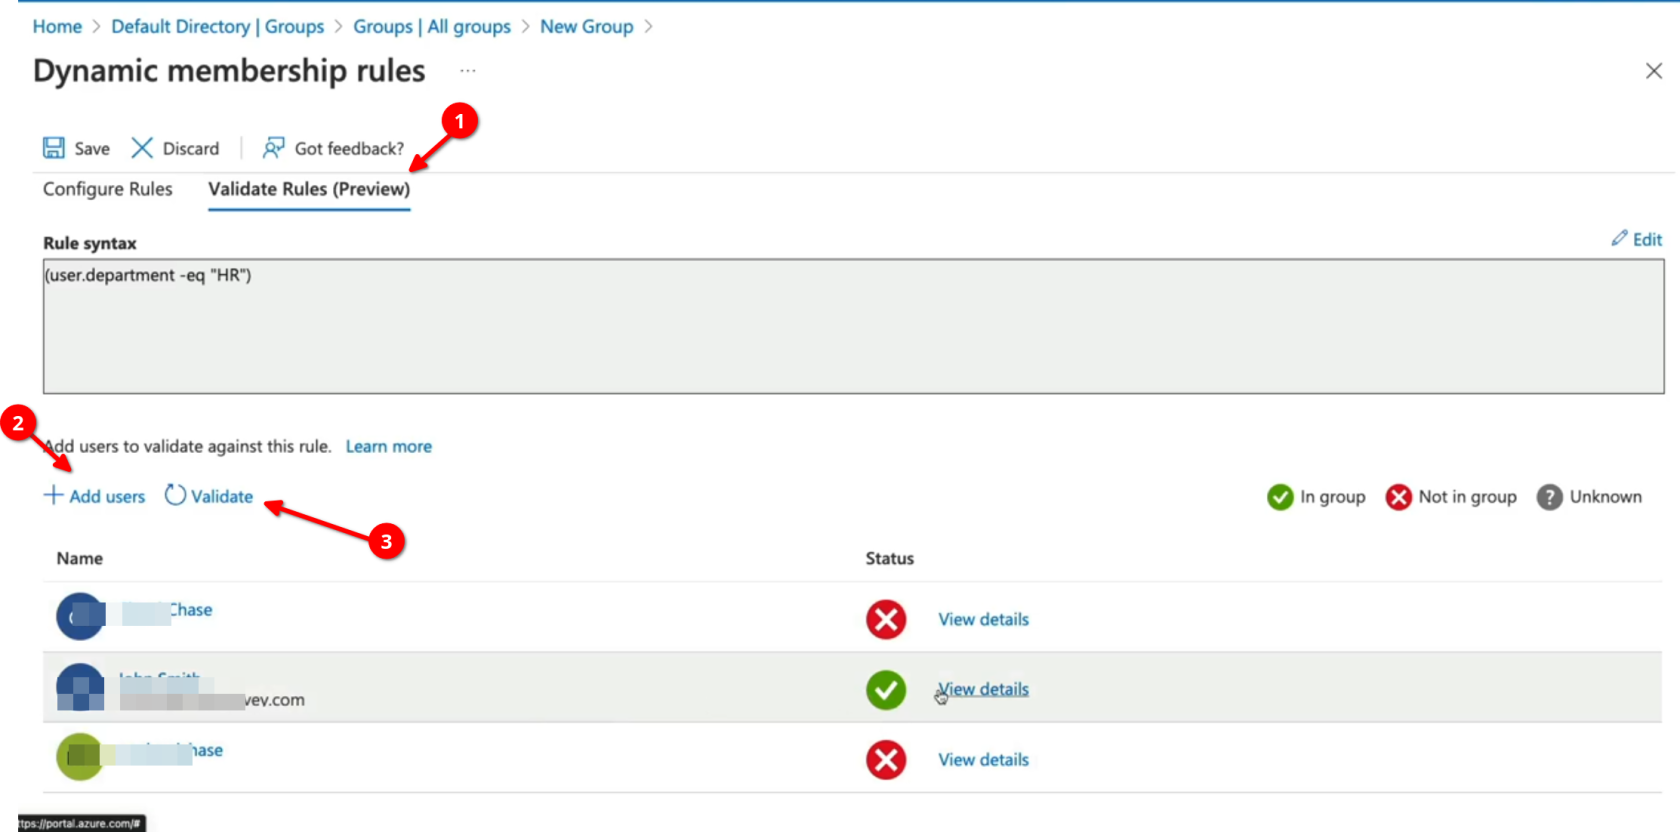
we can also search by user-type for all Guest for example and apply a group for all Guests.
Group Types
- Security: Security groups are used to manage access o shared resources for a group of users.
- Microsoft 365: These groups are used to give members access to shared mailbox, calendar, files, etc.
- Assigned: Users are specifically selected to be members of a group.
- Dynamic user: Membership rules are created that automate group membership via user attributes.
- Dynamic Device: Membership rules are created that automate group membership via devices attributes.
# AZ-104 Azure Identity - Creating Administrative Units
- [ ] [Administrative Units for Entra ID](https://learn.microsoft.com/en-us/entra/identity/role-based-access-control/administrative-units)
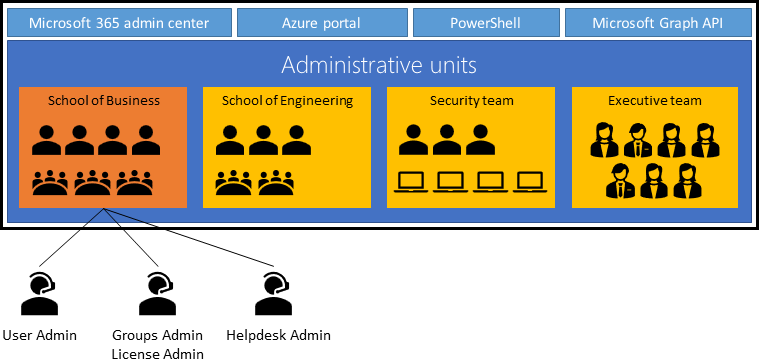
An administrative unit is a Microsoft Entra resource that can be a container for other Microsoft Entra resources. An administrative unit can contain only users, groups, or devices.
## Constraints
- Administrative units can't be nested.
- Administrative units are currently not available in [Microsoft Entra ID Governance](https://learn.microsoft.com/en-us/entra/id-governance/identity-governance-overview).
## Groups
Adding a group to an administrative unit brings the group itself into the management scope of the administrative unit, but **not** the members of the group. In other words, an administrator scoped to the administrative unit can manage properties of the group, such as group name or membership, but they cannot manage properties of the users or devices within that group (unless those users and devices are separately added as members of the administrative unit).
For example, a [User Administrator](https://learn.microsoft.com/en-us/entra/identity/role-based-access-control/permissions-reference#user-administrator) scoped to an administrative unit that contains a group can and can't do the following:
Permissions
Can do
Manage the name of the group
✅
Manage the membership of the group
✅
Manage the user properties for individual **members** of the group
❌
Manage the user authentication methods of individual **members** of the group
❌
Reset the passwords of individual **members** of the group
❌
#### Plan the organization
Plan the organization and evaluate its needs to determine the value that administrative units can provide for managing identities like groups and users.
#### Crate and Administrative Unit
Create an administrative unit to logically divide the organization and allow for scoping.

- Purpose of administrative units: An Azure AD resource for providing a container for Azure AD Objects.
- Benefits of Administrative units: Allow you to control the scope of your administrative users.
# AZ-104 Azure Identity - Configuring SSPR (self serfice password reset)
- [Self Serfice Password Reset (SSPR)](https://learn.microsoft.com/en-us/training/modules/allow-users-reset-their-password/)
- SSPR Process
- Authentication Methods
- SSPR Considerations

##### **Authentication methods**
- Mobile app: Authentication via app notification. AN example is the Microsoft authentication application
- Mobile app code: Authentication via time-based codes, An example is the Microsoft authentication application
- Email: Authentication via an external to Microsoft using codes sent to that email address
- Mobile Phone: Authentication via a mobile number using a phone call or SMS provides a code. (less recommended method)
- Office Phone: Authentication via a non-mobile phone using a phone cal that prompts the user to press #
- Security Questions: Authentication via answering a set of security questions (Least recommended method).
##### SSPR Considerations
Enable and manage SSPR via Azure AD Groups.
- Required methods: One or more of the available authentication methods is required for SSPR
- SSPR for Admins: Security questions not available by admins. By Default, admins must register for MFA methods
- Required Licenses: Azure AD P1 or P2, Microsoft apps for business, or Microsoft licensing is required for SPPR.
Navigate to Entra ID then password reset

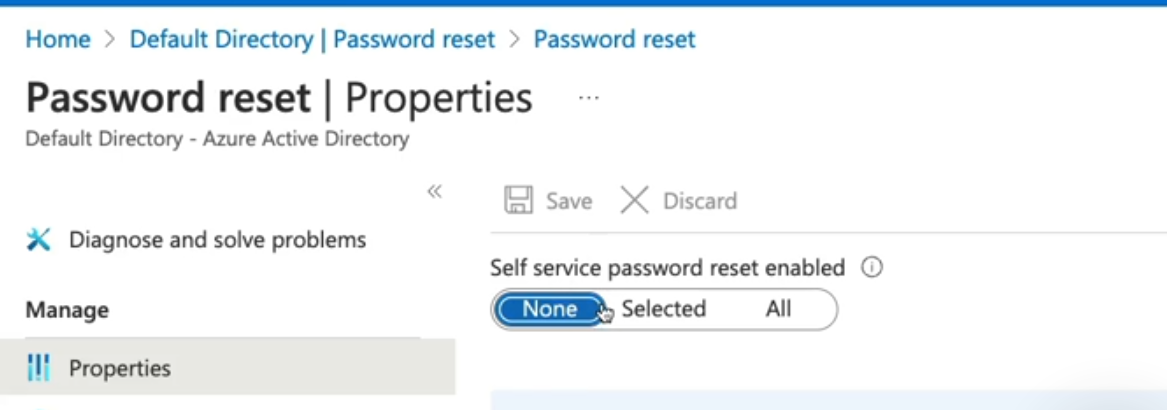
These settings only apply to end users in your organizations ,admins are always enabled for SSPR and are required to use two authentication methods to reset their passwords
- None: no user can perform SSPR (except admins).
- Select: Here we can use groups to Enable SSPR.
- ALL - this will enable all users in the tenant with SSPR.
For this exercise we select all users and select which type of authentication method
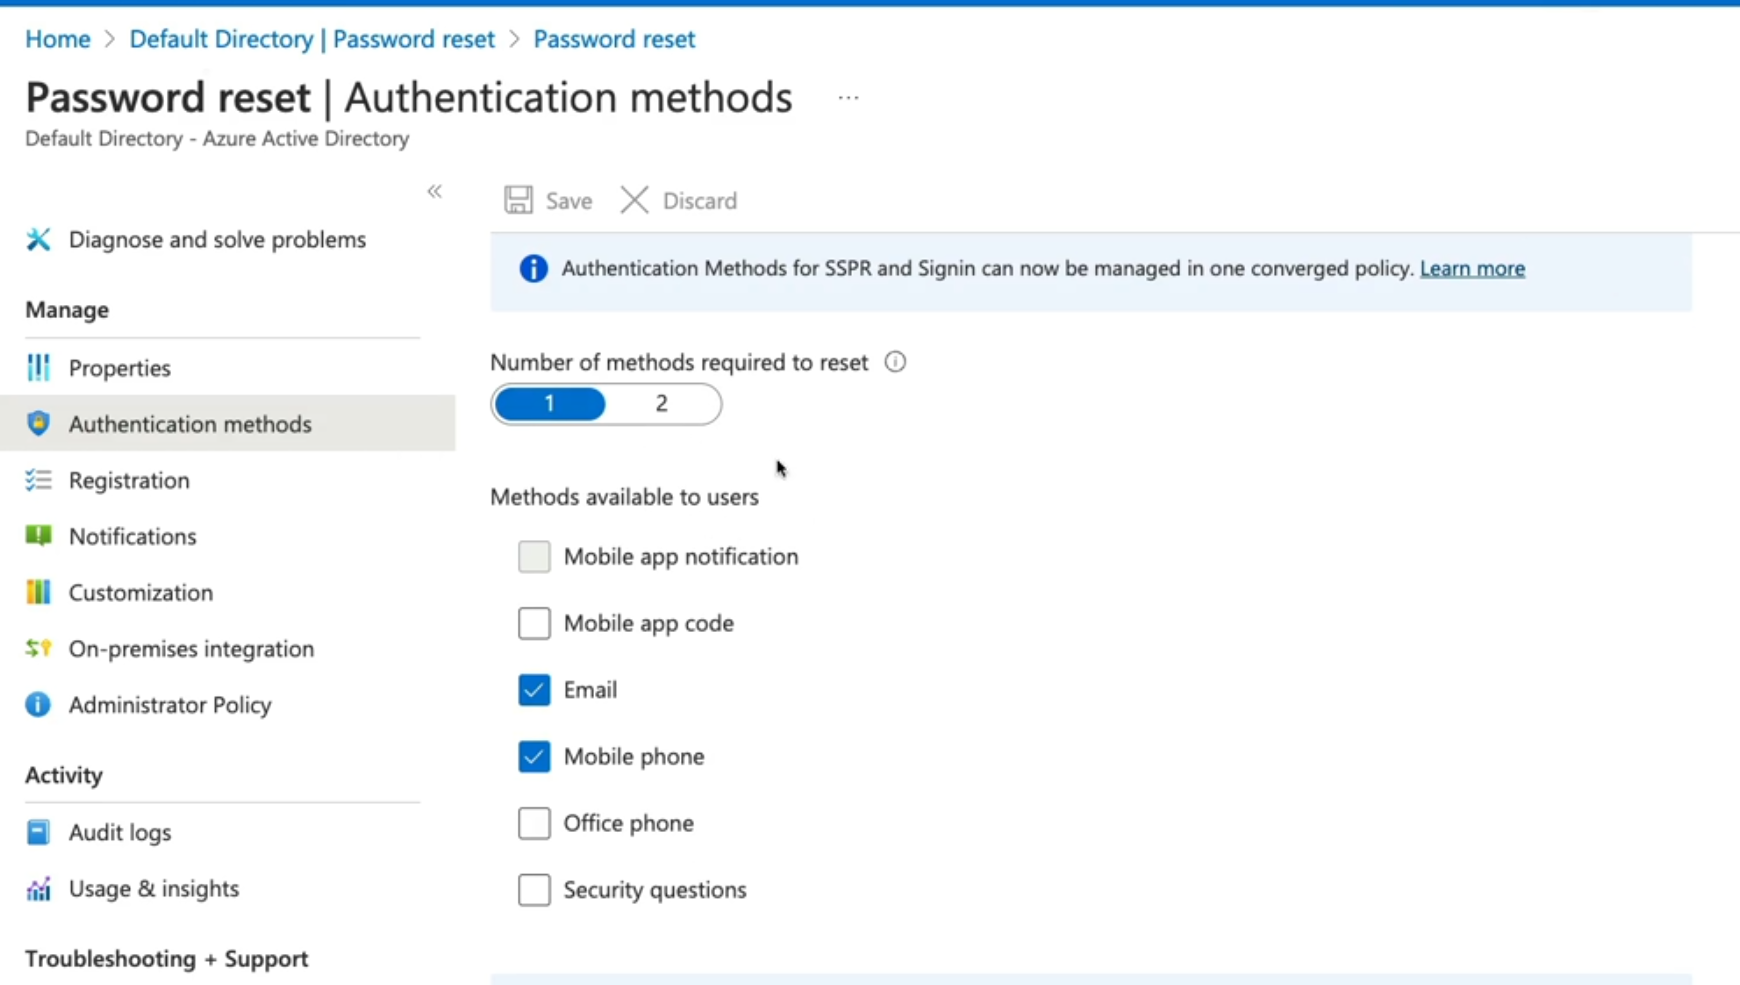
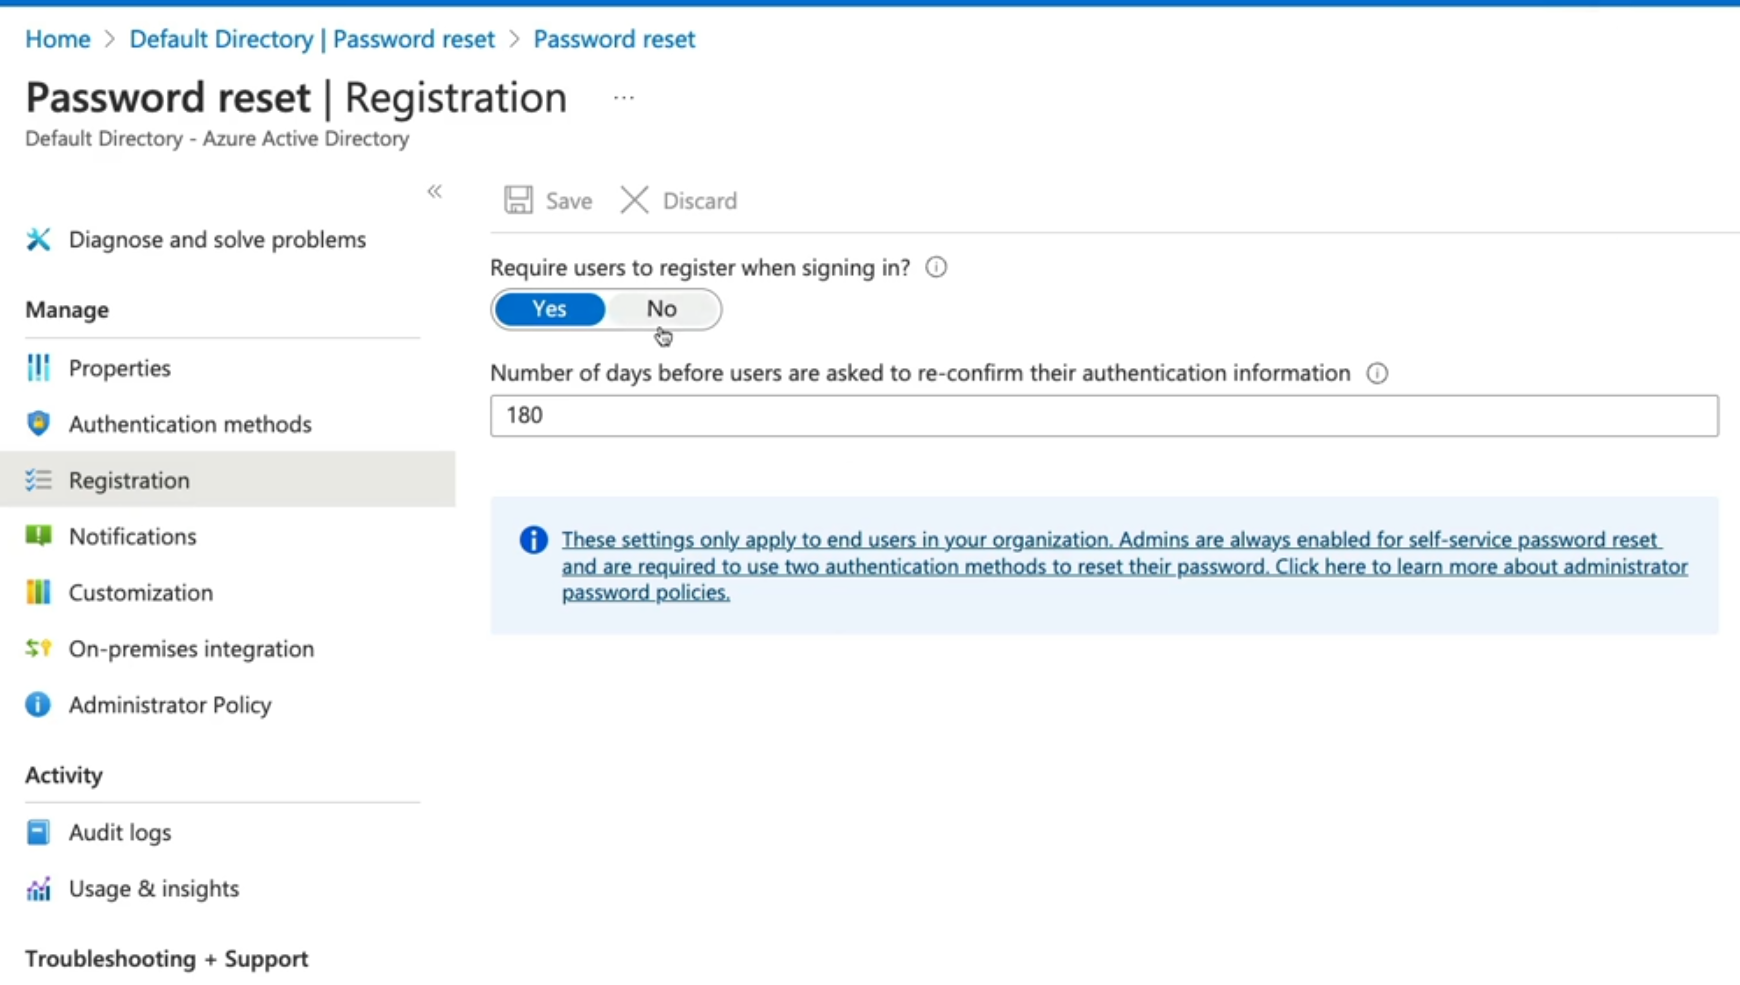
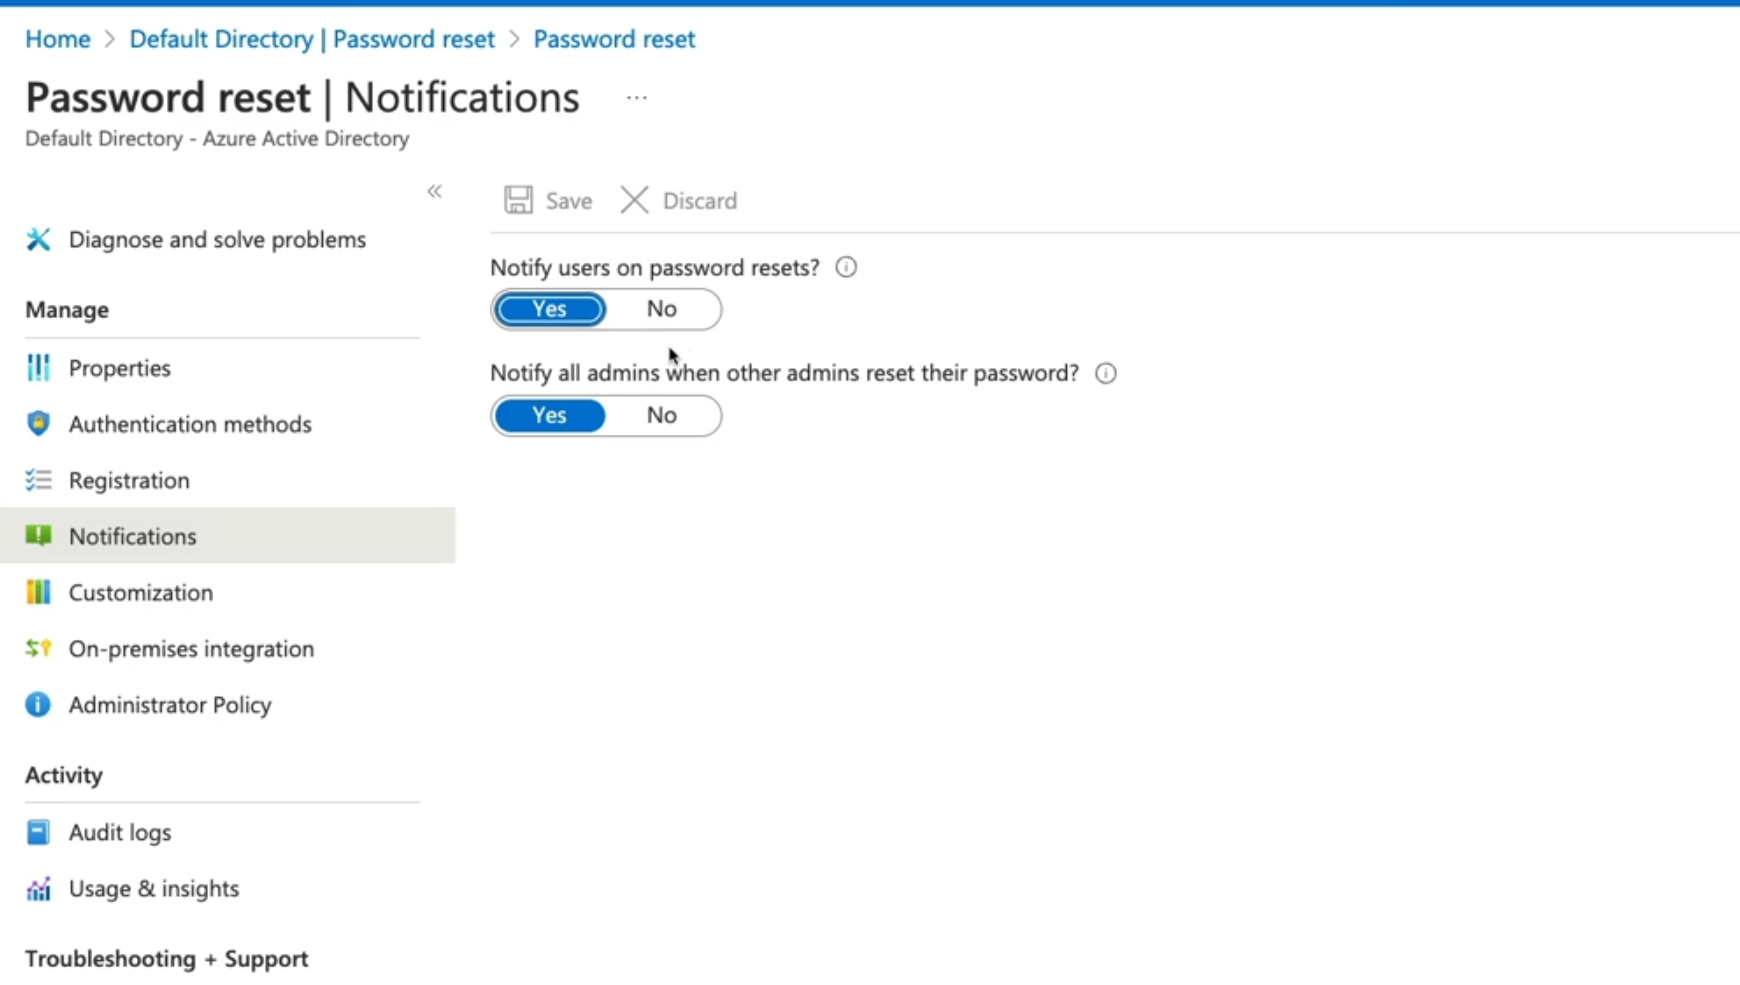
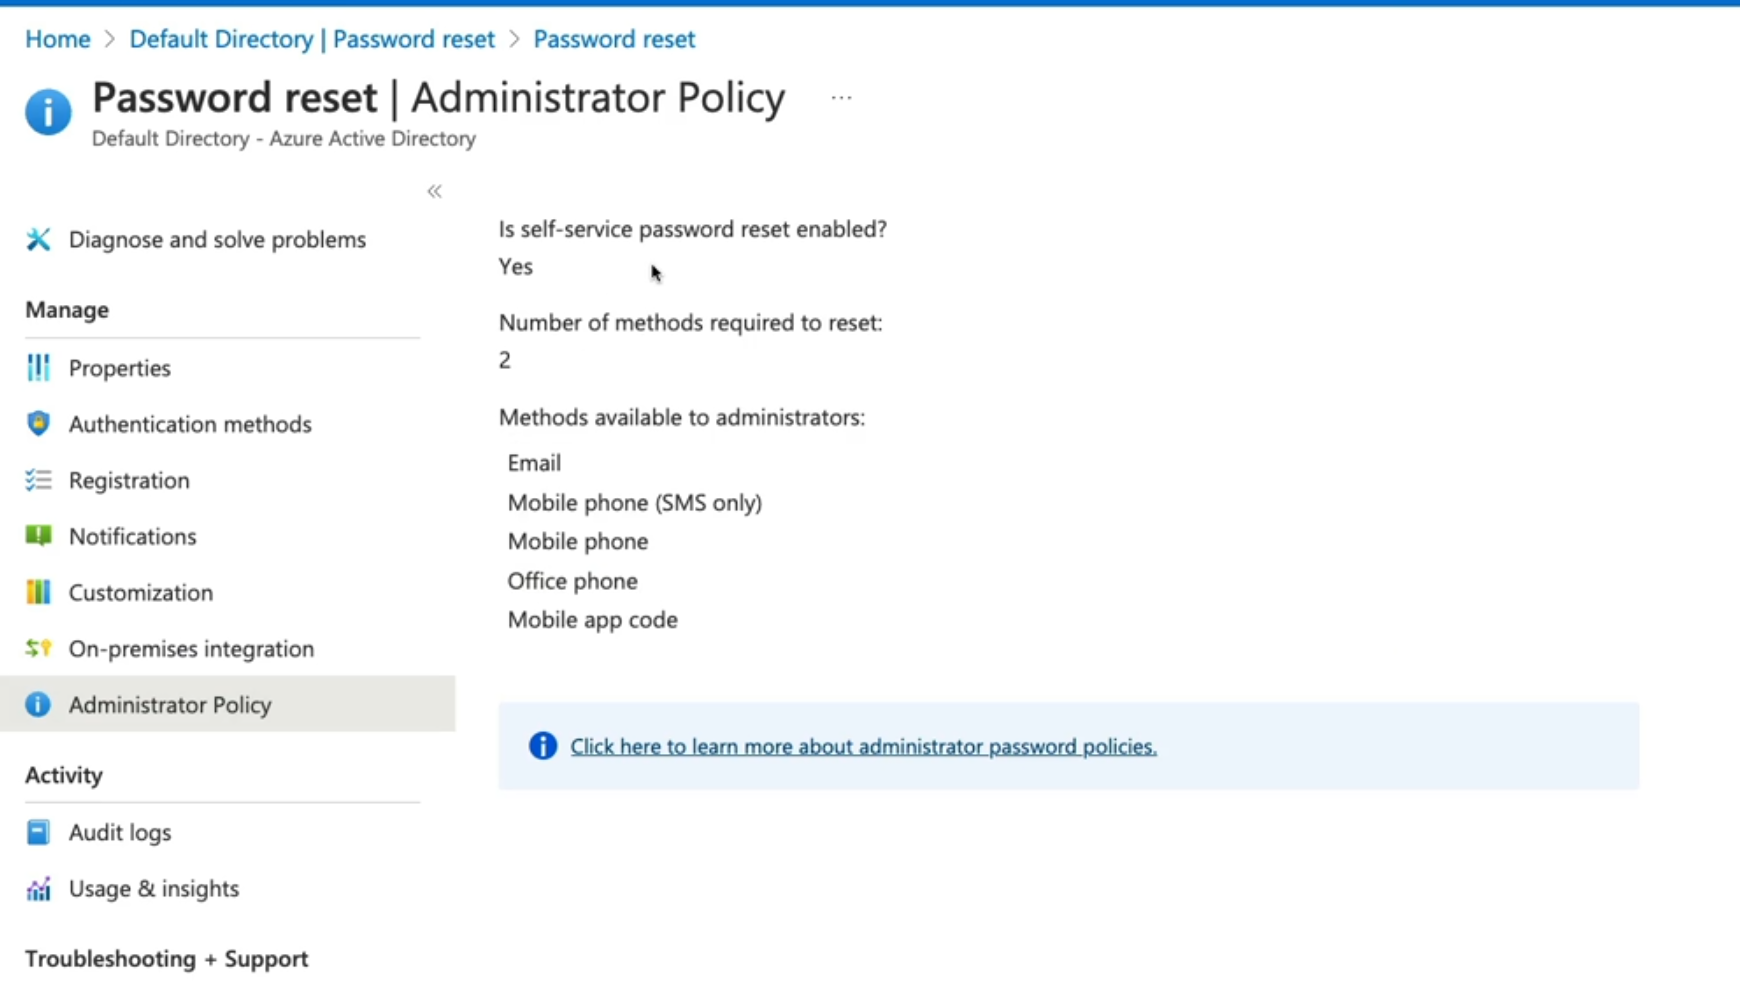
# AZ-104 Azure Identity - Azure Entra ID Device Management
[Device Management](https://learn.microsoft.com/en-us/training/modules/manage-device-identity-ad-join/)
- Basics of Identity
- Registration Options
##### **How to register devices**
- Azure AD Registered: Least restrictive option, allowing for bring your own device (BYOD) with a personal Microsoft or local account, supports windows 10, IOS IpadOS, Android and macOS.
- Azure AD Joined: Device is owned by the organization and accesses Azure AD through a work account. These identities exist only in the cloud supports windows 10 and Server 2019
- Hybrid Azure AD Joined: Similar to AD joined: however, these devices identities exist both on prem and in the cloud, Support windows 7, 8.1, 10 and server 2008 or later.
Navigate to Entra ID then over to Devices
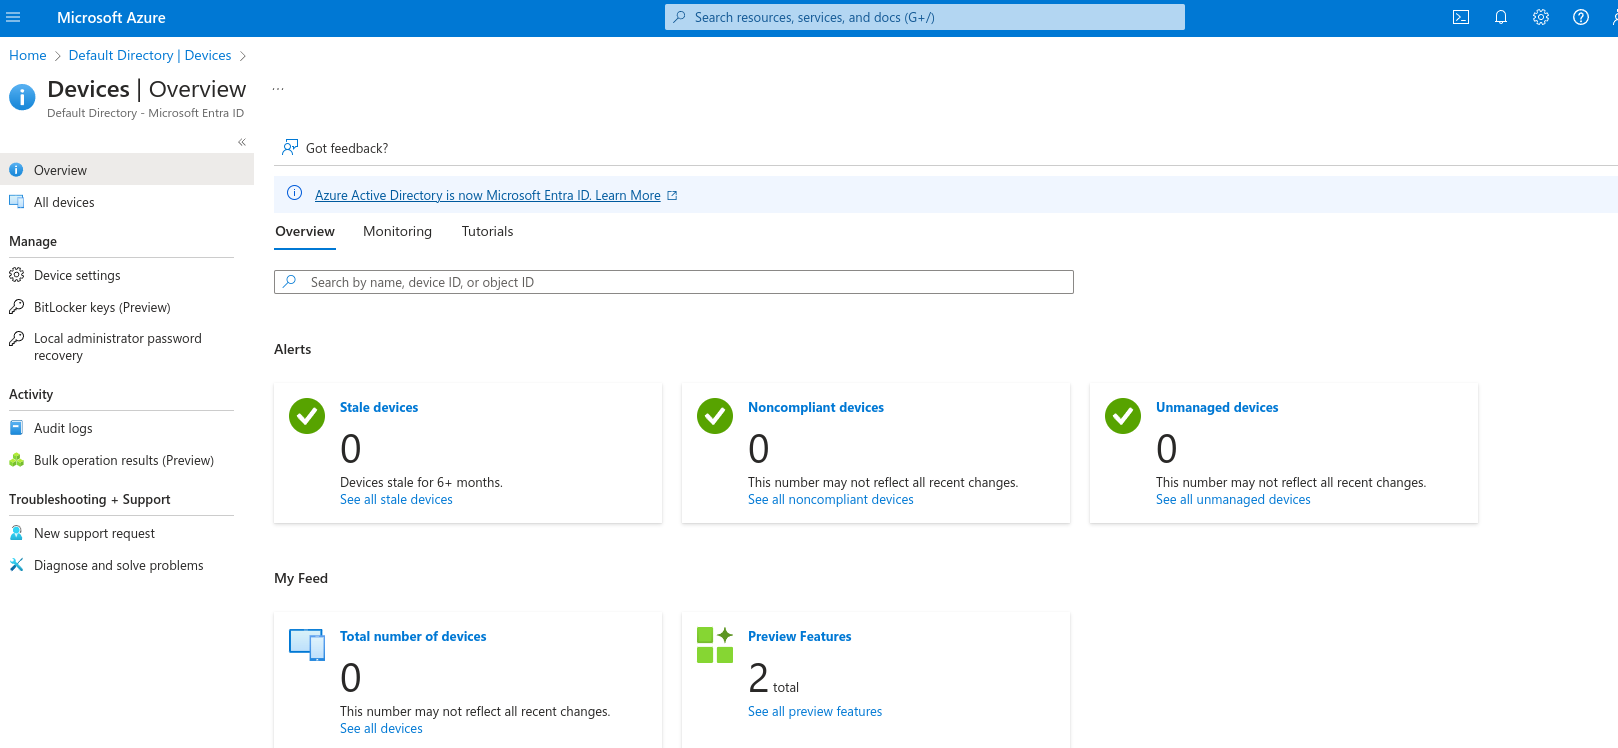
Over in Device settings we can specify which or how users can register devices on our tenant
Users may join devices to Microsoft Entra.
- All: Will allow all users to join their devices.
- Selected: specify which users can join their device.
- None: No users can join their device.
Users may register their devices with Microsoft Entra.
- Allow users to register their BYOD devices to registered devices.
Require multi-factor authentication to register or join devices with Azure ID (self explanatory)
Maximum devices per user to add, recommended is 20.
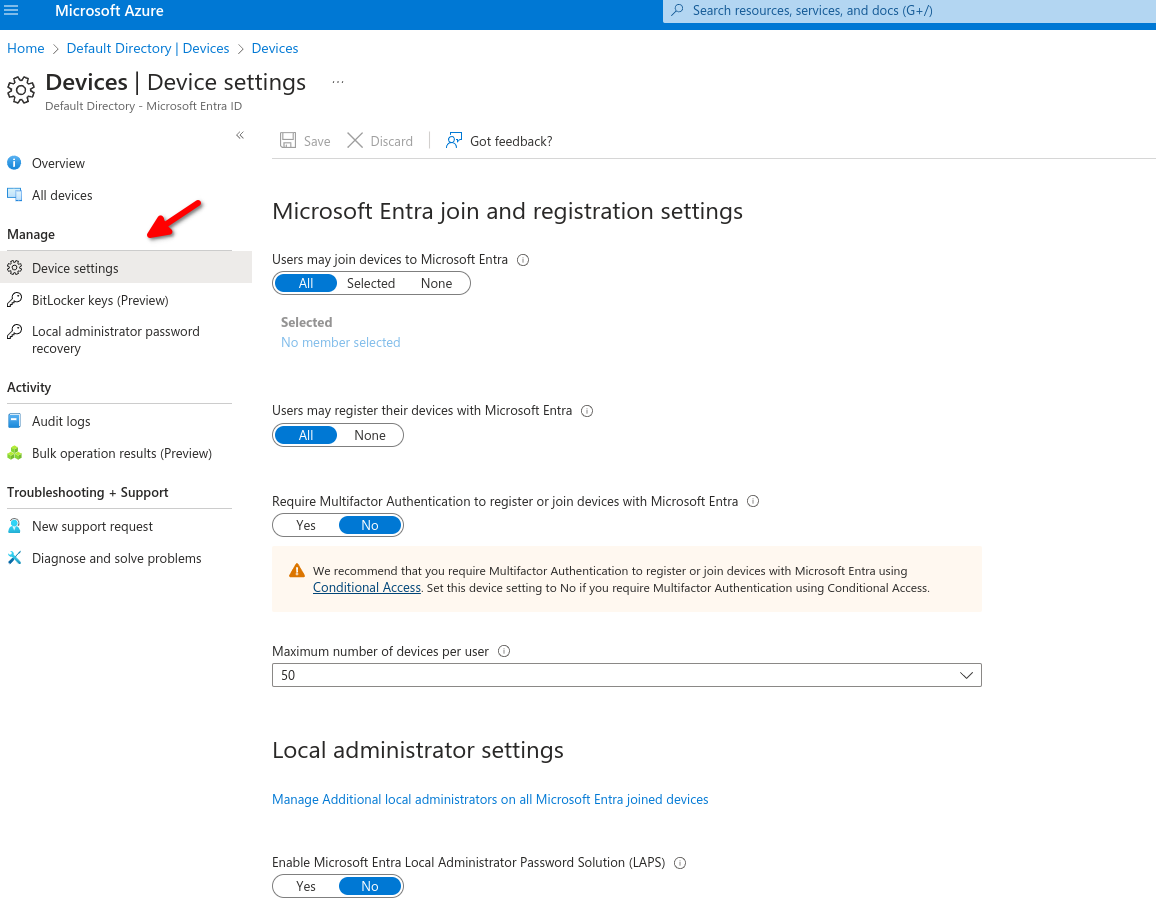
**Device Identity**
- Simplified procedure for adding and managing devices
- Improved user experience on devices
- Single Sign-on (SSO) for any registered or joined devices.
# 4.- AZ-104 Azure RBAC - Role-based Access Control
# AZ-104 Azure RBAC - Understanding Roles in Azure
[Manage RBAC](https://learn.microsoft.com/en-us/training/modules/manage-subscription-access-azure-rbac/)
- Describing RBAC
- Describing Azure Roles
- Describing Azure AD Roles
- Azure Roles vs Azure AD Roles
- RBAC Architecture
##### **Describing RBAC**
"Who can do what, where, who what and where"
Describing Azure Roles
- Owner: Full access to resources and delegates access to other users
- Reader: Provides the ability to view sources, cannot perform actions on resources
- contributor: Can create and manage resources
- User Access Administrator: Can delegate access to resources
Describing Azure Entra ID Roles
- Special set of roles for providing access to manage identity objects inside our azure tenant, to manage user application or devices not resources.
- Global Administrator: Provide access to manage AD Resources
- Billing Administrator: Perform billing tasks
- User Administrator: Can manage users and groups inside Azure Entra ID Tenant
- Helpdesk Administrator: perform password resets if SSPR is not enabled.
## Microsoft Entra and Azure roles
Microsoft Entra roles and Azure roles are often confused when you first work with Azure. Microsoft Entra roles provide the mechanism for managing permissions to Microsoft Entra resources, like user accounts and passwords. Azure roles provide a wealth of capabilities for managing Azure resources like virtual machines (VMs) at a granular level.
Azure Roles
Microsoft Entra ID Roles
Manage access to Azure resources like VMs, storage, networks, and more
Manage access to Microsoft Entra resources like user accounts and passwords
Role information accessible through Azure portal, Azure CLI, Azure PowerShell, Azure Resource Manager templates, REST API
Role information accessible in Azure admin portal, Microsoft 365 admin center, Microsoft Graph, [Microsoft Graph PowerShell](https://learn.microsoft.com/en-us/powershell/microsoftgraph/overview)
**Azure Roles**
Azure Entra ID Roles
Manage access to Azure resources
Manage access to Azure AD Resources at tenant
Scope can be at multiple levels
Scope is at tenant level
Support custom roles
Support custom roles
Main roles:
- Owner
- Contributor
- Reader
- User Access Administrator
Main roles:
- Global Administrator
- User Administrator
- Billing Administrator
**Azure Roles**
Azure Entra ID Roles
Control access to azure resources, VMs, Virtual Networks
Control Access to Azure AD REsources, user objects, group devices, ad features
Referred to as Azure RBAC
Built in roles
Built in roles
Custom roles
custom roles
Scope at Azure AD Tenant level, provide access for user that exist inside of our Azure Entra ID tenants to perform administrative functions inside of the tenant itself
Scope at management groups subscription groups resource groups and resources using identities that exist inside our azure AD Tenant
# AZ-104 Azure RBAC - Assigning access to resources
[Secure Azure RBAC](https://learn.microsoft.com/en-us/training/modules/secure-azure-resources-with-rbac/ "Azure RBAC")
- Explaning Azure RBAC
- Understanding Role definitions
- Additive Property
##### **Explaining Azure RBAC**
Azure RBAC is an authorization system
- Security Principal: Defining the who we want to authorize, WHO?
- Role Definition: assign a role definition to that identity, WHAT?
- Scope: where we are defining where we are going to perform this actions, WHERE?
We have to provide this access explicit, there is an implicit deny
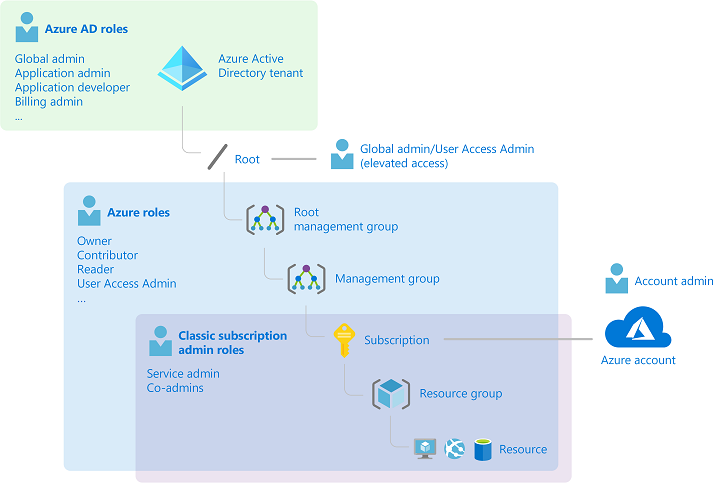
##### **Understanding Role Definitions**
Contributor
- Actions: Define what actions are allowed to be performed on the management plane, managing resources inside of azure like starting or stopping virtual machines.
- NotActions: Actions we are going to deny on managing resources inside of Azure. For example, if we wanted to allow a user to perform a restart on a virtual machine, we could outline that in Actions, but it could be overwritten and overruled by a NotAction denying that same action inside this role definition.
Then we have the next component, which are our DataActions, and our NotDataActions.And these are the same kind of thing as our Actions and NotActions, except for rather than being on the control plane of managing Azure resources, this will take an impact on data-related actionssuch as working with data inside of Azure Storage accounts.
- AssignableScope: where we define where we're going to assign the scope for this resource. And it can be all the way down
to a specific resource, where we assign the scope to a resource group, to a subscription, or even a management group.
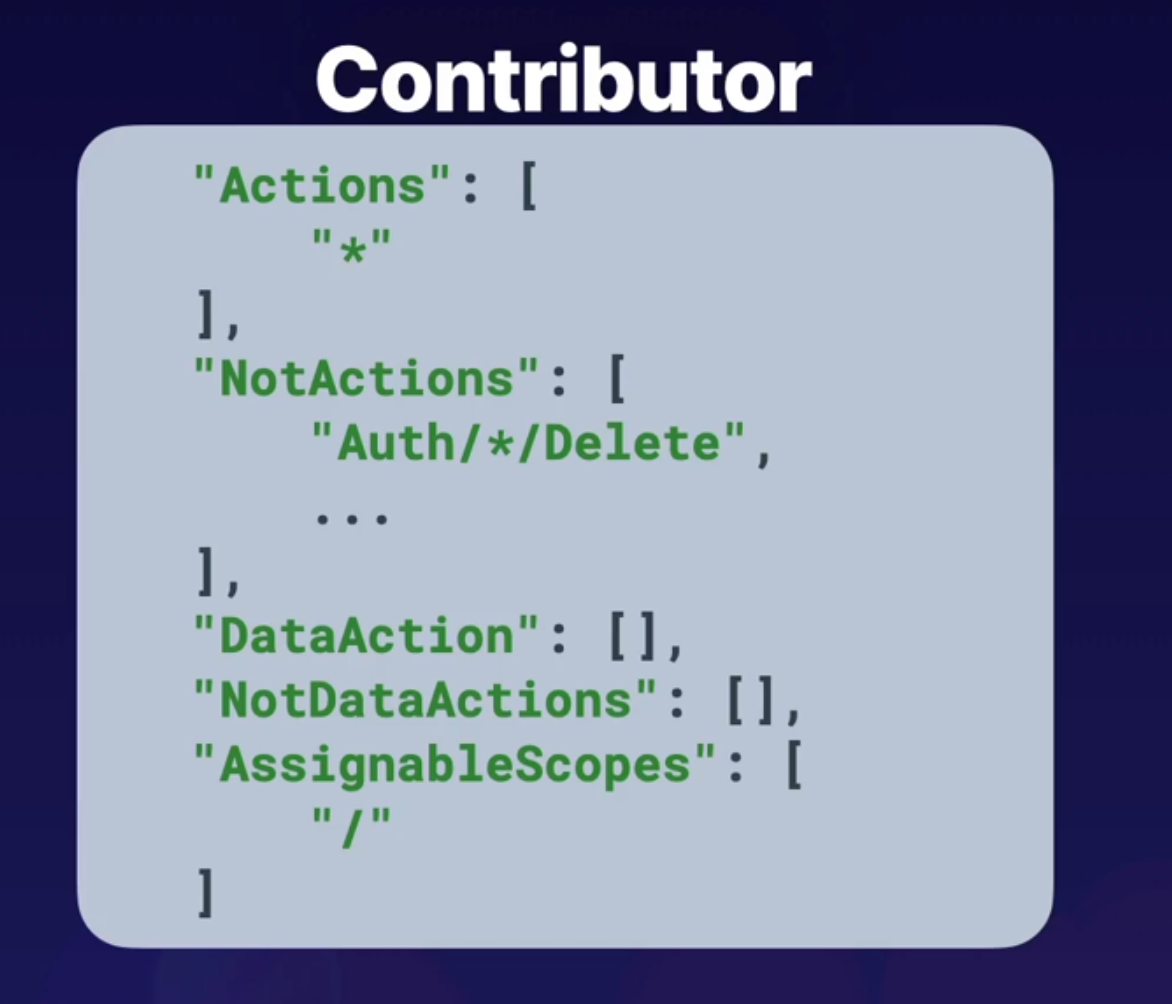
For example, if we have this user here in our Azure Active Directory tenant that is assigned the Contributor role at the management group scope here, but also assigned a Reader role at a resource group scope inside of the same hierarchical structure, what we have to understand when we have overlapping roles like this, and multiple role assignments for a single identity, is that roles follow an additive property. So what we do is we add the effective permissions of each of these role definitions, and by performing this addition, this will inform us what the effective permissions will be. So in this case, Contributor + Reader = Contributor, because Contributor provides Reader functionality. So effectively, this user will have Contributor at the management group scope, and that will be inherited all the way down. And there's no additional permissions that are being provided by actually having the Reader role assignment. So this user's permissions will just waterfall all the way down and be inherited to the lowest level.
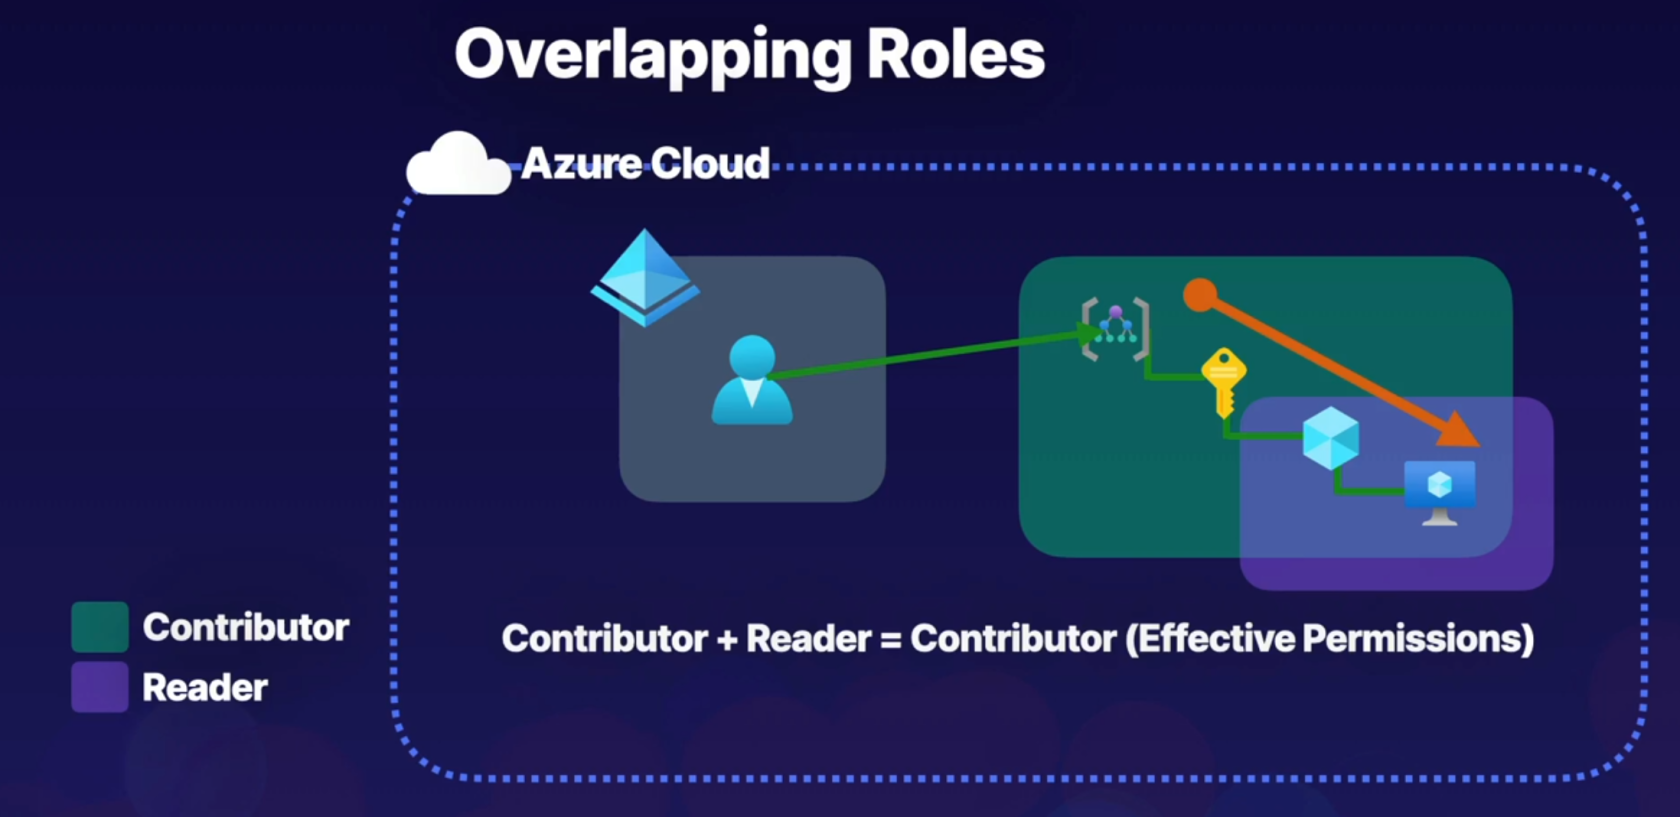
##### **Assigning access**
Lets go to resource groups and select a group (K8s\_group in example below) then if we go to roles we can see all role assignments, here we can determine a user can be a contributor (grants full access to manage all roesources bu tdoes not allow you to assign roles in Azure RBAC)
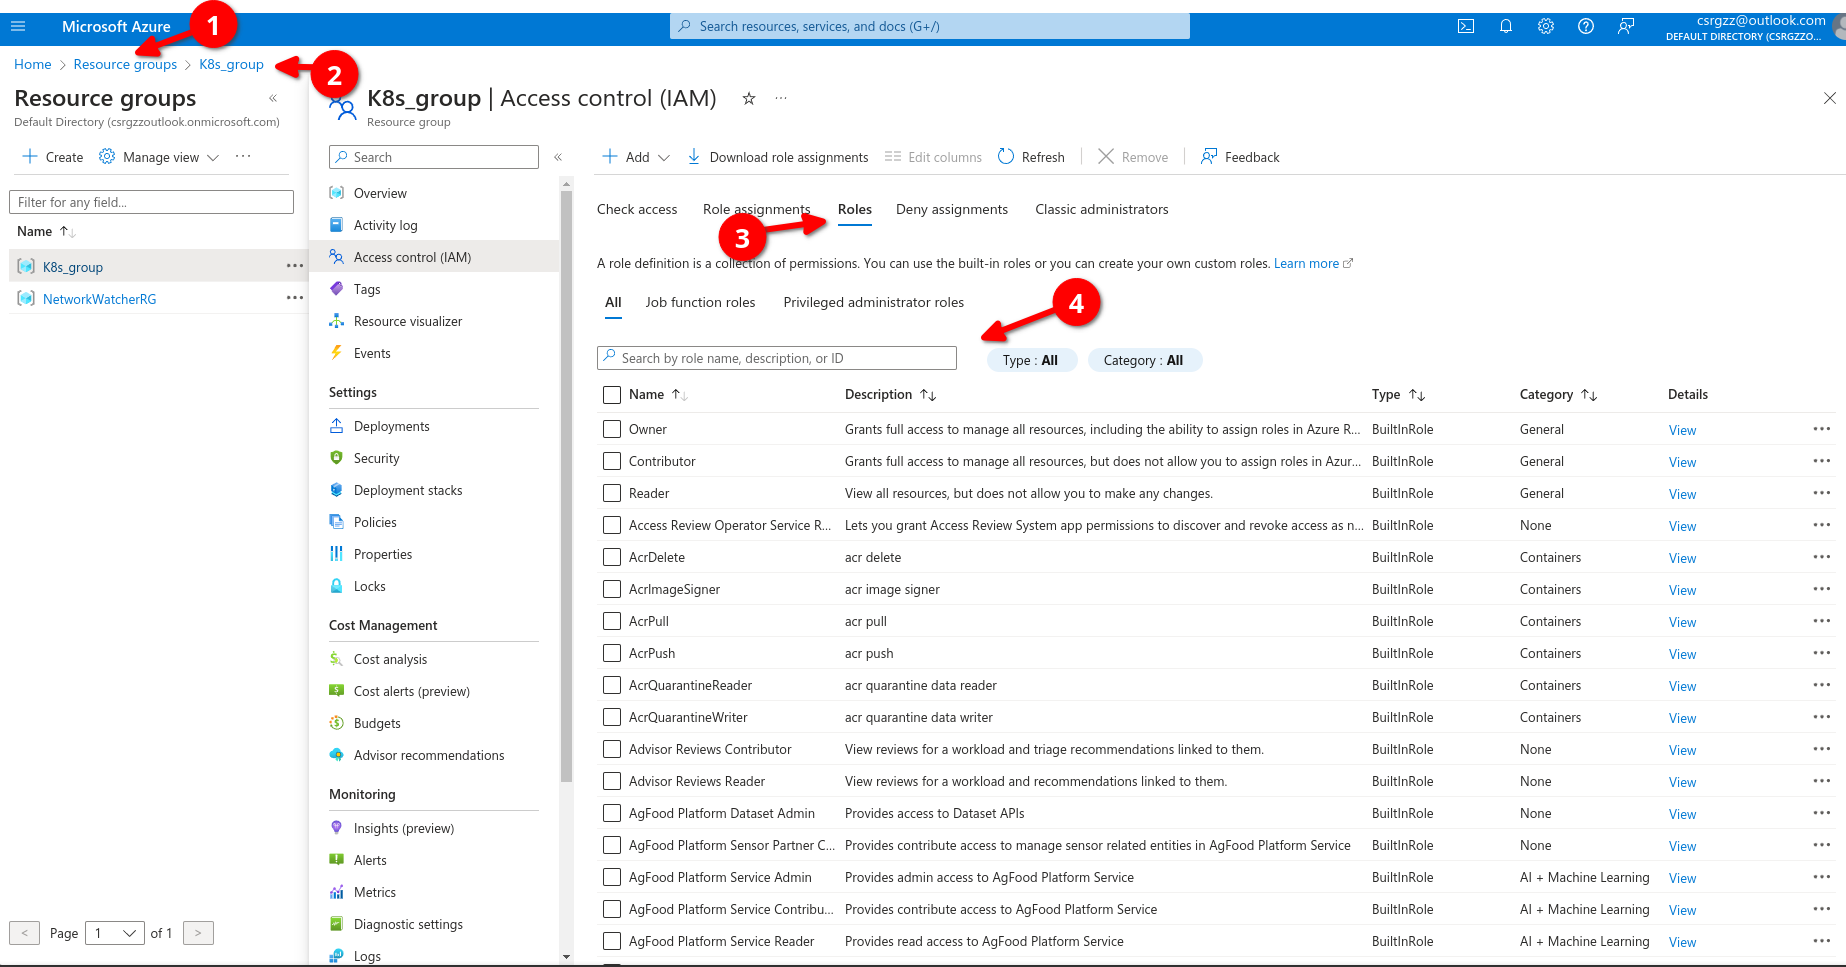
We select contributor,, then add then add role assignment
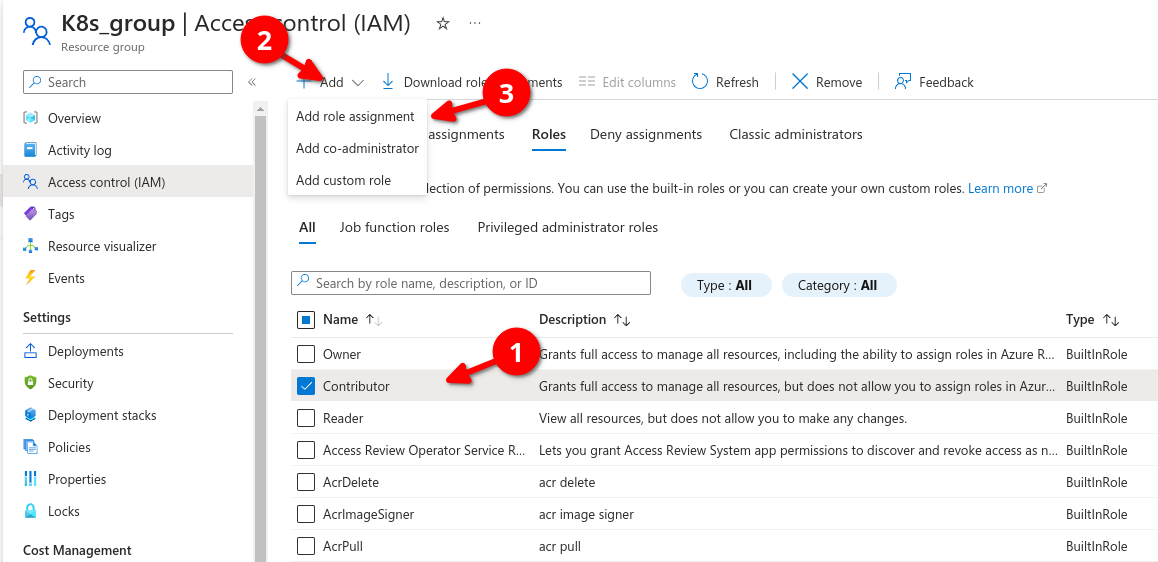

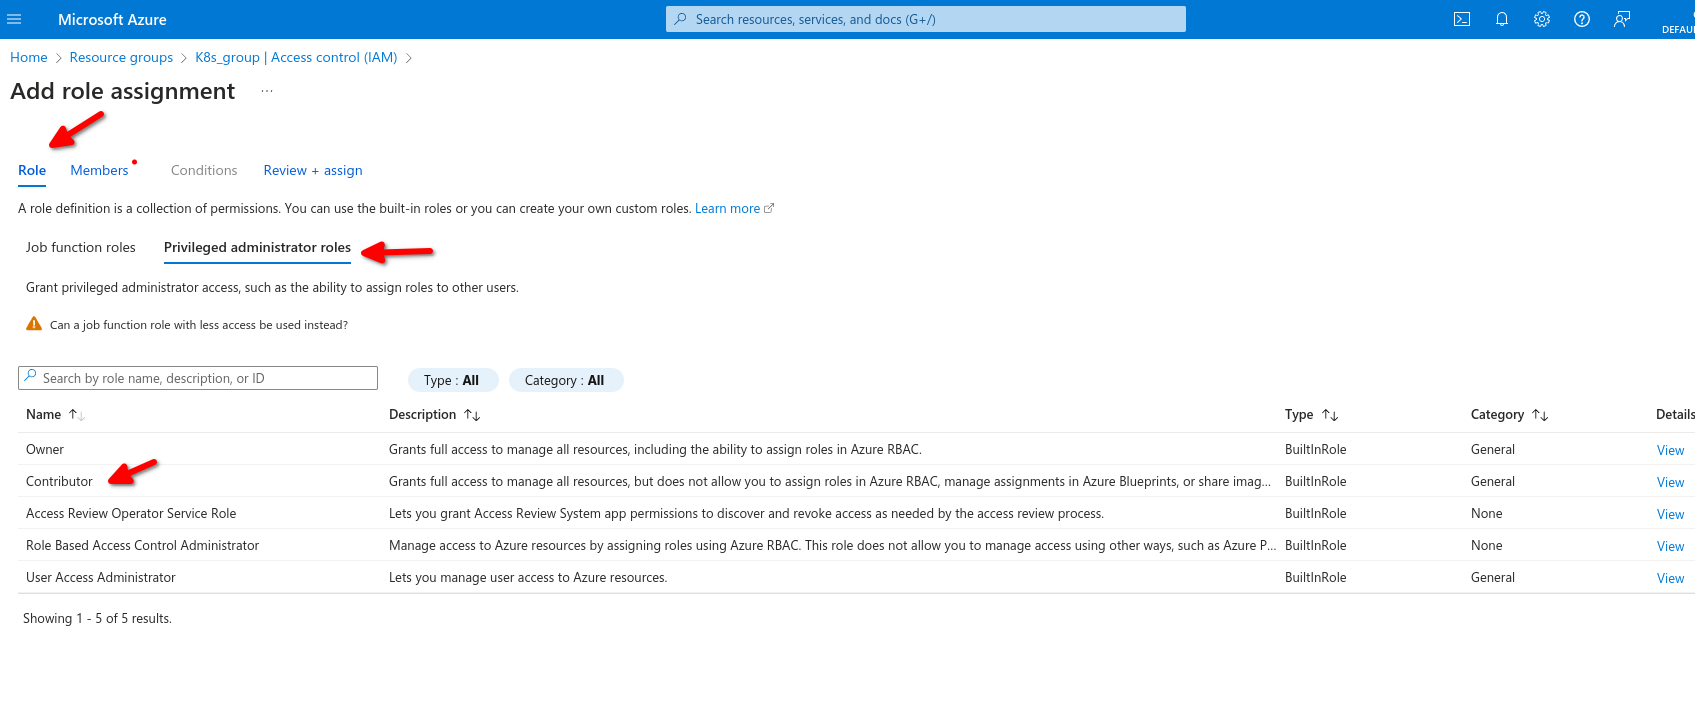
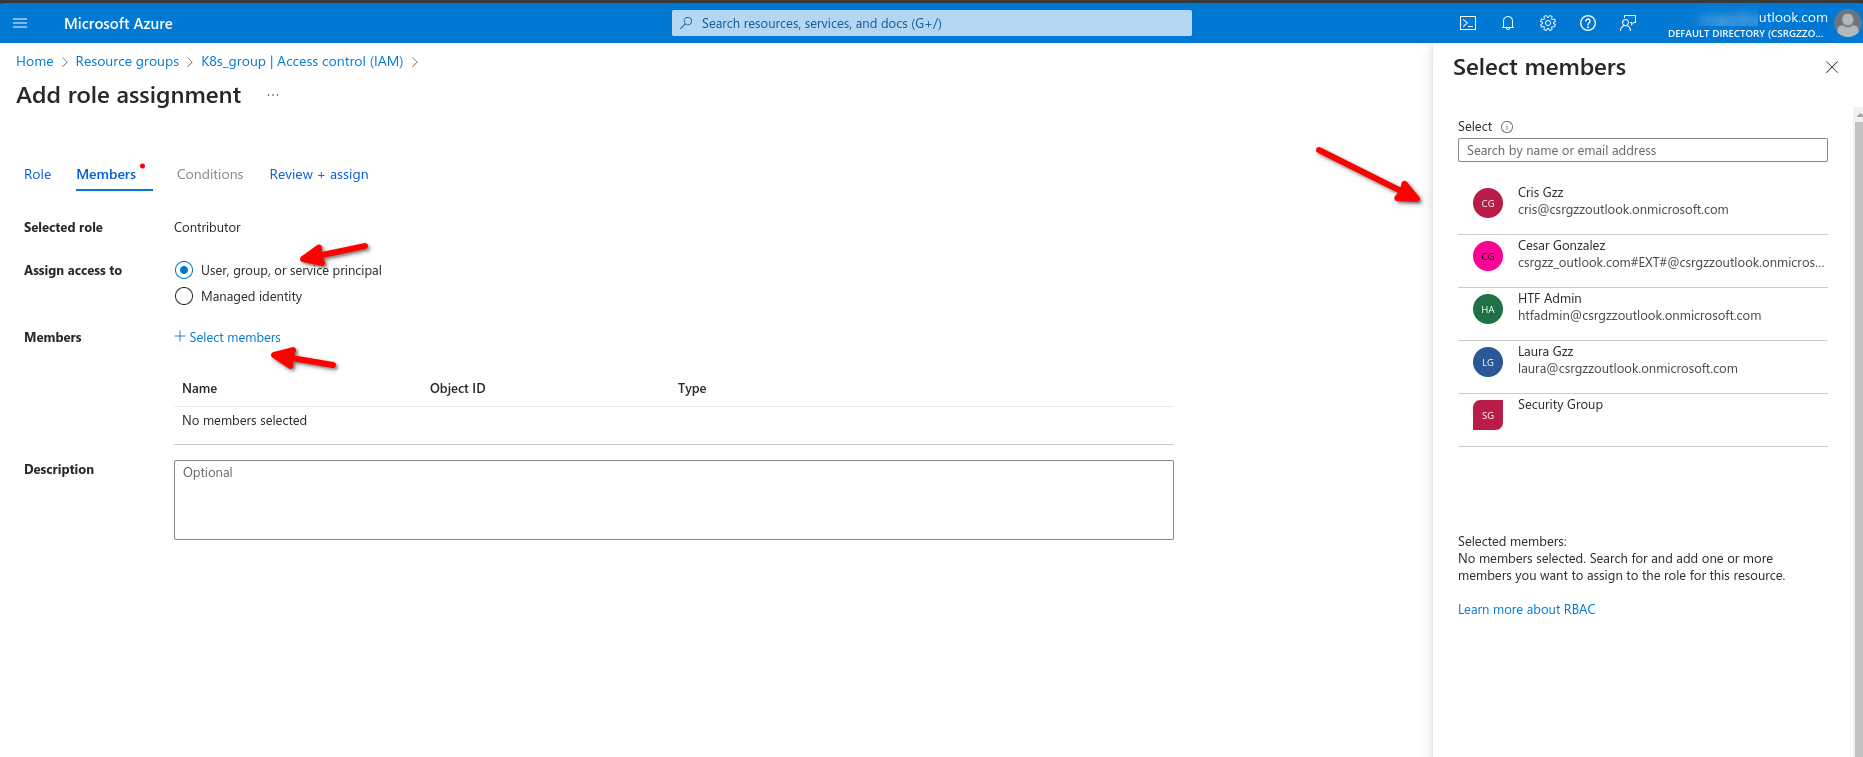
Now back on resources group we can see the role assignments
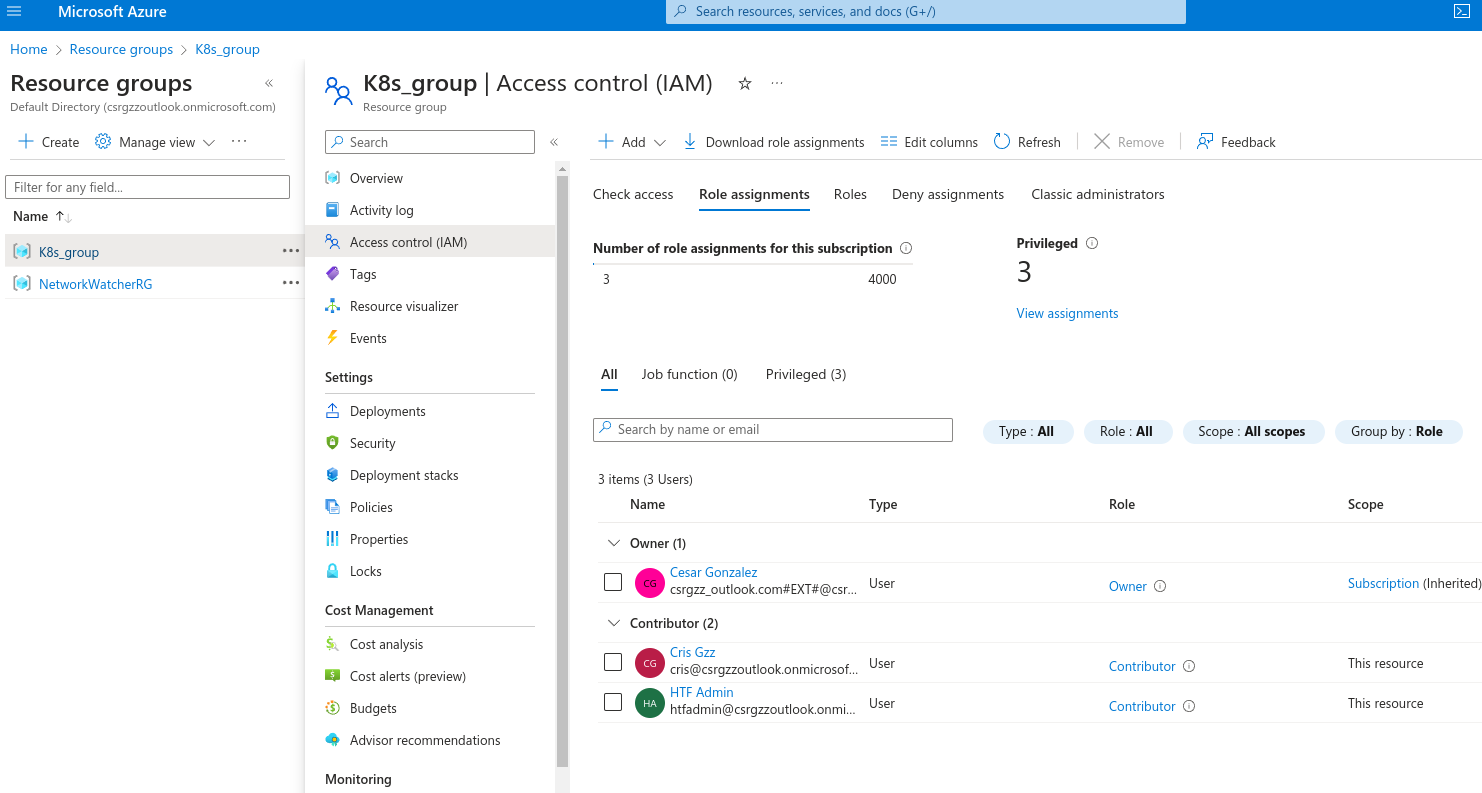
Same inside those resources it inherited the assignment
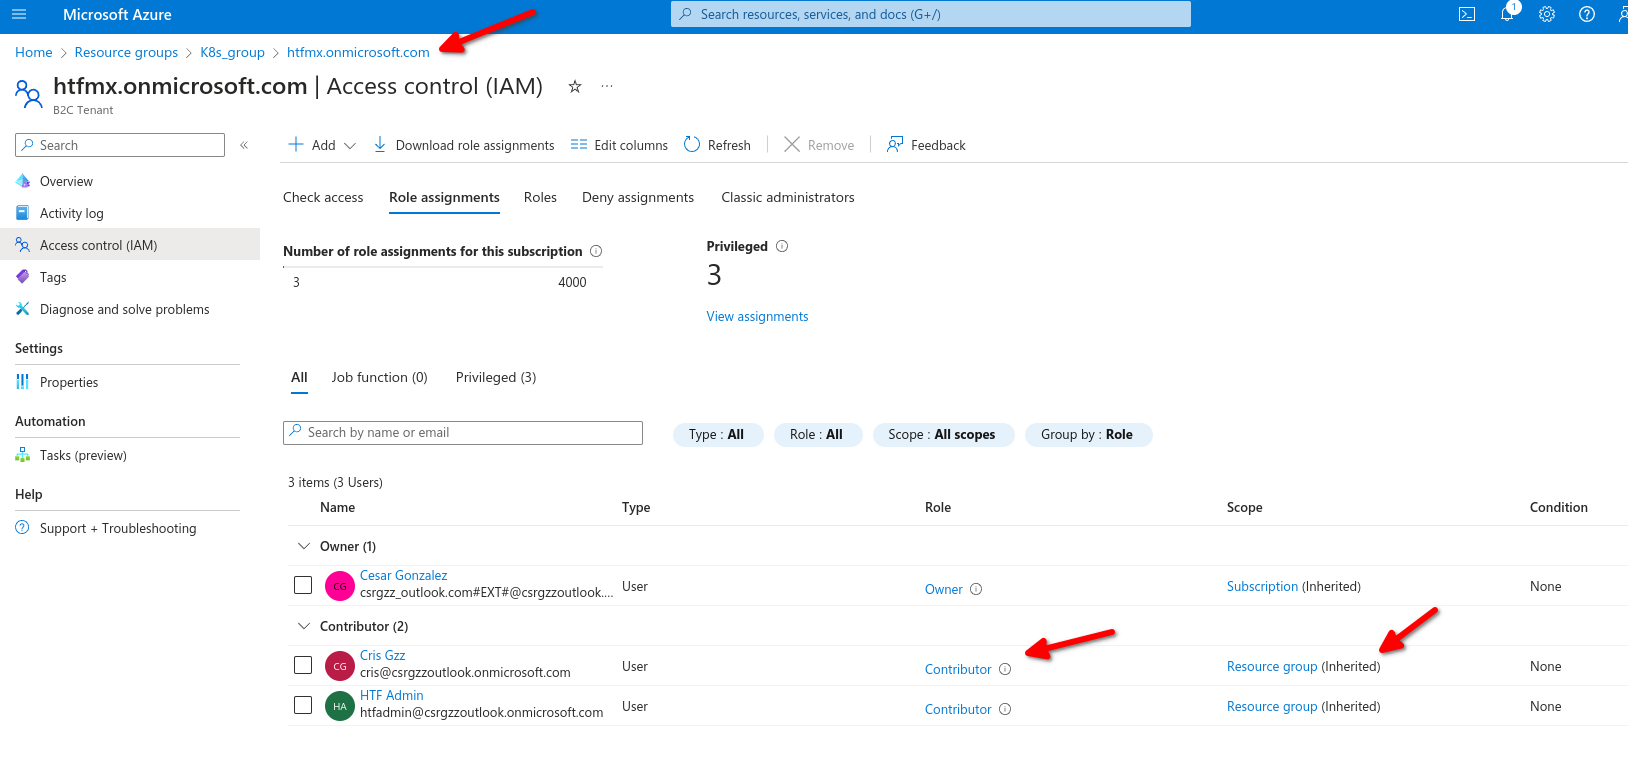
Authorization system
- Provide identities with access to azure resources
- Roles are a collection of permissions
- There is a scoping hierarchy for role assignment
- Implicit deny - Explicit Allow - Explicit Deny
# AZ-104 Azure RBAC - LAB Using service Principal Identity to List AD Roles
In this hands-on lab, you are tasked with gathering the role definitions and role assignments for your organization.
You do not have access to the portal, so you must collect this information via SSH connection, by using a Linux VM and a service principal. Once you have gained access to the Azure subscription, use the Azure CLI to collect the required information, and output to a file so you can email it to your manager.
Solution
Log in to the virtual machine using the credentials provided:
```
ssh cloud_user@
```
### Log in to Azure using the Service Principal
1. Once connected to the lab VM, perform the `az login` command with the `--service-principal` flag to login to the Azure account:
```
az login --service-principal \
-u "" \
-p "" \
--tenant ""
```
> **NOTE:** To get your own `Tenant ID`, search for `Tenant properties` in the Azure portal. The value will be under the `Tenant ID` field.
If you experience an error regarding invalid arguments, please see the Additional Information section for the details of a fix.
### List the Role Definitions and Role Assignments
1. List the role definitions: ```
az role definition list
```
2. Output the list to a file named `roleinfo.json`: ```
az role definition list > roleinfo.json
```
3. List the role assignments: ```
az role assignment list --all
```
4. Append the list to the `roleinfo.json` file: ```
az role assignment list --all >> roleinfo.json
```
5. Verify that the file was created successfully: ```
vi roleinfo.json
```
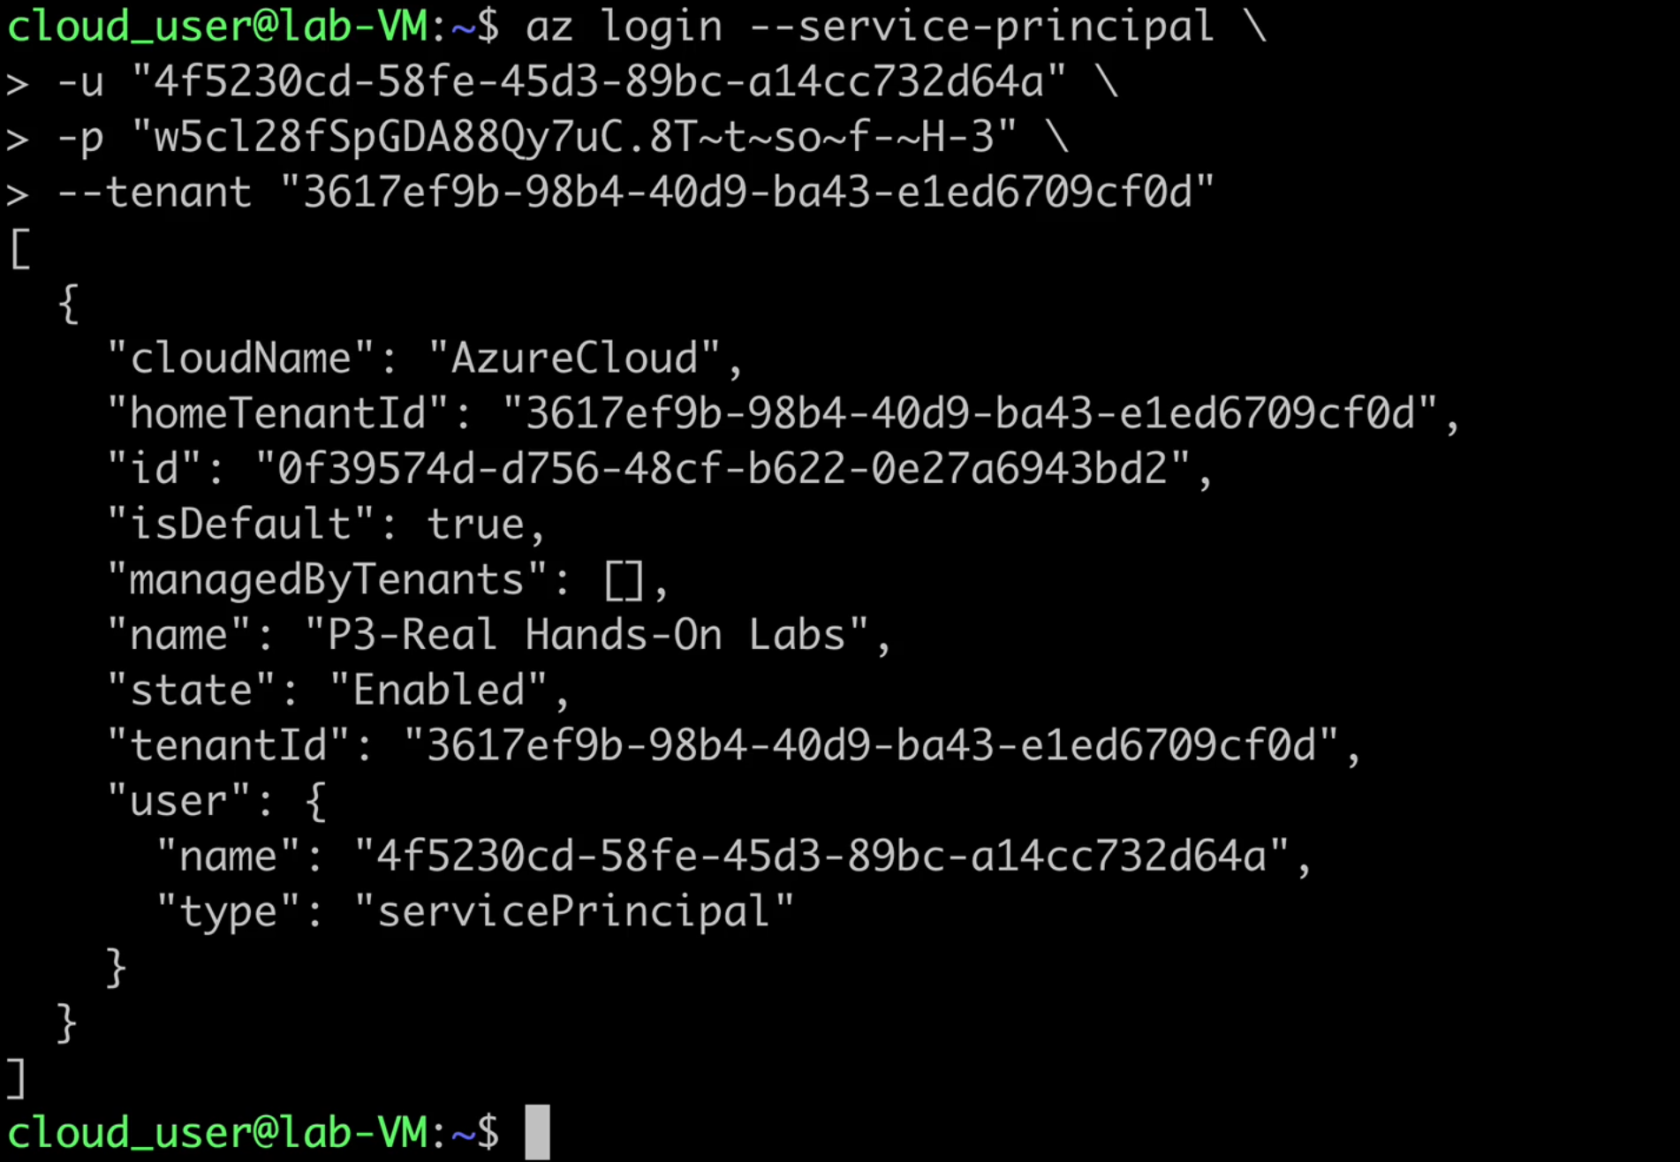
# AZ-104 Azure RBAC - Creating custom roles
[Custom Roles RBAC](https://learn.microsoft.com/en-us/training/modules/create-custom-azure-roles-with-rbac/)
- Describing custom roles
- Creating role definitions
- Custom role definition
- No built in role met requirement
- user access administrator or owner role for the account
## Assignment and scope of custom roles
Users with the User Access Administrator or Owner roles can create or assign custom roles in Azure RBAC.
You can assign custom roles to:
Security principal
Summary
**User**
An individual who has a profile in Microsoft Entra ID
**Group**
A set of users created in Microsoft Entra ID
**Service principals**
A security identity used by applications or services to access specific Azure resources
**Managed identity**
An identity in Microsoft Entra ID that is automatically managed by Azure
Sometimes, built-in roles don't grant the precise level of access you need. Custom roles allow you to define roles that meet the specific needs of your organization. You can assign the Azure custom roles you create to users, groups, and service principals at the scope of subscription, resource group, or resource.
Microsoft Entra roles and Azure roles are often confused when you first work with Azure. Microsoft Entra roles provide the mechanism for managing permissions to Microsoft Entra resources, like user accounts and passwords. Azure roles provide a wealth of capabilities for managing Azure resources like virtual machines (VMs) at a granular level

helpdesk.json
```json
Name "Helpdesk Administrators"
Description "Can Read, Restart VMs, and log support tickets with Microsoft"
Actions
0 "*/read"
1 "Microsoft.Compute/virtualMachines/start/action"
2 "Microsoft.Support/*"
NotActions []
DataActions []
NotDataActions []
AssignableScopes
0 "/subscriptions/subscriptionId"
```
Open powershell tytpe ini code and name of the json file, right click on top bar to save and exit editor
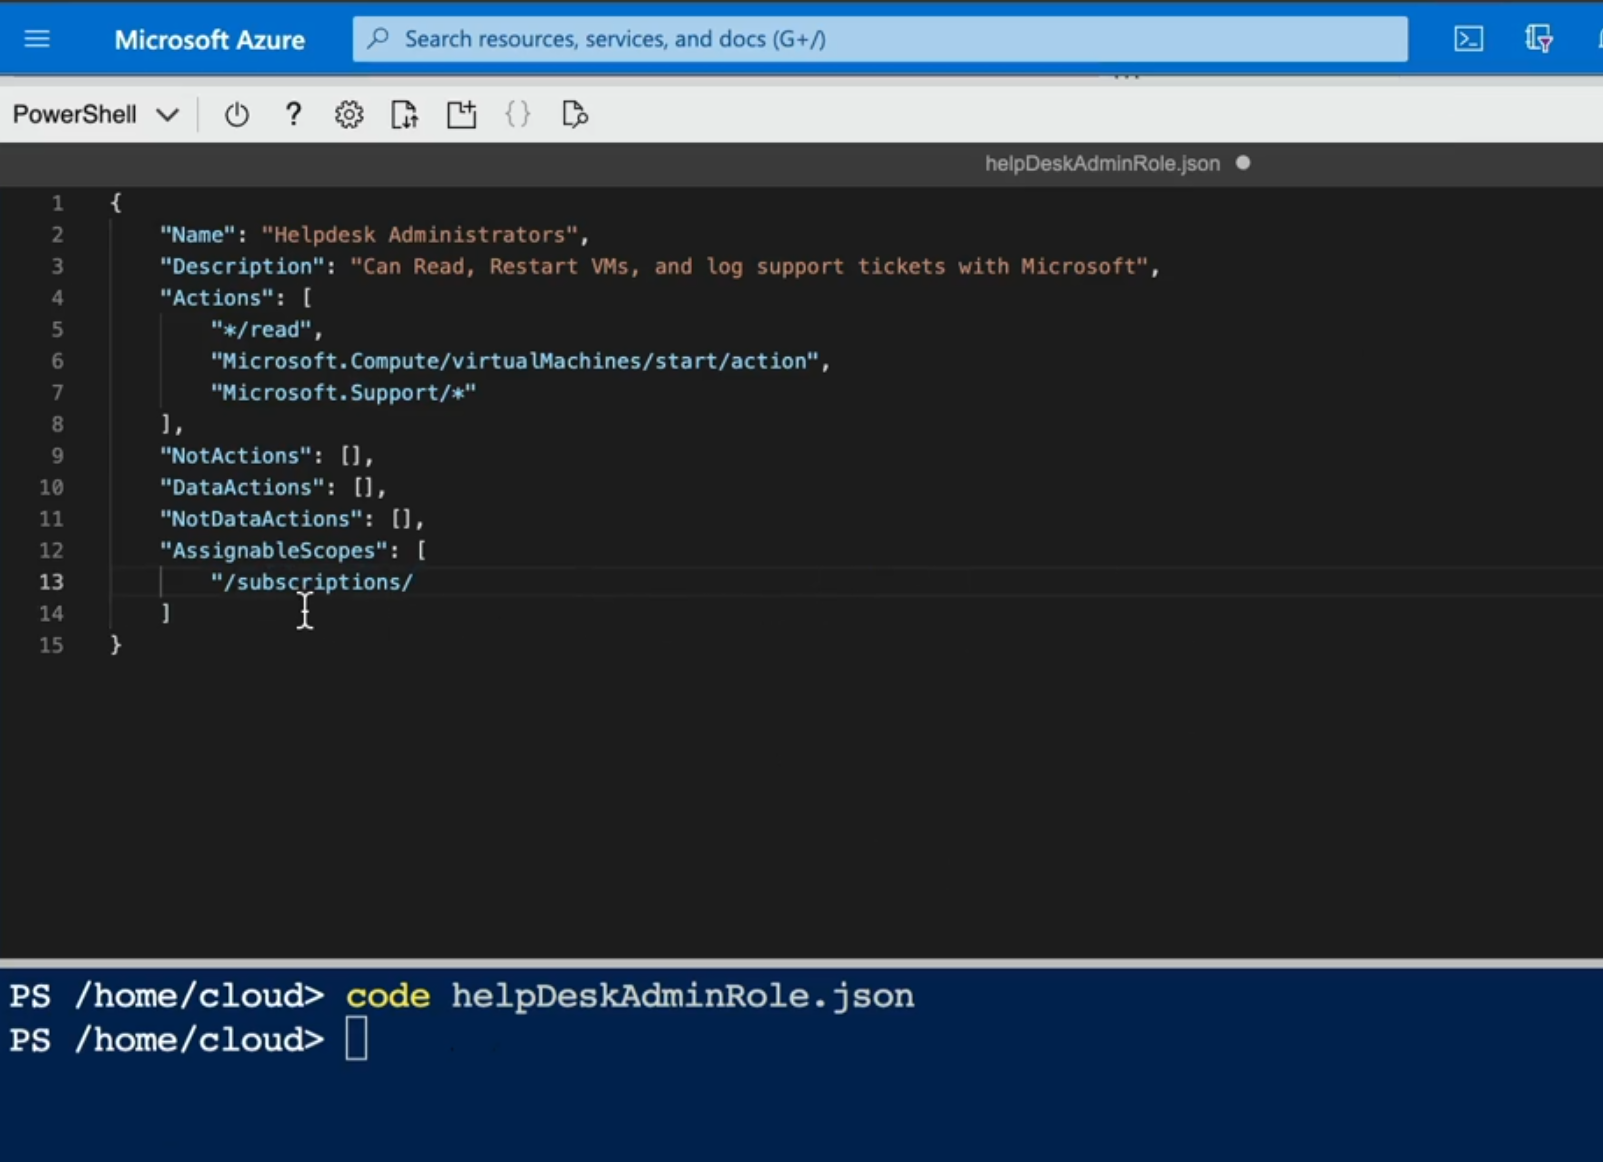
create custom role

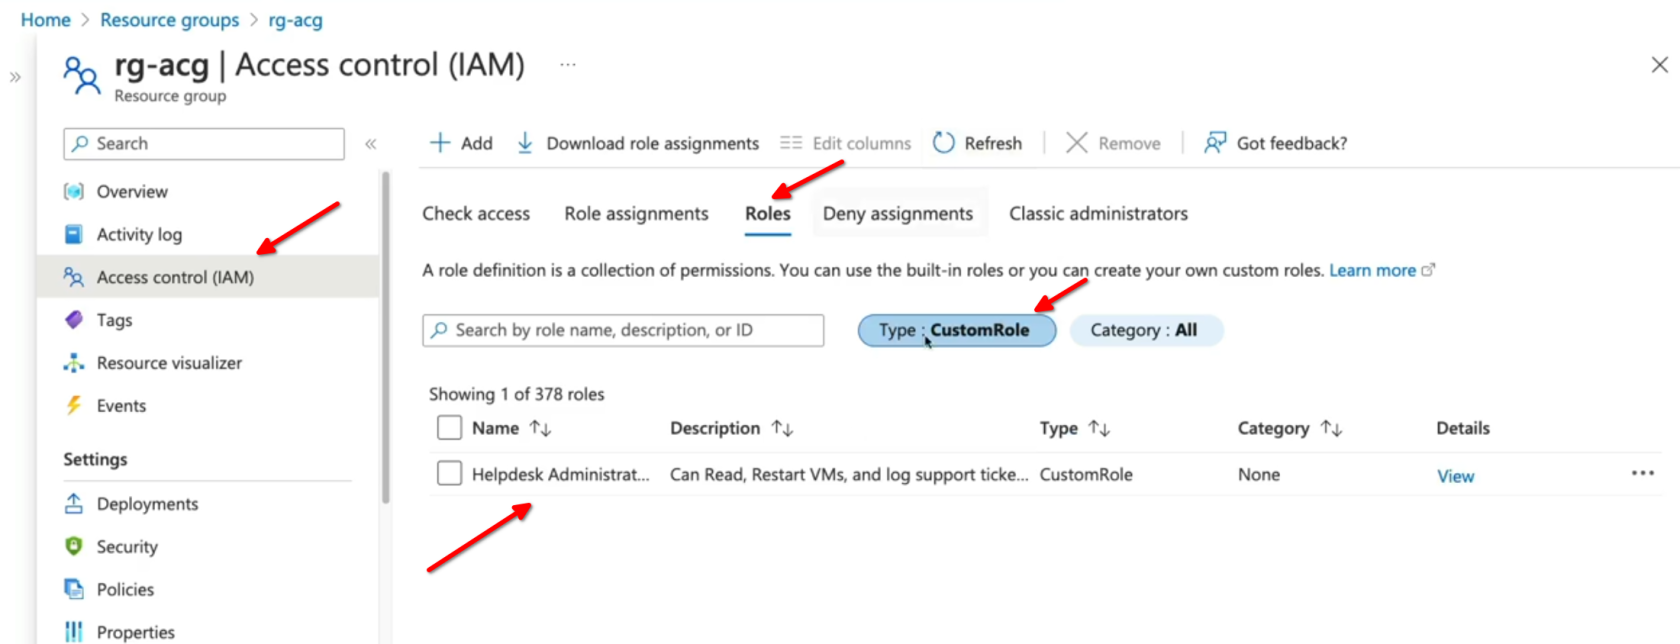
Assign, you can assign to members groups, etc.
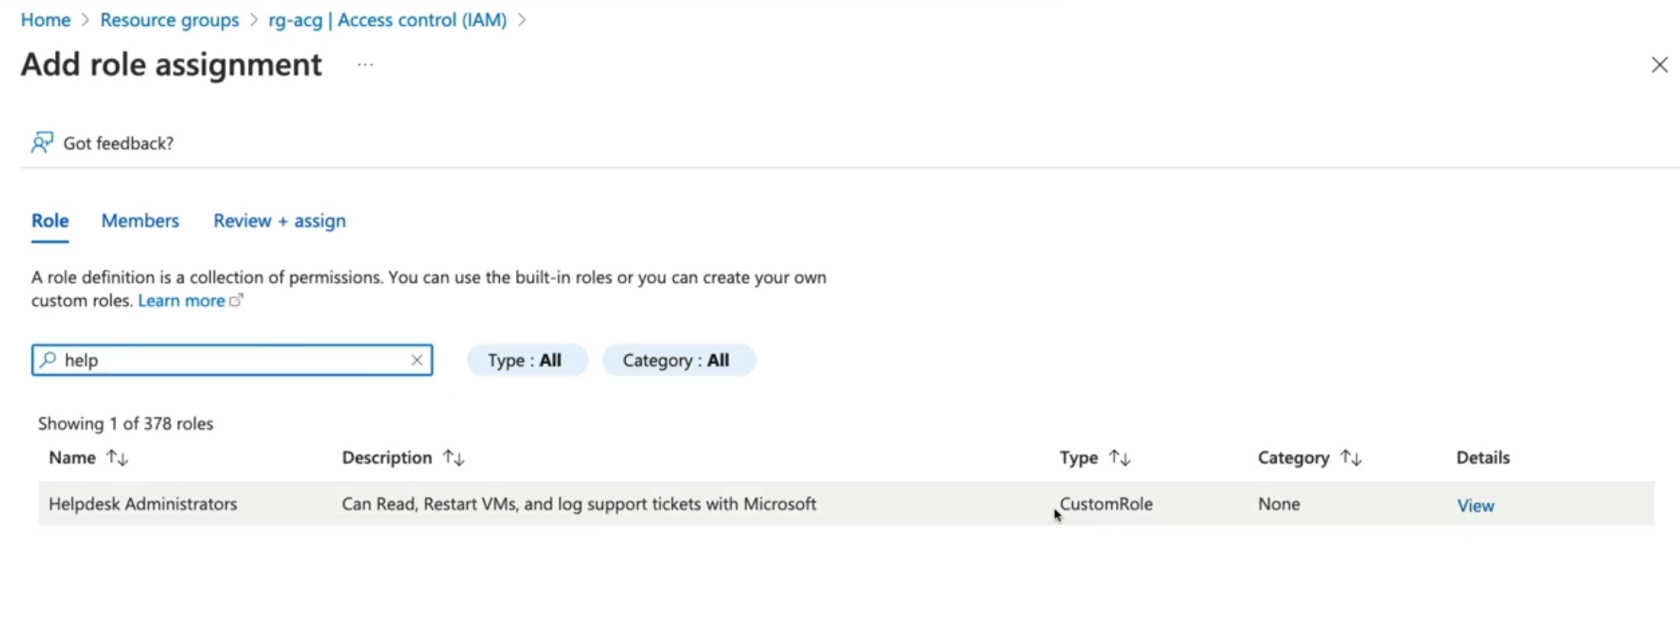
Here we can check our own access or check someone else access
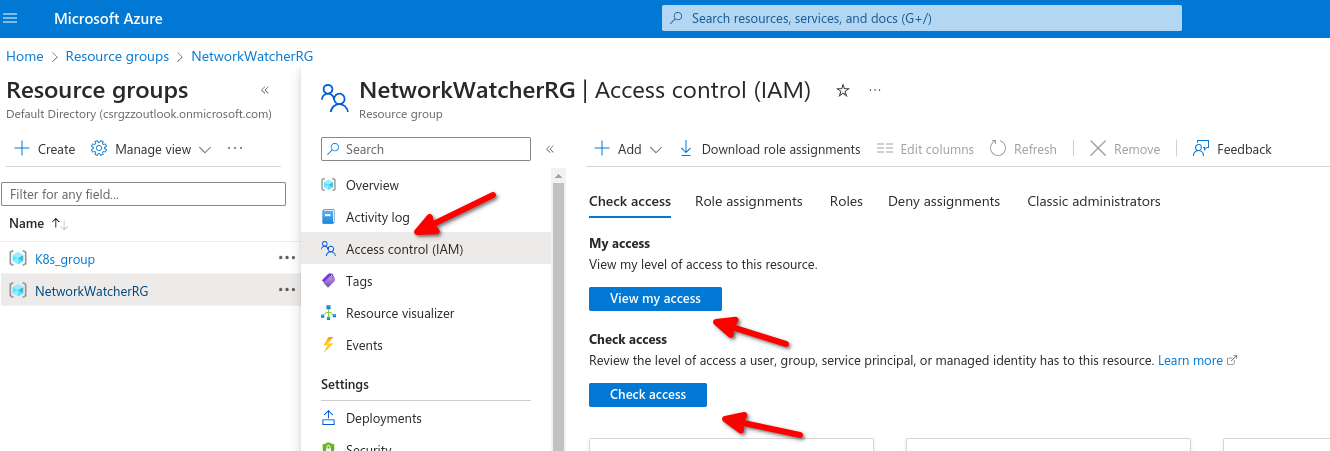
- Provide identities with access to Azure Resources
- Roles are collection of permissions
- Scoping hierarchy for role assignments
- Custom role definition
- No built-in role meets requirements
- User Access Administrator or Owner role for the account
# 5.- AZ-104 Azure - Storage
# AZ-104 Azure - Storage Accounts
- [Storage Account Overview](https://learn.microsoft.com/en-us/azure/storage/common/storage-account-overview)
- [Create Storage Account](https://learn.microsoft.com/en-us/training/modules/create-azure-storage-account/)
- [Data Redundancy Options](https://learn.microsoft.com/en-us/training/modules/provide-disaster-recovery-replicate-storage-data/2-evaluate-data-redundancy-options)
1. Azure Queue: Message Based storage for microservices.
2. Azure Table: Non-relational semi-structured data storage service.
3. Azure Files: Cloud-based file-sharing service.
4. Azure blob: object-oriented storage solutions (store jpgs, mp4s, etc).
Type of storage account
Supported storage services
Redundancy options
Usage
Standard general-purpose v2
Blob Storage (including Data Lake Storage1), Queue Storage, Table Storage, and Azure Files
Standard storage account type for blobs, file shares, queues, and tables. Recommended for most scenarios using Azure Storage. If you want support for network file system (NFS) in Azure Files, use the premium file shares account type.
Premium block blobs3
Blob Storage (including Data Lake Storage1)
LRS
ZRS2
Premium storage account type for block blobs and append blobs. Recommended for scenarios with high transaction rates or that use smaller objects or require consistently low storage latency. [Learn more about example workloads.](https://learn.microsoft.com/en-us/azure/storage/blobs/storage-blob-block-blob-premium)
Premium file shares3
Azure Files
LRS
ZRS2
Premium storage account type for file shares only. Recommended for enterprise or high-performance scale applications. Use this account type if you want a storage account that supports both Server Message Block (SMB) and NFS file shares.
Premium page blobs3
Page blobs only
LRS
ZRS2
Premium storage account type for page blobs only. [Learn more about page blobs and sample use cases.](https://learn.microsoft.com/en-us/azure/storage/blobs/storage-blob-pageblob-overview)
##### **Storage accounts**
- Account type: determines feature and costs.
- Performance tier: determines performance levels.
- Replication: determines infrastructure redundancy.
- Access tier: determines access level and data costs.
##### **Azure Storage Redundancy**
##### Locally redundant storage

Locally redundant storage (LRS) copies your data three times across separate racks of hardware in a datacenter inside one region. Even if there's a hardware failure or if there's maintenance work in the datacenter, this replication type ensures data is available for use.
LRS doesn't protect you from a datacenter-wide outage. If the datacenter goes down, you could lose your data.
Geographically redundant storage
[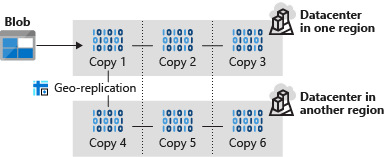](https://wiki.tinod.net/uploads/images/gallery/2024-02/1WFOod9eDqNHy6eh-image.png)
Read-access geo-redundant storage
With GRS, your secondary region isn't available for read access until the primary region fails. If you want to read from the secondary region, even if the primary region hasn't failed, use Read-access geo-redundant storage (RA-GRS) for your replication type.
##### Zone-redundant storage

Zone-redundant storage (ZRS) copies your data in three storage clusters in a single region. Each cluster is in a different physical location and is considered as a single availability zone. Each cluster uses its own separate utilities for things like networking and power. If one datacenter is experiencing an outage, your data remains accessible from another availability zone in the same Azure region.
Because all availability zones are in a single region, ZRS can't protect your data from a regional-level outage.
##### Geo-zone-redundant storage
Geo-zone-redundant storage (GZRS) combines the high availability benefits of ZRS with GRS. With this replication type, your data is copied across three availability zones in one region. Data is also replicated three times to another secondary region that's paired with it. This way, your zone-redundant data is also secure from regional-level outages.
##### Read-access geo-zone-redundant storage
Read-access geo-zone-redundant storage (RA-GZRS) uses the same replication method as GZRS, but lets you read from the secondary region. If you want to read the data that's replicated to the secondary region, even if your primary isn't experiencing downtime, use RA-GZRS for your replication type.
GZRS and RA-GZRS are currently available in the following regions:
- South Africa North
- Australia East
- East Asia
- Japan East
- Korea Central
- Southeast Asia
- Central India
- France Central
- Germany West Central
- North Europe
- Norway East
- Sweden Central
- Switzerland North
- UK South
- West Europe
- Canada Central
- Central US
- East US
- East US 2
- South Central US
- West US 2
- West US 3
- US Gov Virginia
- Brazil South
##### Paired regions
A paired region is where an Azure region is paired with another in the same geographical location to protect against regional outage. Paired regions are used with GRS and GZRS replication types.

Here's a list showing some of the regions that are paired together. You can get the full list at [Azure paired regions](https://learn.microsoft.com/en-us/azure/reliability/cross-region-replication-azure#azure-paired-regions).
Region
Region
Asia
East Asia
Southeast Asia
Australia
Australia East
Australia Southeast
Canada
Canada Central
Canada East
China
China North
China East
Europe
North Europe (Ireland)
West Europe (Netherlands)
Japan
Japan East
Japan West
North America
East US
West US
South Africa
South Africa North
South Africa West
UK
UK West
UK South
Use cases for each replication type
The following table summarizes how many copies you get with each replication type and when you should use it.
Replication type
Copies
Use case
LRS
3
Data remains highly available, but for compliance reasons, isn't allowed to leave the local datacenter.
GRS
6
App has access to the data, even if an entire region has an outage.
RA-GRS
6
App reads from multiple geographical locations, so you can serve users from a location that's closer to them.
ZRS
3
Need redundancy in multiple physical locations, but because of compliance, data isn't allowed to leave a region.
GZRS
6
App can access data, even if the primary region has failed, and your secondary region has a datacenter that's experiencing an outage, but you don't want to read from the secondary region unless the primary region is down.
RA-GZRS
6
Regularly read data from your secondary region, perhaps to serve users from a location closer to them, even if a datacenter is up in your primary region.
##### Creating a storage account
Navigate to Storage accounts and then create
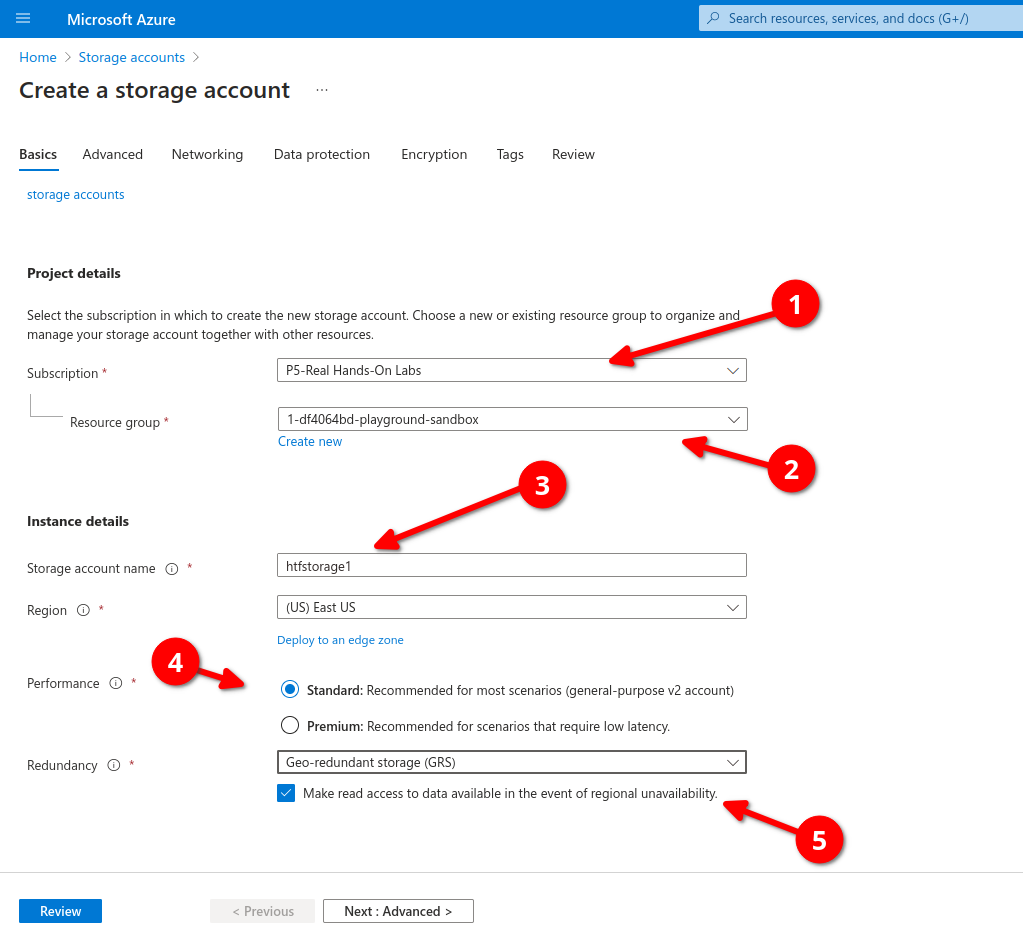
Select type of redundancy
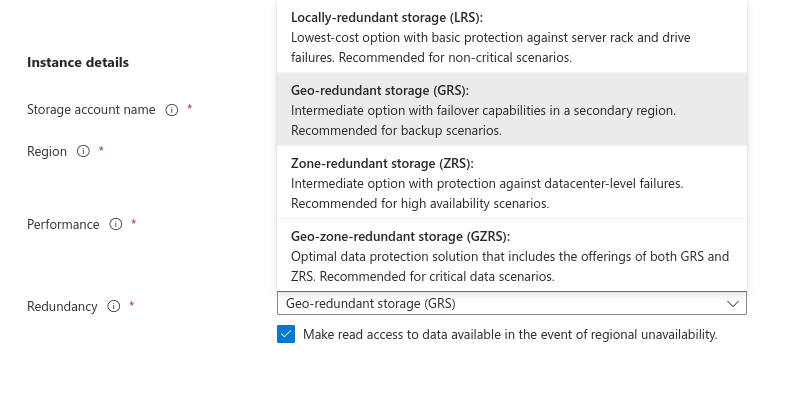
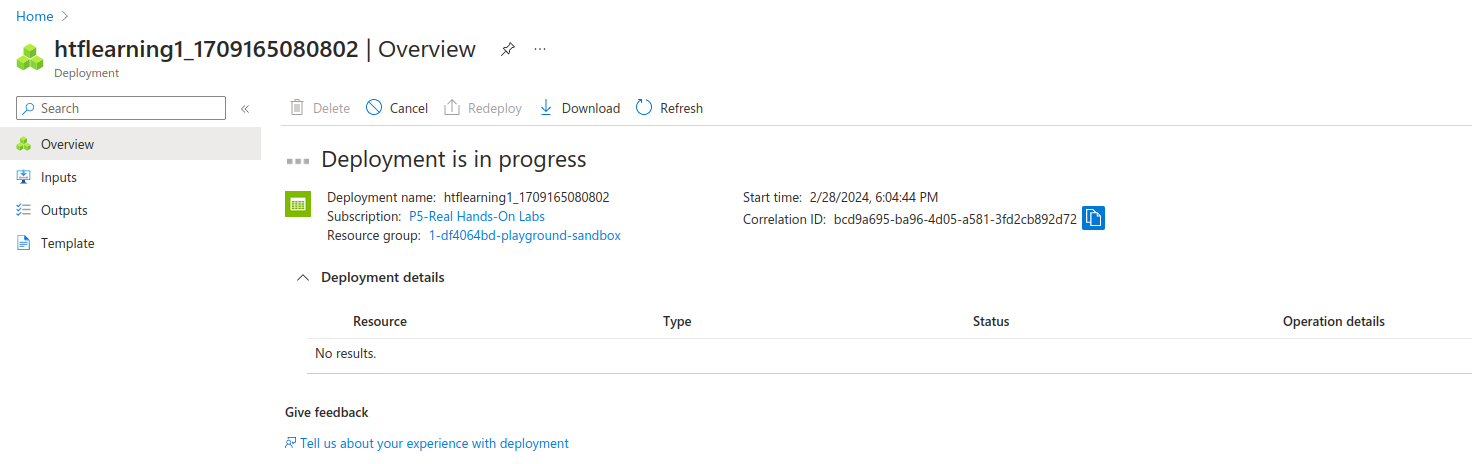
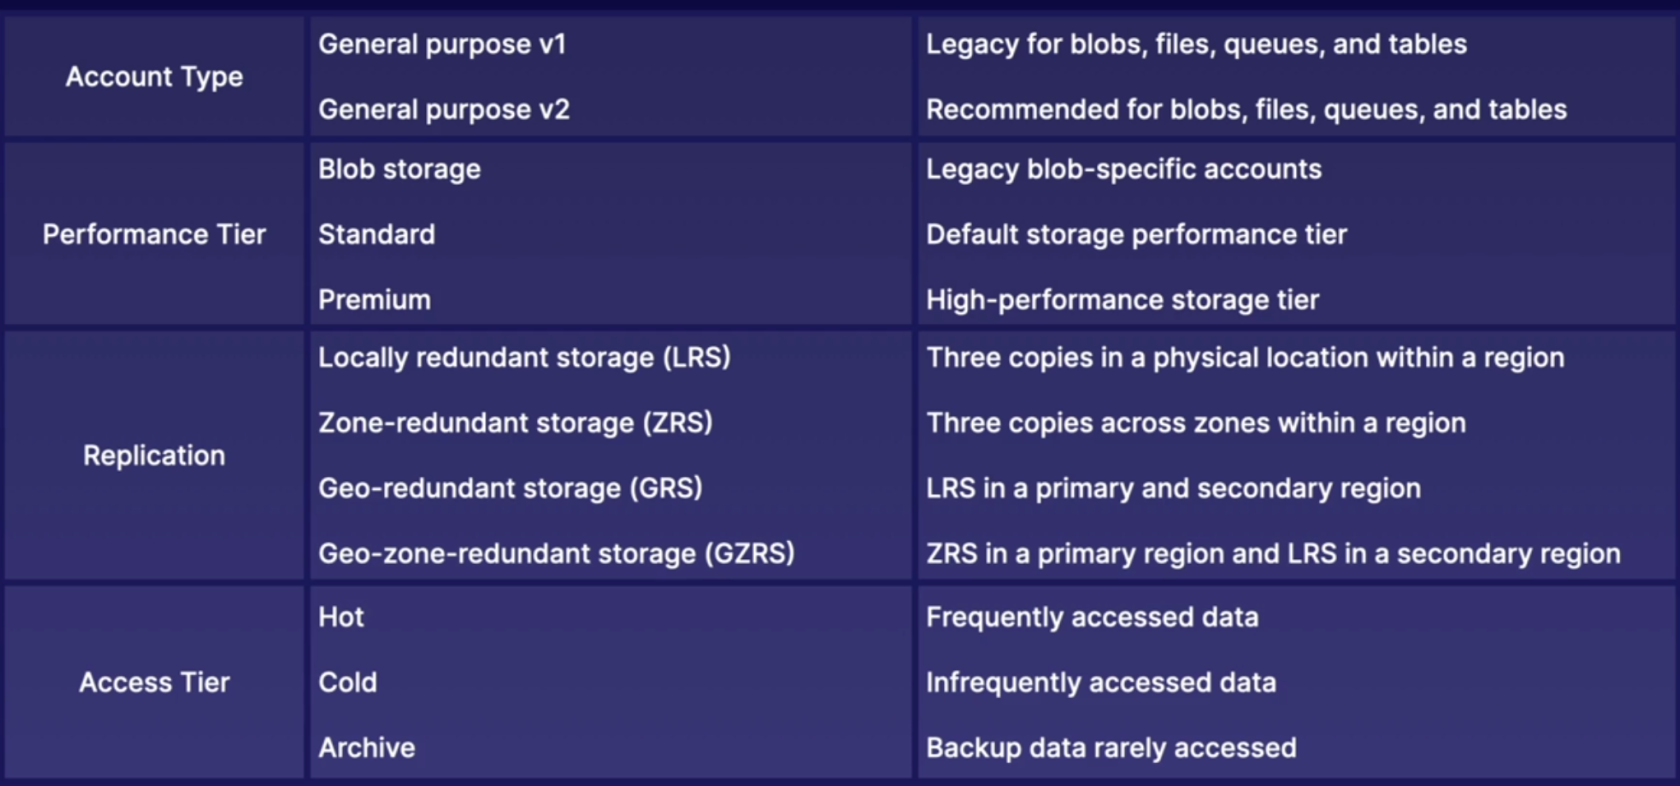
# AZ-104 Azure - Conceptualizing Azure Blog Storage
- [What is blob storage](https://learn.microsoft.com/en-us/azure/storage/blobs/storage-blobs-overview)
- [Introduction to Azure Blog Storage](https://learn.microsoft.com/en-us/azure/storage/blobs/storage-blobs-introduction)
1. Describing Azure Blob Storage
2. Components of Blob Architecture
3. Type of Blobs
4. Container Access Levels
Azure Blob Storage is Microsoft's object storage solution for the cloud. Blob Storage is optimized for storing massive amounts of unstructured data. Unstructured data is data that doesn't adhere to a particular data model or definition, such as text or binary data. Its object based and easily accessible from HTTP/REST
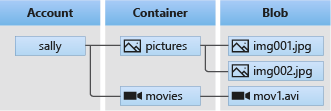
Blob Storage is designed for:
- Serving images or documents directly to a browser.
- Storing files for distributed access.
- Streaming video and audio.
- Writing to log files.
- Storing data for backup and restore, disaster recovery, and archiving.
- Storing data for analysis by an on-premises or Azure-hosted service.
##### Blob Architecture
- Blob Service: A sub service for storage accounts.
- Blob Container: The container where we store our blobs.
- Blobs: The data we store in our containers.
##### Types of Blobs
- Block blobs: Storing images or videos best suited for streaming.
- Append blobs: Log files
- Page Blobs: Virtual machine disks
##### Container Access Level
- Access control: By default, public access to blobs is granted at the storage account level
##### Container Access Levels:
- Private: No anonymous access.
- Blob: Anonymous access to blob
- Container: Anonymous access to container and blobs it contains.
Now let's access our Storage account ,below we can see the system storage account, here we will crate a container
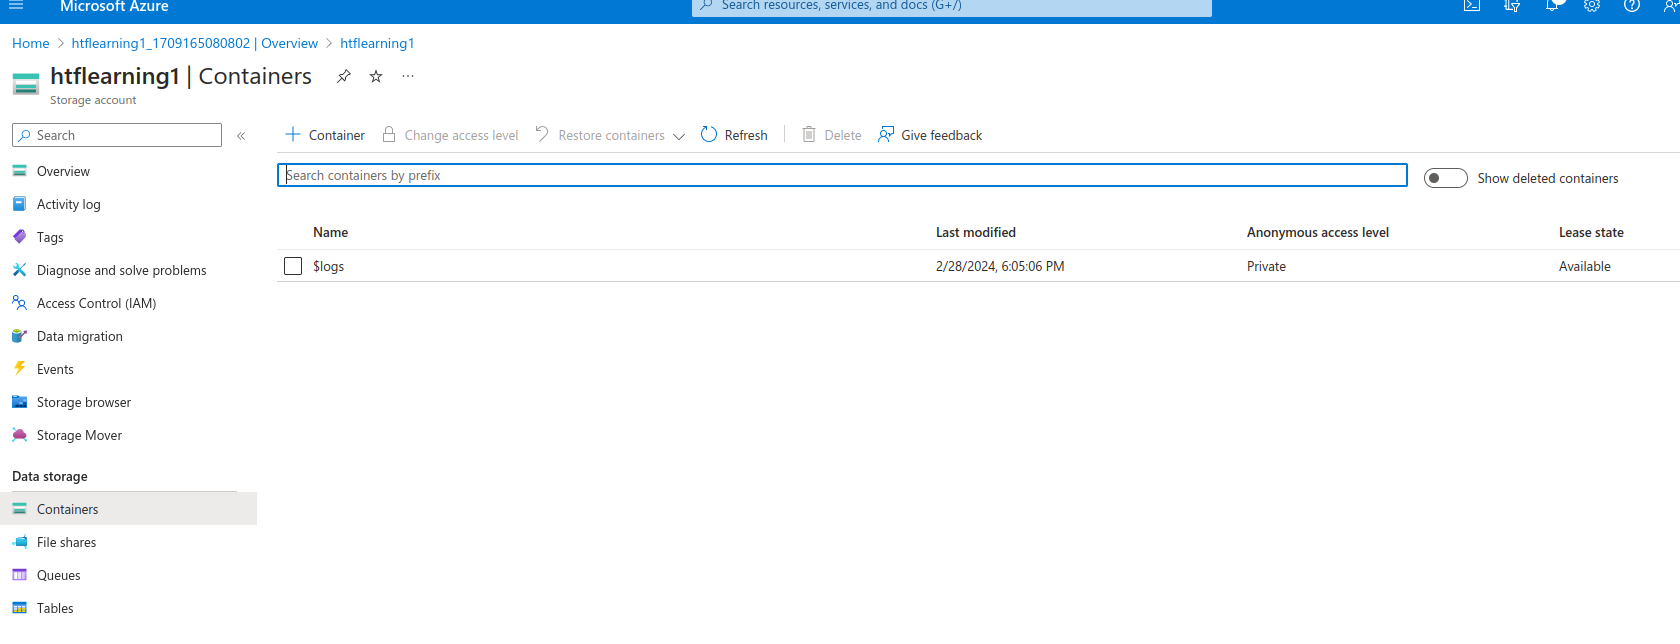
First check if blob anonymous access its enabled if not click on the link to enable
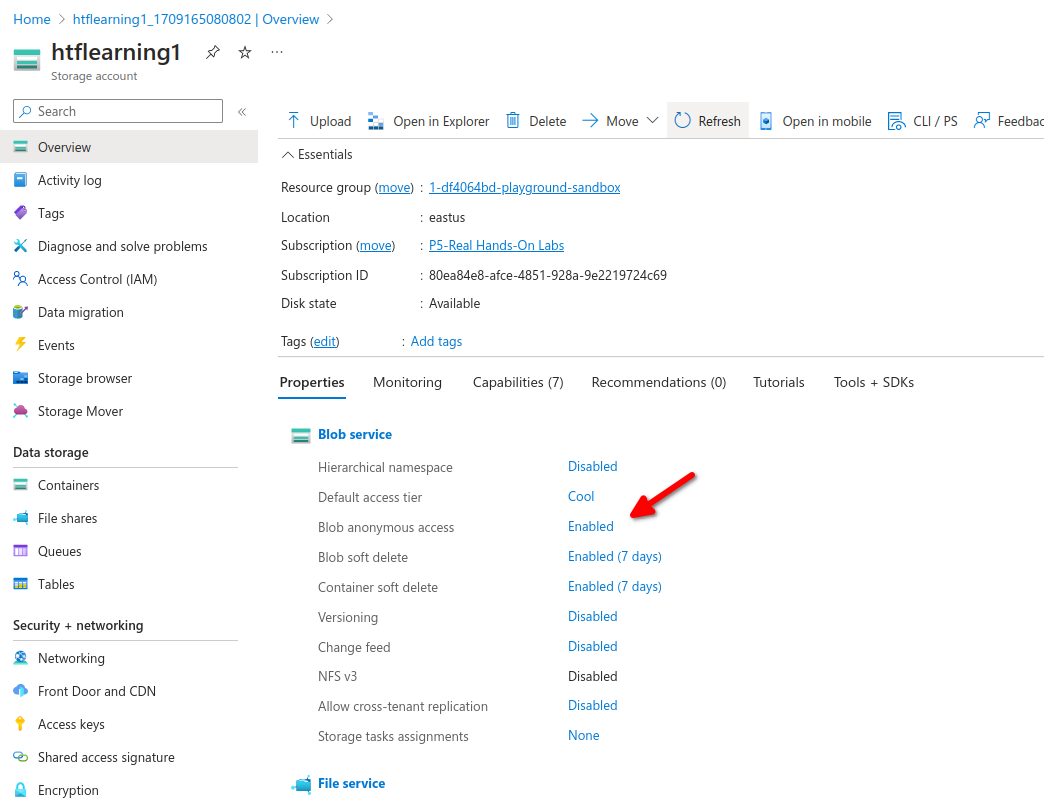
now create a new container, anonymous access level will only be available if blob anonymous access its enabled.

3 different levels of containers with different access.
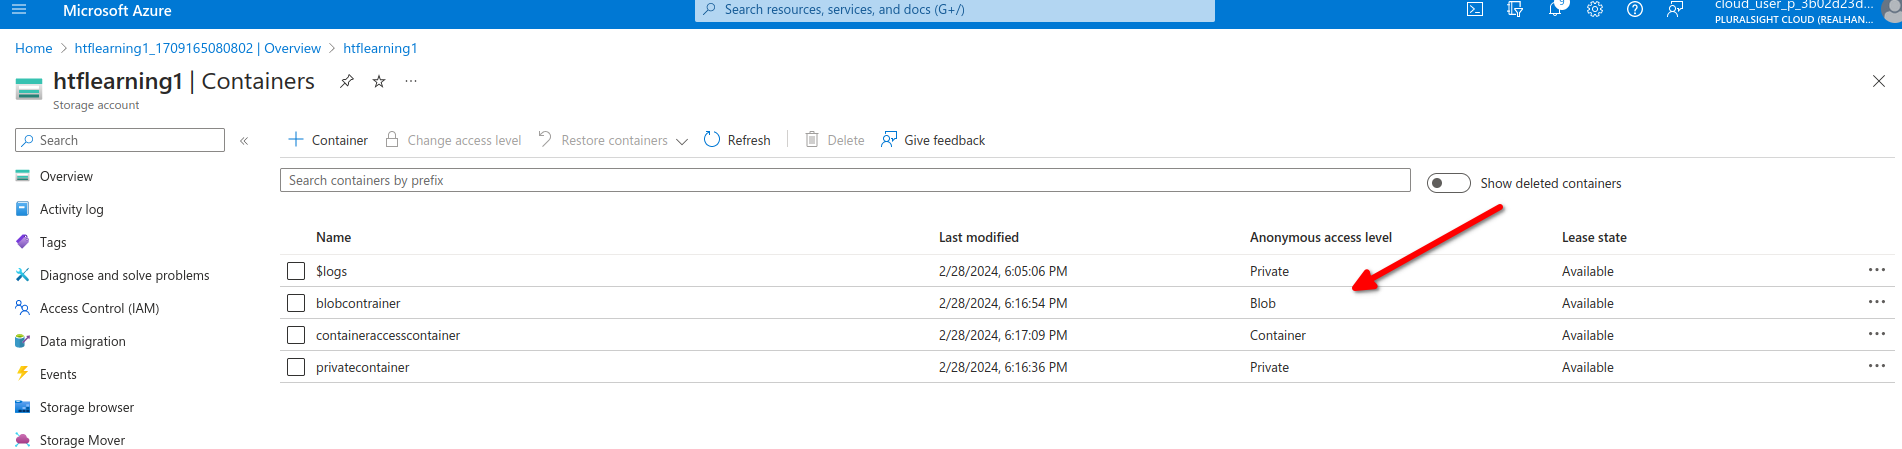
We can see each container has its own url to access the container
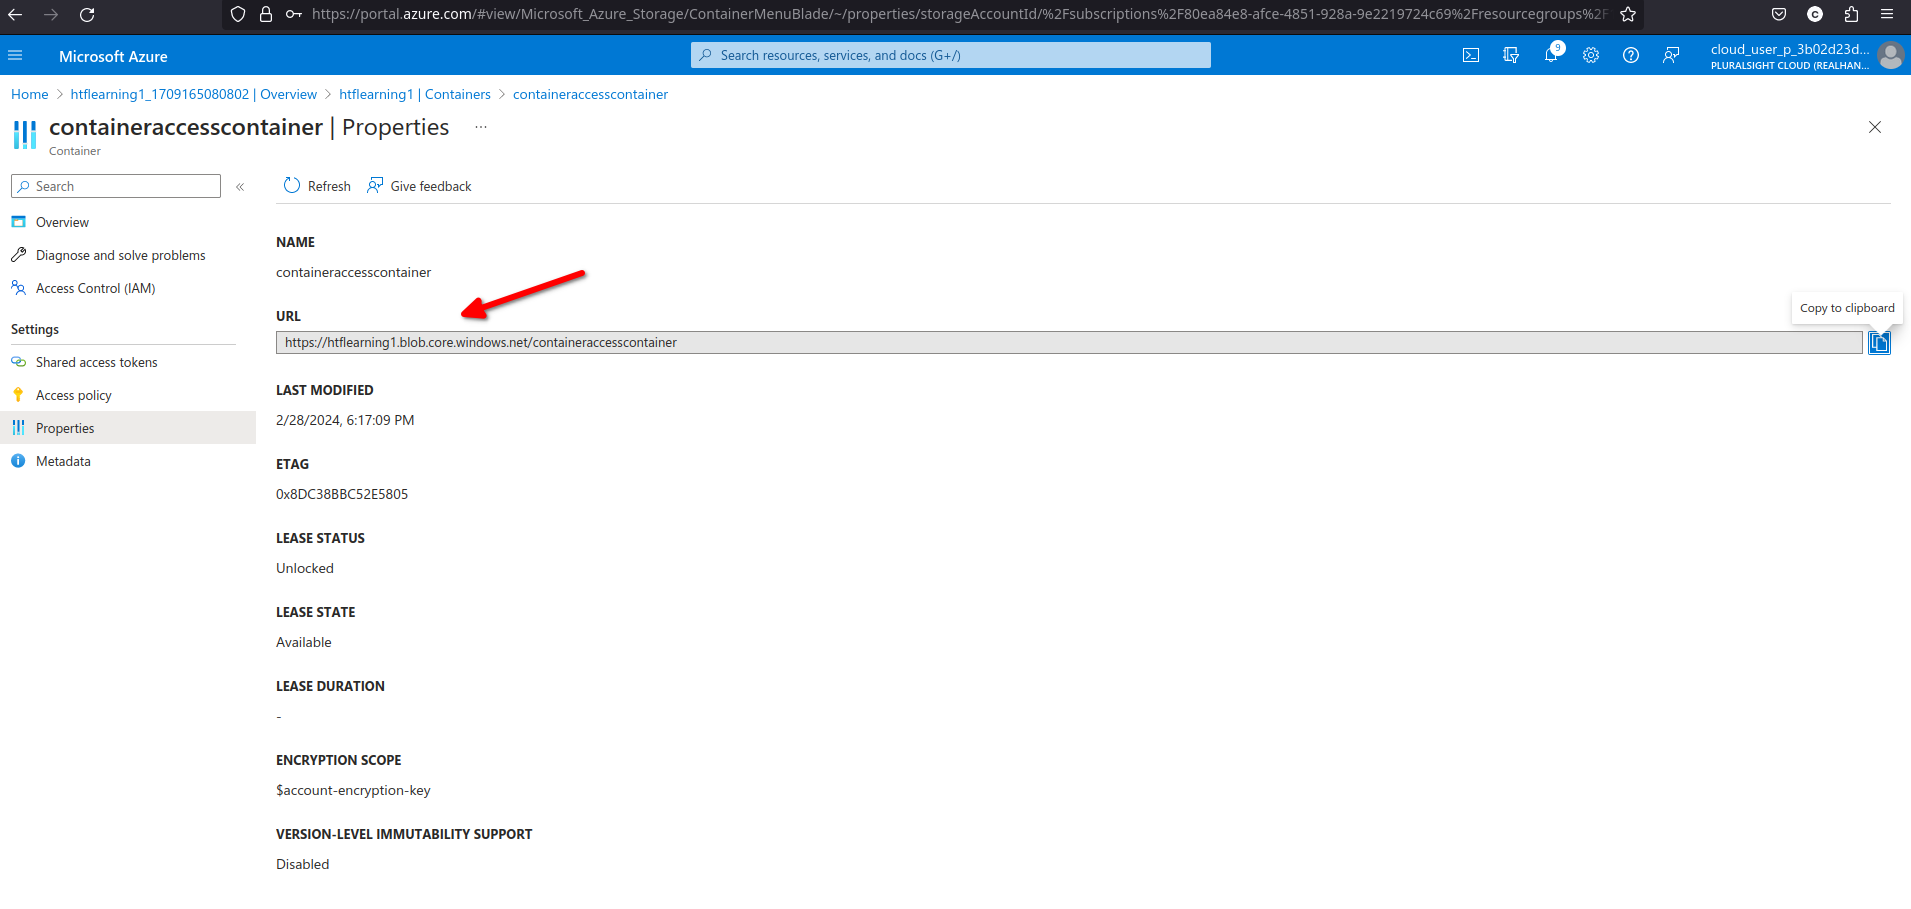
now let's upload a random file to our private container, we can see it has its own url to access the file directly
[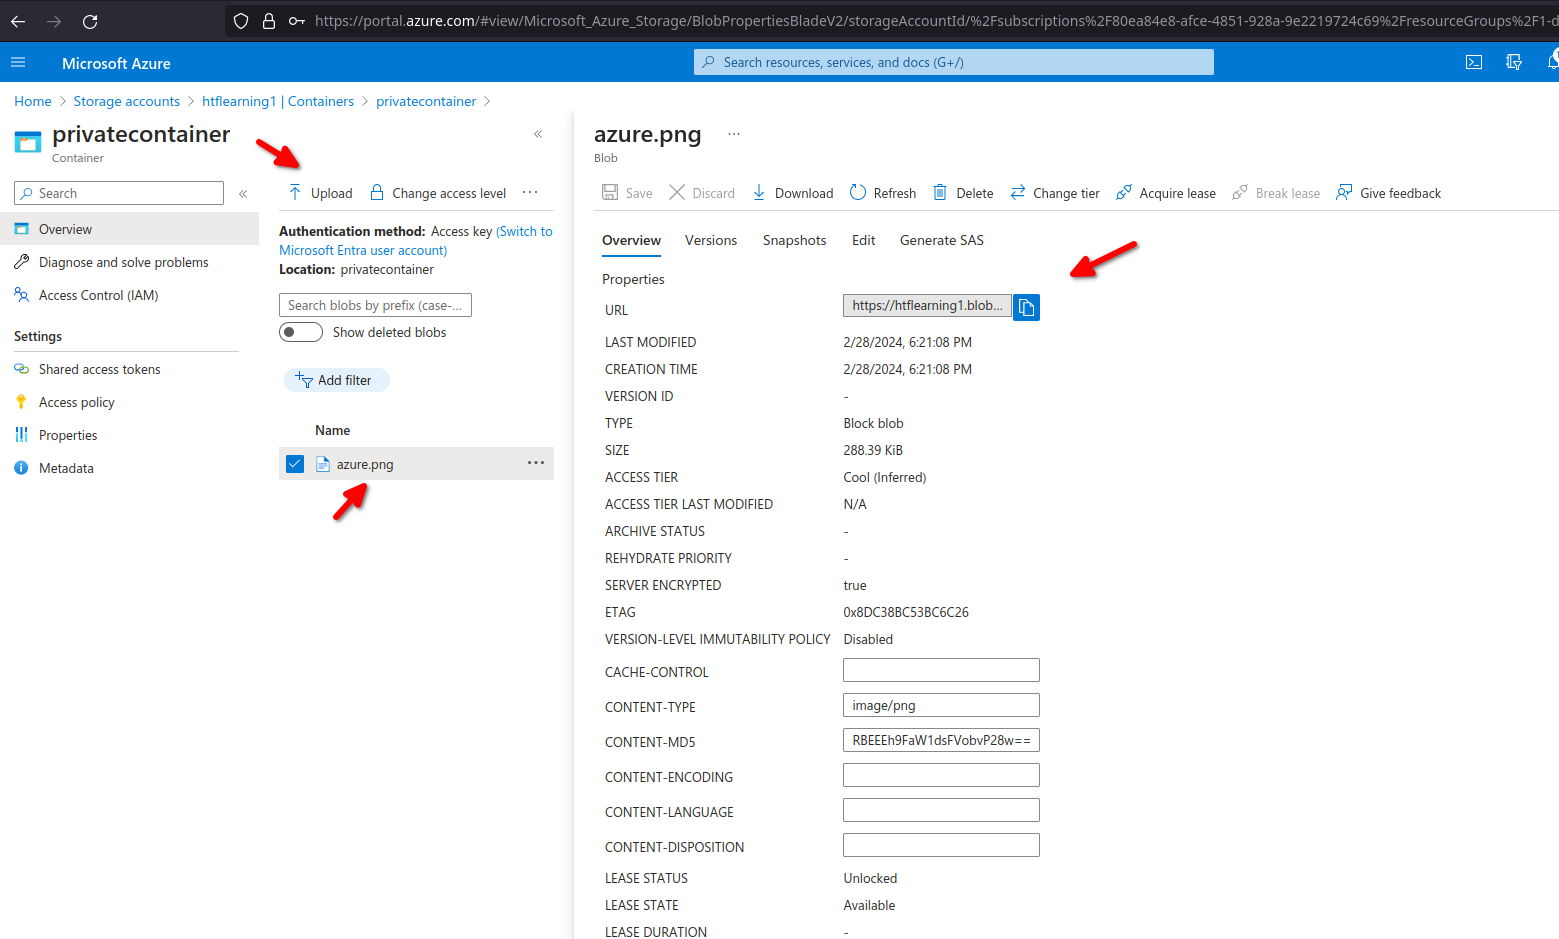](https://wiki.tinod.net/uploads/images/gallery/2024-02/YI7UOXriGNOLlhNN-image.png)
# AZ-104 Azure - Configuring blob object replication
- [Object replication configuration](https://learn.microsoft.com/en-us/azure/storage/blobs/object-replication-configure?tabs=portal)
- [Object replication overview](https://learn.microsoft.com/en-us/azure/storage/blobs/object-replication-overview)
Object replication asynchronously copies blocks of blobs between storage accounts
- - Requires source and destination storage accounts
- Requires versioning and change feed
- Support cross-tenant replication

- Minimize latency - reduce latency for read requests.
- Increased efficiency - Processing block blob in different regions.
- Data distribution - Processing and analyzing data in one location that replicate to other regions.
- Cost Optimization -moving replicate data to the archive tier can reduce cost.
- Versioning: Versioning must be enabled on both the source and desalination accounts to perform replication
- Change feed: Change feed must be enabled on the source account. Azure storage monitors the $blobchangefeed to advise replication.
- Cross subscription and azure AD: Object replication is supported across subscriptions and azure AD tenants
- Replication Policy: A Storage account can be a source for up to two destination accounts. Each policy supports only a single pairing using a policy ID.
Create a destination storage account and make sure versioning for blobs its enabled
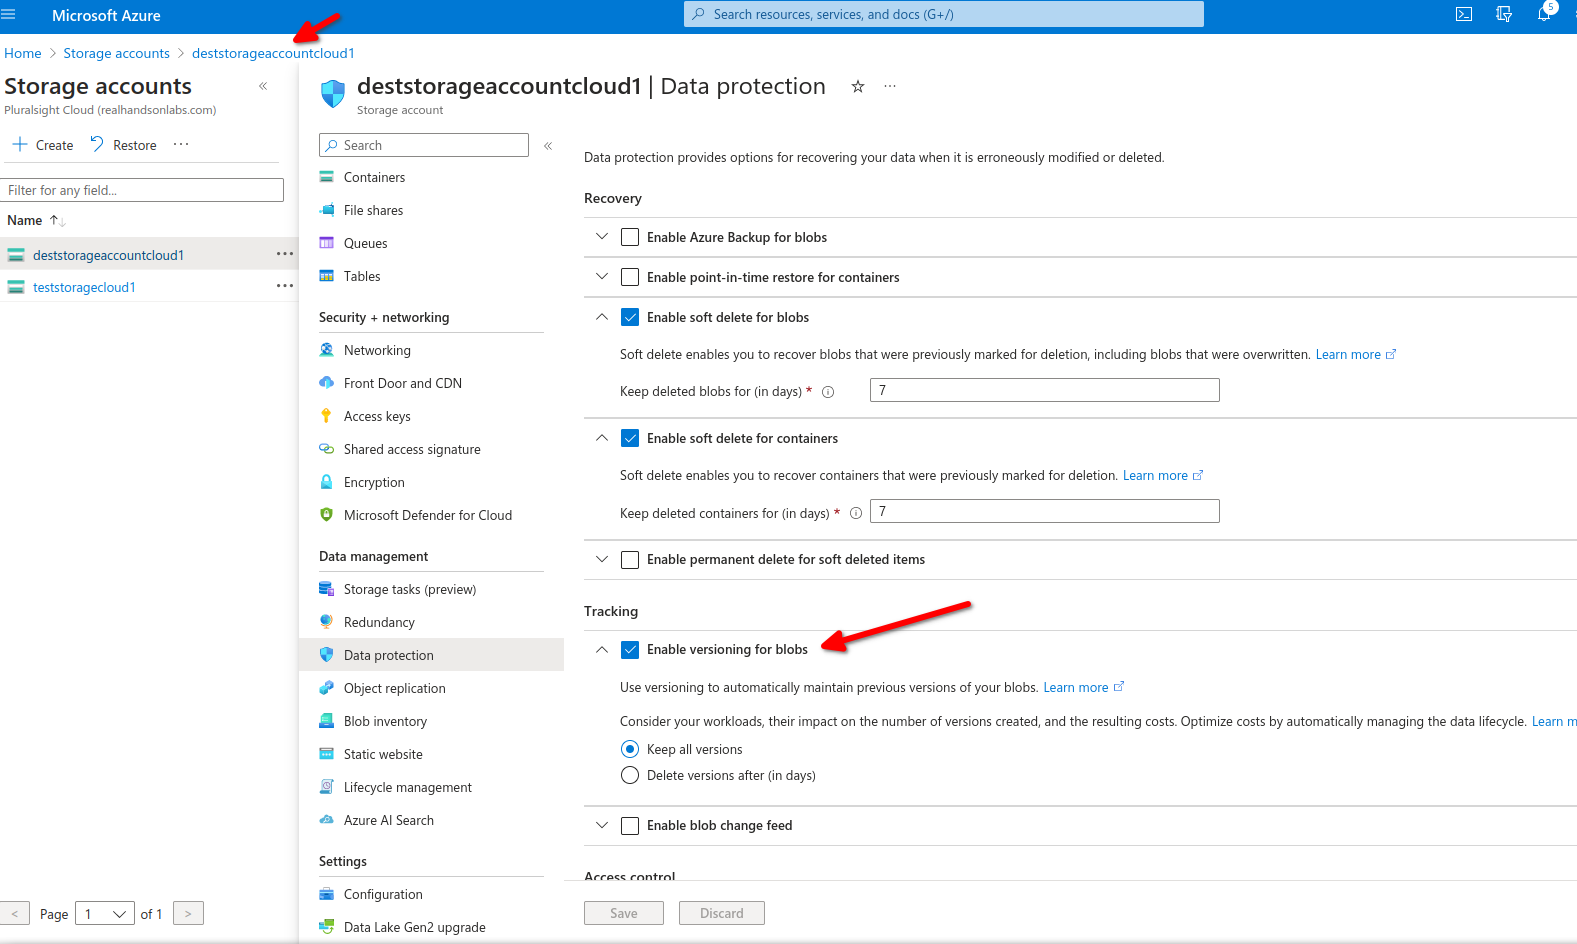
For source storage account we will enable versioning and change feed.
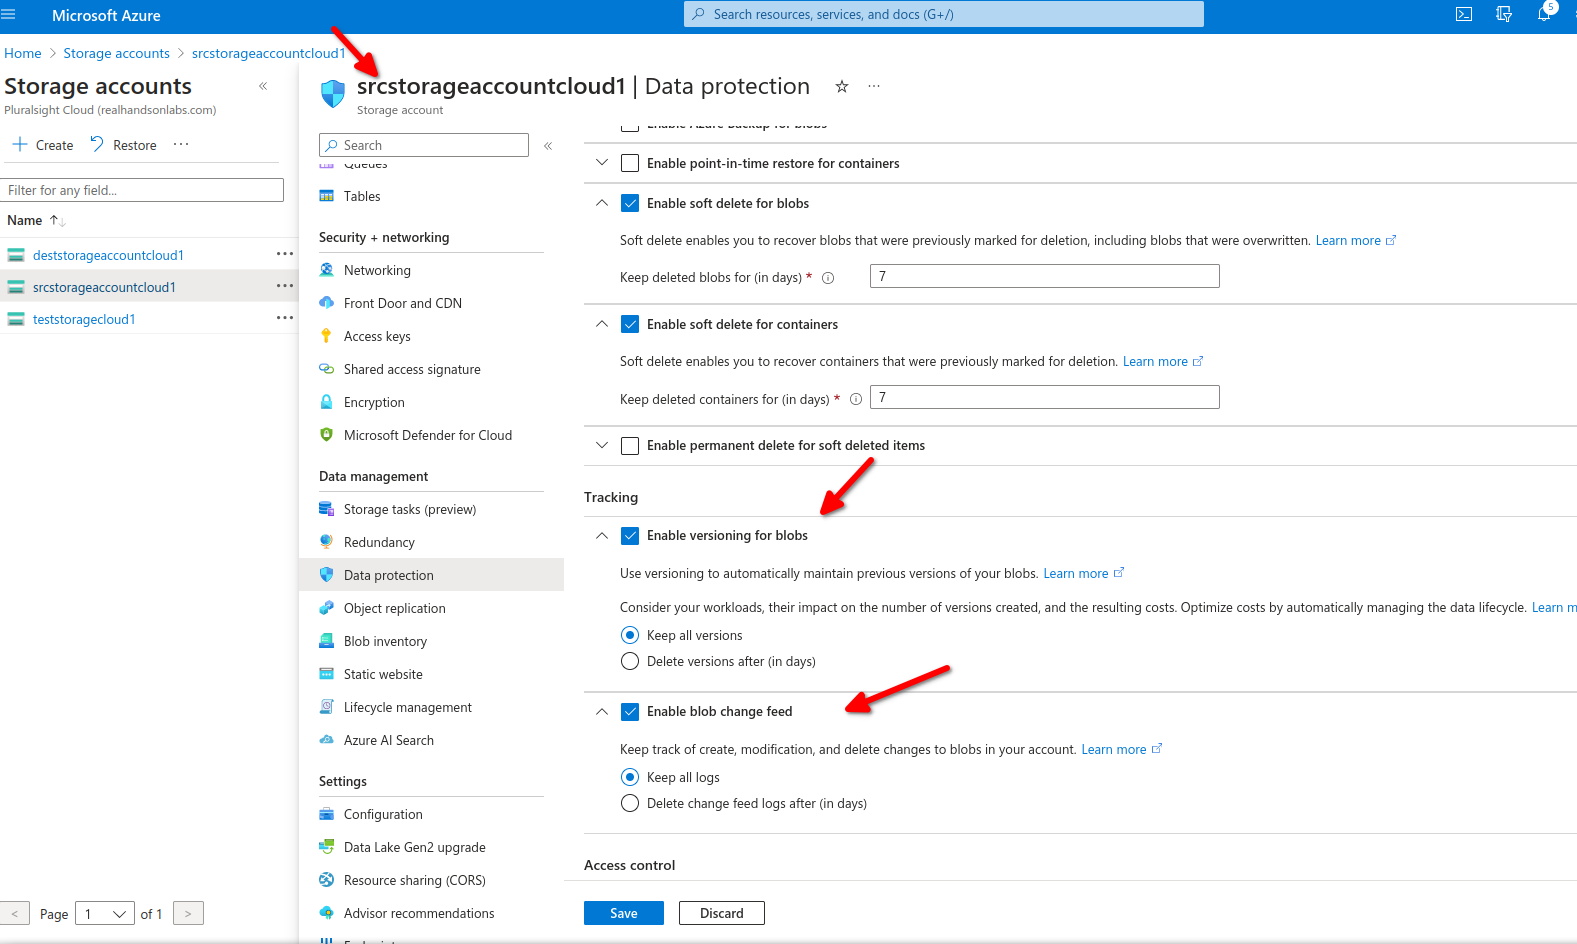
now we need to add our containers one on source and one on destination storage account.


Next step is to create an object replication rule on our source data storage
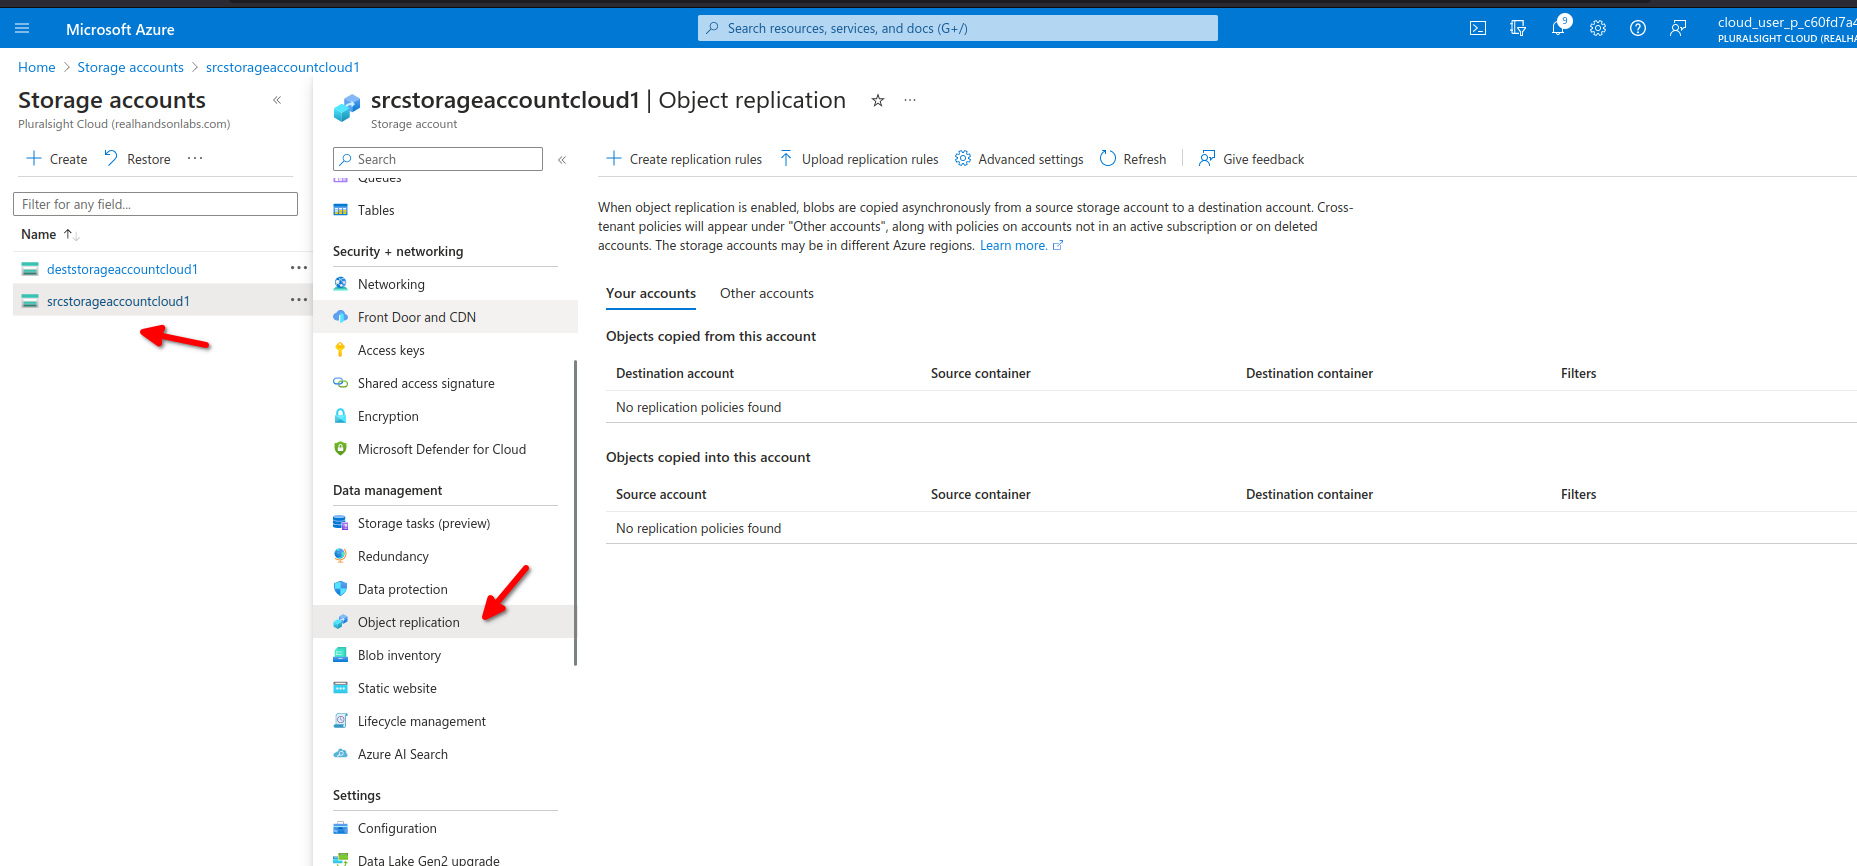
for our replication rule we need to select the destination storage account in this case dststorageaccountcloud1 specify the source container and destination container we can also apply filters to replicate only data on specific folder structure ,we can also specify which data to copy over here we select only new objects.
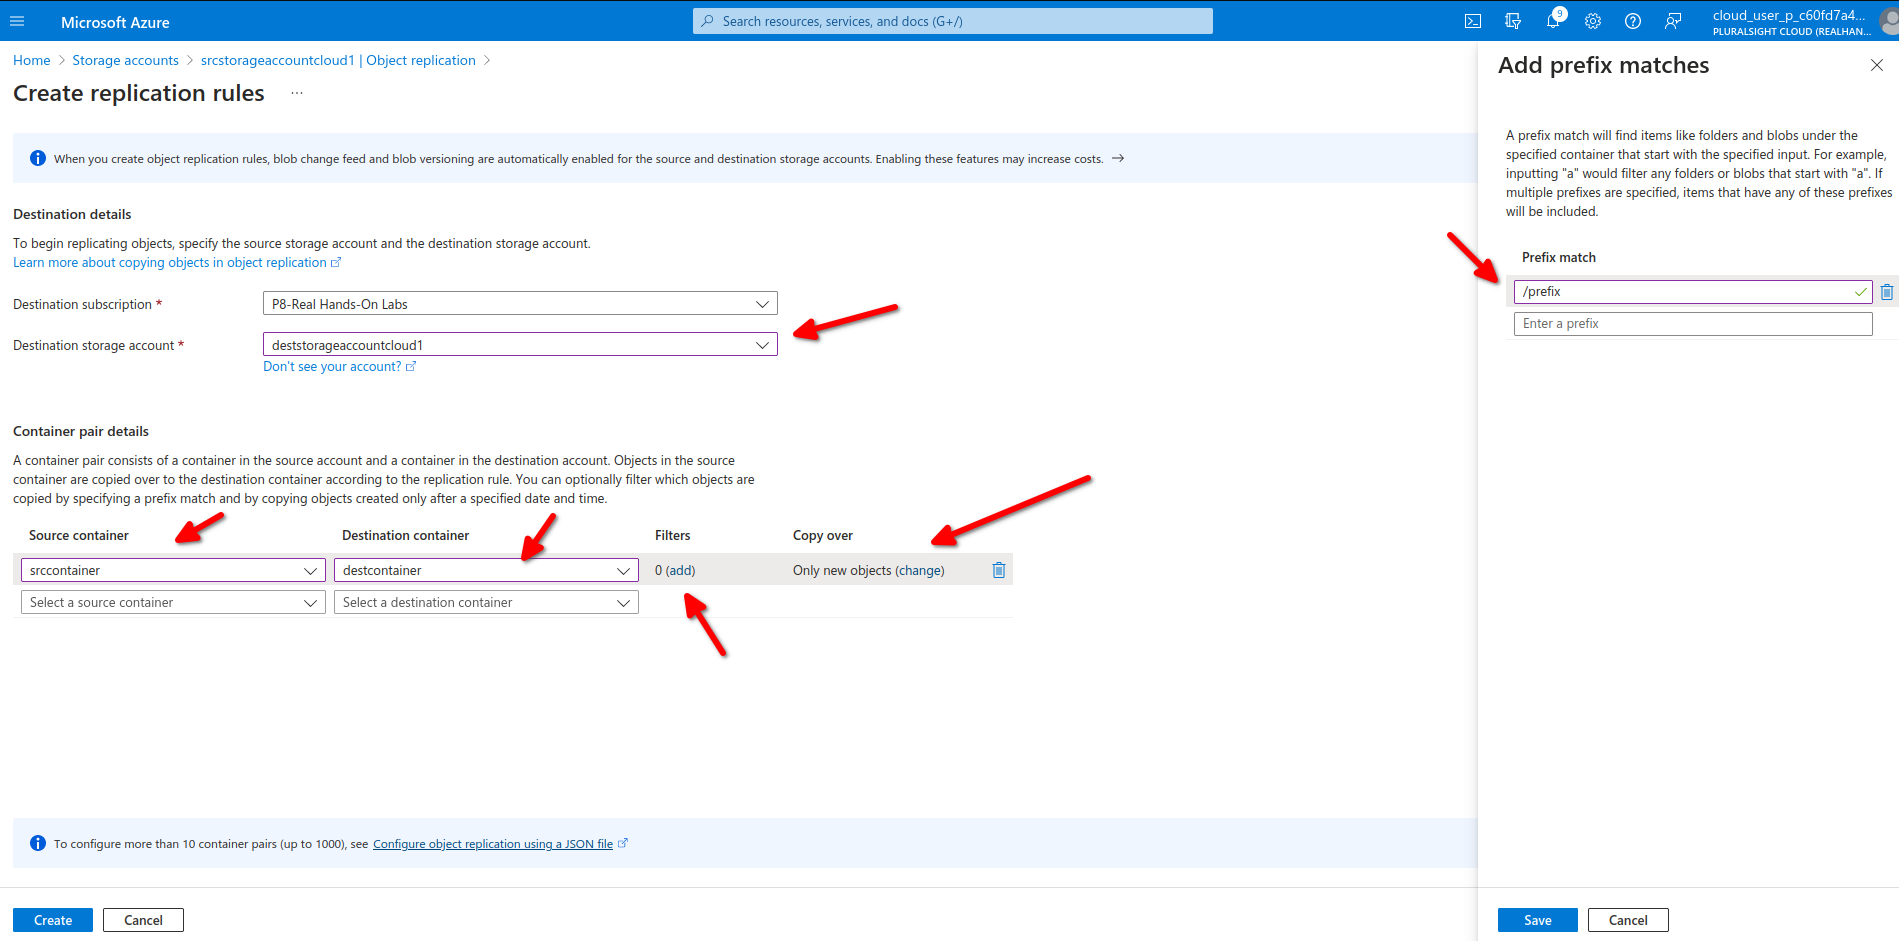
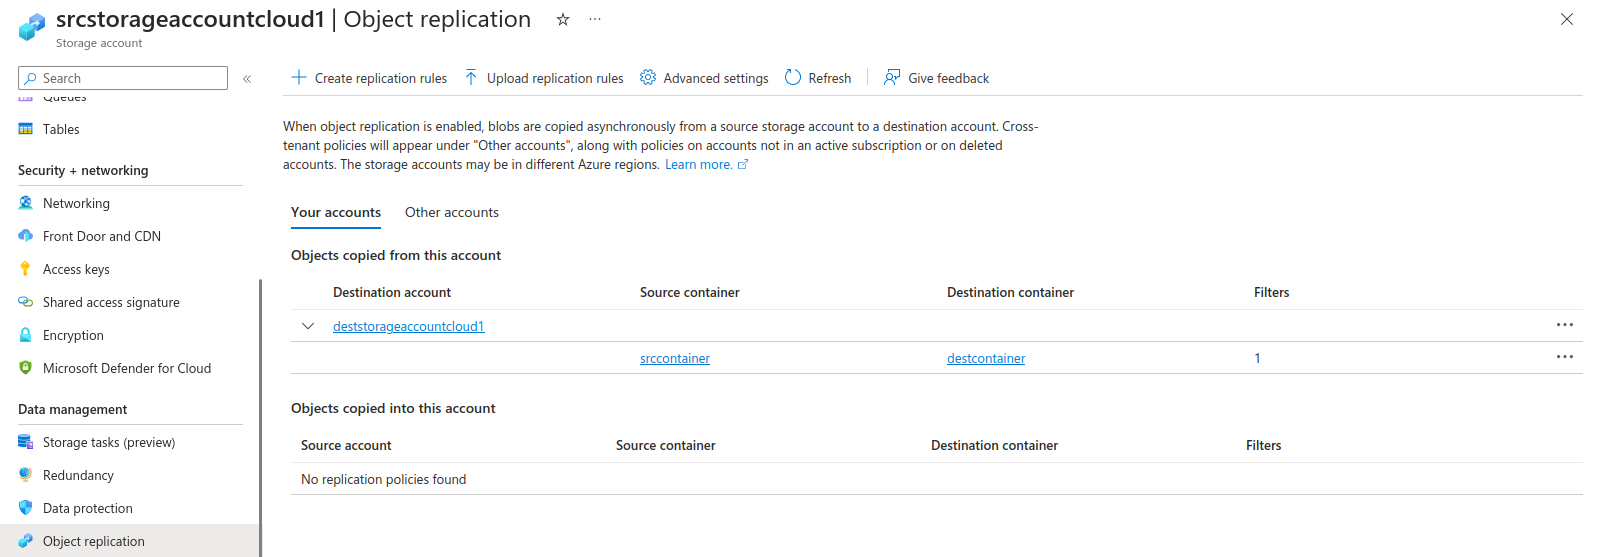
Now we are uploading a new blob on our src storage account and src container

now we can see file blob1.txt on our source account but not on our destination as there is a rule

we are adding our same blob but this time we will specify the folder /prefix to match our object rule.
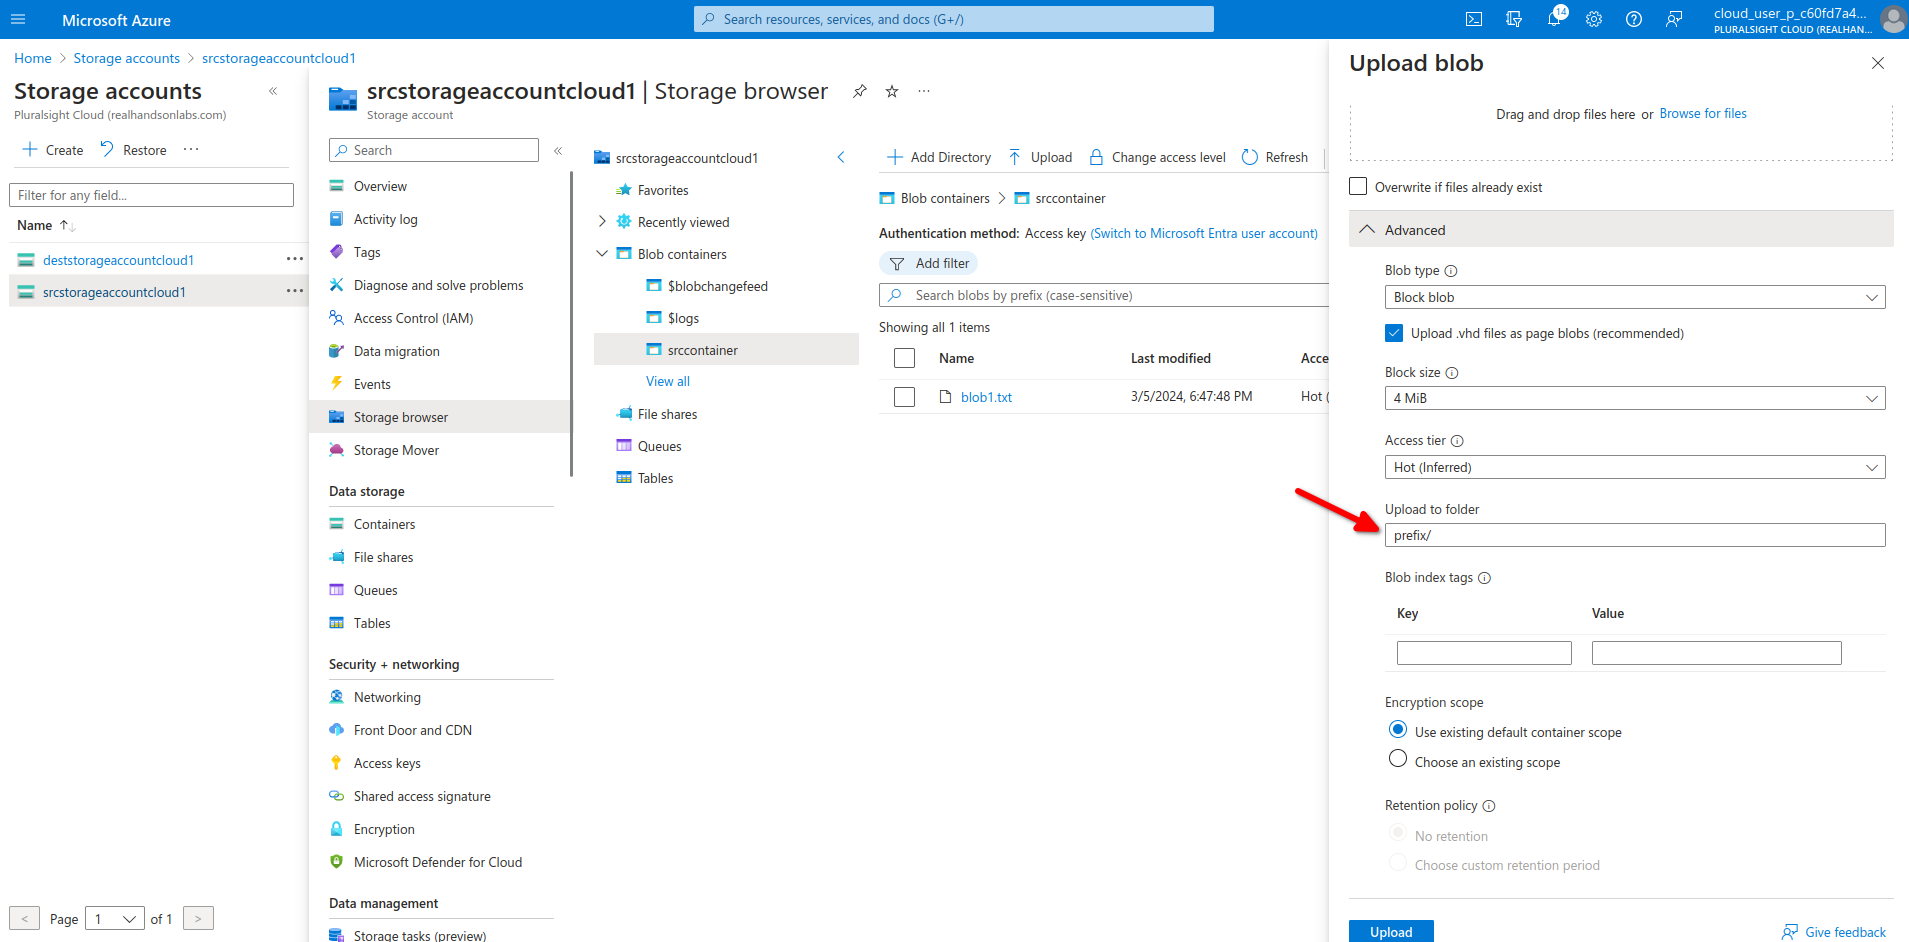
blob.txt is now also on destination container due to our object replication
[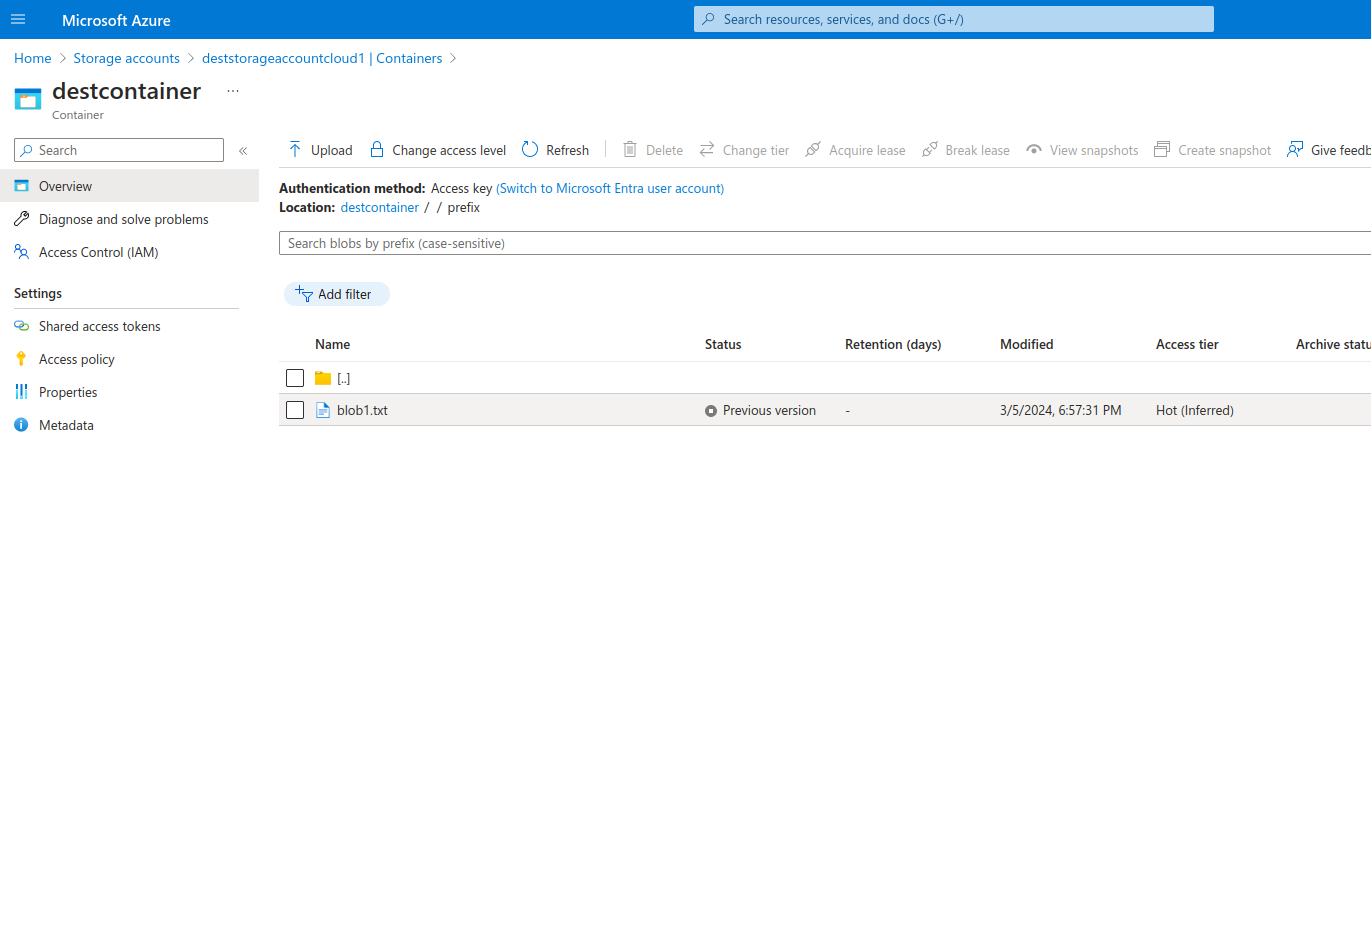](https://wiki.tinod.net/uploads/images/gallery/2024-03/wgEU6hNUe9F0AHDf-image.png)
# AZ-104 Azure - Configuring Blob Lifecycle Management
[Lifecycle Management Concepts](https://learn.microsoft.com/en-us/azure/storage/blobs/lifecycle-management-overview?tabs=azure-portal)
Azure Blob Storage service feature that enables automation to manage lifecycle operations of blobs.
- Automate blob lifecycle: Easily manage blob life-cycles from frequent use to archive or deletion
- Move access tiers: Switch blobs between tiers to meet access or usage needs.
- Optimize cost: Save money by decreasing admin overhead and tiering blobs based on usage requirements.
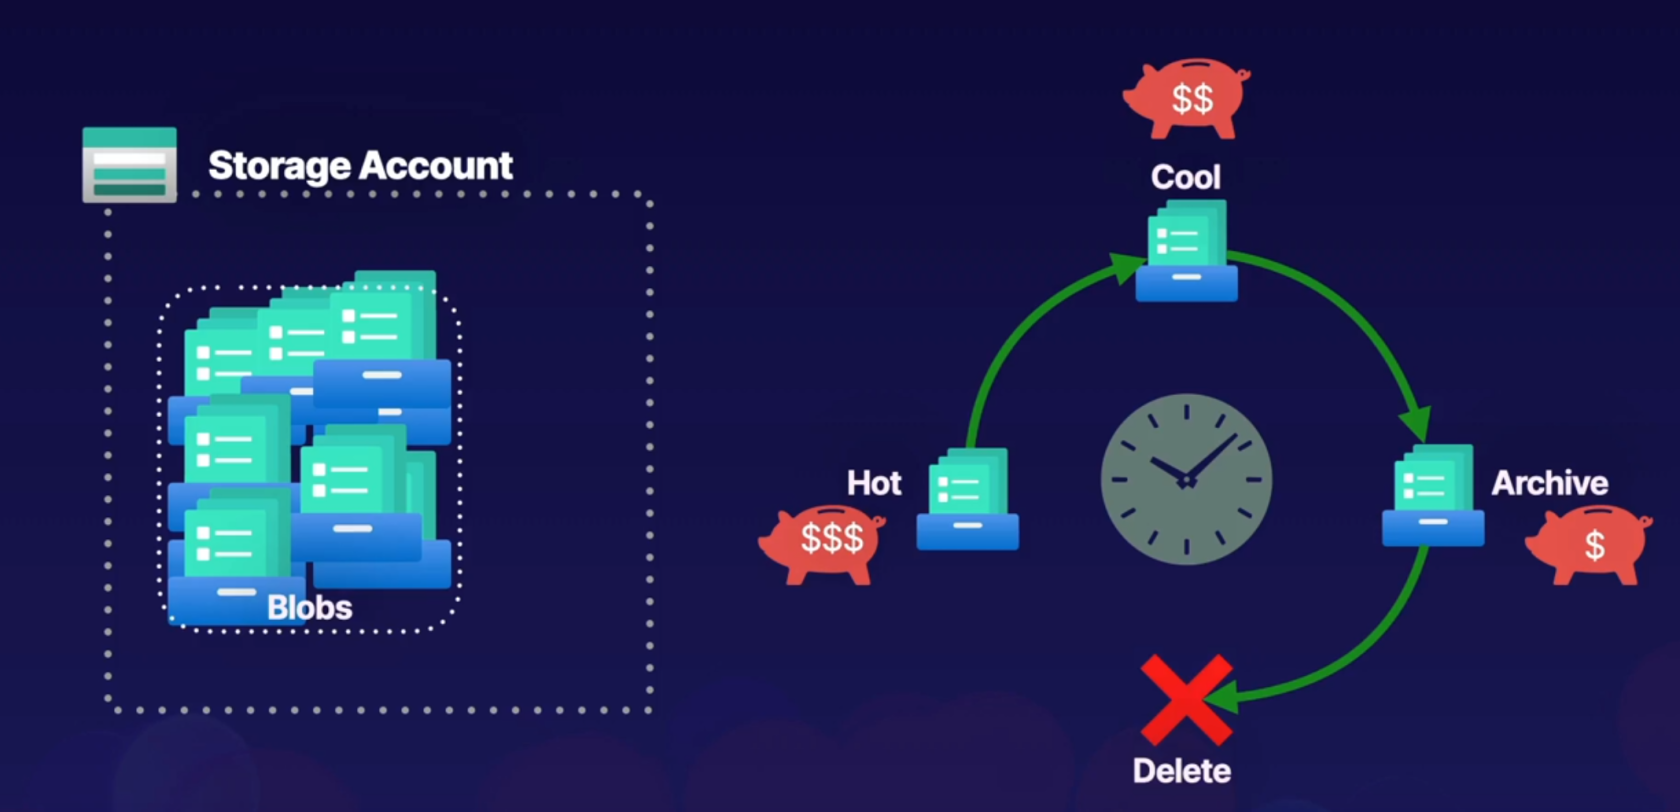
Let's add random files to our container and add a lifecycle rule
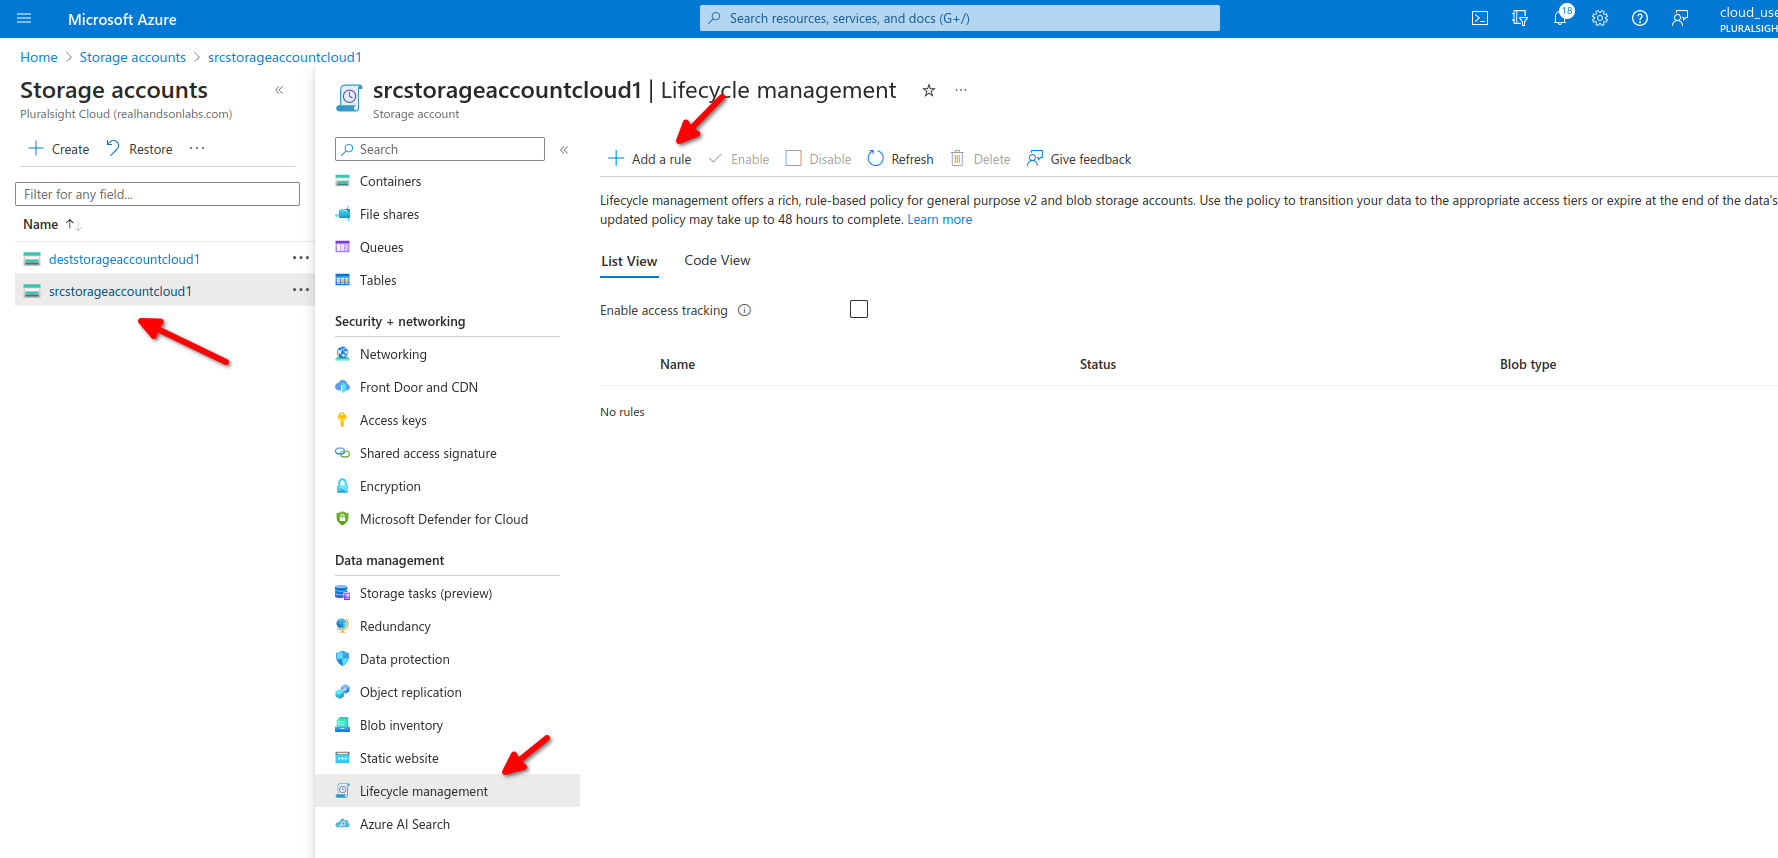
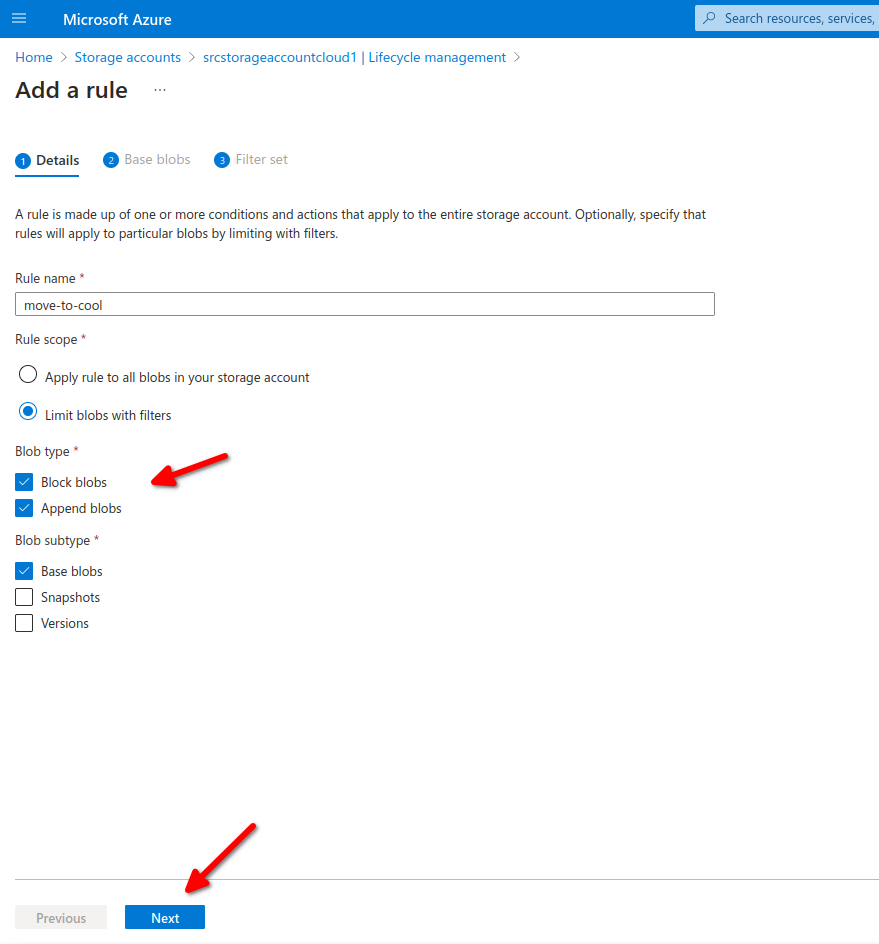
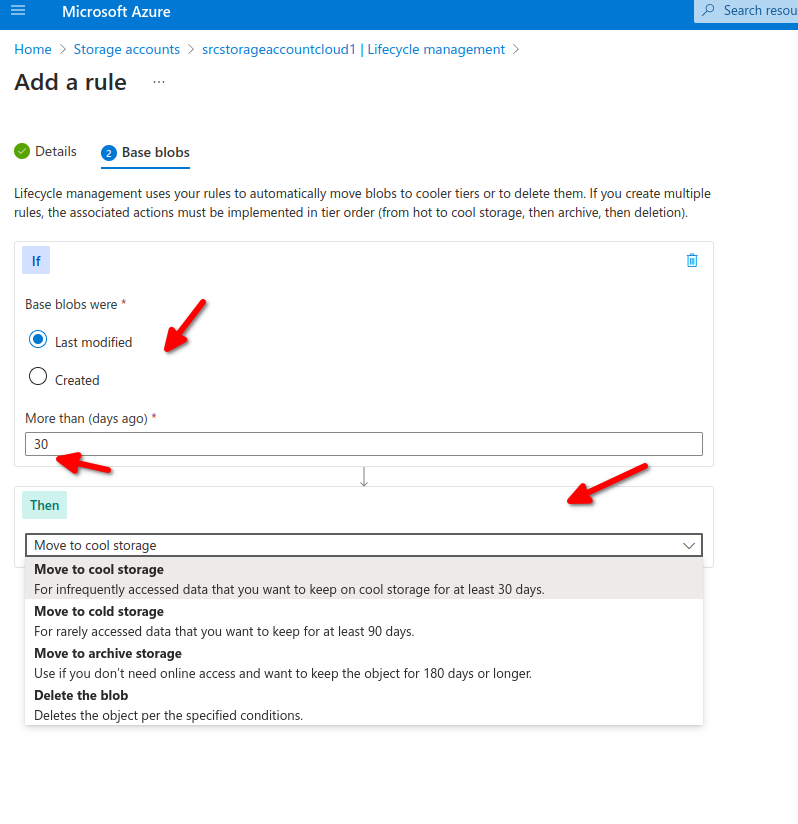
we can also specify a filter to modify only those inside our testcontainer/folder
[](https://wiki.tinod.net/uploads/images/gallery/2024-03/vXwipvAreuQ0VfAl-image.png)
Now after 30 days all our blobs will move from hot to cold.
- Storage accounts: Support GPv2 storage accounts and blob storage accounts.
- Types and Sub-types: Support block and append blobs and support sub-types such as based blobs snapshots and versions.
- Filtering: filter blobs in the rule using prefix or blob index matches.
- Scoping: Scope at the storage account or limit blobs with filters.
- If/Then Logic: Uses logic in lifecycle rules to move blobs through access tiers based on modification and access times.