# 3.- AZ-104 Azure Identity
# AZ-104 Azure Identity - Conceptualizing Entra ID (Azure Active Directory)
[What is Microsoft Entra ID](https://learn.microsoft.com/en-us/entra/fundamentals/whatis)
- Identity and Access Management (IAM) Basics
- What is Azure AD (Entra ID)?
- Azure AD Tenant ARchitecture
- Azure AD Features
- Active Directory vs Azure AD (Entra ID)
##### **Identity and Access Management (IAM) Basic**
- IAM: A global cloud-based identity service for azure that provides an identity repository
- Principal: An unauthenticated entity that will seek to authenticate as an identity.
- Identity: An Identity profile that is authenticated against using credentials
- Authorization: Actions that are permitted/prohibited for an identity to perform
- Create Identity Resources - Create users and groups
- Manage Identity Security - Enable multi-factor authentication (MFA) control resources access and provide policy based controls
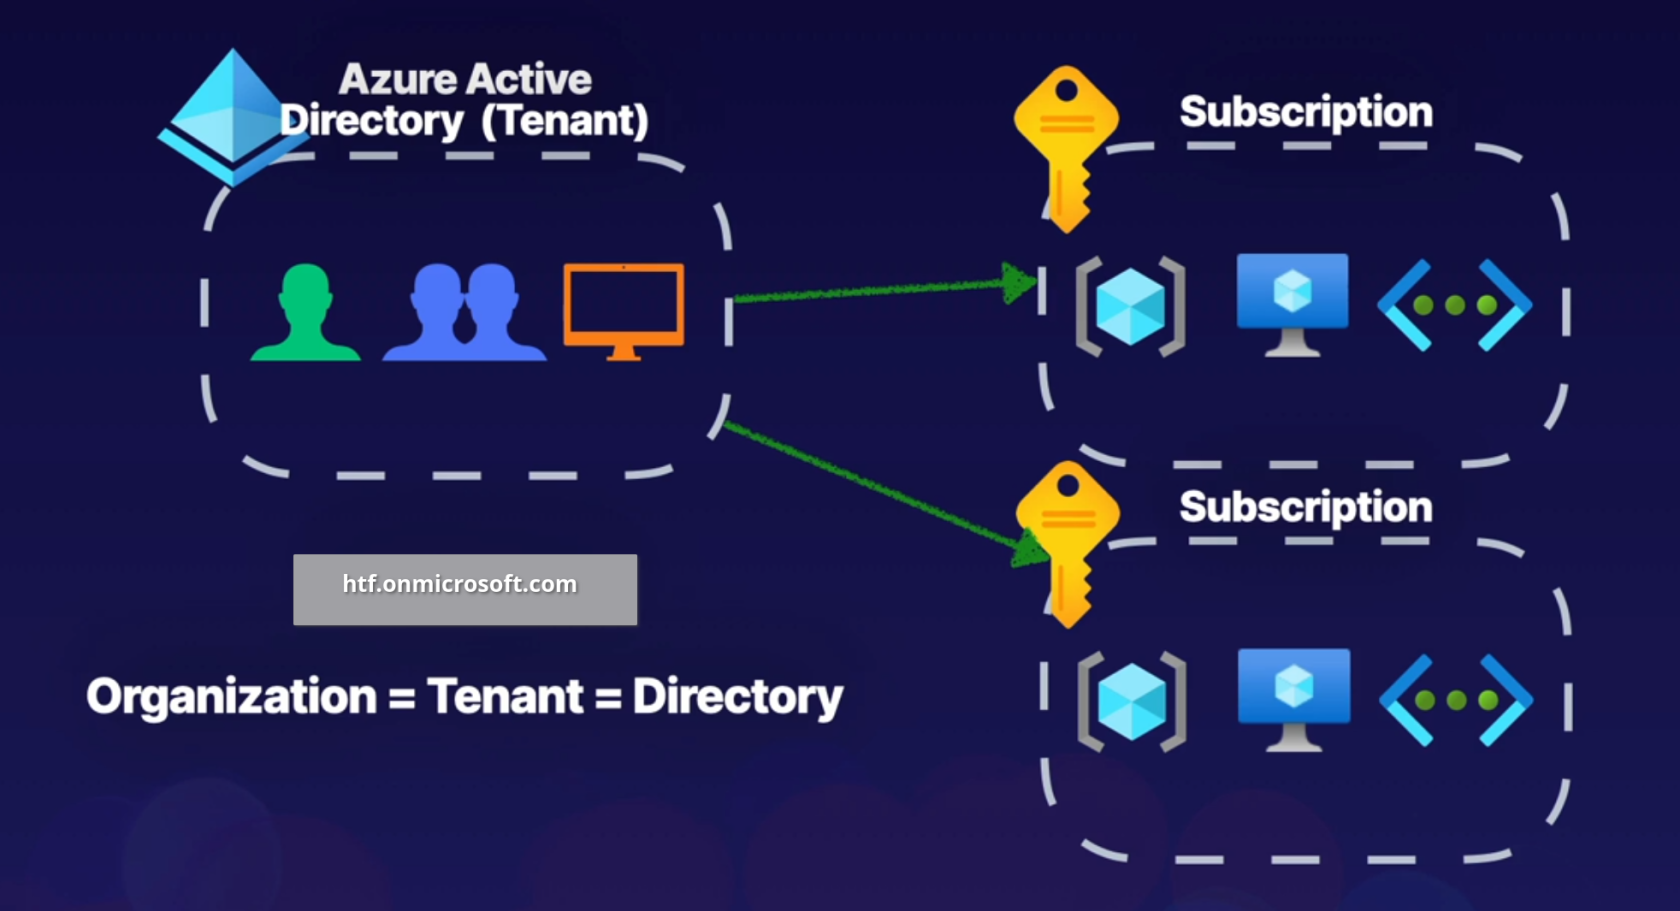
##### **Azure AD Tenant Architecture**
When crating a tenant it will automatically assign a domain for us, for example htf.onmicrosoft.com, you can also register a custom domain name.
A tenant can be associated to multiple subscriptions but a subscription can only be associated to one tenant.
##### **Azure AD Features**
- IAM Platform - for azure cloud based resources.
- Identity security - additional security with MFA and Privileged Identity Management (PIM).
- Collaboration and Development - Azure AD B2B collaboration and Azure AD B2C to support development.
- Monitoring - Audit logs, security monitoring, identity protection and risk management.
- Identity Integration - Hybrid identity and single sign-on (SSO) using Azure AD connect and Azure AD Domain Services.
- Enterprise Access - Additional security for applications and devices both on-premises and in the cloud
**Active Directory**
**Entra ID**
Organizational units (OUs)
Administrative units
Group Policy Objects (GPOs)
SAML, WS-Federation, OAuth
Kerberos, LDAP, NTLM
Flat Directory Structure
Hierarchical
Cloud-based solution
On-Premises
Global
As part of Hybrid solution we can use Entra Connect to manage on prem infrastructure.
# AZ-104 Azure Identity - Managing Tenants
##### [Set up a tenant](https://learn.microsoft.com/en-us/entra/identity-platform/quickstart-create-new-tenant)
##### **Managing Tenants**
**Designing Tenants:**
Planning out the design of our tenant will support easy adoption
- Build Secure Foundations: Setup best practices (e.g., SSPR (Self Service Password Reset), MFA, backup global admin, and privileged users), for specific tasks.
- Populate Identity Resources: Add users, create groups, add devices, and setup hybrid identity
- Manage Applications: Identify apps to be used form the app gallery, and register apps from on-premises
- Monitor and automate: Monitor administrators perform access reviews, and automate user life-cycles.
##### **Creating a Tenant**
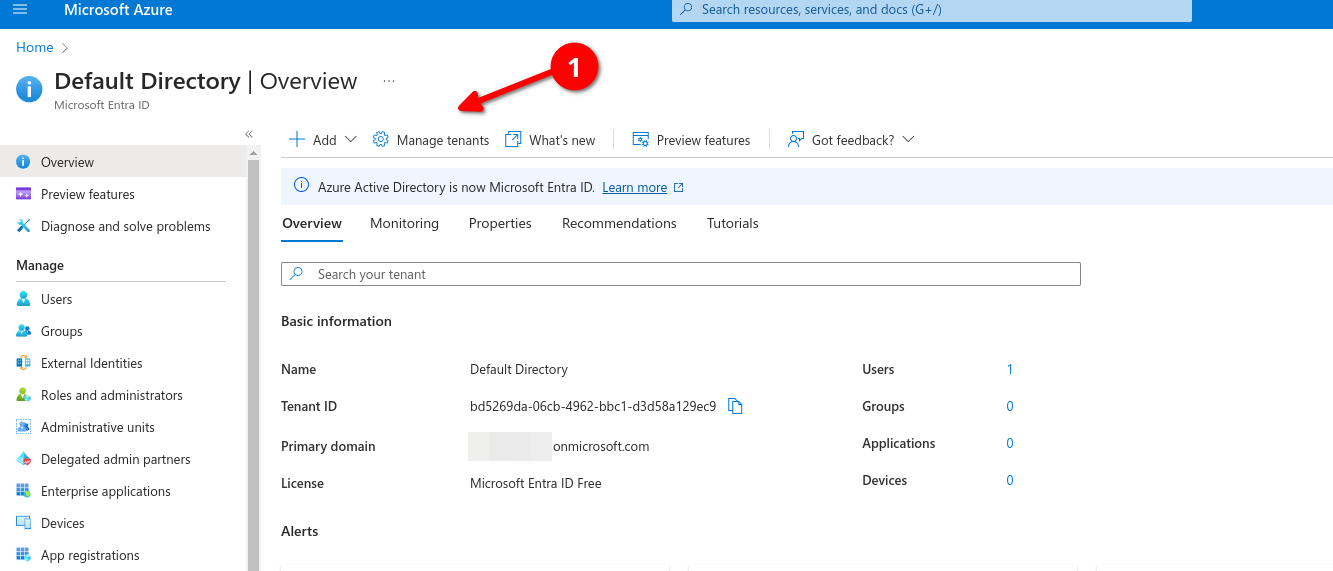
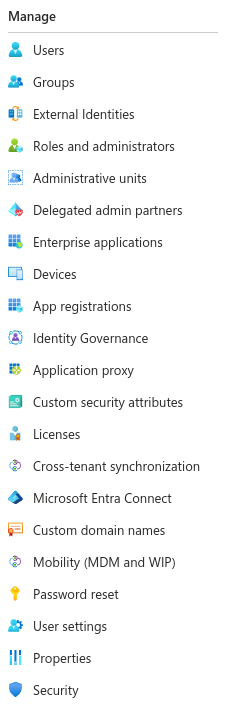
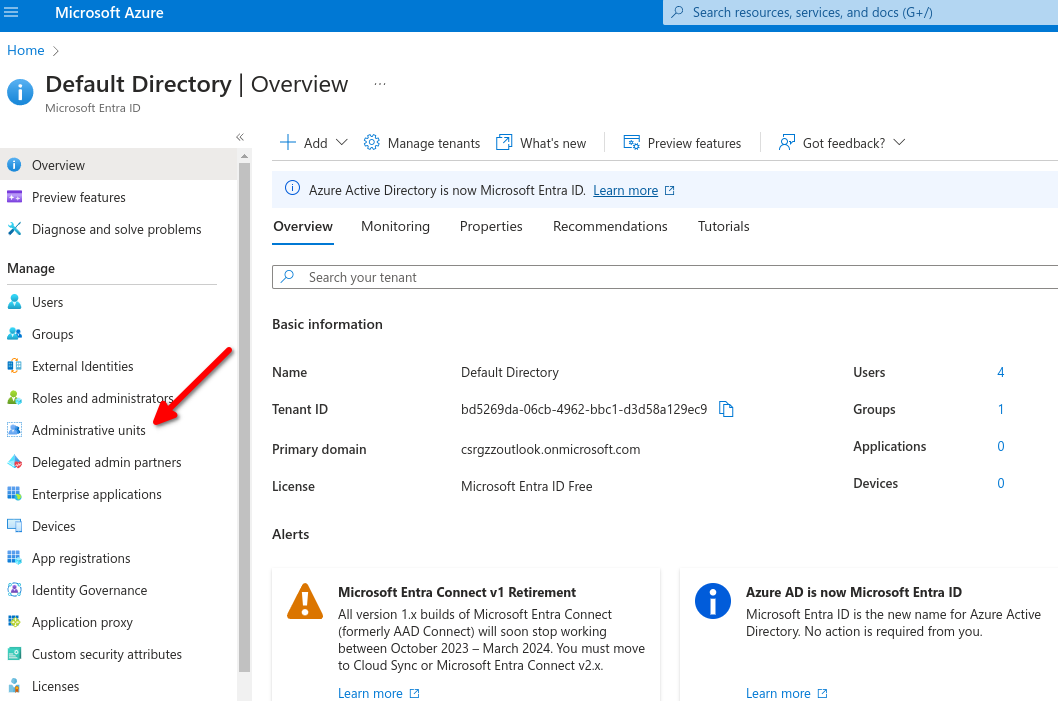
Logon to azure portal and go to Entra ID (formerly known as Active Directory) then go to Manage Tenants

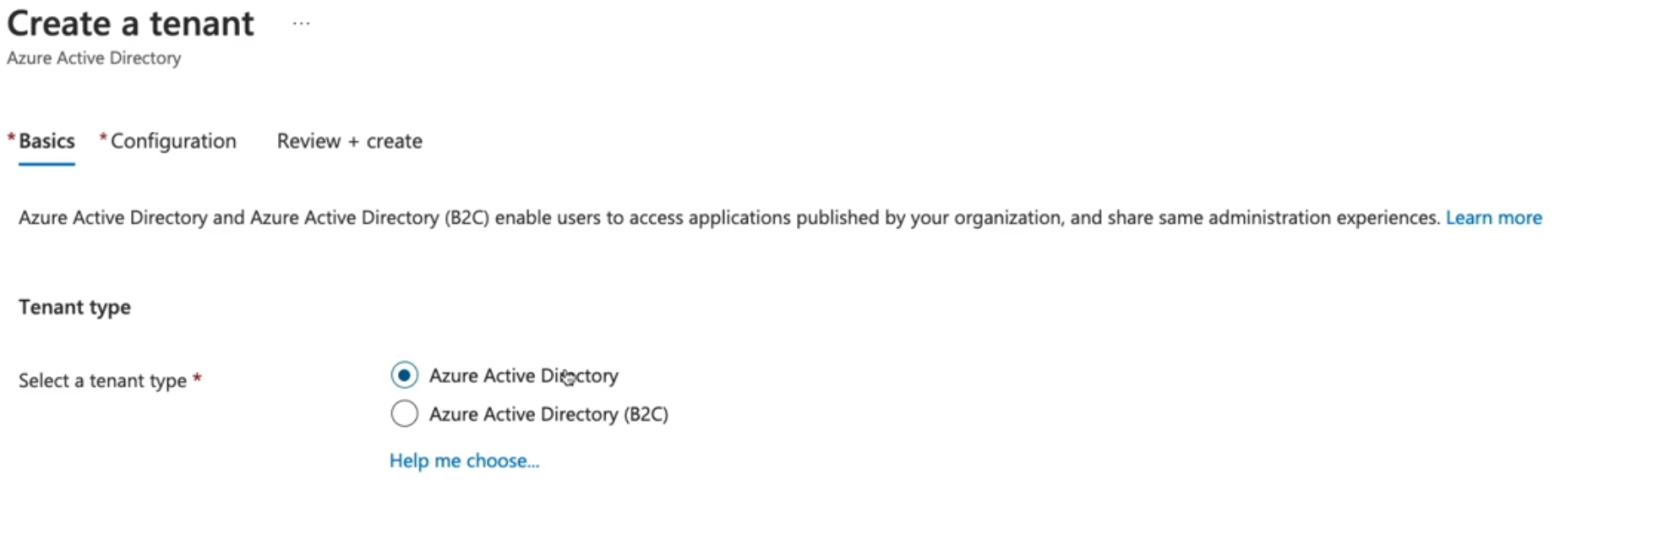
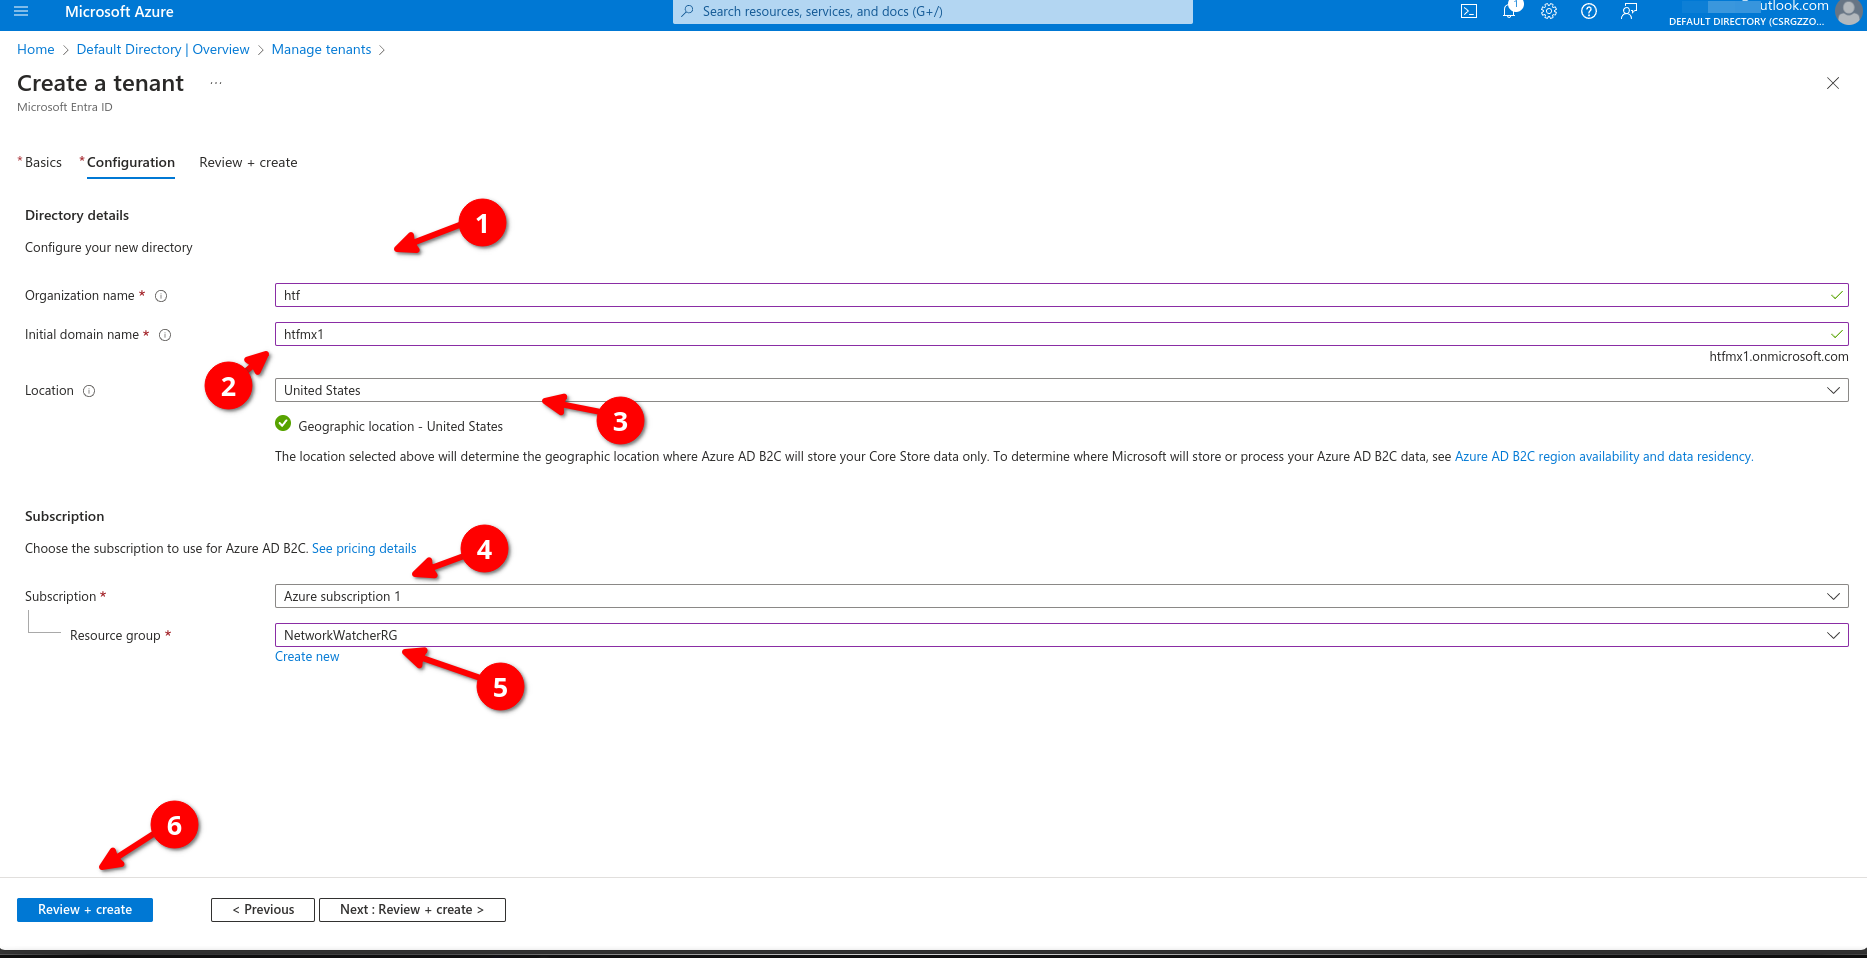
Add organization name, Make sure initial domain its unique, select location, assign your tenant to a subscription, add a resource group then review+create
Now we can go back to manage our tenant, remember this will be different from the main tenant.

We can use the left panel to manage our tenant access, licensing, external devices, enterprise applications, etc.
# AZ-104 Azure Identity - Creating and Managing Users
[Creating Azure Users](https://learn.microsoft.com/en-us/training/modules/create-users-and-groups-in-azure-active-directory/)
[Manage Azure Users](https://learn.microsoft.com/en-us/training/modules/manage-users-and-groups-in-aad/)
[Azure AD to Entra ID](https://learn.microsoft.com/en-us/entra/fundamentals/new-name)
- Describing Users
- Type of Users
- Creating a User
- Managing User Propertiies
- Bulk Adding Users
- Inviting Guests
##### **Entra ID**
Describing Members
- Administrative users: Global admins, Billing Administrators, User Administrators.
- Members: Employees such as a support engineer to manage virtual machines, organization data engineering team with access to specific services.
- Guest users: Users invited from a different Microsoft Entra ID Tenant, etc.
> All users are part of Azure AD Tenant and are all just identity objects with certain properties, each member will have a set of default permissions and all these members are all identity objects with JSON properties we can modify these properties such as job title, given name or user's location.
- Administrators: users whit administrator role assigned
- Members: Regular user that are native to Azure AD
- Guest: External users that tare invited to the azure AD Tenant
##### **Creating a user in Entra ID**
Different methods of creating users
- Auzure Portal: Navigate to Azure Entra ID select Users, new user
- Azure CLI: az ad user create
- Powershell: New-AzureADUser
Exercise:
1. Create/add a User - create a member account inside off Entra ID
2. Update user properties - Update the properties to show this user is part of the HR department
3. Bulk add users - Using a csv file, bulk add users to azure AD
4. Invite a Guest account - Invite an External guest to Azure AD
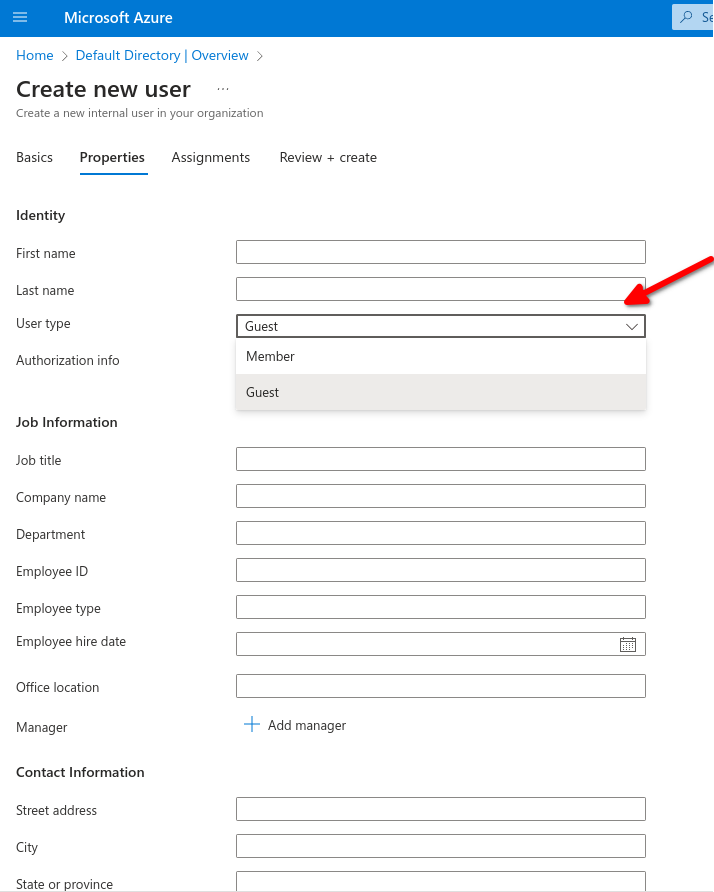
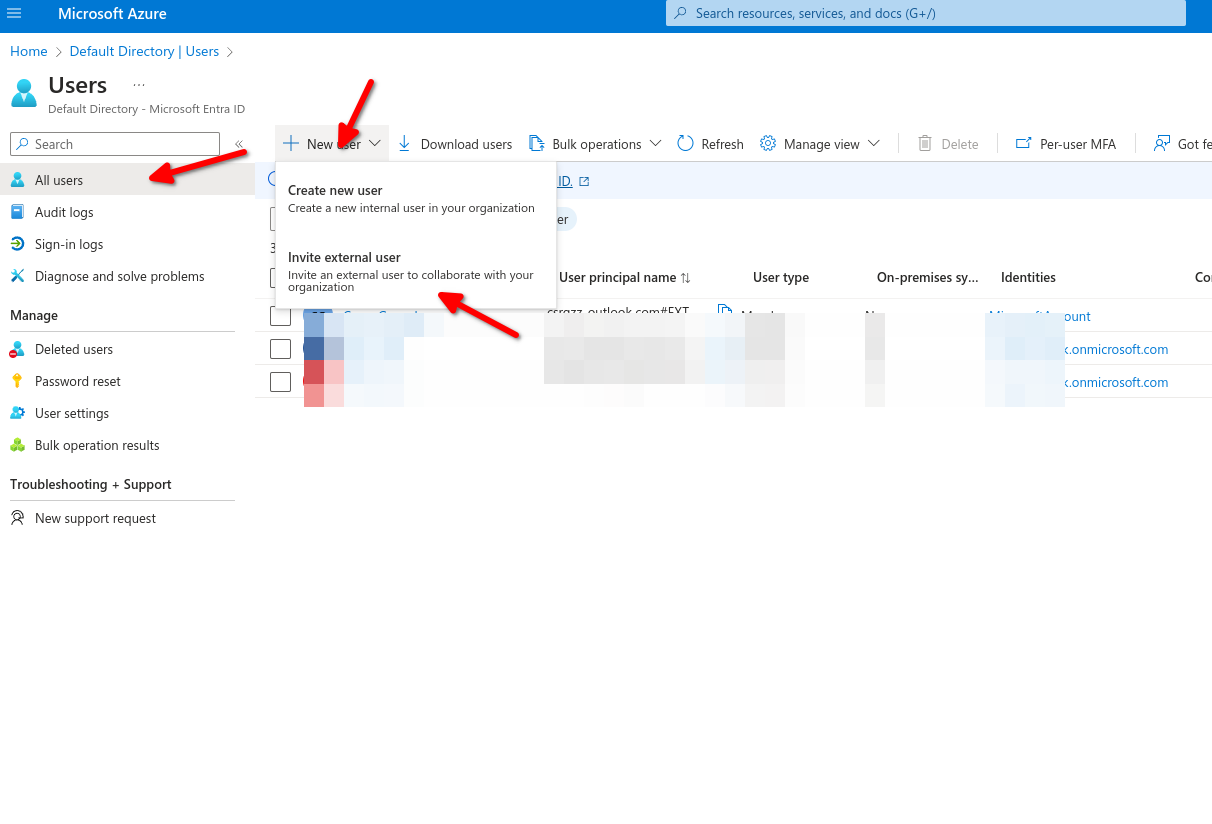
Navigate to Entra ID and select users, add, create new user

Navigate to Properties to fill out personal user information such as first, last name, etc, here you can specify if its a member or a Guest.
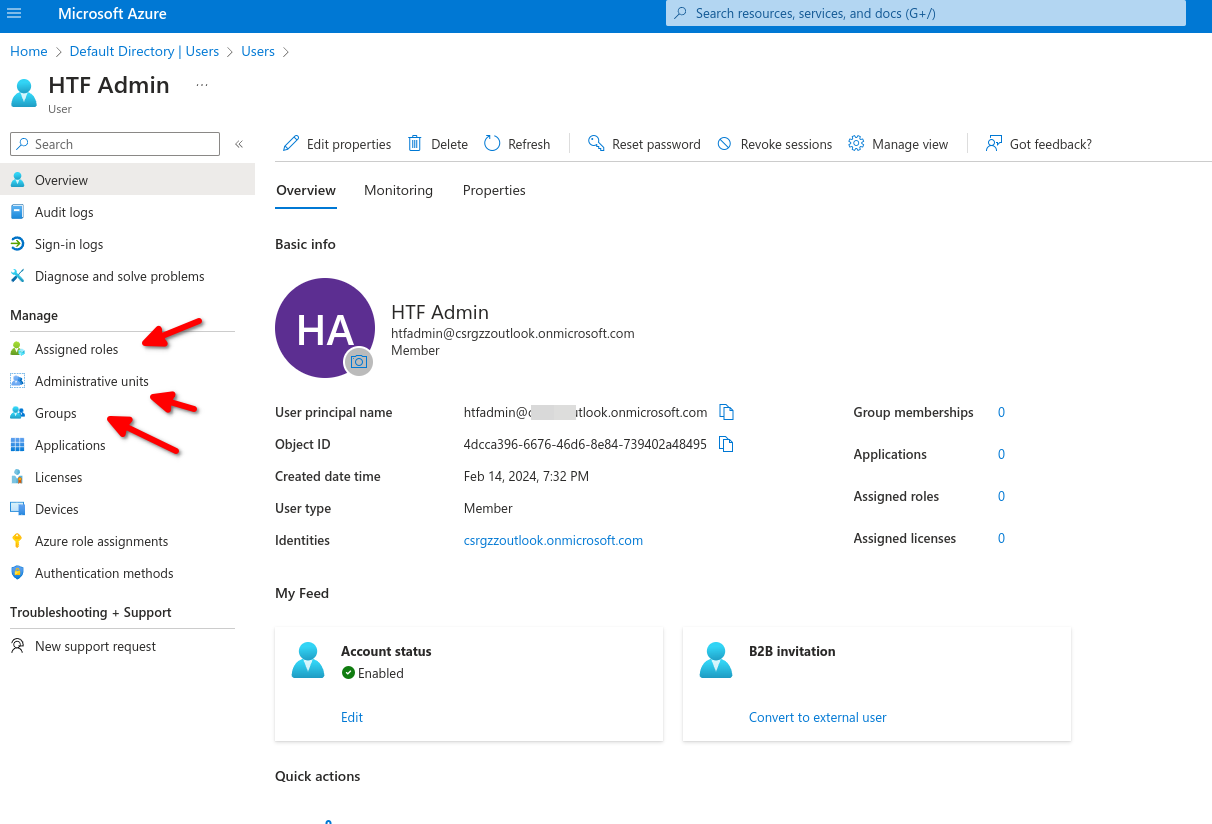
After creating our user we can go back to list all user and select our new user, here we can edit properties, manage assigned roles, admin units, groups etc.
Inviting a Guest Account
[](https://wiki.tinod.net/uploads/images/gallery/2024-02/OS31SfUGwJx3TETk-image.png)
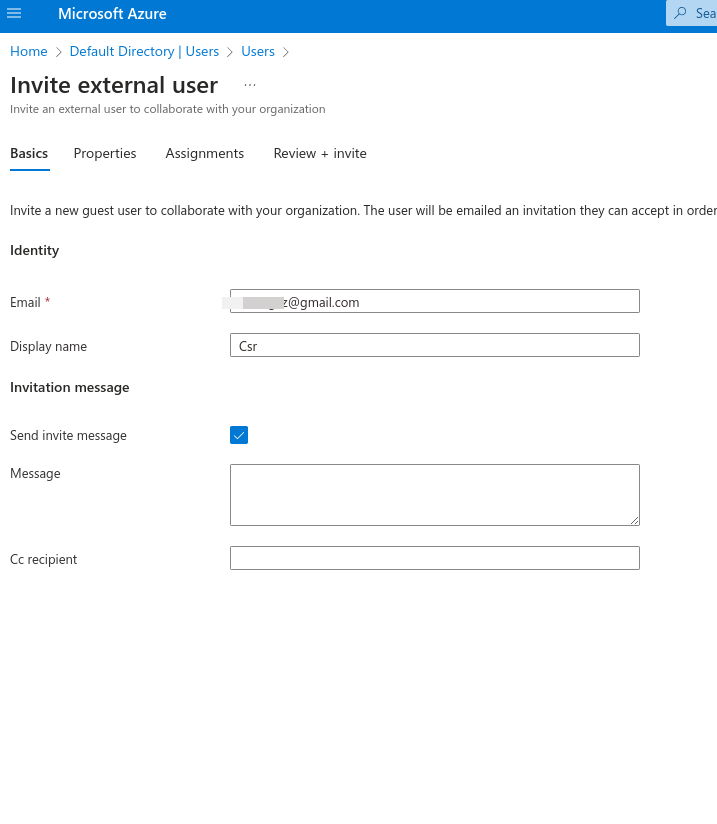
An Invitation will be sent to access your Organization
Type of users - Administrators Members and Guest Accounts.
Role Assignment - Determines permissions and access.
Object Ownership - App, Devices, groups and resources that are owned.
# AZ-104 Azure Identity - LAB Create and Manage Microsoft Entra ID Users in the Portal
**[Crate Azure users and groups in Entra ID](https://learn.microsoft.com/en-us/training/modules/create-users-and-groups-in-azure-active-directory/)**
**Scenario**
To help you walk through the lab, consider the following scenario:
You work as a senior systems administrator, and the management of Microsoft Entra ID is one of your many responsibilities. As a senior team member, it's also important that you share your knowledge with other colleagues. Your manager has recently asked you to provide a **walk through** of basic user management tasks for a group of new Helpdesk team members.
Using an empty demonstration Microsoft Entra ID tenant you have configured, you are going to demonstrate the following:
- Creating a new user.
- Modifying existing user accounts.
- Revoking access for users.
- Deleting user accounts.
---
**Lab Setup**
The objectives for this hands-on lab can be completed using the Azure portal. Specifically, all tasks will be performed using the **Microsoft Entra ID** service pages.
Solution
### Create Microsoft Entra ID User Accounts
1. In the Azure portal, click the hamburger icon at the top-left of the screen to open the menu.
2. From the menu, select **Microsoft Entra ID**.
3. From the menu on the left, select **Users**.
4. From the menu at the top, click **New user**, and then select **Create new user**.
5. In the **User principal name** field, enter a username for the first new user account. Leave the domain name as is.
6. In the **Display name** field, enter a first name and last name for the first new user account.
7. Click **Next: Properties**.
8. Scroll through and view some of the properties you can configure for a new user account. For the purposes of this hands-on lab, you do not need to configure any other properties for the new user account.
> **Note:** Attempting to assign a role to your user may break your hands-on lab.
9. Click **Review + Create**.
10. Then, click **Create**.
11. Repeat steps **4** through **10** to create your second new user account.
12. From the menu at the top, click **Refresh** and verify that both user accounts you just created now appear in the **All users** list in your Microsoft Entra ID service.
> **Note**: You may need to refresh the page a few times for the list to be updated.
### Modify a Microsoft Entra ID User Account
1. From the **All users** list, select one of the users you just created to open their profile.
2. View some of the options and settings that you can modify for a user account using the menu at the left.
3. If necessary, select **Overview** in the menu to return to the user's profile.
4. From the menu at the top, click **Edit properties**.
5. Modify some of the settings for the user, such as entering their **First name** and **Last name** or updating the information for their **Job title**.
6. Click **Save**.
7. From the menu at the top, click **Reset password**.
8. In the **Reset password** pane that displays on the right, click the **Reset password** button.
> **Note:** This will generate a temporary password that must be changed on the next sign in. You would need to take note of the temporary password that is displayed and provide it to the user.
9. Click the **X** to close the **Reset password** pane.
### Revoke Access to a Microsoft Entra ID User Account
1. From the menu at the top, click **Revoke sessions**.
> **Note**: This will log the user out of any active sessions that they are currently logged into.
2. In the **Do you want to revoke all sessions for the user?** prompt, click **Yes**.
### Delete a Microsoft Entra ID User Account
1. From the **All users** list, check the checkbox next to one of the users you created.
2. From the menu at the top, click **Delete**.
3. In the **Delete the selected users?** prompt, click **OK**.
4. From the menu at the top, click **Refresh** and verify that the user account has been removed from the accounts in the **All users** list.
> **Note**: You may need to refresh the page a few times for the list to be updated.
5. From the menu on the left, select **Deleted users**. The user account you just deleted should appear in the list of deleted accounts.
> **Note**: You may need to refresh the page a few times before the user you deleted appears in the list.
6. Check the checkbox for the user account and note that you could choose the **Restore users** or **Delete permanently** options from the menu at the top if you needed to take further action on the account.
> **Note**: Users that have been deleted remain in the **Deleted users** list for 30 days.
# AZ-104 Azure Identity - LAB Perform Bulk Microsof Entra ID Operations in the Portal
**Scenario**
To help you walk through the lab, consider the following scenario:
You work as a systems administrator for an organization that has a lot of seasonal projects. As a result, it's very common for you to have to create and delete a large volume of users every few months throughout the year, as well as manage relevant security groups.
You have some spare time now before the project season begins, and you would like to investigate the use of bulk operations to help minimize your workload during these seasonal high peaks.
To get started, you would like to practice the following operations within your empty demo Microsoft Entra ID tenant:
1. Creating and deleting users in bulk
2. Managing group membership in bulk
---
**Lab Setup**
The objectives for this hands-on lab can be completed using the Azure portal. Specifically, all tasks will be performed using the *Microsoft Entra ID* service pages.
Solution
### Bulk Create Users
#### Download and Edit the Template Used to Bulk Create Users
1. In the Azure portal, click the hamburger icon at the top-left of the screen to open the menu.
2. From the menu, select **Microsoft Entra ID**.
3. From the menu on the left, select **Users**.
4. From the menu at the top, click the **Bulk operations** drop-down.
5. Click **Bulk create**.
6. In the *Bulk create user* pane that displays on the right, click the **Download** button to download the latest CSV template.
7. Navigate to and open the CSV template file that was downloaded.
8. View the fields included in the template. Take note of any required fields and the total number of fields, as you will need to include some sort of information for each field.
> **Note:** The template provided from Microsoft may be updated over time, and the fields included in the template (both required and optional) are subject to change. For that reason, we cannot provide you with a list of fields and the information to include or a mocked up file to be uploaded.
9. Enter information for the three new users you want to add, including data for — at minimum — each of the required fields.
- The required fields likely include the user's name that is aligned with their *Name* and a username (in the form of an email address) that is aligned with their *User Principal Name* in AD.
- To obtain the proper domain for the *User Principal Name* field, navigate back to the Azure portal and click on a user in the *All users* list; where their *User Principal Name* is listed, copy the domain following the `@` symbol (including the `@` symbol), and paste it into the template for each user you create.
- The remaining fields will need to be accounted for in the template with a comma.
- Do not include spaces between the commas and the field data. Spaces between them will cause the upload and bulk creation process to fail.
- For example, at the time this lab was made, an entry in the template included the following fields:
`[First Name] [Last Name],[username]@[userPrincipalName],[password],No,,,,,,,,,,,,,`
`Amos Smith,amos@radlabs4p.onmicrosoft.com,password123!,No,,,,,,,,,,,,,`
10. Once you have entered the users to be added, save your changes to the file.
#### Upload Your Edited File and Execute the Bulk Create User Process
1. Back in the Azure portal, in the *Bulk create user* pane on the right, click the folder icon next to the *Upload your csv file* field.
> **Note:** If you navigated away from the page to copy the domain name for the users while editing the template, you may need to navigate back to the *All users* page and then click **Bulk operations > Bulk create** to open the pane again.
2. Navigate to the location of your edited template file and select it.
3. If there are any issues with the data in the file, you will receive a notification of the errors in the *Bulk create user* pane. If any exist, fix the errors, save the file, and upload it again.
> **Note:** You may have to repeat this process until your file has no errors.
4. When your file has uploaded successfully, click the **Submit** button.
> **Note:** It may take some time to create your users.
5. You will receive a status notification about the creation process in the *Bulk create user* pane.
> **Note:** If there are any issues during the creation process, you can click **Bulk operation results** in the menu on the left, click on your file in the list, and view the errors it encountered.
6. From the menu at the top, click **Refresh** and verify that the new users now appear in the list of *All users*.
### Bulk Delete Users
#### Download and Edit the Template Used to Bulk Delete Users
1. From the menu at the top, click the **Bulk operations** drop-down.
2. Click **Bulk delete**.
3. In the *Bulk delete user* pane that displays on the right, click the **Download** button to download the latest CSV template.
4. Navigate to and open the CSV template file that was downloaded.
5. View the fields included in the template. Take note of any required fields and the total number of fields, as you will need to include some sort of information for each field.
6. Enter information for the user you want to delete, including data for the required field.
- The required fields likely include the username that is aligned with their *User Principal Name* in AD.
- For example, at the time this lab was made, an entry in the template included the following fields:
`[username]@[userPrincipalName]`
`amos@radlabs4p.onmicrosoft.com`
7. Once you have entered the user to be deleted, save your changes to the file.
#### Upload Your Edited File and Execute the Bulk Delete User Process
1. Back in the Azure portal, in the *Bulk delete user* pane on the right, click the folder icon next to the *Upload your csv file* field.
> **Note:** If you navigated away from the page to copy the *User Principal Name* for the user while editing the template, you may need to navigate back to the *All users* page and then click **Bulk operations > Bulk delete** to open the pane again.
2. Navigate to the location of your edited template file and select it.
3. If there are any issues with the data in the file, you will receive a notification of the errors in the *Bulk delete user* pane. If any exist, fix the errors, save the file, and upload it again.
4. Once your file has uploaded successfully, type `Yes` in the *Are you sure you want to perform the delete operation?* field.
5. Click the **Submit** button.
6. You will receive a status notification about the deletion process in the *Bulk delete user* pane.
> **Note:** If there are any issues during the deletion process, you can click **Bulk operation results** in the menu on the left, click on your file in the list, and view the errors it encountered.
7. From the menu at the top, click **Refresh** and verify that the user has been removed from the list of *All users*.
### Bulk Add Group Members
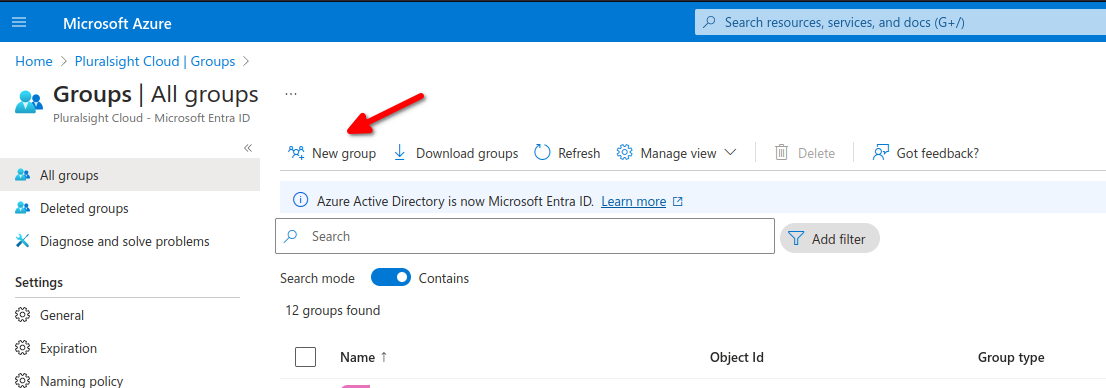
#### Create the Group
1. Using the breadcrumb trail at the top, navigate back to the Microsoft Entra ID tenant.
2. From the menu on the left, select **Groups**.
3. From the menu at the top, click **New group**.
4. From the *Group type* drop-down, select **Security**.
5. In the *Group name* field, enter a name for the group.
6. Leave everything else as is, and click **Create**.
#### Download and Edit the Template Used to Bulk Import Members
1. In the list of groups in the *All groups* view, click on the name of the Security group you created.
2. From the menu on the left, select **Members**.
3. From the menu at the top, click the **Bulk operations** drop-down.
4. Click **Import members**.
5. In the *Bulk import group* pane that displays on the right, click the **Download** button to download the latest CSV template.
6. Navigate to and open the CSV template file that was downloaded.
7. View the fields included in the template. Take note of any required fields and the total number of fields, as you will need to include some sort of information for each field.
8. Enter information for the users you want to add to the group, including data for the required field.
- The required fields likely include the user's *Object ID* **or** the username that is aligned with their *User Principal Name* in AD.
- For example, at the time this lab was made, an entry in the template included the following fields:
`[username]@[userPrincipalName]`
`amos@radlabs4p.onmicrosoft.com`
or
`[memberObjectID]`
`dec3f879-9439-4978-94be-17f17cefc0aa`
> **Note:** You can quickly find this information for each user within the *All users* view in the portal. Modify the view by clicking on **Manage view** in the top menu and then select **Edit columns**. Select only the *User principal name* and *Object ID* options (*Object ID* may need to be added), and click **OK**. Now, the *User Principal Name* and *Object ID* are displayed for each user, which you can then copy and paste into your CSV file.
9. Once you have entered the users to be added to the group, save your changes to the file.
#### Upload Your Edited File and Execute the Bulk Import Group Process
1. Back in the Azure portal, in the *Bulk import group* pane on the right, click the folder icon next to the *Upload your csv file* field.
> **Note:** If you navigated away from the page to copy the *User Principal Name* or *Object ID* for the users while editing the template, you may need to navigate back to the *All groups* page, then click **Members** in the menu on the left, and then click **Bulk operations > Import members** to open the pane again.
2. Navigate to the location of your edited template file and select it.
3. If there are any issues with the data in the file, you will receive a notification of the errors in the *Bulk import group* pane. If any exist, fix the errors, save the file, and upload it again.
4. When your file has uploaded successfully, click the **Submit** button.
5. You will receive a status notification about the import process in the *Bulk import group* pane.
> **Note:** If there are any issues during the import process, you can click **Bulk operation results** in the menu on the left, click on your file in the list, and view the errors it encountered.
6. From the menu at the top, click **Refresh** and verify that the users now appear in the list of *Members*.
# AZ-104 Azure Identity - Creating and Managing Groups
- [ ] [Manage user and groups](https://learn.microsoft.com/en-us/training/modules/manage-users-and-groups-in-aad/)
- [ ] [Create users and groups](https://learn.microsoft.com/en-us/training/modules/create-users-and-groups-in-azure-active-directory/)
- Describing groups
- Practical Use
- Creating a group
- Managing group membership
**Azure Management groups:** Create a hierarchy of Azure management groups tailored to your organization to efficiently manage your subscriptions and resources.
- Owners and Members: An owner of the group or a member of the group.
- Type of group: A security group or a Microsoft 365 group.
- Membership Type: Assigned, dynamic user or dynamic device.
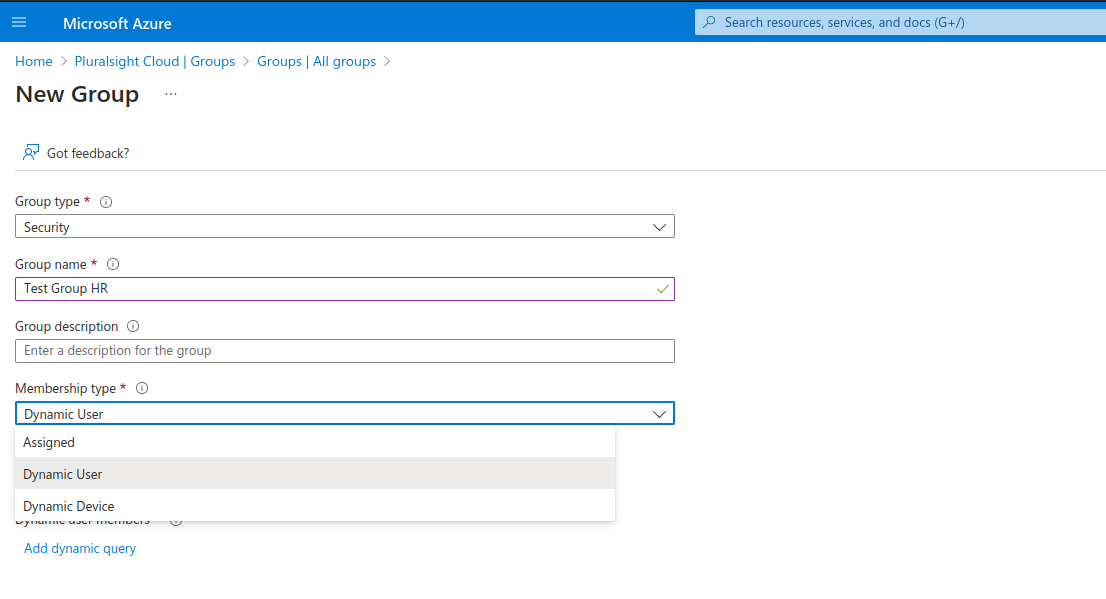
To create a new group we can navigate to Entra ID then groups then add group
We have different membership types
- Assigned: Manually or in bulk add users
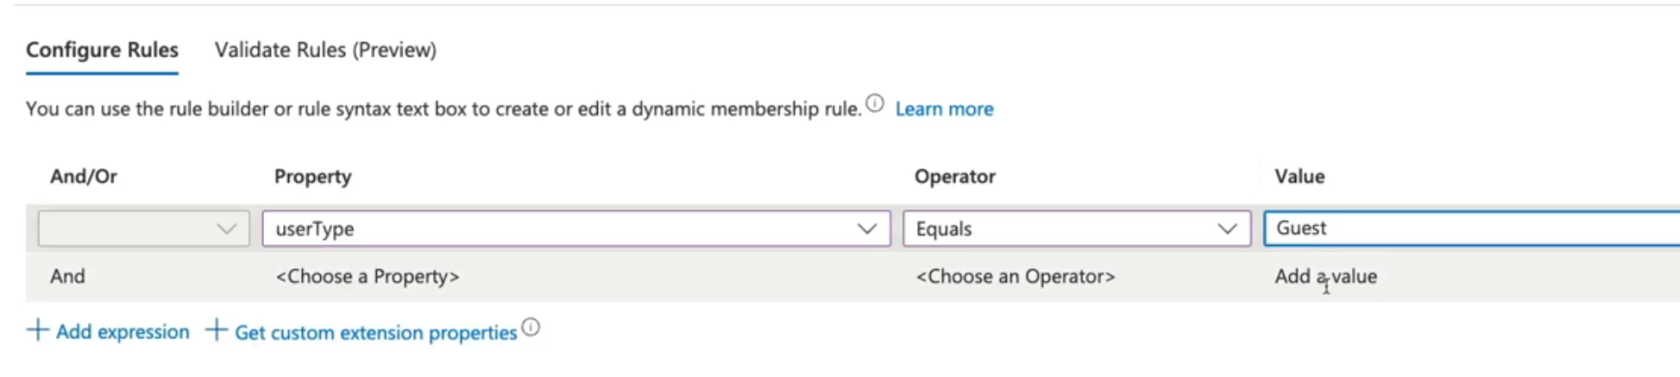
- Dynamic user: Add variables per fields such as department for example to add all users from X department
- Dynamic Device: This apply to specific hardware devices.
We need to click on Add Dynamic Query to add our rules for dynamic users in this case.
Here we added a Rule Syntax to add all members of Company-name X to our group, there are multiple properties and operators we can use.
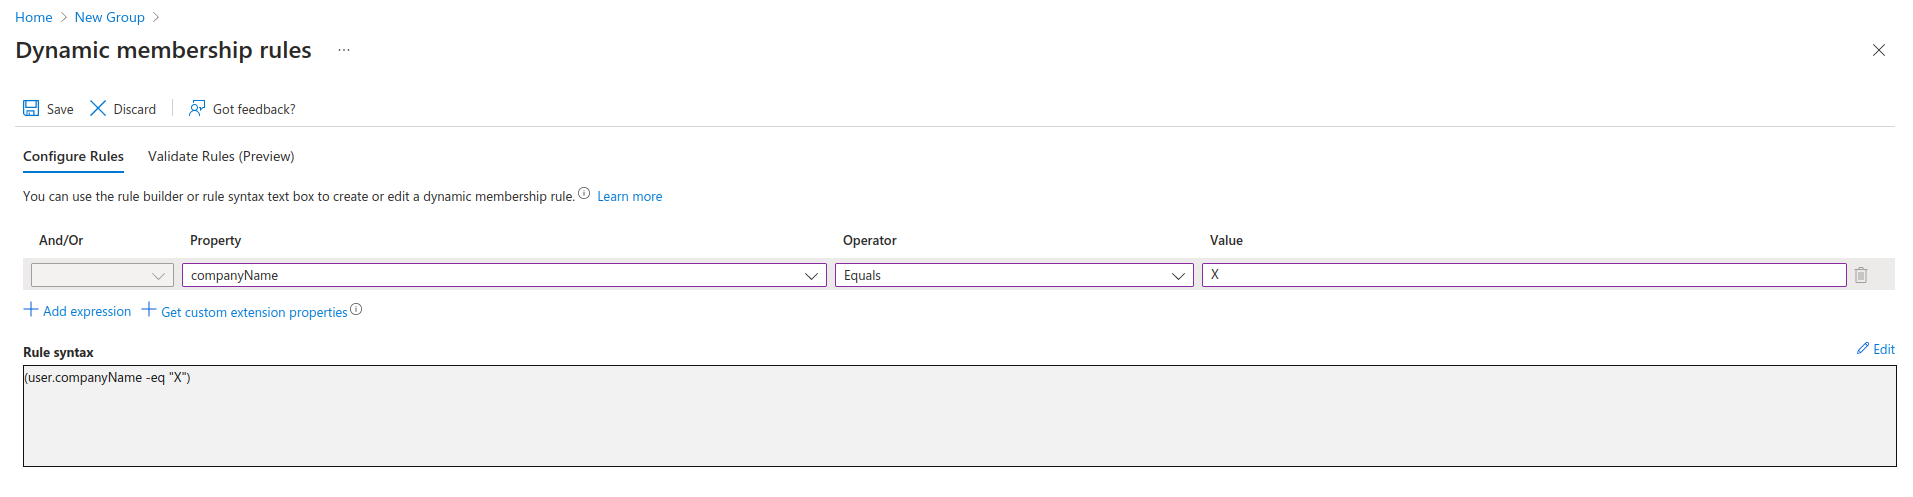
Now we need to add users then validate and see if they belong to group HR
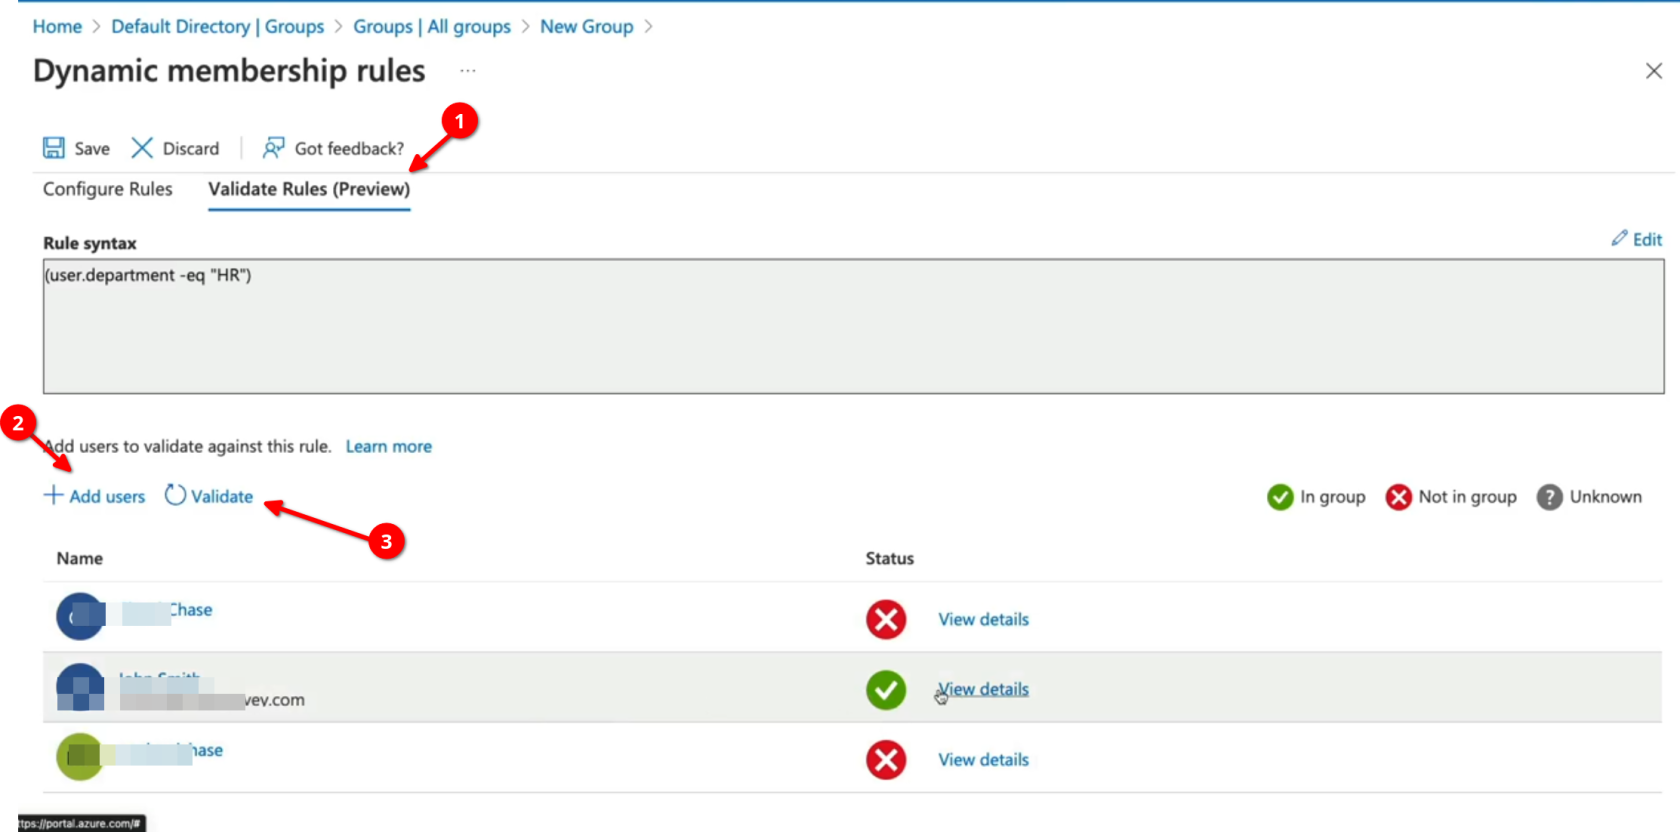
we can also search by user-type for all Guest for example and apply a group for all Guests.
Group Types
- Security: Security groups are used to manage access o shared resources for a group of users.
- Microsoft 365: These groups are used to give members access to shared mailbox, calendar, files, etc.
- Assigned: Users are specifically selected to be members of a group.
- Dynamic user: Membership rules are created that automate group membership via user attributes.
- Dynamic Device: Membership rules are created that automate group membership via devices attributes.
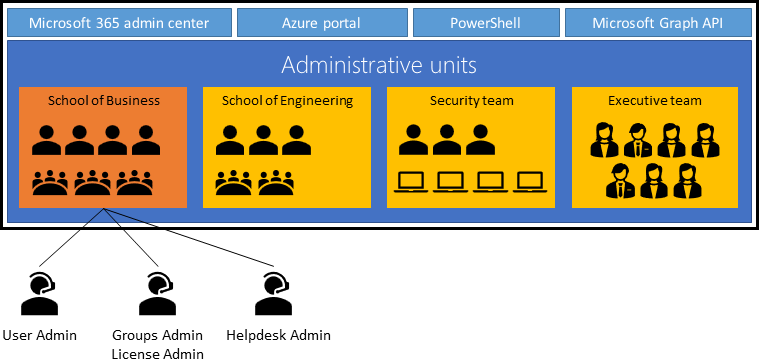
# AZ-104 Azure Identity - Creating Administrative Units
- [ ] [Administrative Units for Entra ID](https://learn.microsoft.com/en-us/entra/identity/role-based-access-control/administrative-units)
An administrative unit is a Microsoft Entra resource that can be a container for other Microsoft Entra resources. An administrative unit can contain only users, groups, or devices.
## Constraints
- Administrative units can't be nested.
- Administrative units are currently not available in [Microsoft Entra ID Governance](https://learn.microsoft.com/en-us/entra/id-governance/identity-governance-overview).
## Groups
Adding a group to an administrative unit brings the group itself into the management scope of the administrative unit, but **not** the members of the group. In other words, an administrator scoped to the administrative unit can manage properties of the group, such as group name or membership, but they cannot manage properties of the users or devices within that group (unless those users and devices are separately added as members of the administrative unit).
For example, a [User Administrator](https://learn.microsoft.com/en-us/entra/identity/role-based-access-control/permissions-reference#user-administrator) scoped to an administrative unit that contains a group can and can't do the following:
Permissions
Can do
Manage the name of the group
✅
Manage the membership of the group
✅
Manage the user properties for individual **members** of the group
❌
Manage the user authentication methods of individual **members** of the group
❌
Reset the passwords of individual **members** of the group
❌
#### Plan the organization
Plan the organization and evaluate its needs to determine the value that administrative units can provide for managing identities like groups and users.
#### Crate and Administrative Unit
Create an administrative unit to logically divide the organization and allow for scoping.

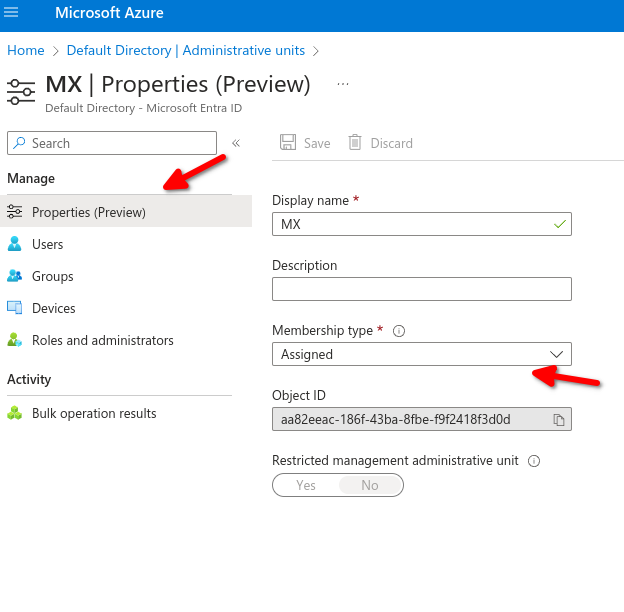
- Purpose of administrative units: An Azure AD resource for providing a container for Azure AD Objects.
- Benefits of Administrative units: Allow you to control the scope of your administrative users.
# AZ-104 Azure Identity - Configuring SSPR (self serfice password reset)
- [Self Serfice Password Reset (SSPR)](https://learn.microsoft.com/en-us/training/modules/allow-users-reset-their-password/)
- SSPR Process
- Authentication Methods
- SSPR Considerations

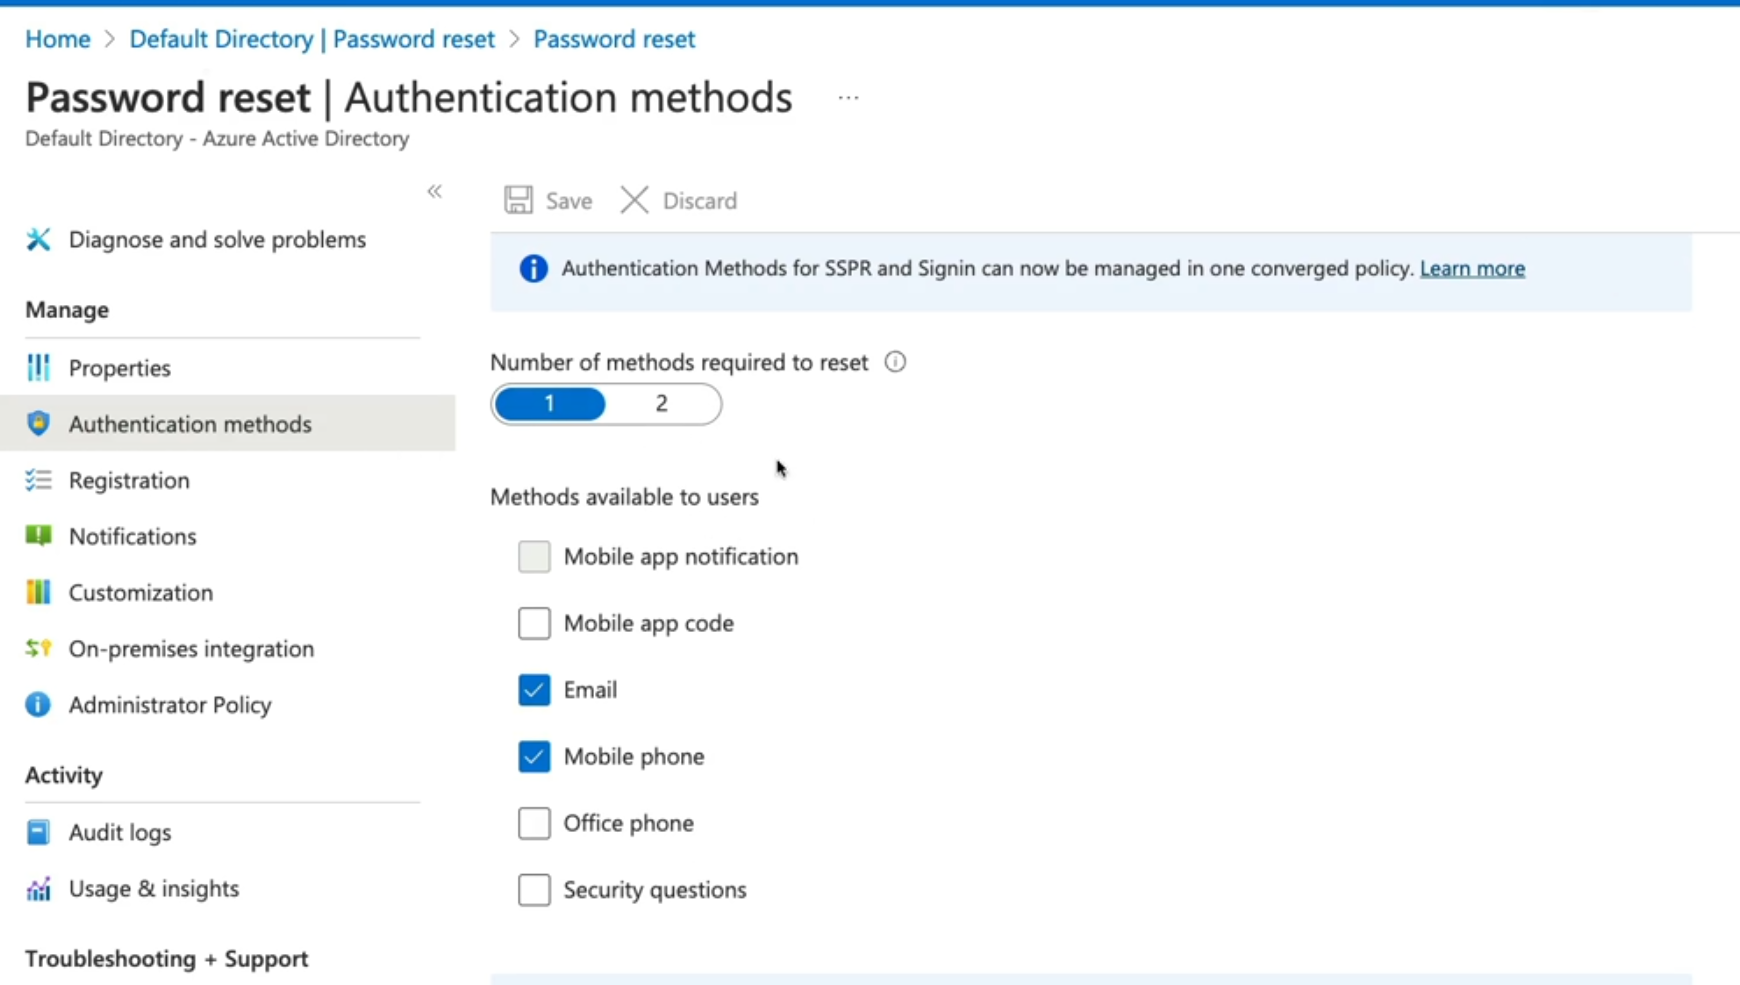
##### **Authentication methods**
- Mobile app: Authentication via app notification. AN example is the Microsoft authentication application
- Mobile app code: Authentication via time-based codes, An example is the Microsoft authentication application
- Email: Authentication via an external to Microsoft using codes sent to that email address
- Mobile Phone: Authentication via a mobile number using a phone call or SMS provides a code. (less recommended method)
- Office Phone: Authentication via a non-mobile phone using a phone cal that prompts the user to press #
- Security Questions: Authentication via answering a set of security questions (Least recommended method).
##### SSPR Considerations
Enable and manage SSPR via Azure AD Groups.
- Required methods: One or more of the available authentication methods is required for SSPR
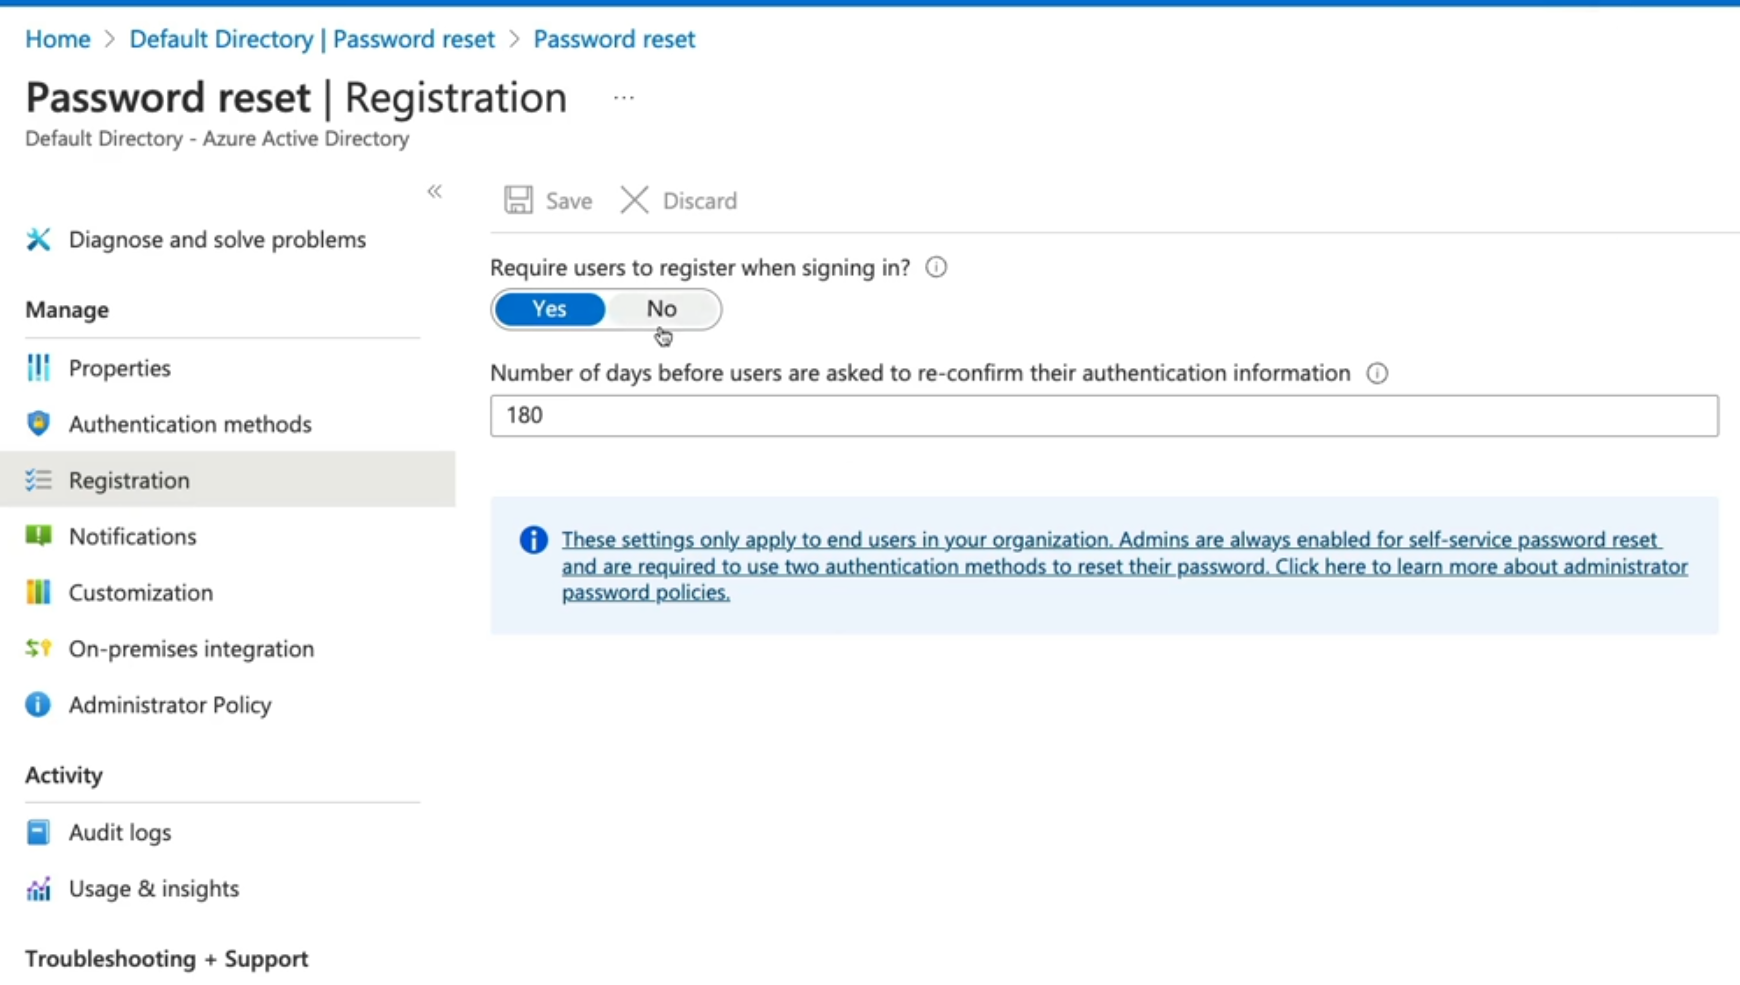
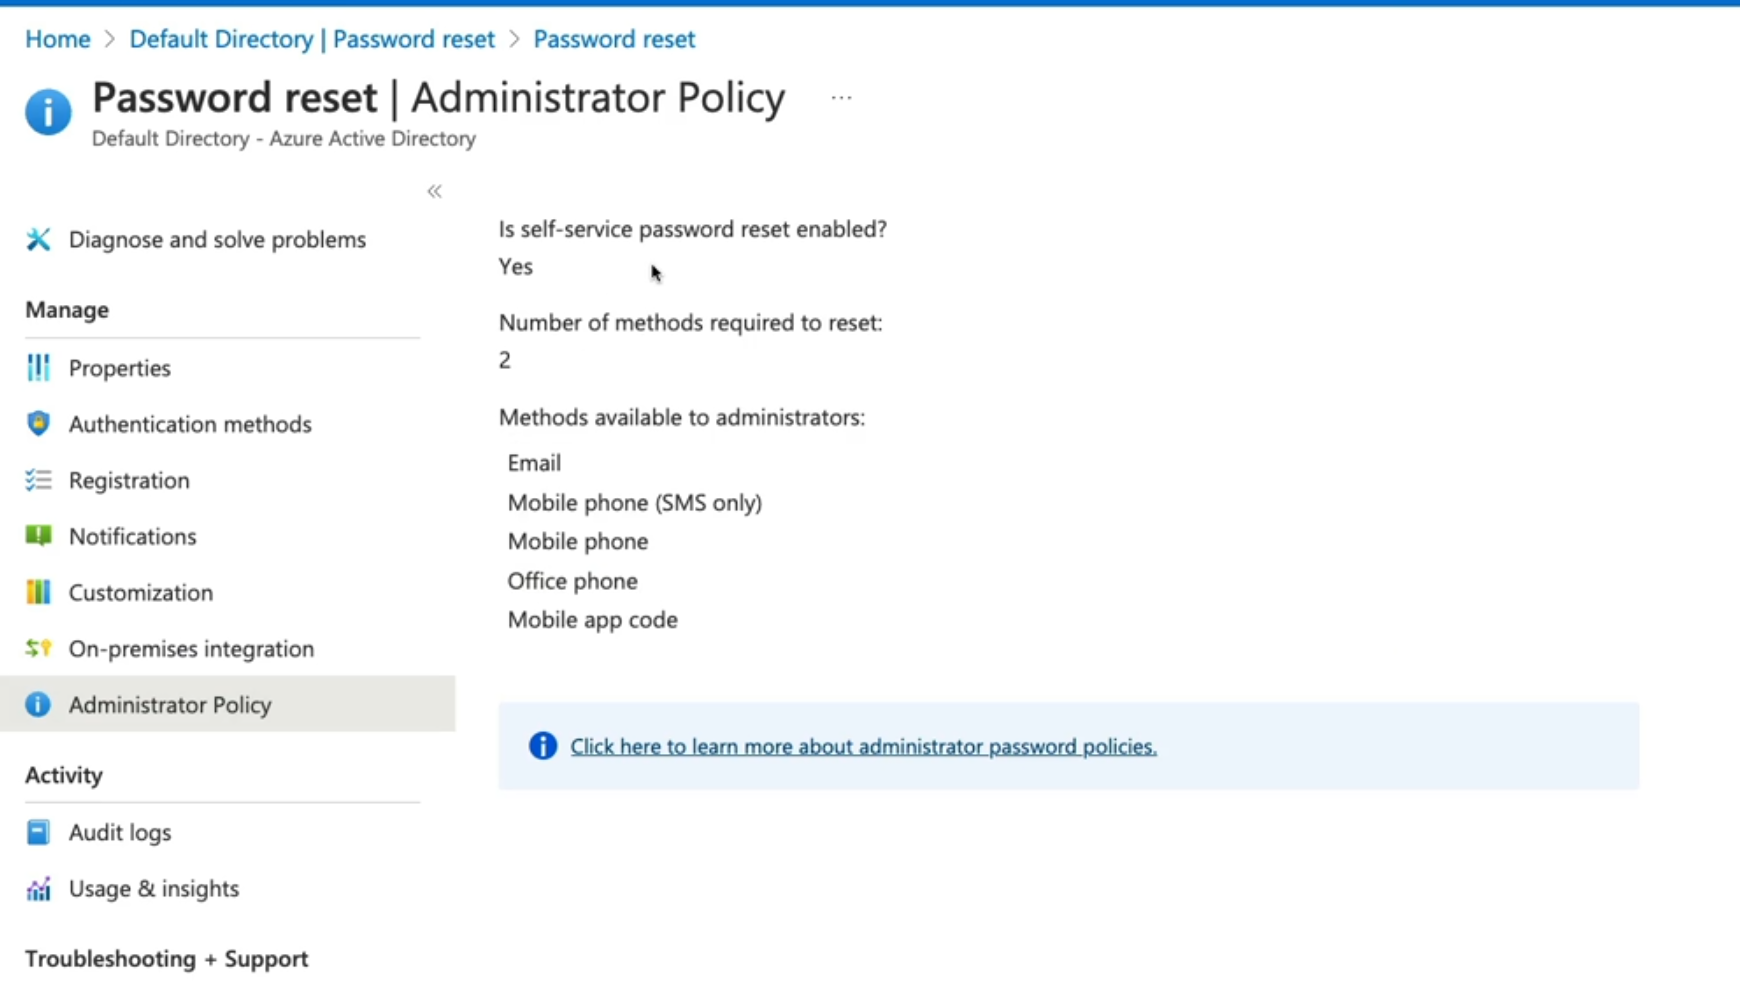
- SSPR for Admins: Security questions not available by admins. By Default, admins must register for MFA methods
- Required Licenses: Azure AD P1 or P2, Microsoft apps for business, or Microsoft licensing is required for SPPR.
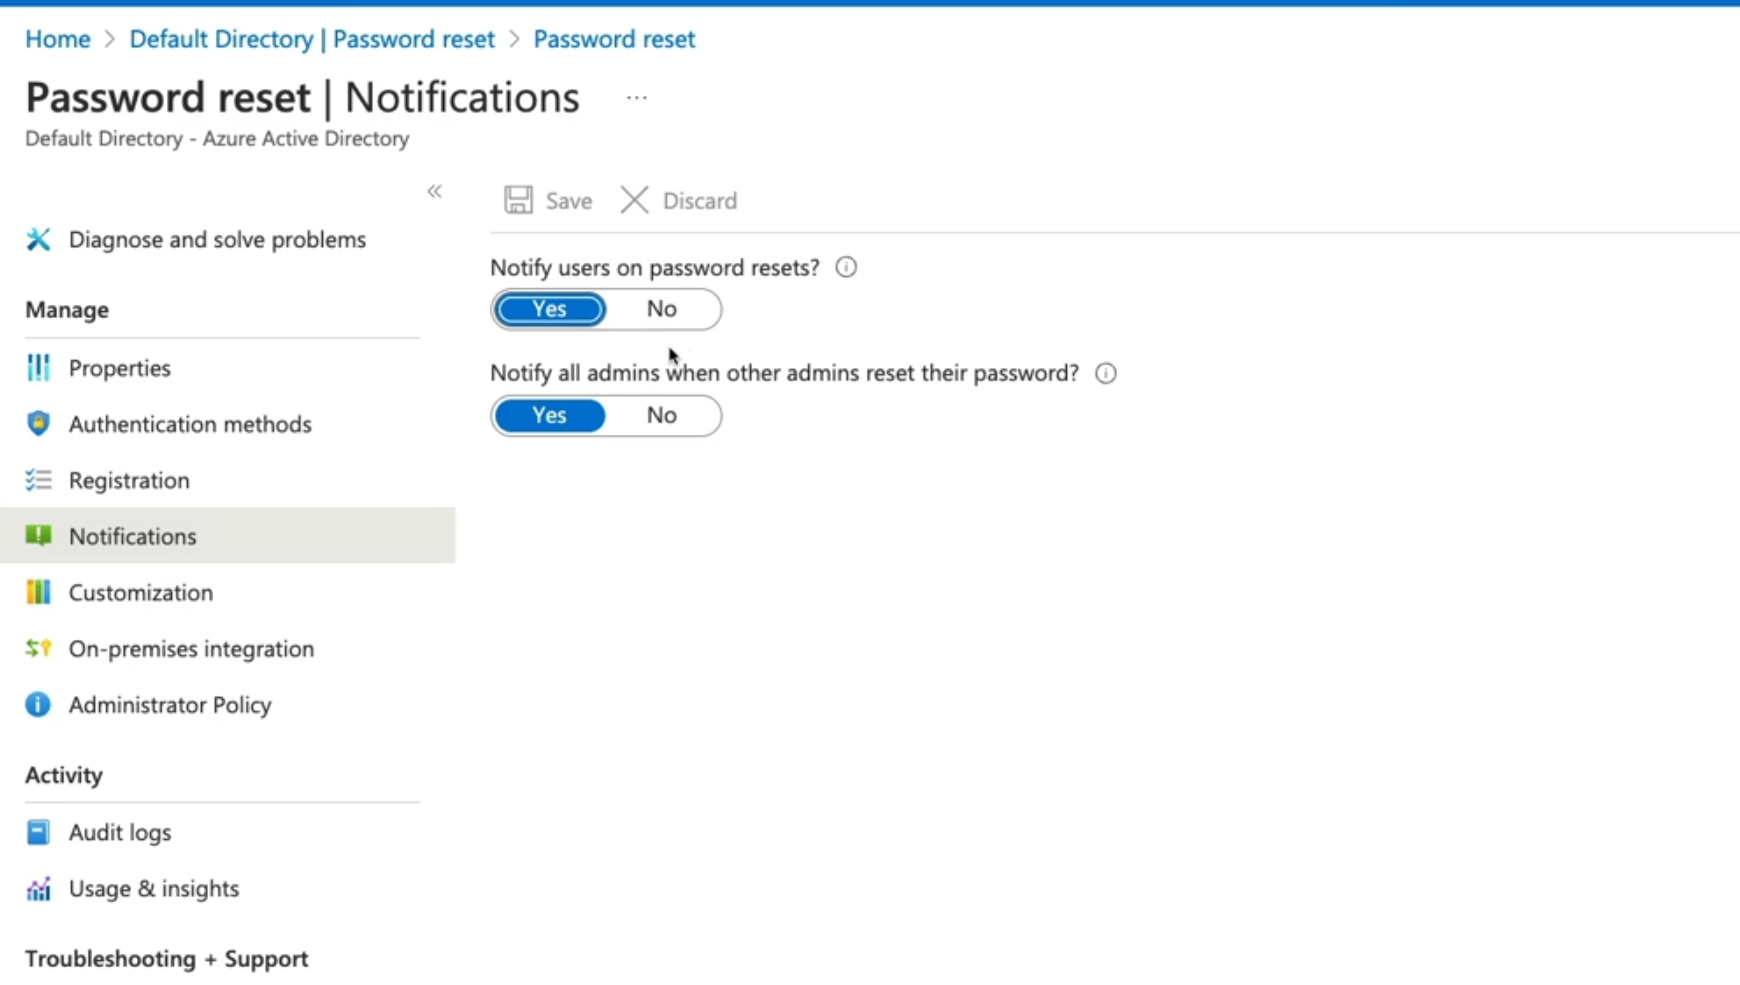
Navigate to Entra ID then password reset

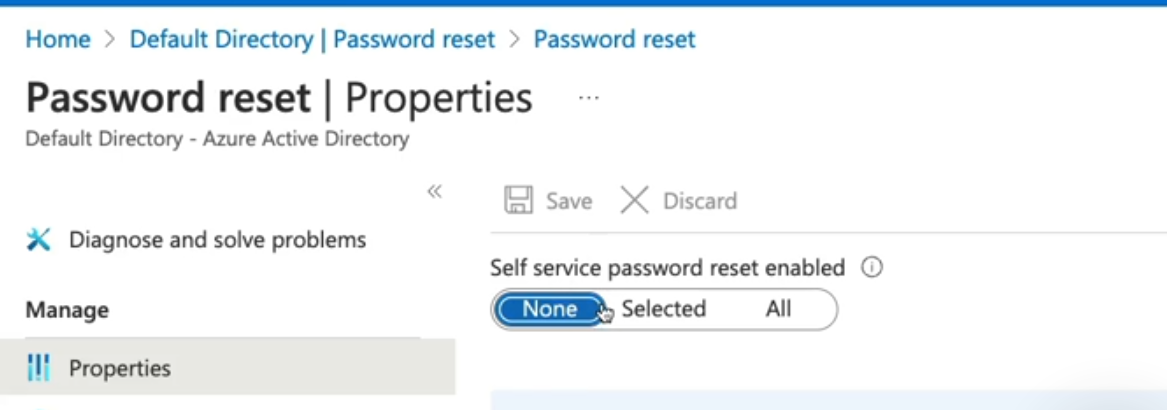
These settings only apply to end users in your organizations ,admins are always enabled for SSPR and are required to use two authentication methods to reset their passwords
- None: no user can perform SSPR (except admins).
- Select: Here we can use groups to Enable SSPR.
- ALL - this will enable all users in the tenant with SSPR.
For this exercise we select all users and select which type of authentication method
# AZ-104 Azure Identity - Azure Entra ID Device Management
[Device Management](https://learn.microsoft.com/en-us/training/modules/manage-device-identity-ad-join/)
- Basics of Identity
- Registration Options
##### **How to register devices**
- Azure AD Registered: Least restrictive option, allowing for bring your own device (BYOD) with a personal Microsoft or local account, supports windows 10, IOS IpadOS, Android and macOS.
- Azure AD Joined: Device is owned by the organization and accesses Azure AD through a work account. These identities exist only in the cloud supports windows 10 and Server 2019
- Hybrid Azure AD Joined: Similar to AD joined: however, these devices identities exist both on prem and in the cloud, Support windows 7, 8.1, 10 and server 2008 or later.
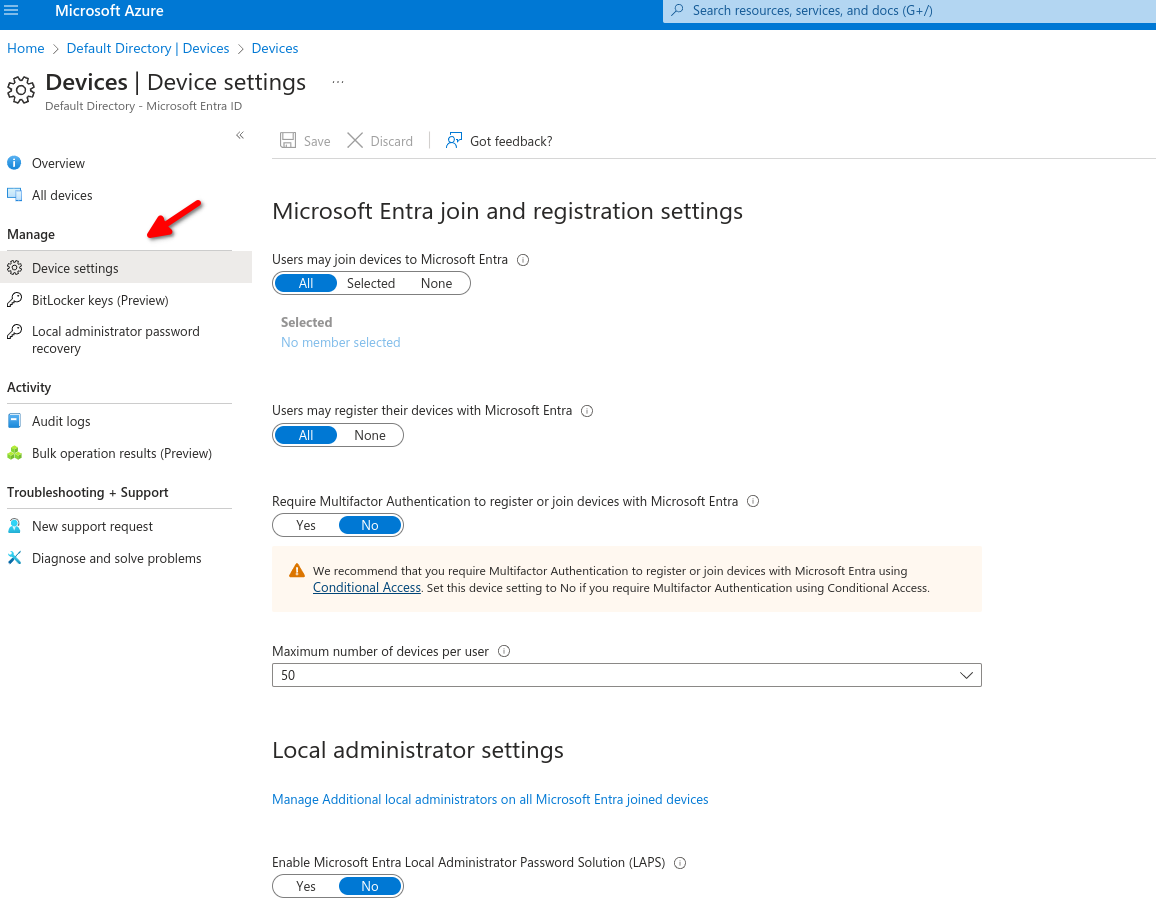
Navigate to Entra ID then over to Devices
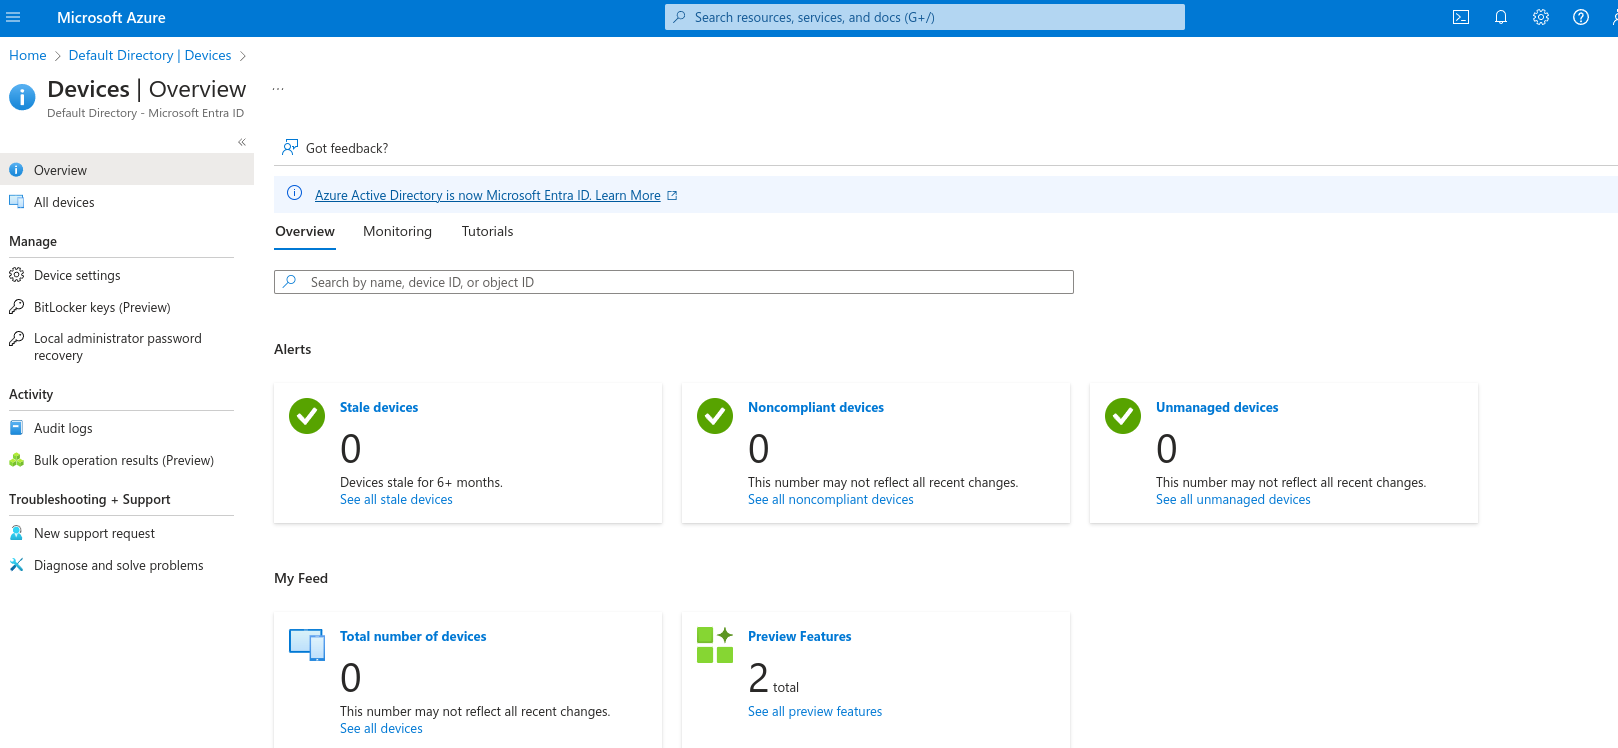
Over in Device settings we can specify which or how users can register devices on our tenant
Users may join devices to Microsoft Entra.
- All: Will allow all users to join their devices.
- Selected: specify which users can join their device.
- None: No users can join their device.
Users may register their devices with Microsoft Entra.
- Allow users to register their BYOD devices to registered devices.
Require multi-factor authentication to register or join devices with Azure ID (self explanatory)
Maximum devices per user to add, recommended is 20.
**Device Identity**
- Simplified procedure for adding and managing devices
- Improved user experience on devices
- Single Sign-on (SSO) for any registered or joined devices.