Troubleshooting
- SMGR - JBoss reestart
- JBoss - Unable to start disk full maillog
- System Manager Logs
- System Manager 8.1 - Geo Replicaition not tworking due o CSYNC2 service down
- System Manager - Change root password on VM Instances
SMGR - JBoss reestart
There are multiple situations where Avaya System Manager JBoss needs to be restarted, in my case multiple alerts from different Avaya systems about loosing connectivity to the Web License Manager (CM, SBCE and AES) were received.
After troubleshooting the problem, it was narrowed down to the JBoss process in the System Manager which had to be restarted to clear all the issues.
Here is the command to verify the status and restart the process (root access is required)
#service jboss status

#service jboss restart
Restarting JBoss process is NOT service affecting, but System Manager web administration wont be accessible for about 10 minutes.
JBoss - Unable to start disk full maillog
to clear out maillog from system manager follow the procedure below
root >df -k
Filesystem                            1K-blocks    Used Available Use% Mounted on
/dev/mapper/smgrvg01-lv_root            4343808 2042116   2301692  48% /
devtmpfs                                6056520       0   6056520   0% /dev
tmpfs                                   6068832       8   6068824   1% /dev/shm
tmpfs                                   6068832  586280   5482552  10% /run
tmpfs                                   6068832       0   6068832   0% /sys/fs/cgroup
/dev/mapper/smgrvg01-lv_var             5724160 1704032   4020128  30% /var
/dev/mapper/smgrvg01-lv_home            1935360  366932   1568428  19% /home
/dev/mapper/smgrvg01-lv_var_log         1935360 1935340        20 100% /var/log
/dev/mapper/smgrvg01-lv_var_log_audit   1935360   33520   1901840   2% /var/log/audit
/dev/mapper/smgrvg01-lv_data           13854720  926576  12928144   7% /var/lib/pgsql/data
/dev/mapper/smgrvg01-lv_opt            10078208 8282612   1795596  83% /opt
/dev/mapper/smgrvg01-lv_tmp             1525760   33192   1492568   3% /tmp
/dev/sda1                                520868  254280    266588  49% /boot
/dev/sdc                               15718400   87540  15630860   1% /emdata
/dev/sdd                               22009344 1435376  20573968   7% /swlibrary
/dev/mapper/smgrvg02-lv_cnd             1038336   70188    968148   7% /var/opt/nortel/cnd
/dev/mapper/smgrvg02-lv_perfdata       25149444  116200  25033244   1% /perfdata
tmpfs                                   1213768       0   1213768   0% /run/user/779

du -h --max-depth=1 | sort -hr

ls -l --block-size=M


to zero out maillog run command:

/dev/null > /var/log/maillog
System Manager Logs
LS directory

for example cd to geo directory to check georedundant logs
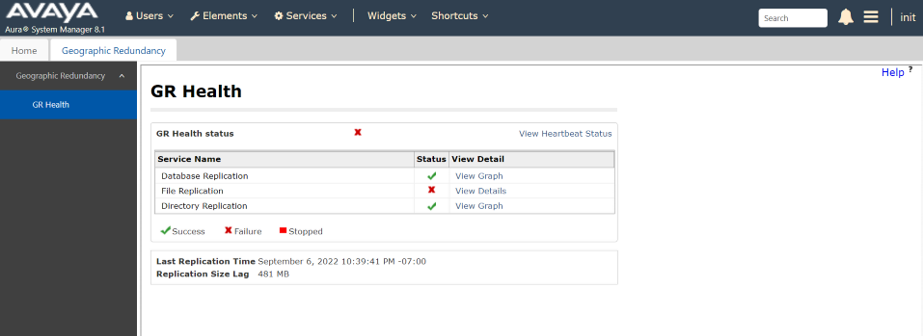
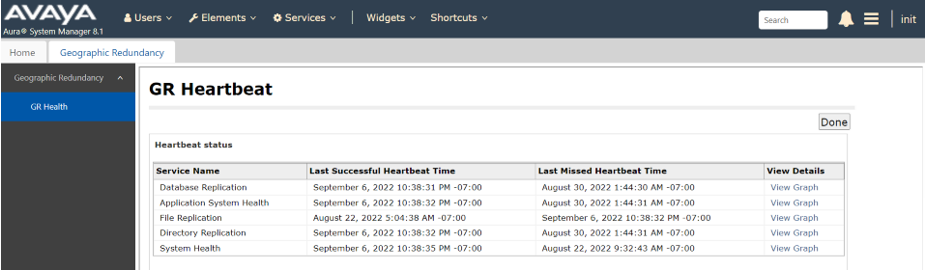
System Manager 8.1 - Geo Replicaition not tworking due o CSYNC2 service down
Problem Clarification
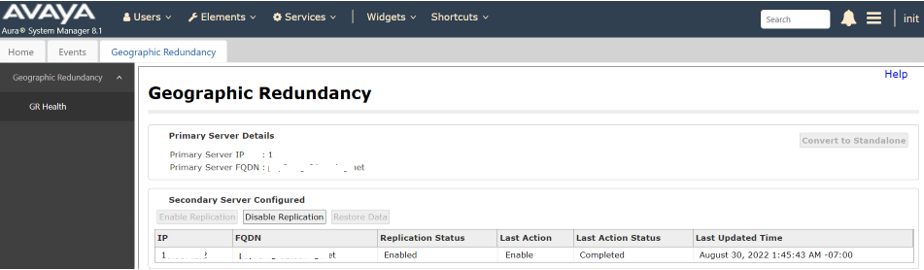
Cause
Primary SMGR csync2.log shows connection to Secondary SMGR failed. TIMESTAMP: 2022-09-07 10:25:02 AEST (GMT+1000) TIMESTAMP: 2022-09-07 10:25:02 AEST (GMT+1000) [10:25:02] ERROR: Connection to remote host `secondarySMGR' failed. [10:25:02] ERROR: Connection to remote host `secondarySMGR' failed. Sniffer trace shows primary SMGR csync2 sent TCP SYNC to secondary SMGR port 30865, but secondary SMGR reset TCP connection. Secondary SMGR is not listening on port 30865 used by Csync2.Found Csync2.socket service is not running on Secondary SMGR which caused the issue

Solution
Peform below actions resolved issue.

1.    Disable GEO from primary server.
2.    Restart csync2 on secondary server.
# systemctl restart csync2.socket
3.    Check csync2 on secondary server to make sure it’s up and running.
# systemctl status csync2.socket
4.    Then enable GEO from primary server.

File replication health status is showing good now
System Manager - Change root password on VM Instances
Reactivate Account and Modify Kernel option in GRUB:
Reboot the vCenter Server appliance using the vSphere Client.
When the GRUB bootloader appears, press the spacebar to disable autoboot.
Note: After powering on, the virtual machines takes only a short time to exits the BIOS/EFI and to launch the guest operating system. You can adjust the boot delay or force the virtual machine to enter BIOS or EFI setup screen after power on. For more information, see the Delay the Boot Sequence in the vSphere Client section in the VMware vSphere 5.5 Single Host Management Guide.
Type p to access the appliance boot options.
Enter the GRUB password.
Note:
If the vCenter Server appliance is deployed without editing the root password in the Virtual Appliance Management Interface (VAMI), the default GRUB password is vmware.
If the vCenter Server appliance root password is reset using the VAMI, the GRUB password is the password last set in the VAMI for the root account.
Use the arrow keys to highlight VMware vCenter Server Appliance and type e to edit the boot commands.
Modifying the GRUB boot loader to start root password reset process
Scroll to the second line displaying the kernel boot parameters.
Scroll to the second line displaying the kernel boot parameters
Type e to edit the boot command.
Append init=/bin/bash to the kernel boot options.
Append init=/bin/bash to the kernel boot options
Press Enter. The GRUB menu reappears.
Type b to start the boot process. The system boots to a shell.
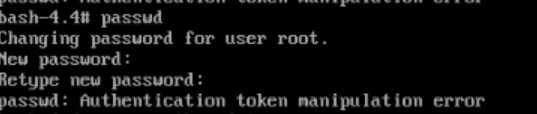
Reset the root password by running the passwd root command.
Restart the appliance by running reboot command.
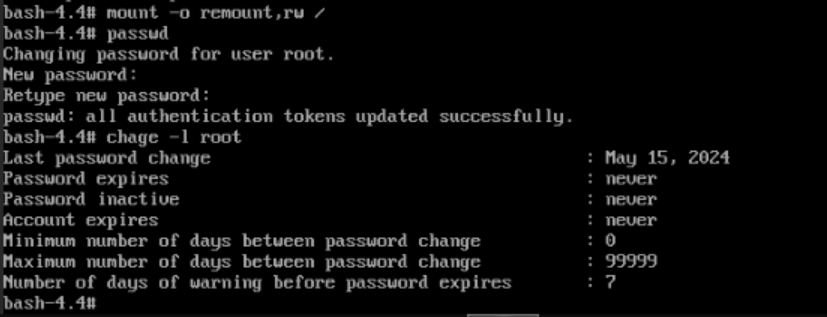
If error received " Authentication manipulation error" mount / with rw permissions
mount -o remount,rw /
run passwd again and change password
Note: If you cannot restart the appliance by running reboot command, then run these commands:
mkfifo /dev/initctl
reboot -f
In order to prevent this issue from happening again in the future, you could set the root password to never expire at the VAMI page or by running this command: chage -I -1 -m 0 -M 99999 -E -1 root
Verify the root account password expiry settings have been changed using the following command: chage -l root