Administration, upgrades and maintenances
App sequence checklist
SM:
Home / Services / Inventory / Manage Elements
-Add CM element and synchronize
Home / Elements / Routing
-Add CM SIP Entity
-Add CM Entity Link
-Add CM Routing Policy
(Dial Patterns are not needed for SIP phones, but may be added towards CM for VM and SIP trunks)
Home / Elements / Session Manager / Application Configuration
-Add Application for CM. CM SIP Entity & CM Element added previously.
-Add Application Sequence with CM App as the only sequence.
Home / Users / User Management / Manage Users
-When adding a SIP user, Origination/Termination Sequence is set to CM App Sequence
CM:
If the SIP user was added correctly, a SIP station should also be added to CM.
Ch station xxxx (sip phone previously created in SM)
-pg6 SIP Trunk: AAR
ch trunk x (x= trunk group created for SM)
-Numbering Format=private
ch route x (x= route pattern added for SM)
-Group No = SIP trunk to SM that matches the SIP entity created in SM; FRL=0; Numbering Format=Lev0-pvt
ch aar analysis 0
-dial string created for sip extension range with route pattern created previously for SM and Call Type=lev0
ch private-numbering 0
-create Ext Code that matches the sip extension range
Items that are usually missed when setting up an Aura SIP phone environment are the last two.
Syslog
SMnetSetup
run SMnetSetup
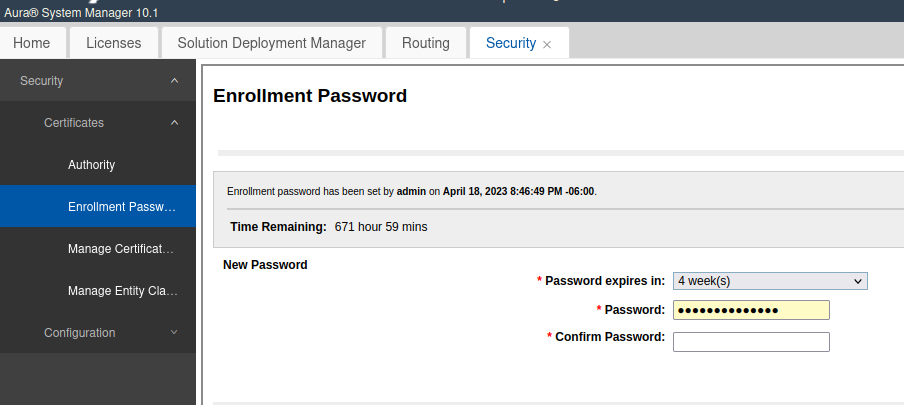
get enrollment pwd first from System Manager
Enter the IP Address of System Manager
[10.10.220.113]:
Changes:
Virtual fqdn from active.smgr.com to choosahostname.lab.mylab.com
Primary SMGR fqdn from avaya-smgr.localdomain to chooseahostname-LABSYSMGR.mylab.COM
Enter the Enrollment Password that matches the value in System
Manager administration (Security -> Certificates --> Enrollment Password).
Enrollment Password:
.................................
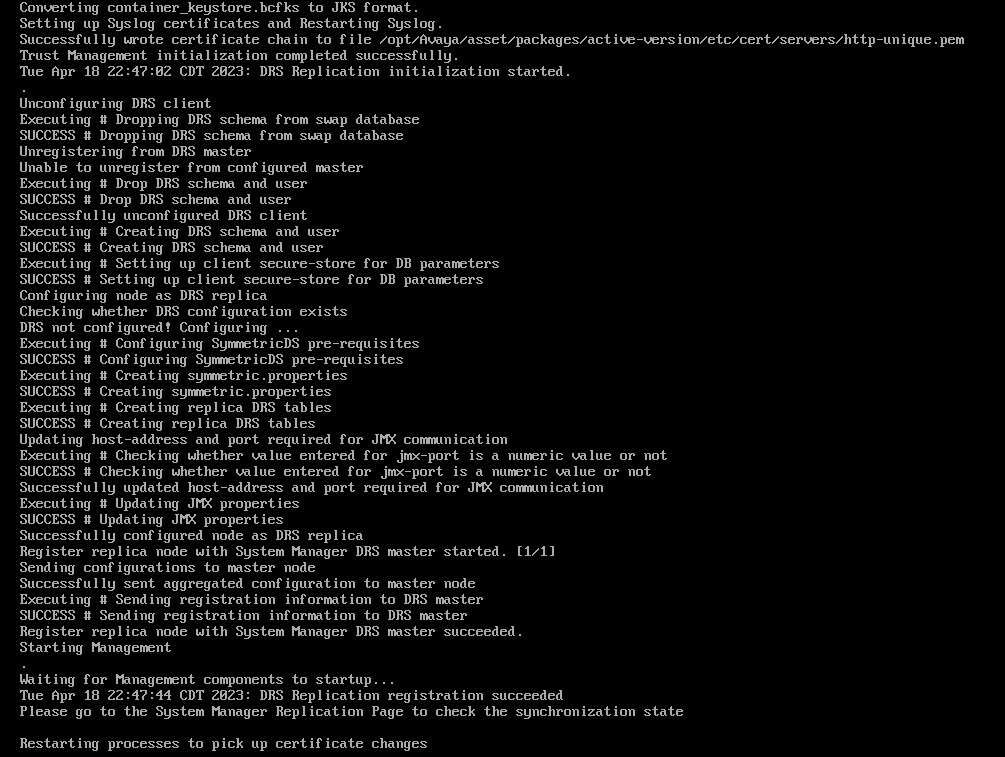
Waiting for Management components to startup...
Thu Jun 24 11:37:46 CDT 2021: DRS Replication registration succeeded
Please go to the System Manager Replication Page to check the synchronization state
check symetric logs
/var/log/Avaya/mgmt/drs/
Registering Session manager with System Manager ver 10.1
On system Manager Navigate to the Elements > Routing > SIP Entities page and add the Session Manager
and Branch Session Manager as a SIP entity. (here you specify the IP for the Security Module)
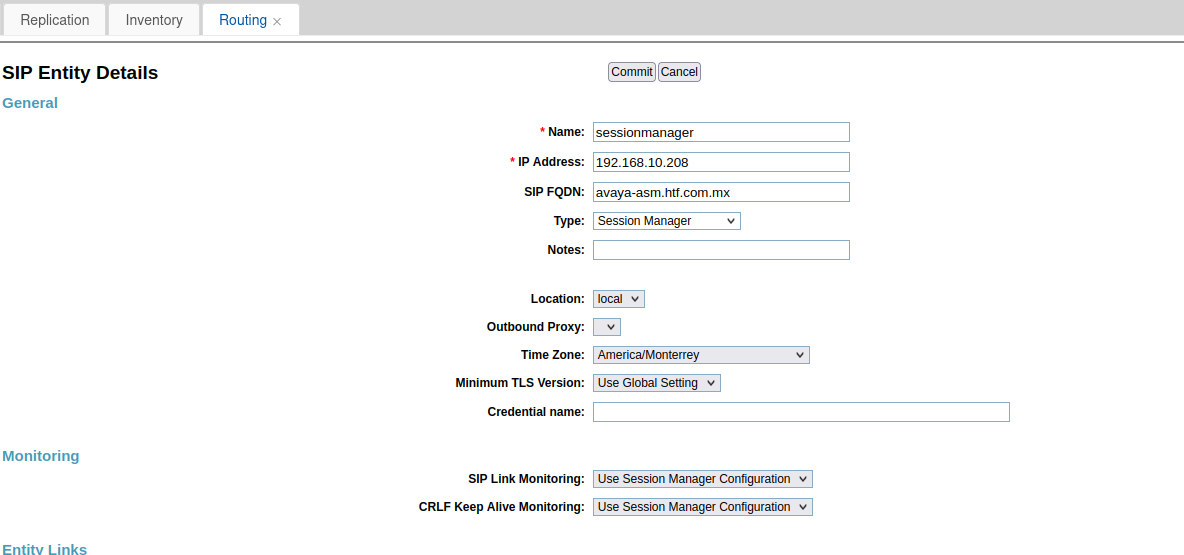
Add new Element for session manager, select previous sip entity and specify the session manager management IP address.

Enrollment is usually done at the initial deployment of Session Manager, you can also perform a manual enrollment process by running initTM, this not always work and its recommended to redeploy session manager and run wizard from CLI after fresh installation.
Validate replication on services, replication, session manager.
Logon to session manager via ssh and run initTM (/opt/Avaya/bin/initTM).
cust@avaya-asm bin]$ initTM
Downloading System Manager root CA
Unable to download System Manager root CA, rc = 28

Enter the Enrollment Password that matches the value in System
Manager administration (Security -> Certificates --> Enrollment Password).
Enrollment Password:
Enrollment Password again:
Trust Management Initialization started.
Trust Management Initialization with System Manager started.
Fail to replicate
validate hostname /etc/hosts to make sure both system manager and session manager have fqdn on their host files
[cust@avaya-asm ~]$ cat /etc/hosts
127.0.0.1   localhost localhost.localdomain localhost4 localhost4.localdomain4
::1         localhost localhost.localdomain localhost6 localhost6.localdomain6
192.168.10.209       avaya-asm.htf.com.mx avaya-asm Asm
192.11.13.17    smgrvirtual.htf.com.mx smgrvirtual AsmSysMgr
192.168.10.210  smgr.htf.com.mx smgr AsmSysMgr1
root >cat /etc/hosts
127.0.0.1 localhost.localdomain localhost
192.168.10.210 smgr.htf.com.mx smgr
::1 localhost6.localdomain6 localhost6
192.168.10.210 smgrvirtual.htf.com.mx smgrvirtual
192.168.10.209 avaya-asm.htf.com.mx avaya-asm