# Administration, upgrades and maintenances

Everything related to Avaya AES Installations, upgrades and implementations

# AES – Testing SMS Service

System Management Service (SMS) is an interesting service that all Application Enablement Servers run by default with no need for licensing, it exposes management features of Communication Manager. This service enables its clients to display, list, add, change and remove specific managed objects on Communication Manager.

This is a diagram representing the 3<sup>rd</sup> party software accessing the SMS web service multiple elements can be accessed via SMS but in this case we will focus in stations (ip softphones):

<div class="is-layout-flow entry-content wp-block-post-content" id="bkmrk-"><div class="is-layout-flow entry-content wp-block-post-content"><figure class="wp-block-image size-full is-resized">![](https://whereismyvoicepacket.com/wp-content/uploads/2022/10/image-377.png)</figure></div></div>Basic administration needs to be set up in the AES (Communication Manager Interface -&gt; Switch Connections) but this will not be covered in this entry.

To have SMS working properly Communication Manager IP address needs to be set up in AES SMS service (AE Services -&gt; SMS):

<div class="is-layout-flow entry-content wp-block-post-content" id="bkmrk--1"><div class="is-layout-flow entry-content wp-block-post-content"><figure class="wp-block-image aligncenter size-full">![](https://whereismyvoicepacket.com/wp-content/uploads/2022/10/image-378.png)</figure></div></div>Normally, a specific user is created in Avaya Communication Manager for audit purposes, in my case SMSSrvc was created with profile 18.

Now its time to test the SMS service, here are some steps you can follow to busyout/release an specific station (SMS Service test web page provide information &amp; documentation for WSDL and more):

```
1)	Access AES SMS web page using https://AES_IP/sms/sms_test.php 
2)	Fill out information to busyout:
a.	CM Login ID/Password
b.	Set Model to “Station”
c.	Operation should be set to “busyout”
d.	Set Qualifier to the extension number to be reset 
3)	Press “Submit Request” Button
4)	Repeat step 2) but setting Operation to “release”
5)	Press “Submit Request” Button
6)	Press “Release” Button to disconnect session
```

Here is a screenshot for running the process described above:

<div class="is-layout-flow entry-content wp-block-post-content" id="bkmrk--2"><div class="is-layout-flow entry-content wp-block-post-content"><figure class="wp-block-image aligncenter size-full is-resized">![](https://whereismyvoicepacket.com/wp-content/uploads/2022/10/image-379.png)</figure></div></div>PBX commands after using the web page

<div class="is-layout-flow entry-content wp-block-post-content" id="bkmrk--3"><div class="is-layout-flow entry-content wp-block-post-content"><figure class="wp-block-image aligncenter size-full">![](https://whereismyvoicepacket.com/wp-content/uploads/2022/10/image-380.png)</figure></div></div>For more information visit Avaya devconnect program:

[https://www.devconnectprogram.com/site/global/home/p\_home.gsp](https://www.devconnectprogram.com/site/global/home/p_home.gsp)

<div class="is-layout-flow entry-content wp-block-post-content" id="bkmrk--4"><figure class="wp-block-image aligncenter size-full is-resized">![](https://whereismyvoicepacket.com/wp-content/uploads/2022/10/image-381.png)</figure><figure class="wp-block-image aligncenter size-full is-resized">![](https://whereismyvoicepacket.com/wp-content/uploads/2022/10/image-382.png)</figure><figure class="wp-block-image aligncenter size-full is-resized">![](https://whereismyvoicepacket.com/wp-content/uploads/2022/10/image-383.png)</figure></div>[Source: https://whereismyvoicepacket.com/aes-sms/](https://whereismyvoicepacket.com/aes-sms/)

# AES - Update Process

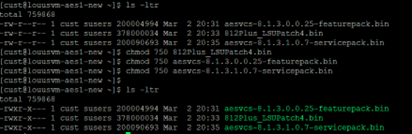
In this entry we will document the process to apply updates in an Application Enablement Server, this what we will be applying:

812Plus\_LSUPatch14.bin &lt;- Linux Security Update Patch

aesvcs-8.1.3.4.0.2-servicepack.bin &lt;- AES Service Pack 8.1.3.4

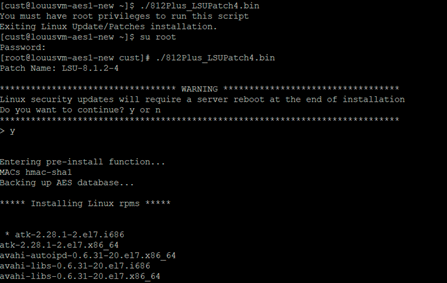
Here is the procedure

<div class="is-layout-flow entry-content wp-block-post-content" id="bkmrk-upload-files-to-%2Ftmp"><div class="is-layout-flow entry-content wp-block-post-content">- Upload files to /tmp (you can use WinSCP)

- SSH the AES and move current directory to /tmp (***cd /tmp***)

- Verify the current version (***swversion***)

</div></div>```Shell
[root@denusvm-labaes1 cust]# swversion
***********************************************************************
Application Enablement Services
***********************************************************************
Version: 8.1.3.1.0.7-0
Server Type: OTHER
Offer Type: VIRTUAL_APPLIANCE_ON_VMWARE
RTS Version:AES-8.1.3.1.0.7-0

***********************************************************************
Operating System Version: Linux 3.10.0-1160.11.1.el7.x86_64

************* Patch Numbers Installed in this system are  *************
LSU-8.1.2Plus-4
FP8.1.3.0.0.25 (AES 8.1.3)
FP8.1.3.1.0.7 (AES 8.1.3)
***********************************************************************
```

<div class="is-layout-flow entry-content wp-block-post-content" id="bkmrk-change-permissions-o"><div class="is-layout-flow entry-content wp-block-post-content">- Change permissions on the files uploaded

</div></div>```shell
chmod 750 812Plus_LSUPatch14.bin
chmod 750 aesvcs-8.1.3.4.0.2-servicepack.bin
```

<div class="is-layout-flow entry-content wp-block-post-content" id="bkmrk-execute-the-linux-up"><div class="is-layout-flow entry-content wp-block-post-content">- Execute the Linux update first (accept all terms), when done AES will restart (reconnect)

</div></div>```shell
[root@denusvm-labaes1 tmp]# ./812Plus_LSUPatch14.bin
```

<div class="is-layout-flow entry-content wp-block-post-content" id="bkmrk-now-lets-apply-aes-s"><div class="is-layout-flow entry-content wp-block-post-content">- Now lets apply AES SP 8.1.3.4 (accept all terms), when done AES will restart (reconnect)

</div></div>```Shell
[root@denusvm-labaes1 cust]# ./aesvcs-8.1.3.4.0.2-servicepack.bin
```

<div class="is-layout-flow entry-content wp-block-post-content" id="bkmrk-verify-the-new-versi"><div class="is-layout-flow entry-content wp-block-post-content">- Verify the new version after patches installed (***swversion***)

</div></div>```Shell
[root@denusvm-labaes1 tmp]# swversion
***********************************************************************
Application Enablement Services
***********************************************************************
Version: 8.1.3.4.0.2-0
Server Type: OTHER
Offer Type: VIRTUAL_APPLIANCE_ON_VMWARE
RTS Version:AES-8.1.3.4.0.2-0

***********************************************************************
Operating System Version: Linux 3.10.0-1160.53.1.el7.x86_64
************* Patch Numbers Installed in this system are  *************
LSU-8.1.2Plus-4
FP8.1.3.0.0.25 (AES 8.1.3)
FP8.1.3.1.0.7 (AES 8.1.3)
LSU-8.1.2Plus-14
FP8.1.3.4.0.2 (AES 8.1.3)
```

# AES - TSAPI CTI link integration

In this entry let’s work in integrating an Application Enablement Server to a Communication Manager and create TSAPI CTI link that we will be testing in the next entry. We will assume that the CM and AES servers are already deployed, connectivity is in place and the administrator have the credentials/permissions to perform changes/additions.

Let’s begin with ***change ip-services*** Set up in the first page enabling AESVCS running on port 8765 on Communication Manager:

<div class="is-layout-flow entry-content wp-block-post-content" id="bkmrk-"><div class="is-layout-flow entry-content wp-block-post-content"><figure class="wp-block-image size-full is-resized">![](https://whereismyvoicepacket.com/wp-content/uploads/2022/10/image-384.png)</figure></div></div>On the third page set up the hostname of the AE Server and password:

<div class="is-layout-flow entry-content wp-block-post-content" id="bkmrk--1"><div class="is-layout-flow entry-content wp-block-post-content"><figure class="wp-block-image size-full is-resized">![](https://whereismyvoicepacket.com/wp-content/uploads/2022/10/image-385.png)</figure></div></div>Second step is adding the CTI link with ***add cti 1***:

<div class="is-layout-flow entry-content wp-block-post-content" id="bkmrk--2"><div class="is-layout-flow entry-content wp-block-post-content"><figure class="wp-block-image size-full is-resized">![](https://whereismyvoicepacket.com/wp-content/uploads/2022/10/image-386.png)</figure><figure class="wp-block-image size-full is-resized">![](https://whereismyvoicepacket.com/wp-content/uploads/2022/10/image-387.png)</figure><figure class="wp-block-image size-full is-resized">![](https://whereismyvoicepacket.com/wp-content/uploads/2022/10/image-388.png)</figure></div></div>Now it’s time to make the changes in the AE Server:

First, log in into the AES using the web portal and navigate to **Communication Manager Interface -&gt; Switch Connections -&gt; Add Connection**:

<div class="is-layout-flow entry-content wp-block-post-content" id="bkmrk--3"><div class="is-layout-flow entry-content wp-block-post-content"><figure class="wp-block-image size-full is-resized">![](https://whereismyvoicepacket.com/wp-content/uploads/2022/10/image-389.png)</figure></div></div>In the next screen type the same password set in the ***change ip-services*** command in the PBX, enable only the *Processor Ethernet* option, leave all other settings by default blank, but make sure the TLS is disabled.

<div class="is-layout-flow entry-content wp-block-post-content" id="bkmrk--4"><div class="is-layout-flow entry-content wp-block-post-content"><figure class="wp-block-image size-full is-resized">![](https://whereismyvoicepacket.com/wp-content/uploads/2022/10/image-390.png)</figure></div></div>Once the new connection appears, select the connection, and select *Edit PE/CLAN IPs*:

<div class="is-layout-flow entry-content wp-block-post-content" id="bkmrk--5"><div class="is-layout-flow entry-content wp-block-post-content"><figure class="wp-block-image size-full is-resized">![](https://whereismyvoicepacket.com/wp-content/uploads/2022/10/image-391.png)</figure></div></div>Type the IP address for the Processor Ethernet and click on *Add/Edit Name or IP*:

<div class="is-layout-flow entry-content wp-block-post-content" id="bkmrk--6"><div class="is-layout-flow entry-content wp-block-post-content"><figure class="wp-block-image size-full is-resized">![](https://whereismyvoicepacket.com/wp-content/uploads/2022/10/image-392.png)</figure></div></div>Navigate to **AE Services -&gt; TSAPI -&gt; TSAPI Links**:

<div class="is-layout-flow entry-content wp-block-post-content" id="bkmrk--7"><div class="is-layout-flow entry-content wp-block-post-content"><figure class="wp-block-image size-full is-resized">![](https://whereismyvoicepacket.com/wp-content/uploads/2022/10/image-393.png)</figure></div></div>In the next screen assign a Link number, select the switch connection created and make sure you select the correct Switch CTI Link Number created in the PBX using the add cti x, in my case it is the cti link 1, on security you can select to have the TLINK encrypted, unencrypted or having both enabled.

<div class="is-layout-flow entry-content wp-block-post-content" id="bkmrk--8"><div class="is-layout-flow entry-content wp-block-post-content"><figure class="wp-block-image size-full is-resized">![](https://whereismyvoicepacket.com/wp-content/uploads/2022/10/image-394.png)</figure></div></div>Lets complete this entry verifying the status of the CM Connection and the TSAPI CTI link:

**Status -&gt; Status and Control -&gt; Switch Conn Summary**

<div class="is-layout-flow entry-content wp-block-post-content" id="bkmrk--9"><div class="is-layout-flow entry-content wp-block-post-content"><figure class="wp-block-image size-full is-resized">![](https://whereismyvoicepacket.com/wp-content/uploads/2022/10/image-395.png)</figure></div></div>**Status -&gt; Status and Control -&gt; TSAPI Service Summary**

<div class="is-layout-flow entry-content wp-block-post-content" id="bkmrk--10"><figure class="wp-block-image size-full is-resized">![](https://whereismyvoicepacket.com/wp-content/uploads/2022/10/image-396.png)</figure></div>[Source: https://whereismyvoicepacket.com/avaya-aes-admin-task-aes-tsapi-cti-link-integration/](https://whereismyvoicepacket.com/avaya-aes-admin-task-aes-tsapi-cti-link-integration/)

# AES - Upgrade 8.0.1 to 8.1.3

In this entry we will focus in upgrading an AES version 8.1.2 to 8.1.3, to accomplish this we will fist deploy a new VM with OVA 8.1.3 file version and we will connect it into the network using a temporary IP address, allowing us to perform preparation task and have the VM ready just for the cut over maintenance window.

In order to simplify the information presented and the simplicity of the OVA deploy, it will be omitted, the most important part in this step is setting up the network connection using a temporary IP address, this can be completed within the wizard or using the command (using the proper permissions):

/opt/mvap/bin/netconfig

<div class="is-layout-flow entry-content wp-block-post-content" id="bkmrk-"><div class="is-layout-flow entry-content wp-block-post-content"><figure class="wp-block-image aligncenter size-full">![](https://whereismyvoicepacket.com/wp-content/uploads/2022/10/image-414.png)</figure><figure class="wp-block-image aligncenter size-full">![](https://whereismyvoicepacket.com/wp-content/uploads/2022/10/image-415.png)</figure></div></div>We will use the previous command later in this entry.

Here is the process to follow:

<div class="is-layout-flow entry-content wp-block-post-content" id="bkmrk-apply-the-service-pa"><div class="is-layout-flow entry-content wp-block-post-content">1. Apply the service pack/feature pack/Linux Security Update (refer to the entry ***Avaya AES – Admin task – Update process*** in case of any doubt)

<figure class="wp-block-image aligncenter size-full is-resized">![](https://whereismyvoicepacket.com/wp-content/uploads/2022/10/image-416.png)</figure><figure class="wp-block-image aligncenter size-full is-resized">![](https://whereismyvoicepacket.com/wp-content/uploads/2022/10/image-417.png)</figure><figure class="wp-block-image size-full is-resized">![](https://whereismyvoicepacket.com/wp-content/uploads/2022/10/image-418.png)</figure><figure class="wp-block-image size-full is-resized">![](https://whereismyvoicepacket.com/wp-content/uploads/2022/10/image-419.png)</figure></div></div>2\. Keep track of the current configuration Backup configuration (Screenshoots)

**AE Services**

<div class="is-layout-flow entry-content wp-block-post-content" id="bkmrk--1"><div class="is-layout-flow entry-content wp-block-post-content"><figure class="wp-block-image size-full is-resized">![](https://whereismyvoicepacket.com/wp-content/uploads/2022/10/image-420.png)</figure></div></div>**AES Services -&gt; CVLAN -&gt; CVLAN Links**

<div class="is-layout-flow entry-content wp-block-post-content" id="bkmrk--2"><div class="is-layout-flow entry-content wp-block-post-content"><figure class="wp-block-image size-full is-resized">![](https://whereismyvoicepacket.com/wp-content/uploads/2022/10/image-421.png)</figure></div></div>**AES Services -&gt; TSAPI -&gt; TSAPI Links**

<div class="is-layout-flow entry-content wp-block-post-content" id="bkmrk--3"><div class="is-layout-flow entry-content wp-block-post-content"><figure class="wp-block-image size-full is-resized">![](https://whereismyvoicepacket.com/wp-content/uploads/2022/10/image-422.png)</figure></div></div>**Communication Manager Interface -&gt; Switch Connections**

<div class="is-layout-flow entry-content wp-block-post-content" id="bkmrk--4"><div class="is-layout-flow entry-content wp-block-post-content"><figure class="wp-block-image size-full is-resized">![](https://whereismyvoicepacket.com/wp-content/uploads/2022/10/image-423.png)</figure></div></div>**Communication Manager Interface -&gt; Switch Connections -&gt; Edit Connection**

<div class="is-layout-flow entry-content wp-block-post-content" id="bkmrk--5"><div class="is-layout-flow entry-content wp-block-post-content"><figure class="wp-block-image size-full is-resized">![](https://whereismyvoicepacket.com/wp-content/uploads/2022/10/image-424.png)</figure></div></div>**Communication Manager Interface -&gt; Switch Connections -&gt; Edit PE/CLAN IPs**

<div class="is-layout-flow entry-content wp-block-post-content" id="bkmrk--6"><div class="is-layout-flow entry-content wp-block-post-content"><figure class="wp-block-image size-full is-resized">![](https://whereismyvoicepacket.com/wp-content/uploads/2022/10/image-425.png)</figure></div></div>**Communication Manager Interface -&gt; Switch Connections -&gt; Survivability Hierarchy**

<div class="is-layout-flow entry-content wp-block-post-content" id="bkmrk--7"><div class="is-layout-flow entry-content wp-block-post-content"><figure class="wp-block-image size-full is-resized">![](https://whereismyvoicepacket.com/wp-content/uploads/2022/10/image-426.png)</figure></div></div>**Maintenance -&gt; Date Time/NTP Server**

<div class="is-layout-flow entry-content wp-block-post-content" id="bkmrk--8"><div class="is-layout-flow entry-content wp-block-post-content"><figure class="wp-block-image size-full is-resized">![](https://whereismyvoicepacket.com/wp-content/uploads/2022/10/image-427.png)</figure></div></div>**Networking -&gt; Network Configure**

<div class="is-layout-flow entry-content wp-block-post-content" id="bkmrk--9"><div class="is-layout-flow entry-content wp-block-post-content"><figure class="wp-block-image size-full is-resized">![](https://whereismyvoicepacket.com/wp-content/uploads/2022/10/image-428.png)</figure><figure class="wp-block-image size-full is-resized">![](https://whereismyvoicepacket.com/wp-content/uploads/2022/10/image-429.png)</figure></div></div>***Security -&gt; Security Database -&gt; Tlinks***

<div class="is-layout-flow entry-content wp-block-post-content" id="bkmrk--10"><div class="is-layout-flow entry-content wp-block-post-content"><figure class="wp-block-image size-full is-resized">![](https://whereismyvoicepacket.com/wp-content/uploads/2022/10/image-430.png)</figure></div></div>**Status -&gt; Switch Conn Summary**

<div class="is-layout-flow entry-content wp-block-post-content" id="bkmrk--11"><div class="is-layout-flow entry-content wp-block-post-content"><figure class="wp-block-image size-full is-resized">![](https://whereismyvoicepacket.com/wp-content/uploads/2022/10/image-431.png)</figure></div></div>**Status -&gt; TSAPI Service Summary**

<div class="is-layout-flow entry-content wp-block-post-content" id="bkmrk--12"><div class="is-layout-flow entry-content wp-block-post-content"><figure class="wp-block-image size-full is-resized">![](https://whereismyvoicepacket.com/wp-content/uploads/2022/10/image-432.png)</figure></div></div>**Utilities -&gt; SNMP -&gt; SNMP Agent**

<div class="is-layout-flow entry-content wp-block-post-content" id="bkmrk--13"><div class="is-layout-flow entry-content wp-block-post-content"><figure class="wp-block-image size-full is-resized">![](https://whereismyvoicepacket.com/wp-content/uploads/2022/10/image-433.png)</figure></div></div>**Utilities -&gt; SNMP -&gt; SNMP Trap Receivers**

<div class="is-layout-flow entry-content wp-block-post-content" id="bkmrk--14"><div class="is-layout-flow entry-content wp-block-post-content"><figure class="wp-block-image size-full">![](https://whereismyvoicepacket.com/wp-content/uploads/2022/10/image-434.png)</figure></div></div>3\. Maintenance window

Create a backup file **Maintenance -&gt; Server Data -&gt; Backup** and download

<div class="is-layout-flow entry-content wp-block-post-content" id="bkmrk--15"><div class="is-layout-flow entry-content wp-block-post-content"><figure class="wp-block-image size-full">![](https://whereismyvoicepacket.com/wp-content/uploads/2022/10/image-435.png)</figure><figure class="wp-block-image size-full">![](https://whereismyvoicepacket.com/wp-content/uploads/2022/10/image-436.png)</figure></div></div>**Shutdown production server**

**Restore backups**

<div class="is-layout-flow entry-content wp-block-post-content" id="bkmrk--16"><div class="is-layout-flow entry-content wp-block-post-content"><figure class="wp-block-image size-full is-resized">![](https://whereismyvoicepacket.com/wp-content/uploads/2022/10/image-437.png)</figure><figure class="wp-block-image size-full is-resized">![](https://whereismyvoicepacket.com/wp-content/uploads/2022/10/image-438.png)</figure></div></div>Last step is verifying all services and validate everything is up and running correctly to start testing applications. This concludes this entry.

[Source: https://whereismyvoicepacket.com/aes-upgrade/](https://whereismyvoicepacket.com/aes-upgrade/)

# AES - Renew AES Cert using System Manager

<span lang="EN" style="mso-ascii-font-family: Calibri; mso-hansi-font-family: Calibri; mso-bidi-font-family: Calibri; mso-ansi-language: EN;">AES certificate renewal if using SMGR certificate with CA Certificate and End Entity in place.</span>

<span lang="EN" style="mso-ascii-font-family: Calibri; mso-hansi-font-family: Calibri; mso-bidi-font-family: Calibri; mso-ansi-language: EN;">\*This work will need a maintenance window for restarts of the AES.</span>

<span lang="EN" style="mso-ascii-font-family: Calibri; mso-hansi-font-family: Calibri; mso-bidi-font-family: Calibri; mso-ansi-language: EN;">1. Remove Certificate that is about to expire from AES.</span>

[![image.png](https://wiki.tinod.net/uploads/images/gallery/2023-04/scaled-1680-/OEWH0V9UuQH2KFUe-image.png)
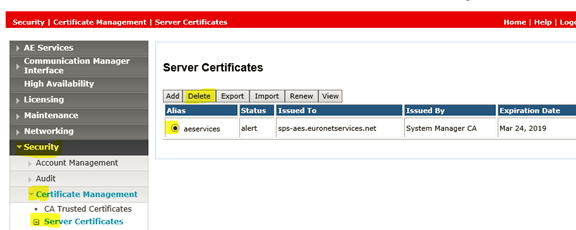
](https://wiki.tinod.net/uploads/images/gallery/2023-04/OEWH0V9UuQH2KFUe-image.png)

<span lang="EN" style="mso-ascii-font-family: Calibri; mso-hansi-font-family: Calibri; mso-bidi-font-family: Calibri; mso-ansi-language: EN;">
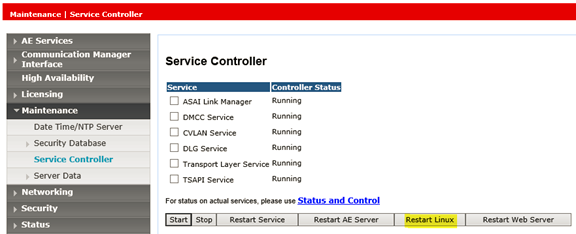
2. Restart AE Server  
<span style="mso-no-proof: yes;"></span></span>

[![image.png](https://wiki.tinod.net/uploads/images/gallery/2023-04/scaled-1680-/OCl8EDaHYqHwm27z-image.png)
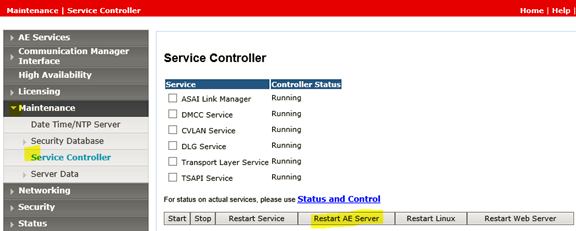
](https://wiki.tinod.net/uploads/images/gallery/2023-04/OCl8EDaHYqHwm27z-image.png)
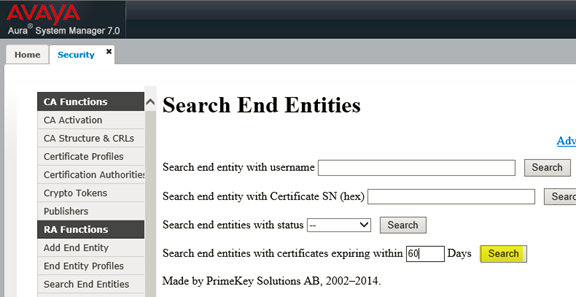
<span lang="EN" style="mso-ascii-font-family: Calibri; mso-hansi-font-family: Calibri; mso-bidi-font-family: Calibri; mso-ansi-language: EN;"><span style="mso-no-proof: yes;">  
</span></span>

<span lang="EN" style="mso-ascii-font-family: Calibri; mso-hansi-font-family: Calibri; mso-bidi-font-family: Calibri; mso-ansi-language: EN;">3. Go to the System Manager&gt; Security&gt; Certificates&gt; Authority&gt; Search End Entities  
<span style="mso-no-proof: yes;"></span></span>

[![image.png](https://wiki.tinod.net/uploads/images/gallery/2023-04/scaled-1680-/LV6WqKC6YNN3qhQB-image.png)](https://wiki.tinod.net/uploads/images/gallery/2023-04/LV6WqKC6YNN3qhQB-image.png)

<span lang="EN" style="mso-ascii-font-family: Calibri; mso-hansi-font-family: Calibri; mso-bidi-font-family: Calibri; mso-ansi-language: EN;"><span style="mso-no-proof: yes;">  
</span></span>

<span lang="EN" style="mso-ascii-font-family: Calibri; mso-hansi-font-family: Calibri; mso-bidi-font-family: Calibri; mso-ansi-language: EN;">
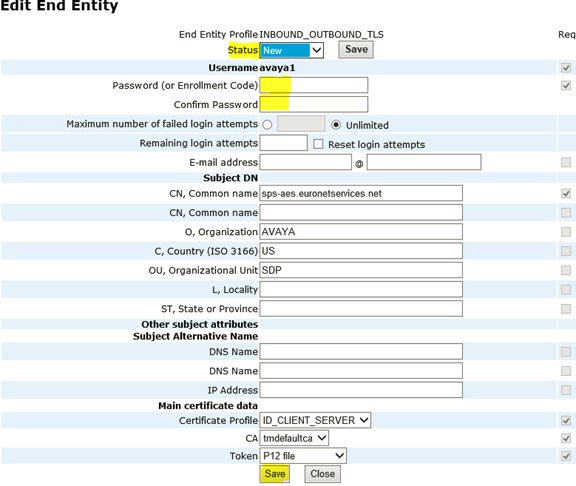
4. Verify the certificate for your AES by the CN and select *Edity End Entity <span style="mso-no-proof: yes;"></span>*</span>

[![image.png](https://wiki.tinod.net/uploads/images/gallery/2023-04/scaled-1680-/tNyeMzh9BN04Ie7T-image.png)](https://wiki.tinod.net/uploads/images/gallery/2023-04/tNyeMzh9BN04Ie7T-image.png)

<span lang="EN" style="mso-ascii-font-family: Calibri; mso-hansi-font-family: Calibri; mso-bidi-font-family: Calibri; mso-ansi-language: EN;">*<span style="mso-no-proof: yes;">  
</span>*</span>

<span lang="EN" style="mso-ascii-font-family: Calibri; mso-hansi-font-family: Calibri; mso-bidi-font-family: Calibri; mso-ansi-language: EN;">5. Change the status to New, enter the passwords and then Save  
<span style="mso-no-proof: yes;"></span></span>

[![image.png](https://wiki.tinod.net/uploads/images/gallery/2023-04/scaled-1680-/KCnfvmZMYjQ8wrpw-image.png)](https://wiki.tinod.net/uploads/images/gallery/2023-04/KCnfvmZMYjQ8wrpw-image.png)

<span lang="EN" style="mso-ascii-font-family: Calibri; mso-hansi-font-family: Calibri; mso-bidi-font-family: Calibri; mso-ansi-language: EN;"><span style="mso-no-proof: yes;">  
</span></span>

<span lang="EN" style="mso-ascii-font-family: Calibri; mso-hansi-font-family: Calibri; mso-bidi-font-family: Calibri; mso-ansi-language: EN;">6. Scroll to the bottom of the page and select *Public Web.*</span>

<span lang="EN" style="mso-ascii-font-family: Calibri; mso-hansi-font-family: Calibri; mso-bidi-font-family: Calibri; mso-ansi-language: EN; mso-no-proof: yes;">[![image.png](https://wiki.tinod.net/uploads/images/gallery/2023-04/scaled-1680-/RnHQI7rf3S3Do89H-image.png)](https://wiki.tinod.net/uploads/images/gallery/2023-04/RnHQI7rf3S3Do89H-image.png)  
</span>

<span lang="EN" style="mso-ascii-font-family: Calibri; mso-hansi-font-family: Calibri; mso-bidi-font-family: Calibri; mso-ansi-language: EN;">
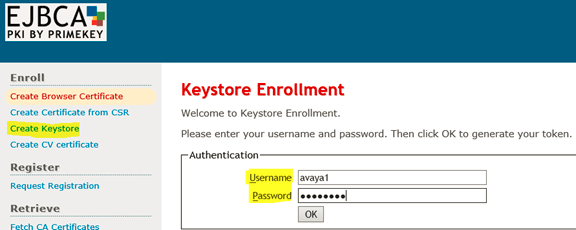
7. Select Create Keystore and then enter the username and password from the End Entity and select OK.</span>

<span lang="EN" style="mso-ascii-font-family: Calibri; mso-hansi-font-family: Calibri; mso-bidi-font-family: Calibri; mso-ansi-language: EN; mso-no-proof: yes;"></span>

[![image.png](https://wiki.tinod.net/uploads/images/gallery/2023-04/scaled-1680-/oPtHpKYwZhRnVlaf-image.png)](https://wiki.tinod.net/uploads/images/gallery/2023-04/oPtHpKYwZhRnVlaf-image.png)
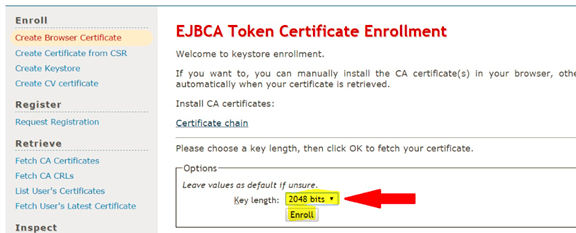
<span lang="EN" style="mso-ascii-font-family: Calibri; mso-hansi-font-family: Calibri; mso-bidi-font-family: Calibri; mso-ansi-language: EN; mso-no-proof: yes;">  
</span>

<span lang="EN" style="mso-ascii-font-family: Calibri; mso-hansi-font-family: Calibri; mso-bidi-font-family: Calibri; mso-ansi-language: EN;">8.<span style="mso-spacerun: yes;"> </span>Select 2048 bits and then Select Enroll.</span>

[![image.png](https://wiki.tinod.net/uploads/images/gallery/2023-04/scaled-1680-/soDAwrWf0izhGwdf-image.png)](https://wiki.tinod.net/uploads/images/gallery/2023-04/soDAwrWf0izhGwdf-image.png)

<span lang="EN" style="mso-ascii-font-family: Calibri; mso-hansi-font-family: Calibri; mso-bidi-font-family: Calibri; mso-ansi-language: EN;">Once you click enroll the certificate will be downloaded (depending on your browser you can select where it is saved or find it in downloads from windows explorer.</span>

**<span style="font-family: 'Times New Roman',serif;">Next Import the new AE Services server certificate into the AES</span>**<span style="font-family: 'Times New Roman',serif;"> </span>

<span style="font-family: 'Times New Roman',serif;">1. Using the AE Services Management Console navigate to "Security &gt; Certificate Management &gt; Server Certificates" </span>

<span style="font-family: 'Times New Roman',serif;">2. Click on the Import button and upload the new AE Services server certificate you created above (this will be the .p12 file). Select an alias (server) from the drop down menu </span>

<span style="font-family: 'Times New Roman',serif;">3. Click the "Apply" button. </span>

<span style="font-size: 12.0pt; font-family: 'Times New Roman',serif; mso-no-proof: yes;"></span>

[![image.png](https://wiki.tinod.net/uploads/images/gallery/2023-04/scaled-1680-/j4JDHpTKInEAIzEH-image.png)
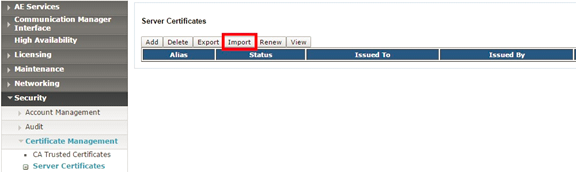
](https://wiki.tinod.net/uploads/images/gallery/2023-04/j4JDHpTKInEAIzEH-image.png)

<span style="font-size: 12.0pt; font-family: 'Times New Roman',serif; mso-no-proof: yes;">  
</span>

<span style="font-size: 12.0pt; font-family: 'Times New Roman',serif;">4. Select Choose file, Establish Chain of Trust and Certificate Alias.</span>

<span style="font-size: 12.0pt; font-family: 'Times New Roman',serif; mso-no-proof: yes;"></span>

[![image.png](https://wiki.tinod.net/uploads/images/gallery/2023-04/scaled-1680-/LXfNW1MIFK3bBc6w-image.png)
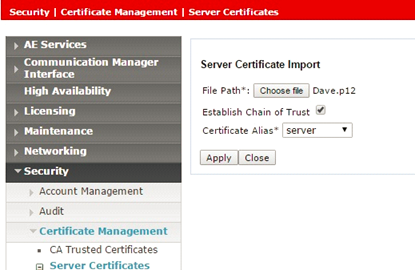
](https://wiki.tinod.net/uploads/images/gallery/2023-04/LXfNW1MIFK3bBc6w-image.png)

<span style="font-size: 12.0pt; font-family: 'Times New Roman',serif; mso-no-proof: yes;">  
</span>

<span style="font-size: 12.0pt; font-family: 'Times New Roman',serif;">5. Enter the PKCS12 password (from the End Entity) and select Apply and then on the next page Apply again.</span>

<span style="font-size: 12.0pt; font-family: 'Times New Roman',serif; mso-no-proof: yes;"></span>

[![image.png](https://wiki.tinod.net/uploads/images/gallery/2023-04/scaled-1680-/iJptZyEFhYD7VQOX-image.png)
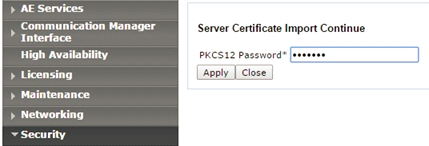
](https://wiki.tinod.net/uploads/images/gallery/2023-04/iJptZyEFhYD7VQOX-image.png)

<span style="font-size: 12.0pt; font-family: 'Times New Roman',serif; mso-no-proof: yes;">  
</span>

<span style="font-size: 12.0pt; font-family: 'Times New Roman',serif; mso-no-proof: yes;"></span>

[![image.png](https://wiki.tinod.net/uploads/images/gallery/2023-04/scaled-1680-/WtapXa5hN6ySgREj-image.png)
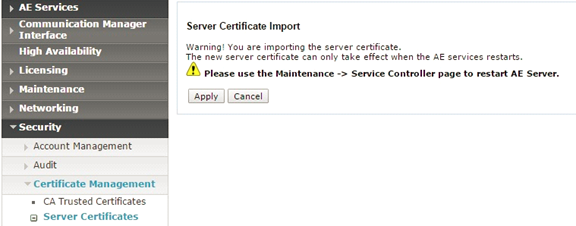
](https://wiki.tinod.net/uploads/images/gallery/2023-04/WtapXa5hN6ySgREj-image.png)

<span style="font-size: 12.0pt; font-family: 'Times New Roman',serif; mso-no-proof: yes;">  
</span>

<span style="font-size: 12.0pt; font-family: 'Times New Roman',serif;">6. Restart the Linux server.</span><span lang="EN" style="mso-ascii-font-family: Calibri; mso-hansi-font-family: Calibri; mso-bidi-font-family: Calibri; mso-ansi-language: EN;"> </span>

<span lang="EN" style="mso-ascii-font-family: Calibri; mso-hansi-font-family: Calibri; mso-bidi-font-family: Calibri; mso-ansi-language: EN;"> </span>

[![image.png](https://wiki.tinod.net/uploads/images/gallery/2023-04/scaled-1680-/n4fb8J4NLCH7hwb9-image.png)](https://wiki.tinod.net/uploads/images/gallery/2023-04/n4fb8J4NLCH7hwb9-image.png)

<span lang="EN" style="mso-ascii-font-family: Calibri; mso-hansi-font-family: Calibri; mso-bidi-font-family: Calibri; mso-ansi-language: EN;"> </span>

<span lang="EN" style="mso-ascii-font-family: Calibri; mso-hansi-font-family: Calibri; mso-bidi-font-family: Calibri; mso-ansi-language: EN;"> </span>

<span lang="EN" style="mso-ascii-font-family: Calibri; mso-hansi-font-family: Calibri; mso-bidi-font-family: Calibri; mso-ansi-language: EN;"> </span>

<span lang="EN" style="mso-ascii-font-family: Calibri; mso-hansi-font-family: Calibri; mso-bidi-font-family: Calibri; mso-ansi-language: EN;"></span>